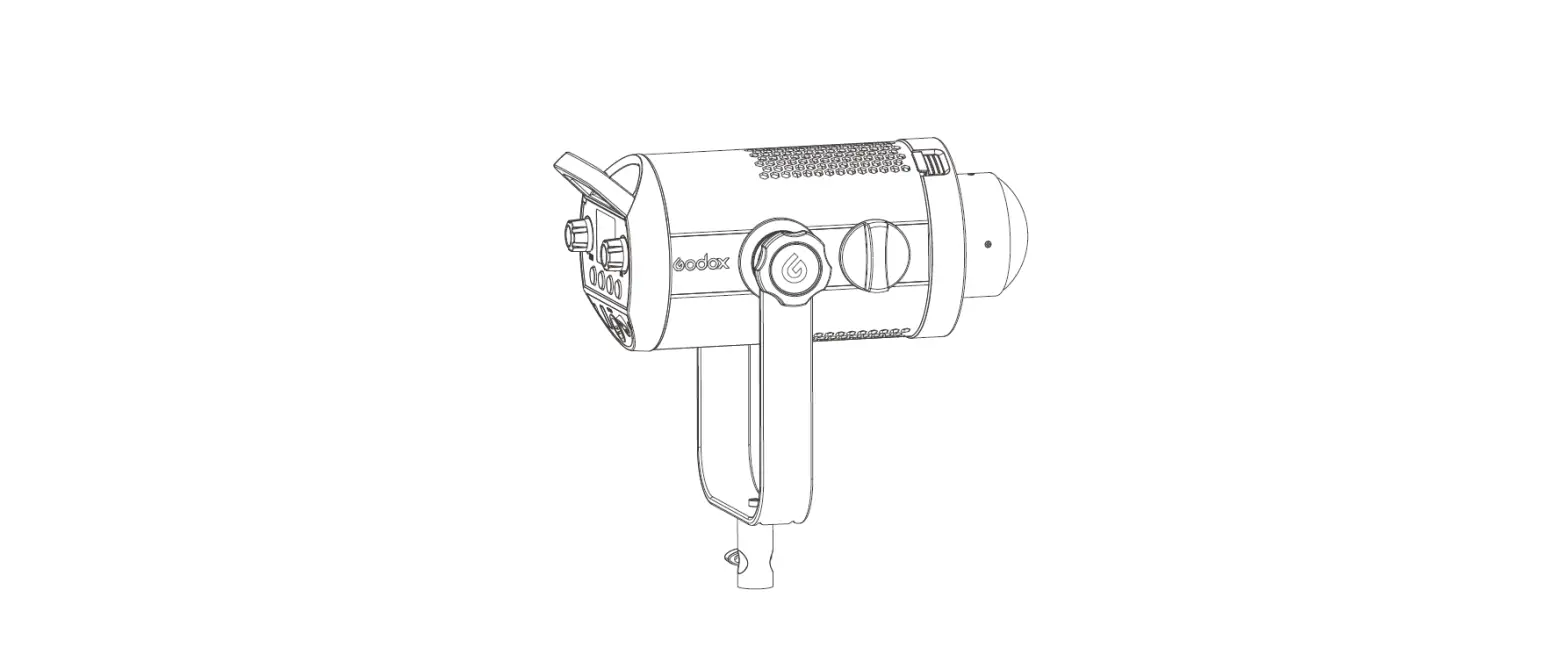
Godox SZ150R Zoom RGB LED Video Light
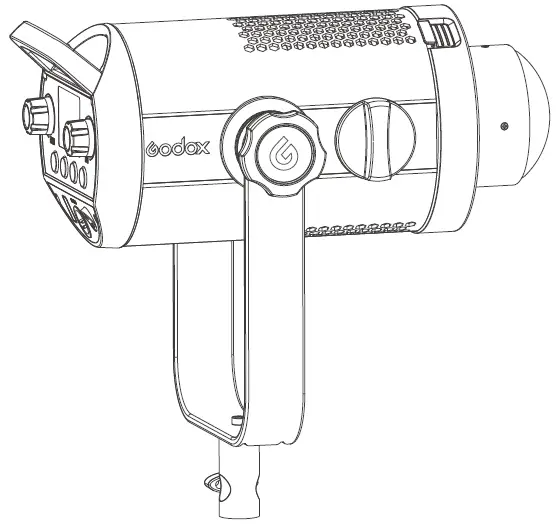
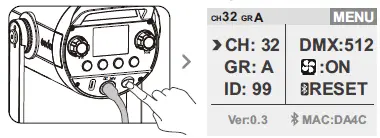
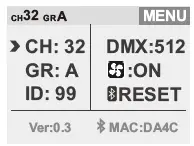
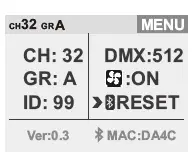
LCD Panel
Menu Interface
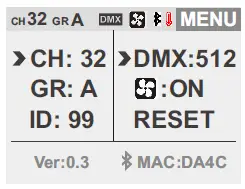
- CH Chanel
- GR Group
- 2.4G Wireless ID
- DMX Channel
- Fan Switch
- Bluetooth Password Reset
- V0.3 (Software Version)
- MAC(Bluetooth number)
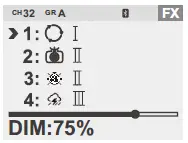
FX Interface
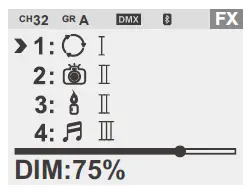
- Different Function Display from 13 categories which are divided into 39 kinds
- DIM: Brightness Display
HSI Interface
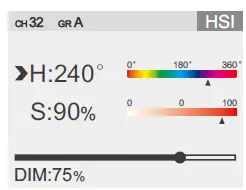
- H: Hue
- S: Saturation
- DIM: Brightness Display
CCT Interface
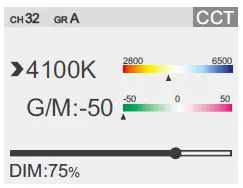
- 2800K~6500K: Color Temperature
- G/M: Hue
- DIM: Brightness Display
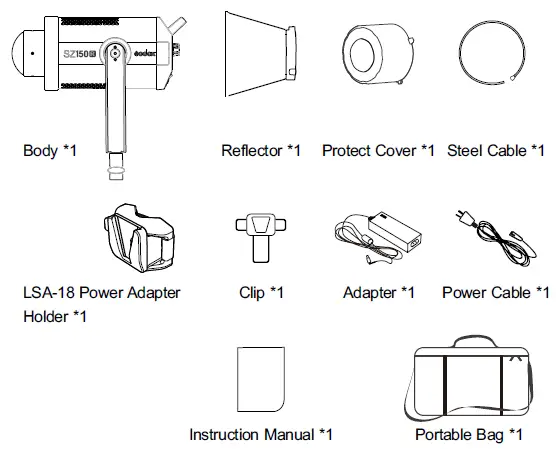
Included Items
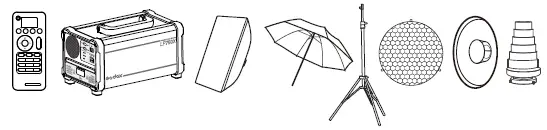
Optional Accessory
The product can be used in combination with the following optional accessories so as to achieve best photography effects RC-R9 Remote control, inverter, softbox, umbrella, light stand, honey comb, beauty dish, snoot, etc.
Power Supply
Connect the SZ150R to power source with adapter and power cable. Press the power switch to turn on the LED light.
Operation
Setting
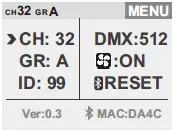
Press the MENU button and the LED light will enter menu interface. In this interface, CH channel (1 to 32), GR group (A/B/C/D/E/F,0-9), ID (OFF/01 to 99), DMX function (OFF/001 to 512), Fan (OFF/ON) and Bluetooth can be set.
FX Button
- Press the FX button and the LED light will enter FX interface. In this interface, you can set 37 different special effects which are divided into 13 categories according to your demands.

- In FX mode, turn the FN select dial to choose the special effect modes from 1 to 13 categories. And the modes will be selected circularly by turning the select dial. After choosing the current mode, press down the FN multifunctional select dial from. And the modes will display circularly when keeping pressing the FN multifunctional select dial. Turn the DIM select dial to choose brightness from 0% to 100% and the brightness value will be precisely displayed on the LCD panel.

HSI Button
Press HSI button and the LED light will enter HSI interface.
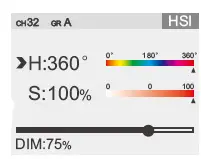
- Short press FN button, choose H and turn the FN select dial to adjust H hue from 0° to 360°. Quickly change the parameters by turning the select dial faster.
- Short press FN button, choose S and turn the FN select dial to adjust S saturation from 0 to 100. Quickly change the parameters by turning the select dial faster.
- Turn the DIM select dial to adjust light brightness from 0% to 100%. Short press the DIM select dial once to turn off the brightness. Press the button again to recover the brightness set before.
CCT Button
Press the CCT button to enter color temperature setting interface.
- Short press the FN button to select the color temperature. Then, turn the FN select dial to adjust color temperature from 2800K to 6500K.
- Short press the FN button to select G/M.
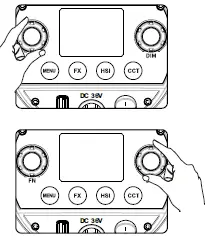
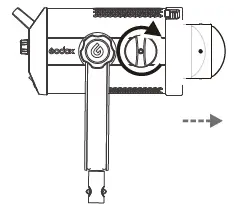
Zooming Knob
By adjusting this knob, the beam angle can be changed from 20° to 65°.
USB Upgrade Port
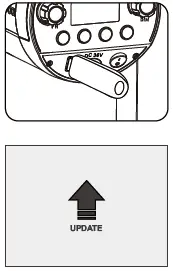
- Download the new firmware into U disk from official website http://www.godox.com.cn/Downloads.html.
- Turn off the LED light. Insert the U disk with new firmware into the USB upgrade port.
- Turn on the LED light, and it will
- The LED light will automatically back to the main interface.
Silent Mode
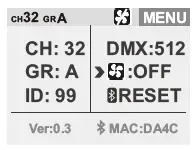
Press the Menu button to enter the MENU interface. Turn the FN select dial to choose icon. Then, turn the DIM select dial, choose ON to boot the fan. When choosing OFF, be displayed and the fan will be turned off to achieve silent mode.
Control Mode Selection
DMX Control Setting
In NENU interface, choose DMX options to set DMX channels (OFF/001~512). Connect the LED light to DMX control panel by RJ45 port. Set them to the same channel, the SZ150R can be controlled by control panel.
| Mode
Channel | CCT | HSI | RGBW | FX | Note |
| n(Mode) | 0-51 | 52-103 | 104-155 | 156-255 | |
| n+1 | DMX*(100/255) Integer 0-100% Light Brightness | DMX*(100/255) Integer 0-100% Light Brightness | 0-255 | DMX*(100/255) Integer 0-100% Light Brightness | |
| n+2 | DMX*(Max. Color Temperature – Min. Color Temperature)/ 100)/255)Inte ger | DMX*(360/255) Integer Hue Selection | 0-255 R’s Value | DMX*(Total Number of Special Light Effect/255) | 1. Color Temperature Adjustment(e.g. min. color temperature 2800, min. color temperature 6500, DMX=102,102*((6500- 2800)/100)/255=14(Corresponding color temperature 28+14=42*100=4200) 2. Hue Adjustment (DMX=200:H=200*360/255=282) 3. For example: total number of special light effect 14,DMX=160,number of special light effect=160*14/255=8 |
| n+3 | DMX*(100/255 ) Integer G/M Setting | DMX*(100/255) Integer Saturation Setting | 0-255 G’s Value | 0-85: I 86-171: II 172-255: III | G/M Adjustment(-50–0–50 Corresponding Value0-50-100) DMX=212,GM Mapped Value=(212*100/255=83 ) -50=33 |
| n+4 | 0-255 B’s Value | ||||
| n+5 | 0-255 W’s Value |
Wireless Control
With 2.4G wireless system, SZ150R LED video light has remote grouping and control function. It is recommended to purchase RC-R9 remote control(optional) to achieve wireless control. Up to 16 groups of LED lights can be controlled. channels and 99IDs are available with strong anti-interference capability. Press the MENU button to enter MENU interface and turn the FN select dial: Select CH and turn the DIM select dial to choose channels from 1 to 32. Select GR and turn the DIM select dial to choose groups from A to E and 0 to 9. Select ID and turn the DIM select dial to choose IDs from OFF, 01 to 99.
Note:
- Please make LED light’s channel, group and ID to the same as remote control’s.
- The wireless signals can only be received in the situation that the LED light is powered on.
Bluetooth Control
Press the MENU button to enter MENU interface. Turn the FN select dial to choose RESET. Then, short press the FN button to achieve Bluetooth function.
Note: the APP can be used directly on the firstly installed device. When changing to other mobile device, the light shall be reset before the normal usage of APP.
Scan the QR code to download the “Godox Light” smartphone APP(can be used by Android and Apple system). For more smartphone APP operations, please open the “help” in APP to gain detailed guidance.

Technical Data
| LED Light | SZ150R | |
| Power Supply | AC100V-240V(50/60HZ) | |
| Power | 150W | |
| Channel | 32 | |
| Group | 16(A, B, C, D, E, F, 0-9) | |
| Color Temperature Range | 2800K~ 6500K | |
| Brightness Range | 0%-100% | |
| RGB Hue | 0~360° | |
| 100% Illuminance(LUX) (darkroom, 1m distance with included reflector) | Central point | |
| Max. diffused light of focal length | =19000 | |
| Min. diffused light of focal length | =26000 | |
| CRI (=) | 97 | |
| TLCI (=) | 96 | |
| Working Environment Temperature | -10°C~ 40°C | |
| Special Effects Modes | 37 | |
| Mode | Bicolor mode/HSI mode/situational mode | |
| Zooming | Beam Angle 20°~ 65° | |
| Control Method | Smartphone APP/2.4G wireless/ DMX intelligent control | |
| Wireless Control Distance | =50m (with optional remote control RC-R9) | |
| Silent Mode | Yes | |
| Display | Color Display | |
| Dimension | 336*198.6*165mm | |
| Net Weight | 2.65kg (not include reflector and protect cover) | |
Maintenance
This product, except consumables e.g. adapter and adapter cable, is supported with a one-year warranty. Avoid sudden impacts and the product should be dedusted regularly. Maintenance of the flash must be performed by our authorized maintenance department which can provide original accessories. Unauthorized service will void the warranty. If the product had failures or was wetted, do not use it until it is repaired by professionals. Changes made to the specifications or designs may not be reflected in this manual.
FCC Statement
This device complies with part 15 of the FCC Rules. Operation is subject to the following two conditions: (1) This device may not cause harmful interference, and (2) this device must accept any interference received, including interference that may cause undesired operation. Any Changes or modifications not expressly approved by the party responsible for compliance could void the user’s authority to operate the equipment.
Note: This equipment has been tested and found to comply with the limits for a Class B digital device, pursuant to part 15 of the FCC Rules. These limits are designed to provide reasonable protection against harmful interference in a residential installation. This equipment generates uses and can radiate radio frequency energy and, if not installed and used in accordance with the instructions, may cause harmful interference to radio communications. However, there is no guarantee that interference will not occur in a particular installation. If this equipment does cause harmful interference to radio or television reception, which can be determined by turning the equipment off and on, the user is encouraged to try to correct the interference by one or more of the following measures:
- Reorient or relocate the receiving antenna.
- Increase the separation between the equipment and receiver.
- Connect the equipment into an outlet on a circuit different from that to which the receiver is connected.
- Consult the dealer or an experienced radio/TV technician for help.


