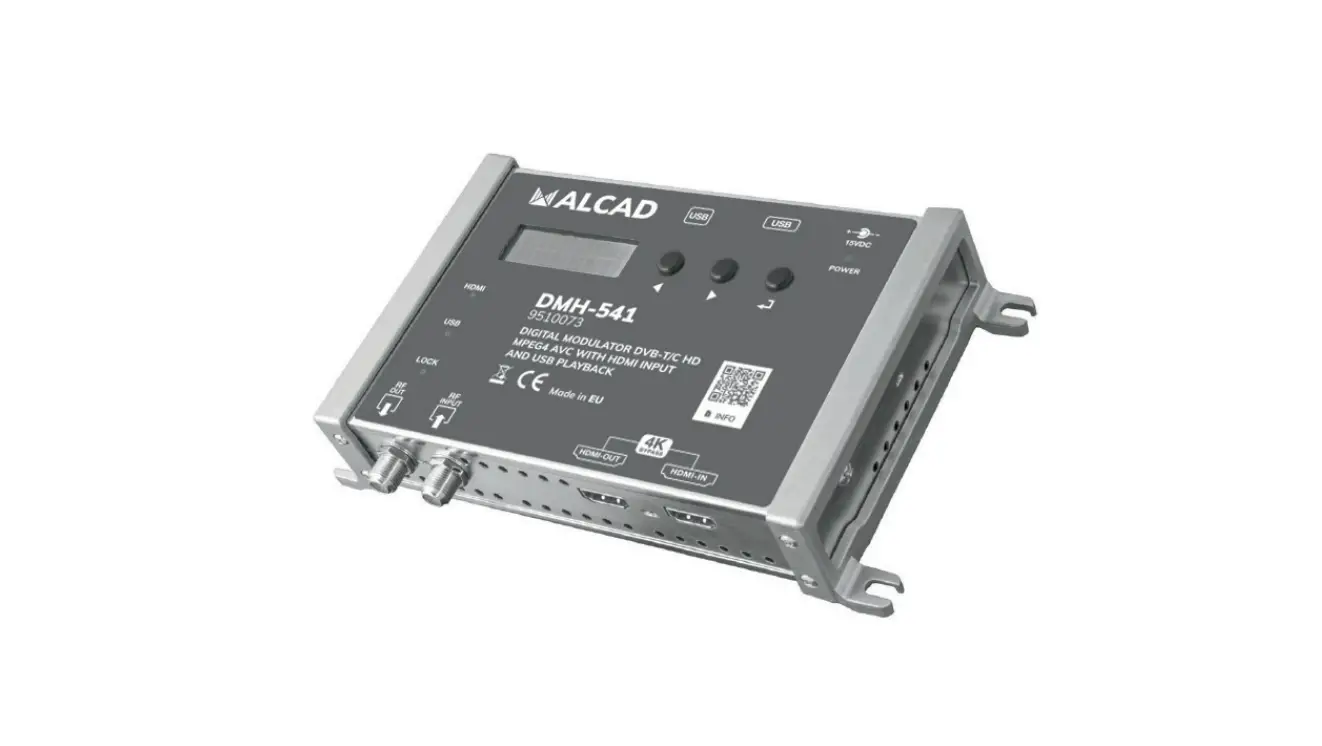
ALCAD DMH-541 Digital Modulator HDMI and USB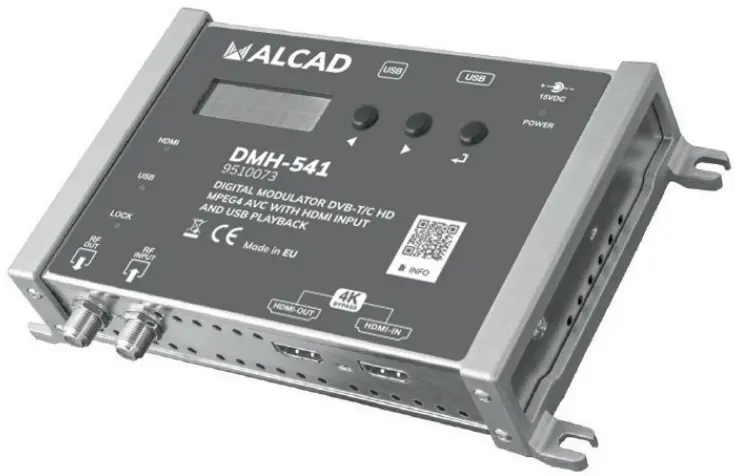
FEATURES
![]() 4K UltraHD HDMI 2.2 Loop through
4K UltraHD HDMI 2.2 Loop through![]() Hight RF Output Level
Hight RF Output Level![]() USB pen drive video player
USB pen drive video player
- Perfect image and audio synchronization
- RF Loop through 5… 2.200 MHz
- Video bit rate up to 30 Mbps
- Over 36 dB MER (Modulation Error Rate)
- Low consumption and energy saving function
AUDIO – VIDEO
| VIDEO ENCODING | – | H.264 MPEG |
| VIDEO INTERFACE | – | HDMI 2.2 |
| VIDEO RESOLUTION MODES | – | 576p – 720p – 1080p |
| VIDEO BIT RATE | Mbp/s | 5… 30 |
| AUDIO MODE | – | MPEG AC3 DTS AAC |
RF OUTPUT
| FREQUENCY RANGE | MHz | 170… 230 / 470… 862 |
| MER | dB | >36 |
| RF OUTPUT LEVEL | dBpV | 70… 100 |
| RF LOOP PASS THROUGH | 5… 2.200 MHz Loss s 2 | |
| DVB-T | ||
| CONSTELLATION – FEC | QPSK – 16QAM – 64QAM – 1/2 – 2/3 – 3/4 – 5/6 – 7/8 | |
| GUARD INTERVALL | 1/4 – 1/8 – 1116 – 1/32 | |
| MODULATION CARRIERS | 2K/8K | |
| SELECTABLE BANDWIDTH | MHz | 6/ 7/ 8 |
| DVB-C | ||
| CONSTELLATION | 16QAM – 32QAM – 64QAM – 128QAM -256QAM |
GENERAL
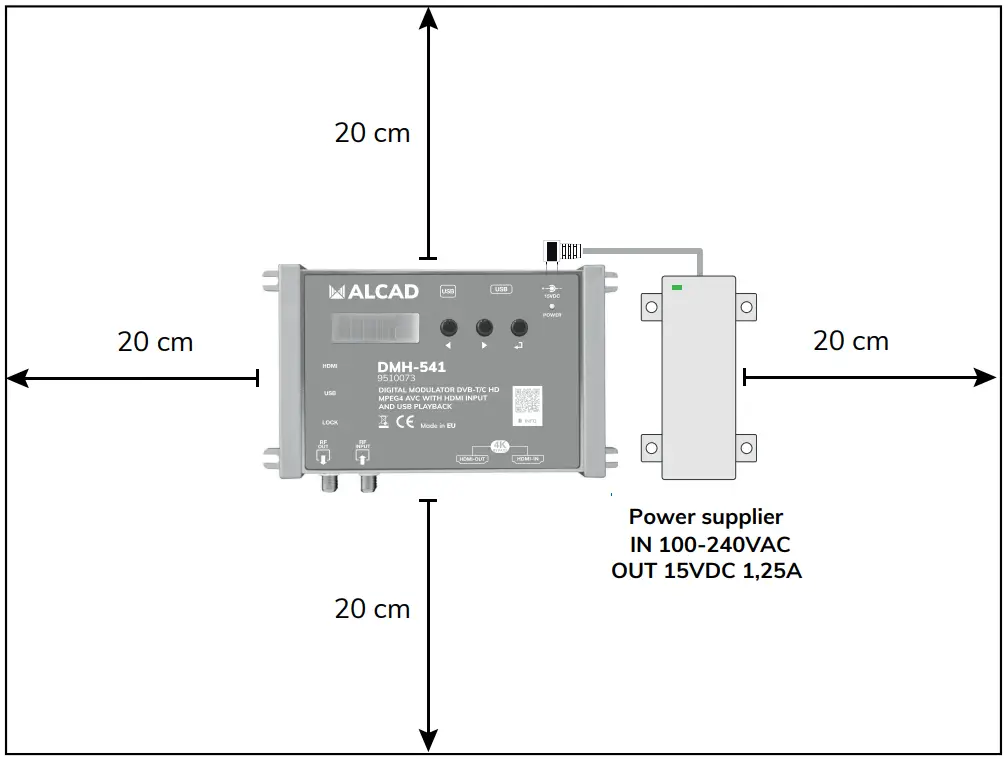
| POWER SUPPLY | Volt | 15VDC (External PSU 100-240VAC 50/60Hz) |
| POWER CONSUMPTION | W | 4,8 Watt Max. / 3,5 Watt Energy saving mode |
| DIMENSIONS | mm | 193x109x39h |
| OPERATING TEMPERATURE | C° | 0… 45 |
DESCRIPTION OF SYMBOLS AND ELECTRICAL SAFETY
 The equipment complies with the CE requirements
 The equipment is designed for indoor use only
 Equipment grounding terminal
- This symbol indicates that the equipment complies with the safety requirements for class II equipment
 To avoid the risk of electric shock, do not open the equipment.
 The equipment is compliant with RoHS 2011/65EU
 Dispose according to local authorities recycling processes
Safety instructions
- Read carefully these instructions
- Keep these instructions
- Heed all warnings
- Follow all instructions
- Do not expose this apparatus to extreme temperatures
- Do not install this apparatus near water or expose to rain and moisture
- Place the apparatus in a dry and well-aired location
- Install the unit on a vertical wall, or in a waterproof cabinet with a minimum IP55 rating, and fix it safely using the provided fixing plugs
- Connect the power adapter cord to a detachable power supply socket
- Unplug the apparatus during lighting storms or when unused for long time
- Only use accessories specified by the manufacturer
- Do not remove the cover without disconnecting from the mains first
- Ambient temperature should not be higher than 45°
- Please allow air circulation around the apparatus

 IMPORTANT!
Place the apparatus and the power supplier in a dry and well-aired location
Install the unit on a vertical wall, or in a waterproof cabinet with a minimum IP55 rating, and fix it safely using the provided fixing plugs
Use only the power supplier provided with the amplifier.
The use of not-original power suppliers determines the not-compliance of the product and can cause malfunctions and void the warranty
DMH-541 DESCRIPTION
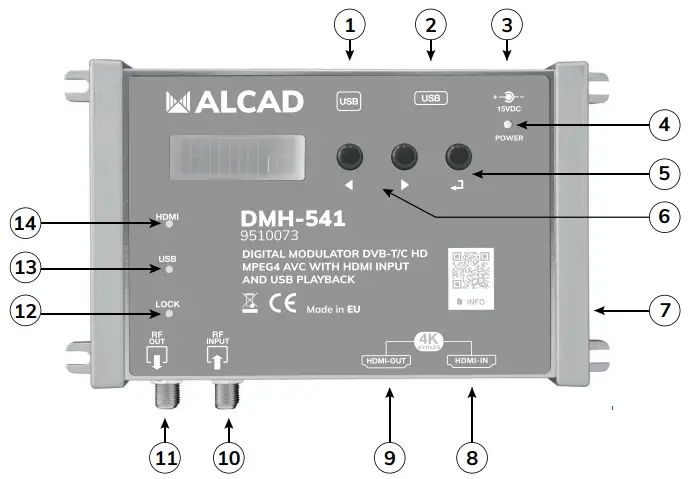
- USB Type B (F.W. Upgrade)
- USB Type A (USB Pendrive for Video Play)
- Power Input 15Vdc
- Power Supply Status Led
- Confirmation key
- Menu navigation keys
- Ground point
- HDMI Output
- HDMI Input
- RF Input
- RF Output
- Video Signal Lock
- USB TS Signal
- HDMI Connected
DVB-T available rates (Mbit/s) in 8MHz channels
Table (1)
| MODULATION | FEC Coding Rate | GUARD INTERVAL (TG) | |||
| 1/4 | 1/8 | 1/16 | 1/32 | ||
| QPSK | 1/2 | 4.98 | 5.53 | 5.85 | 6.03 |
| 2/3 | 6.64 | 7.37 | 7.81 | 8.04 | |
| 3/4 | 7.46 | 8.29 | 8.78 | 9.05 | |
| 5/6 | 8.29 | 9.22 | 9.76 | 10.05 | |
| 7/8 | 8.71 | 9.68 | 10.25 | 10.56 | |
| 16QAM | 1/2 | 9.95 | 11.06 | 11.71 | 12.06 |
| 2/3 | 13.27 | 14.75 | 15.61 | 16.09 | |
| 3/4 | 14.93 | 16.59 | 17.56 | 18.10 | |
| 5/6 | 16.59 | 18.43 | 19.52 | 20.11 | |
| 7/8 | 17.42 | 19.35 | 20.49 | 21.11 | |
| 64QAM | 1/2 | 14.93 | 16.59 | 17.56 | 18.10 |
| 2/3 | 19.91 | 22.12 | 23.42 | 24.13 | |
| 3/4 | 22.39 | 24.88 | 26.35 | 27.14 | |
| 5/6 | 24.88 | 27.65 | 29.27 | 30.16 | |
| 7/8 | 26.13 | 29.03 | 30.74 | 31.67 | |
DVB-C Available rates (Mbit/s)
Table (2)
| BANDWIDTH | MODULATION | ||||
| 16QAM | 32QAM | 64QAM | 128QAM | 256QAM | |
| 8MHz | 25.64 | 32.05 | 38.47 | 44.88 | 51.29 |
| 6MHz | 19.23 | 24.04 | 28.85 | 33.66 | 38.47 |
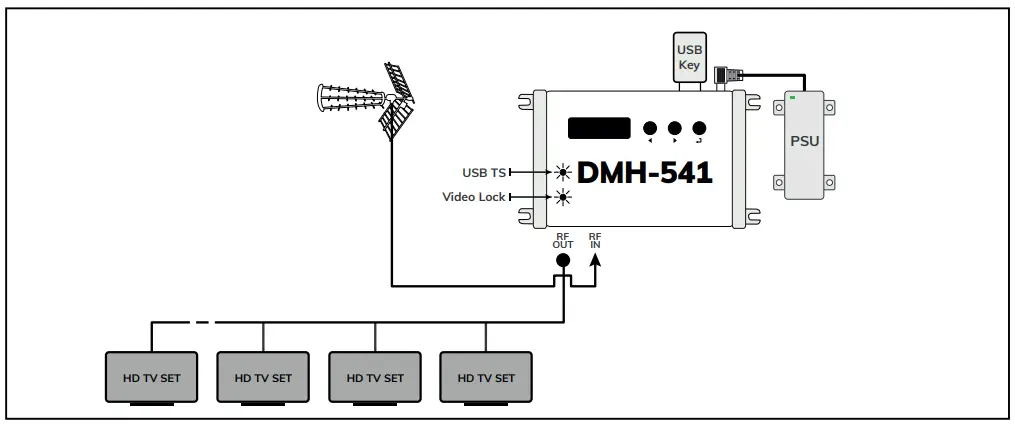
CONNECTION TO A HDMI SOURCE
- Connect the RF coaxial input and output cables
- Connect the HDMI input and output cables
- Connect the power supplier unit to DMH-541 and only then connect the power supplier to mains plug. Wait the end of the booting procedure to start
programming the DMH-541 - If the HDMI input source is correct the Led HDMI and LOCK will be lighted on


CONNECTION TO A USB PEN DRIVE SOURCE
- Connect the RF coaxial input and output cables
- Connect the USB pen drive to the USB type A input containing a video file named media.ts
- Connect the power supplier unit to DMH-541 and only then connect the power supplier to mains plug. Wait the end of the booting procedure to start programming the DMH-541
- The Led USB TS and LOCK will be lighted on
Note: the bitrate of the media.ts file cannot exceed the DMH-541 encoder bitrate
DMH-541 Programming
- Press to activate the display
- Press and hold for five seconds to enter the programming menu
If any key is pressed for 3 minutes the display turn to standby mode. Press any key to re-activate.
DMH-541 has a built-in DVB-T/C tuner for self test. Every parameter modification is verified and stored and require from 10 to 15 seconds.


- Output channel
Output Level
Output LCN
Country preset parameters
- Video mode
Video PID - Audio mode
Audio PID - DVB-T
Constellation
Carrier
Bandwidth
FEC
TG
DVB-C
Constellation - Video Resolution
Bit Rate
Service ID
Transport Stream ID
Network ID
Original Network ID
PMT ID
NIT Version
Audio Bitrate - EDID
Protection Password
Apparatus Serial number - Exit the programming
- Reset to default settings
- Service name
- Network name
- Provider name


OUTPUT
- RF OUTUP
Press to enter the OUTPUT menu.
- OUTPUT CHANNEL
Position the function selector > on CH and press to activate the pointer — and set the output channel.
To confirm your selection press.
E5÷E12 / E21÷E69 Default E36 On the right of the selected channel is displayed the center frequency in MHz.
 - OUTPUT LEVEL

70÷ 100dB V (1dB step)
Position the function selector > on LEV and press to activate the pointer — and set the RF output level. To confirm your selection press . - OUTPUT LCN

00001 ÷ 65535
Position the function selector > on LCN and pressto activate the pointer — and set LCN number required. To confirm your selection press . If in the network there are more than one DMH-541 to avoid TSID conflict when the LCN number is changed also the TSID is automatically reassigned. - Country preset parameters


See Table below
| AUSTRIA | AUT | GERMANY | DEU | NETHERLANDS | NLD | SLOVENIA | SVN |
| AUSTRALIA | AUS | GREECE | GRC | NORWAY | NOR | SPAIN | ESP |
| CROATIA | HRV | HUNGARY | HUN | NEW ZEALAND | NZL | SWEDEN | SWE |
| CZECH REP | CZE | ISRAEL | ISR | POLAND | POL | SWITZERLAND | CHE |
| DENMARK | DNK | IRELAND | IRL | PORTUGAL | PRT | UNITED KINGDOM | GBR |
| ESTONIA | EST | ITALY | ITA | RUSSIA | RUS | ||
| FINLAND | FIN | LATVIA | LVA | SINGAPORE | SGP | ||
| FRANCE | FRA | MALAYSIA | MYS | SLOVAKIA | SVK |
AUDIO VIDEO SETUP
- VIDEO SET UP
Press to enter the menu to select the video compression required. - VIDEO MODE
H264 / MPEG
Position the function selector > on MODE and press to activate the pointer — and select  the VIDEO MODE. To confirm your selection press .
 - VIDEO PID
00001 ÷ 65535
Position the function selector > on MODE and press to activate the pointer — and set VPID. To confirm your selection press . - AUDIO
Press to enter the AUDIO menu. - AUDIO MODE
MPEG / AC / DTS / AAC
Press to enter the menu to select the AUDIO MODE. Select  and confirm your choice pressing .
 - AUDIO PID
00001 ÷ 65535
Position the function selector on APID Press to activate the pointer — and set APID. To confirm your selection press .


MODULATION

Press ![]() to enter the MODULATION menu.
to enter the MODULATION menu.
- MODULATION MODE

DVB-T – DVB-C
Position the function selector > on DVB and press to activate the pointer — and select the DVB-Tor DVB-C modulation mode. To confirm your selection press .

DVB-T
- CONSTELLATION
QPSK – 16 – 64QAM
Position the function selector > on COST and press to activate the pointer — and select the constellation. To confirm your selection press . - MODULATION CARRIER
2K – 8K
Position the function selector > on CARR and press to activate the pointer — and select the 2K or 8K carrier. To confirm your selection press . - BANDWIDTH
6 – 7 – 8 MHz
Position the function selector > on BW and press to activate the pointer — and select the bandwidth.
To confirm your selection press.
The channel bandwidth is pre-set in relationship to the country channeling. - FEC
1/2 – 2/3 – 3/4 – 5/6 – 7/8
Position the function selector > on FEC and pressto activate the pointer — and select the Forward Error Correction value. To confirm your selection press . - TG
1/32 – 1/16 – 1/8 – 1/4
Position the function selector > on Tg and press to activate the pointer — and select the Tg value.
To confirm your selection press.


DVB-C
- CONSTELLATION
16 – 32 – 64 – 128 – 256QAM
Position the function selector > on COST and press to activate the pointer — and select the constellation. To confirm your selection press .

ENCODER

Press ![]() to enter the ENCODER menu Line up the function selector > to the parameter and press
to enter the ENCODER menu Line up the function selector > to the parameter and press ![]() to activate the pointer — and select the value pressing
to activate the pointer — and select the value pressing ![]() . To confirm the selection press
. To confirm the selection press ![]() .
.
- Video Resolution
576 – 720 – 1080 - Bit Rate
4000… 30.000 Mbps See Table (1) or (2) - Service ID
00001÷65535 - Transport Stream ID
00001÷65535 - Network ID
00001÷65535 - Original Network ID
00001÷65535 - PMT ID
00001÷65535 - NIT Version
001÷999 - Audio Bitrate
64-96-112-128-160-192-224-256-320-384 Kbps


ADVANCED

Press![]() to enter the ENCODER menu
to enter the ENCODER menu
Line up the function selector > to the parameter and press![]() to activate the pointer — and select the value pressing
to activate the pointer — and select the value pressing ![]() . To confirm the selection press
. To confirm the selection press ![]() .
.
- EDID
INT2K; INT4K; COPY
INT2K= HDMI Bypass HD only
INT4K= HDMI Bypass 4K and HD
COPY= Bypass resolution detected from TV input HDMI - Protection Password
- Apparatus Serial number


EXIT

To exit the setting procedure select EXIT and press ![]() . Select YES and press
. Select YES and press![]() to confirm.
to confirm.

To continue the DMH-541 setting select NO and press![]() to confirm.
to confirm.
RESET

To cancel all settings select the RESET menu pressing ![]() and Select YES and confirm . All the factory settings will be restored and the DMH-541 rebooted.
and Select YES and confirm . All the factory settings will be restored and the DMH-541 rebooted.
SERVICE NAME

Press ![]() to enter SERVICE NAME menu
to enter SERVICE NAME menu
Line up the function selector > to the parameter and press![]() to activate the pointer — and select the digit pressing
to activate the pointer — and select the digit pressing ![]() . To confirm press
. To confirm press ![]() .
.
![]() The preset service name is ALCADSERV but can assigned a different name with up to 11 digits
The preset service name is ALCADSERV but can assigned a different name with up to 11 digits
NETWORK NAME

Press![]() to enter NETWORK NAME menu
to enter NETWORK NAME menu
Line up the function selector > to the parameter and press![]() to activate the pointer — and select the digit pressing
to activate the pointer — and select the digit pressing ![]() . To confirm press
. To confirm press ![]() .
.
PROVIDER NAME

Press ![]() to enter PROVIDER NAME menu
to enter PROVIDER NAME menu
Line up the function selector > to the parameter and press![]() to activate the pointer — and select the digit pressing
to activate the pointer — and select the digit pressing ![]() . To confirm press
. To confirm press ![]() .
.
CUSTOMER SERVICE
ALCAD Electronics, S.L.
Pol. Ind. Arreche-Ugalde, 1
Apdo. 455 I 20305 IRUN – Spain
Tel. (+34) 943 63 96 60
[email protected]
![]()


 Installation Guide")


