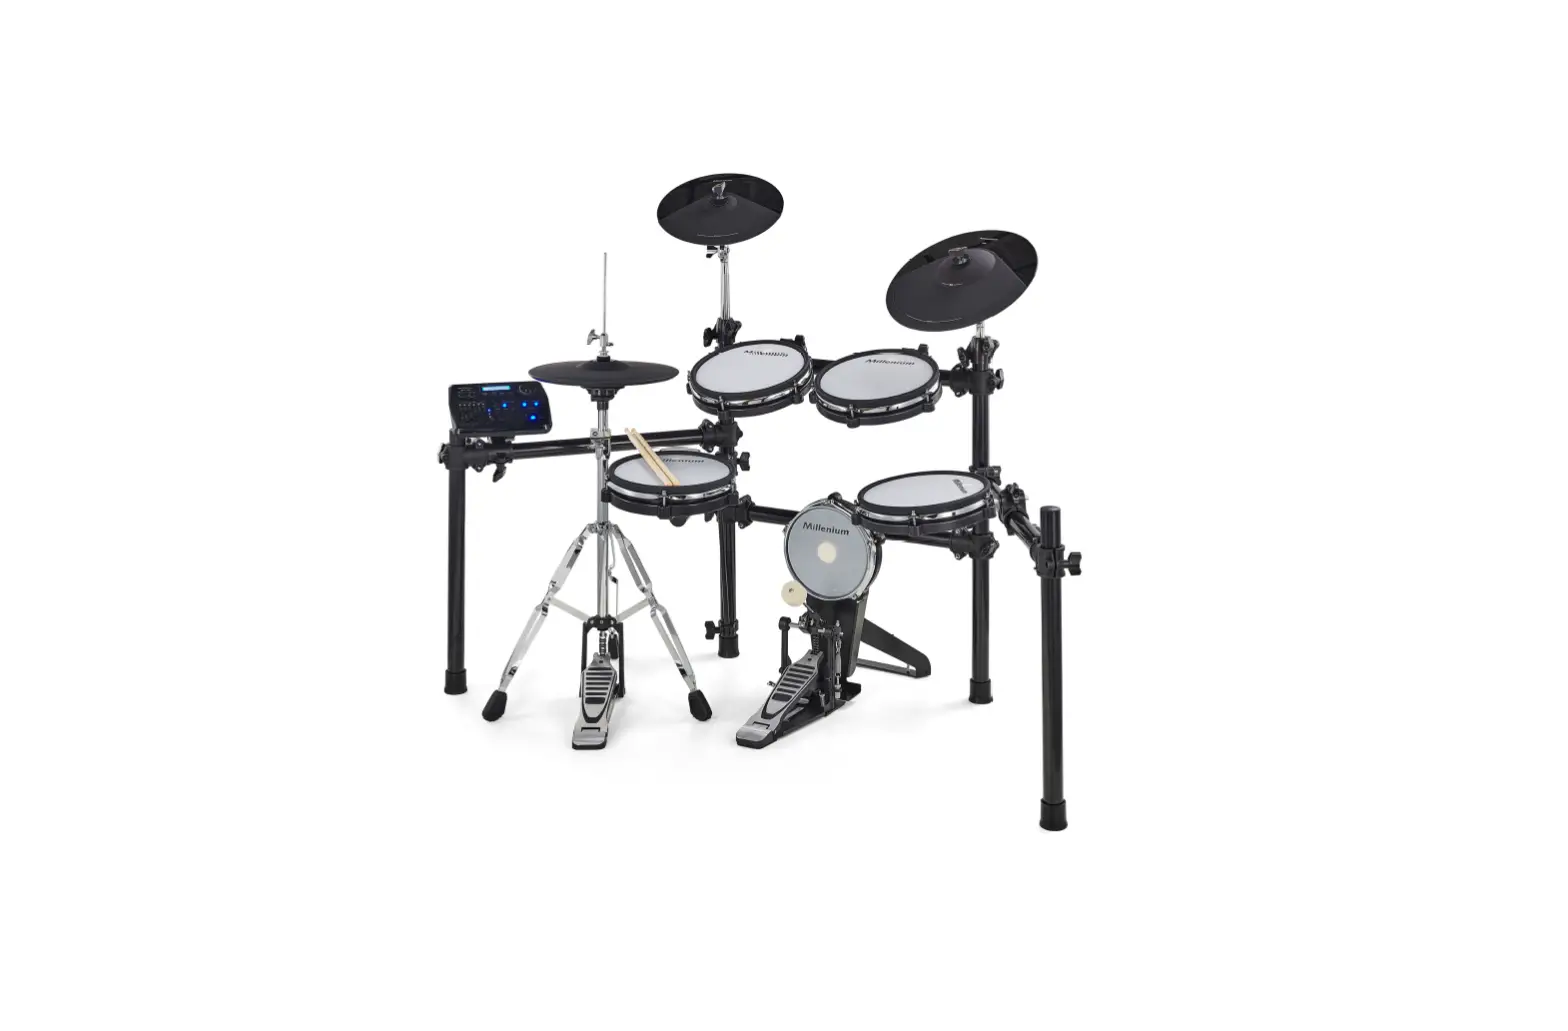
Millenium MPS-750X Electric Drum Mesh Set

Thomann GmbH
Hans-Thomann-Straße 1
96138 Burgebrach
Germany
Telephone: +49 (0) 9546 9223-0
Internet: www.thomann.de
17.06.2022, ID: 464015, 493327 (V2)
Safety instructions
DANGER!
Danger for children
Ensure that plastic bags, packaging, etc. are disposed of properly and are not within reach of babies and young children. Choking hazard!
Ensure that children do not detach any small parts (e.g. knobs or the like) from the unit. They could swallow the pieces and choke!
Never let children unattended use electrical devices.
NOTICE!
Possible staining
The plasticiser contained in the rubber feet of this product may possibly react with the coating of your surface and after some time cause permanent dark stains.
In case of doubt, do not put the rubber feet directly on the surface and use a suitable underlay if necessary, i.e. felt pads or similar.
Scope of delivery
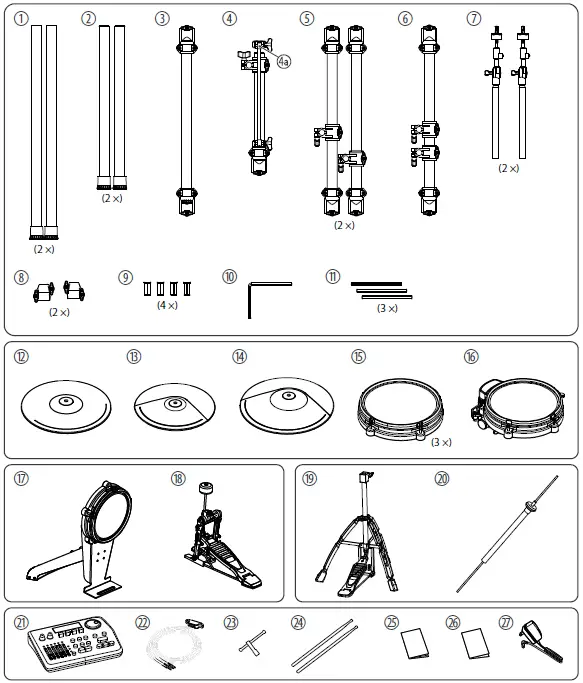
Before you assemble your drum set, make sure the contents of package is complete according to the following list and figure.
| Item | Qty. | |
| 1 | 2 | Lateral support tube left and right |
| 2 | 2 | Support tube for left and right crossbeams |
| 3 | 1 | Lower horizontal connection tube |
| 4 | 1 | Crossbeam for the Snare |
| 5 | 2 | Crossbeams left and right |
| 6 | 1 | Upper horizontal connection tube |
| 7 | 2 | Cymbal bracket (Crash and Ride) |
| 8 | 2 | Connection for the cymbal holder (Crash and Ride) |
| 9 | 4 | Sleeve for mounting bracket / mounting rod for the pads |
| 10 | 1 | Mounting bracket for the pads |
| 11 | 3 | Mounting rod for the pads |
| 12 | 1 | Hi-hat pad (10 inch) |
| 13 | 1 | Crash (12″, two zones, with stop function) |
| 14 | 1 | Ride (14″, three zones, with stop function) |
| 15 | 3 | Tom pad (10″, two zones, mesh head) |
| 16 | 1 | Snare pad (10″, two zones, mesh head) |
| 17 | 1 | Bass drum pad (8″ mesh head) |
| 18 | 1 | Bass drum pad pedal |
| 19 | 1 | Hi-hat tripod with pedal |
| 20 | 1 | Hi-hat bracket |
| 21 | 1 | e-drum module Millenium MPS-750X |
| 22 | 1 | Multiple cable for connecting the pads, cymbals and pedals to the e-drum module |
| 23 | 1 | Drum key |
| 24 | 1 | Set of drum sticks |
| 25 | 1 | User manual e-drum module |
| 26 | 1 | Assembly instructions e-drum set |
| 27 | 1 | Plug-in power supply |
Scope of delivery
Assembly
Overview
Loosen the screws of the clamps before sticking the tubes together. Mount the various elements in the specified sequence. The final positions of the components are shown in the illustration below.
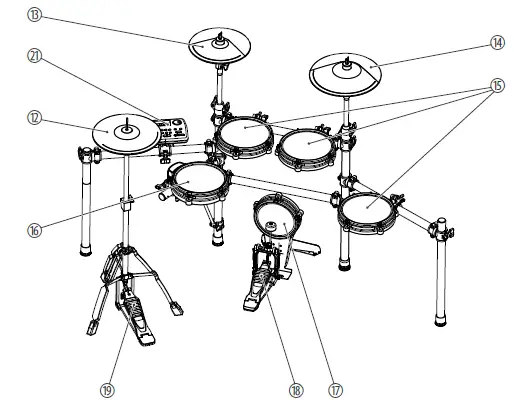
| 12 | Hi-hat pad (10 inch) |
| 13 | Crash (12″, two zones, with stop function) |
| 14 | Ride (14″, three zones, with stop function) |
| 15 | Tom pad (10″, two zones, mesh head) |
| 16 | Snare pad (10″, two zones, mesh head) |
| 17 | Bass drum pad (8″ mesh head) |
| 18 | Bass drum pad pedal |
| 19 | Hi-hat tripod with pedal |
Assembling the rack
CAUTION!
Danger of cuts on hands and fingers
When connecting the parts, take care for sharp edges on the metal tubes, screws etc.
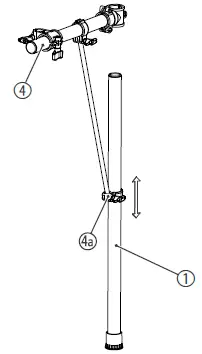
- Attach the clamp (4a) of the snare crossbeam (4) to one of the two lateral support tubes (1).
- Then tighten the wing nut of the clamp (4a).
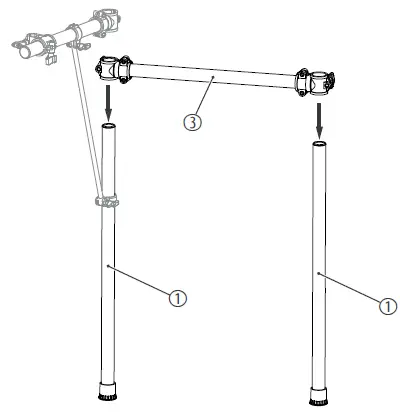
- Fasten the two lateral support tubes (1) in the fastening clamps of the horizontal connecting tube (3).
- Then tighten the wing nuts of the fastening clamps.
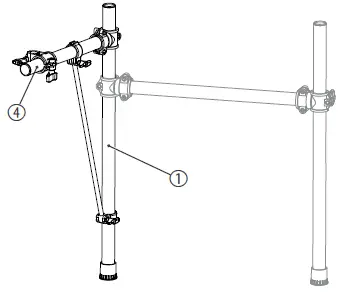
- Attach the crossbeam for the snare (4) to the left support tube (1).
- Then tighten the wing nut of the fastening clamps.
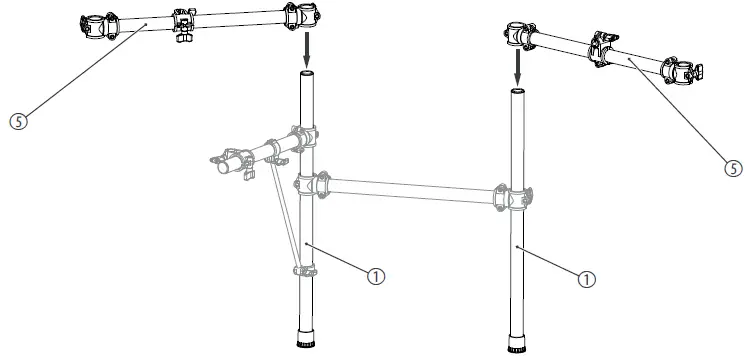
- Attach the two crossbeams (5) to the two lateral support tubes (1).
- Then tighten the wing nuts of the fastening clamps.
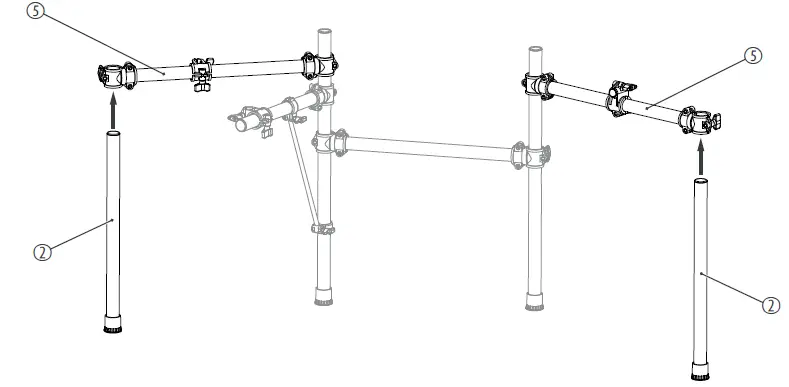
- Fasten the two support tubes for the crossbeams (2) in the fastening clamps of the crossbeams (5).
- Then tighten the wing nuts of the fastening clamps.
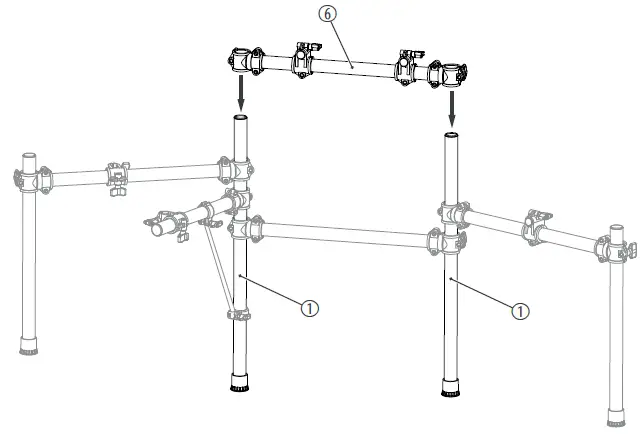
- Fasten the two lateral support tubes (1) in the fastening clamps of the horizontal connecting tube (6).
- Then tighten the wing nuts of the fastening clamps.
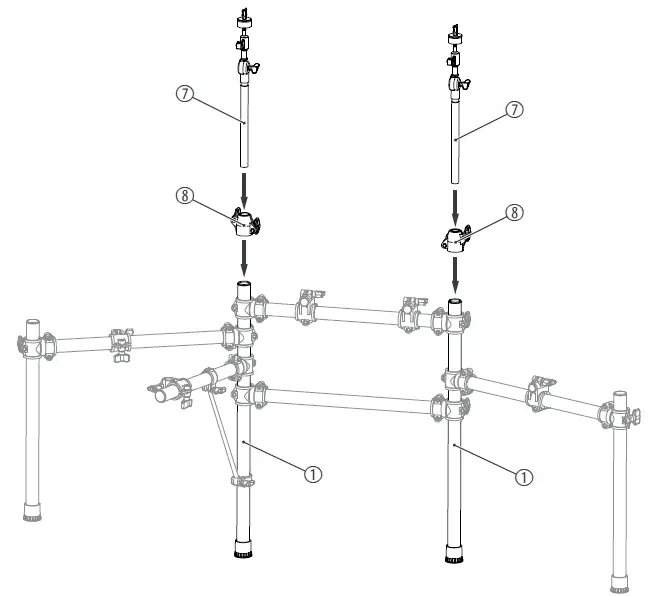
- Attach the two connections for the cymbal holder (8) and the cymbal holder (7) to the two lateral support tubes (1).
- Then tighten the wing nuts of the fastening clamps.
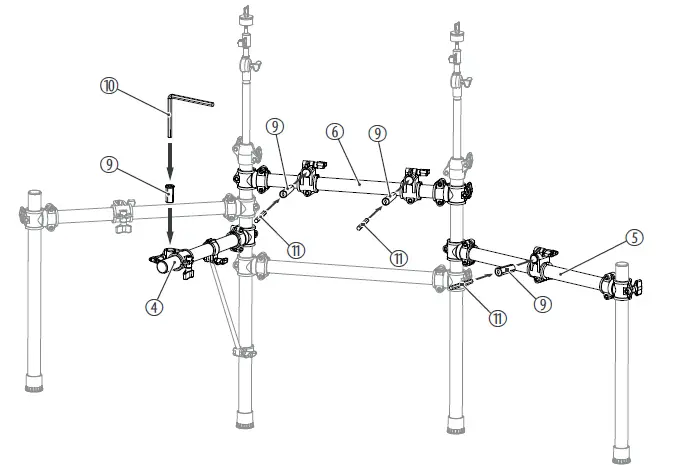
- Attach the sleeve for the mounting bracket (9) and the mounting bracket (10) in the bracket for the snare on the crossbeam (4).
- Then attach the sleeves for the mounting rods (9) and the mounting rods (11) in the holders for the tom pads on the right crossbeam (5) and on the horizontal connecting tube (6).
- Then tighten the wing nuts of the brackets.
Mounting tom pads on the rack
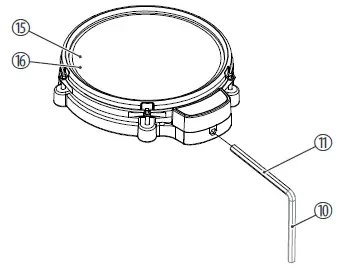
- Attach the tom pads (15) to the mounting rods (9) and tighten the wing nuts of the tom pads hand-tight.
- Align the pads on the rack to meet your needs, then tighten the wing nuts of the brackets and the wing nuts of the tom pads evenly.
Mounting cymbals on the rack
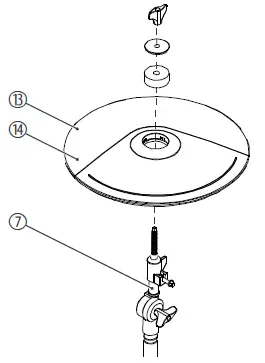
- Unscrew the wing nuts from the cymbal holders (7) and take the felt washers off the holders.
- Place the cymbals (13, 14) as shown in the figure on the holders. Be sure to attach the crash pad (12″) to the left holder and the ride pad (14″) to the right cymbal holder.
- Place the felt washers on the cymbals (13, 14) and fix the cymbals with the associated wing nuts on the holders.
Mounting the Hi-hat on the rack
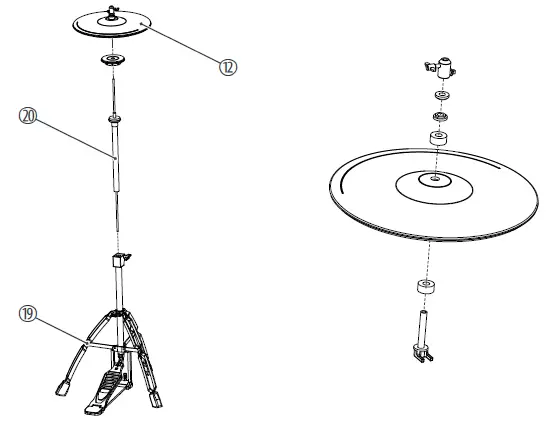
- Screw on the wing nuts of the hi-hat tripod with pedal (19) and open the feet. Then tighten the wing nuts of the brackets.
- Insert the hi-hat holder (20) into the hi-hat tripod with pedal (19) and tighten the holder clockwise.
- Unscrew the wing nuts from the Hi-hat holder (20) and take the felt washers off the holders.
- Place the Hi-hat (12) as shown in the figure on the holder.
- Place the felt washers on the cymbals and fix the Hi-hat (12) with the associated wing nut on the holder.
Setting up the bass drum pedal
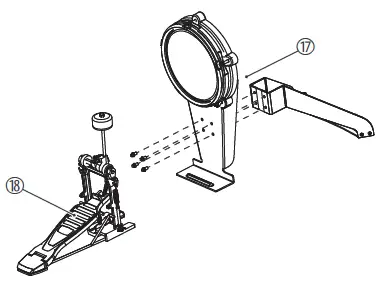
- Screw the bass drum pad and the associated foot (17) with the supplied screws using the drum key (23).
- Engage the bolt of the foot machine (18) into the provided recess on the bass drum pad (17).
Mounting the drum module on the rack
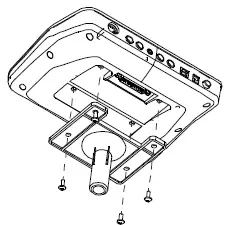
- Put the drum module (21) up to the stop into the free bracket of the left crossbeam (5). Insert the D-sub plug of the multiple cable (22) into the provided socket on the bottom side of the drum module.
- Tighten the D-sub plug with the hand screws.
- Align the module and tighten the wing nut of the bracket.
Bass Drum positioning
Place the pedal with the bass drum pad centred under the rack. Position the bass drum pedal centred in front of the pad.
Set-up and cabling
Set up the rack, the pads and the cymbals according to your needs. Finally, position the pedal with the bass drum pad in front of the rack and connect all trigger cables to the e-drum module.
The skin tension of the mesh heads is relatively low in the delivery state in order to avoid damage during transport. For good playa‐bility and better trigger behaviour, adjust the skin tension to your playing habits.
Protecting the environment
Disposal of the packaging material
For the transport and protective packaging, environmentally friendly materials have been chosen that can be supplied to normal recycling.
Ensure that plastic bags, packaging, etc. are properly disposed of.
Do not just dispose of these materials with your normal household waste, but make sure that they are collected for recycling. Please follow the notes and markings on the packaging.
Disposal of your old device
This product is subject to the European Waste Electrical and Electronic Equipment Directive (WEEE) in its currently valid version. Do not dispose with your normal household waste.
Dispose of this device through an approved waste disposal firm or through your local waste facility. When discarding the device, comply with the rules and regulations that apply in your country. If in doubt, consult your local waste disposal facility.


