![]()
Quick Start Guide
iQ Brackets
iQ15-WB, iQ12-WB, iQ10-WB, iQ8-WB
Steel Wall Brackets for iQ Series Loudspeakers
LEGAL DISCLAIMER
MUSIC Tribe accepts no liability for any loss which may be suffered by any person who relies either wholly on or in part upon any description, photograph, or statement contained herein. Technical specifications, appearances, and other information are subject to change without notice. All trademarks are the property of their respective owners. MIDAS, KLARK TEKNIK, LAB GRUPPEN, LAKE, TANNOY, TURBOSOUND, TC ELECTRONIC, TC HELICON, BEHRINGER, BUGERA, and COOLAUDIO are trademarks or registered trademarks of MUSIC Tribe Global Brands Ltd. © MUSIC Tribe Global Brands Ltd. 2018 All rights reserved.
LIMITED WARRANTY
For the applicable warranty terms and conditions and additional information regarding MUSIC Tribe’s Limited Warranty, please see complete details online at music. be/warranty.
Thank you for choosing a TURBOSOUND loudspeaker product for your application. If you would like further information about this or any other TURBOSOUND product, please visit our website at turbosound.com.
Unpacking the Brackets
After unpacking the unit please check carefully for damage. If damage is found, please notify your supplier at once. You, the consignee, must instigate any claim. Please retain all packaging in case of future re-shipment.
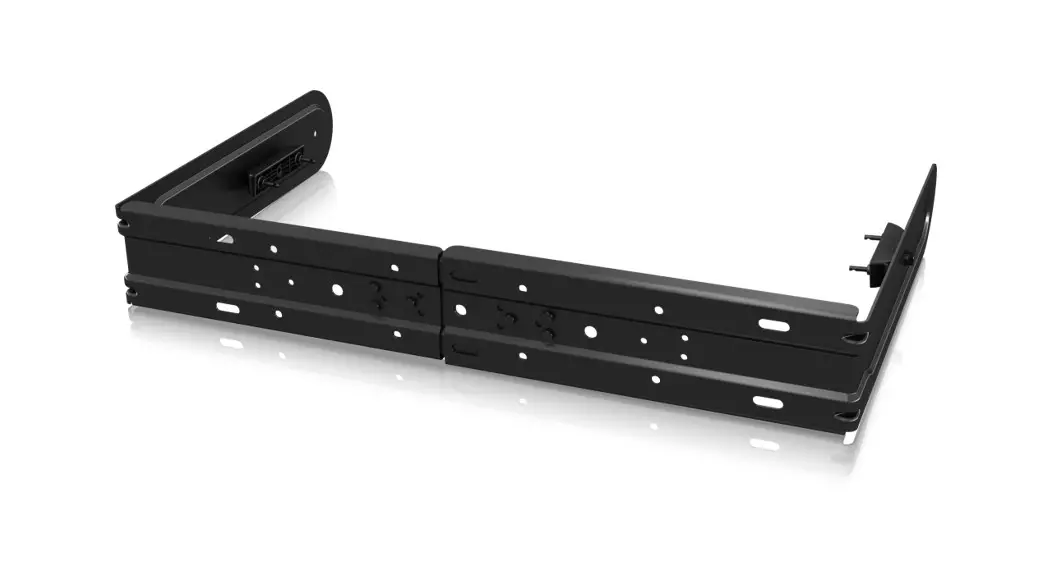
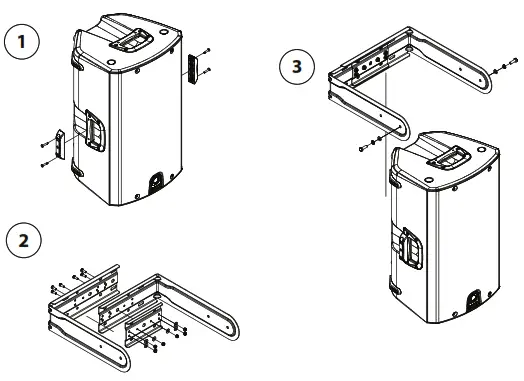
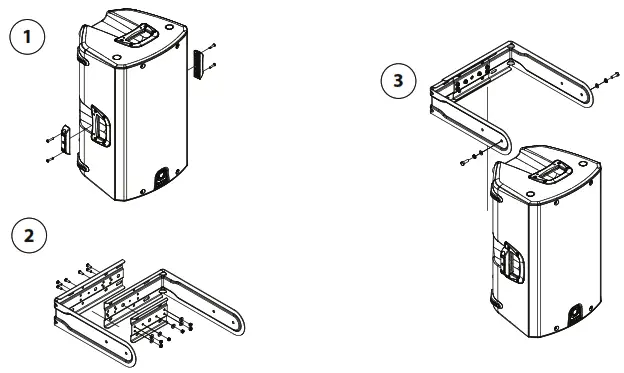
The graphics below show the assembly of the optional mounting brackets (iQ8-WB, iQ10-WB, iQ12-WB, and iQ15-WB). These mounting brackets are designed to mount one speaker each only. Do not secure any additional loads of any kind. These brackets are intended solely for use with iQ speakers when assembled in accordance with the following instructions:
iQ8-WB Yoke Mounting
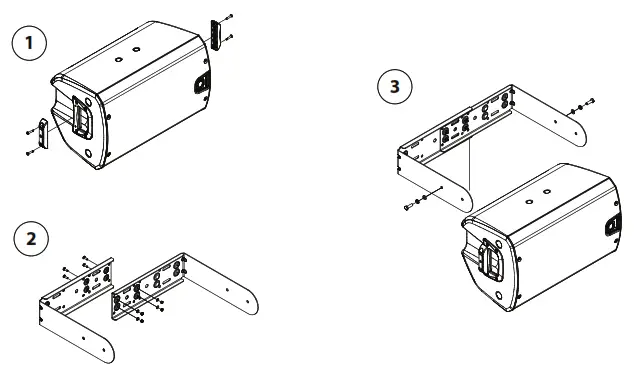
iQ8-WB YOKE HORIZONTAL MOUNTING
Step 1: Secure Yoke Spacers
| ITEM | DESCRIPTION | QUANTITY |
| 1 | Yoke spacer | 2 |
| 2 | M5 x 25 mm screw with nylon thread locking | 4 |
Step 2: Assemble Steel Yoke Bracket
| ITEM | DESCRIPTION | QUANTITY |
| 1 | Steel yoke bracket 1 | 1 |
| 2 | Steel yoke bracket 2 | 1 |
| 3 | M5 x 15 mm screw | 2 |
| 4 | M5 plain washer | 2 |
| 5 | M5 nylon locking nut | 2 |
iQ8-WB YOKE VERTICAL MOUNTING
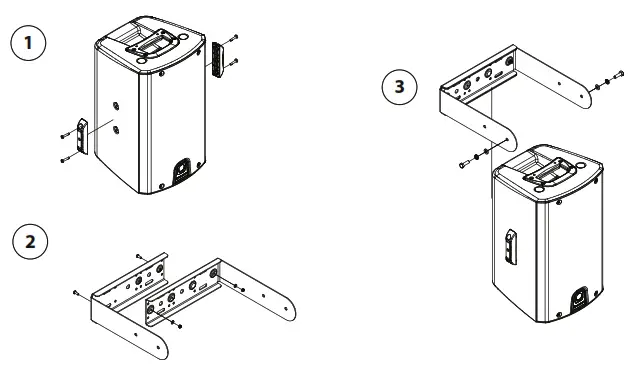
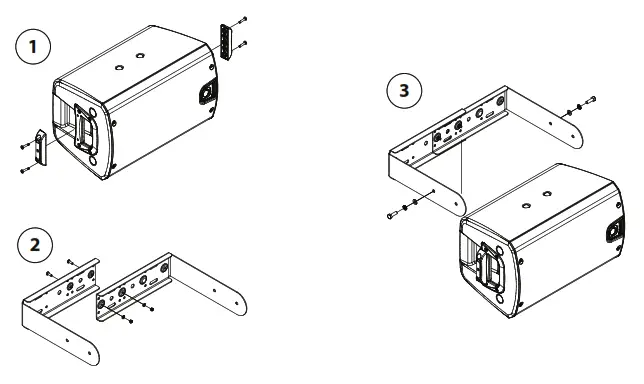
Step 3: Place Speaker Into Yoke Bracket
ITEM | DESCRIPTION | QUANTITY |
| 1 | Steel yoke bracket assembly | 1 |
| 2 | M8 x 25 mm screw | 2 |
| 3 | M8 plain washer | 2 |
| 4 | M8 spring lock washer | 2 |
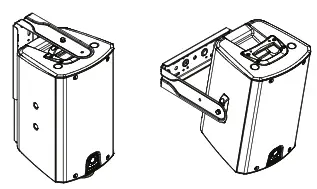
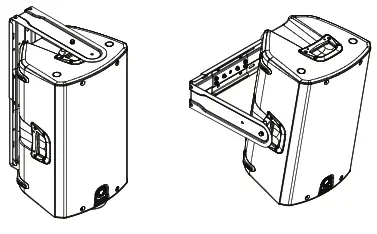
iQ8-WB Mounting Options
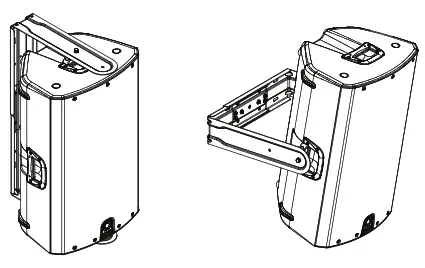
CEILING MOUNTED
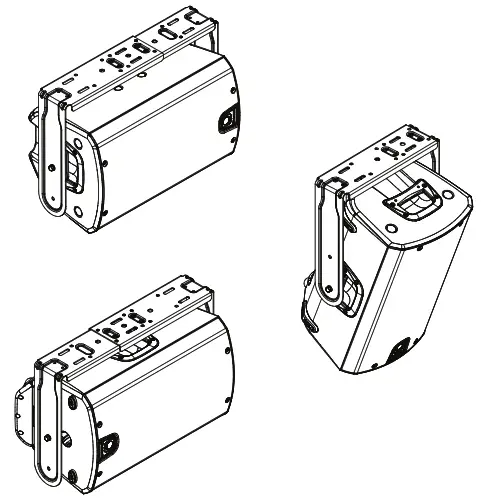
WALL-MOUNTED
iQ10-WB Yoke Mounting
iQ10-WB YOKE HORIZONTAL MOUNTING
 Step 1: Secure Yoke Spacers
| ITEM | DESCRIPTION | QUANTITY |
| 1 | Yoke spacer | 2 |
| 2 | M5 x 25 mm screw with nylon thread locking | 4 |
Step 2: Assemble Steel Yoke Bracket
ITEM | DESCRIPTION | QUANTITY |
| 1 | Steel yoke bracket 1 | 1 |
| 2 | Steel yoke bracket 2 | 1 |
| 3 | M5 x 15 mm screw | 4 |
| 4 | M5 plain washer | 4 |
| 5 | M5 nylon locking nut 3 | 4 |
iQ10-WB YOKE VERTICAL MOUNTING
Step 3: Place Speaker Into Yoke Bracket
| ITEM | DESCRIPTION | QUANTITY |
| 1 | Steel yoke bracket assembly | 1 |
| 2 | M8 x 25 mm screw | 2 |
| 3 | M8 plain washer | 2 |
| 4 | M8 spring lock washer | 2 |
iQ10-WB Mounting Options
CEILING MOUNTED
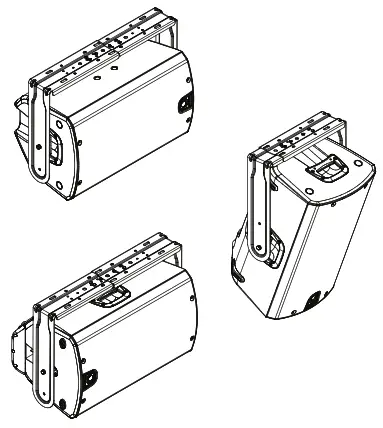 WALL-MOUNTED
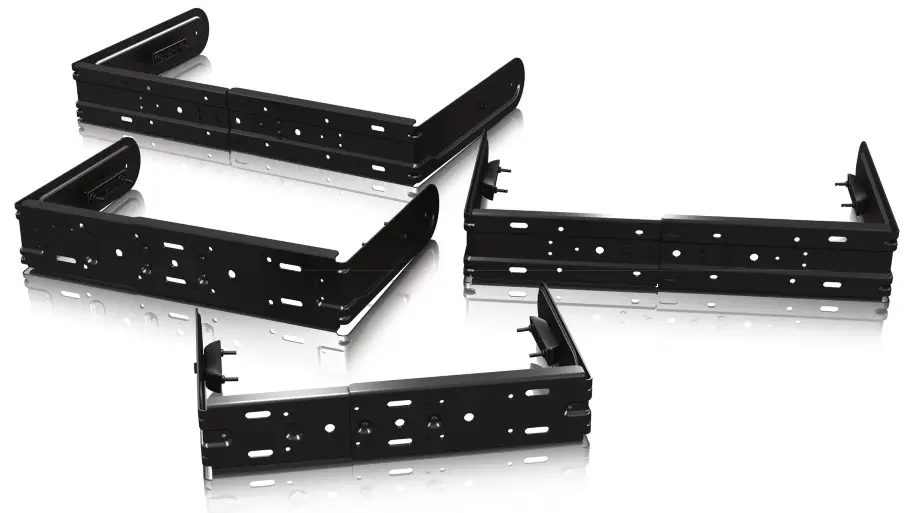
NOTE: For iQ8 and iQ10, the finished bracket requires only 2 pieces, while the iQ12 and iQ15 bracket requires 3 pieces.
iQ12-WB Yoke Mounting
iQ12-WB YOKE HORIZONTAL MOUNTING
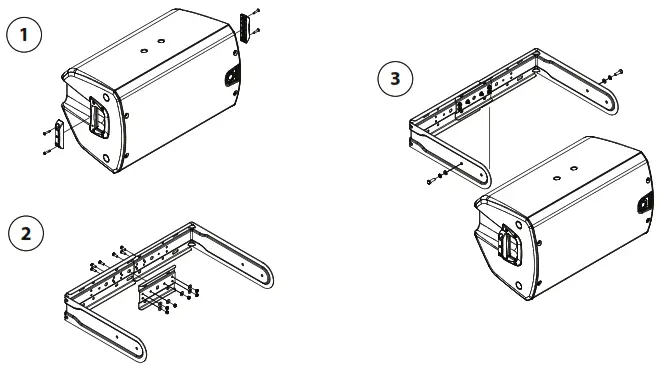 Step 1: Secure Yoke Spacers
ITEM | DESCRIPTION | QUANTITY |
| 1 | Yoke spacer | 2 |
| 2 | M5 x 25 mm screw with nylon locking | 4 |
Step 2: Assemble Steel Yoke Bracket
ITEM | DESCRIPTION | QUANTITY |
| 1 | Steel yoke bracket 1 | 1 |
| 2 | Steel yoke bracket 2 | 1 |
| 3 | Steel yoke bracket 3 | 1 |
| 4 | M6 plain washer | 6 |
| 5 | M6 x 16 mm screw | 6 |
| 6 | M6 nylon locking nut | 6 |
Step 3: Place Speaker Into Yoke Bracket
| ITEM | DESCRIPTION | QUANTITY |
| 1 | Steel yoke bracket assembly | 1 |
| 2 | M8 x 25 mm screw | 2 |
| 3 | M8 plain washer | 2 |
| 4 | M8 spring lock washer | 2 |
iQ12-WB Mounting Options
CEILING MOUNTED
WALL-MOUNTED
iQ15-WB Yoke Mounting
iQ15-WB YOKE HORIZONTAL MOUNTING
Step 1: Secure Yoke Spacers
ITEM | DESCRIPTION | QUANTITY |
| 1 | Yoke spacer | 2 |
| 2 | M5 x 25 mm screw with nylon thread locking | 4 |
Step 2: Assemble Steel Yoke Bracket
| ITEM | DESCRIPTION | QUANTITY |
| 1 | Steel yoke bracket 1 | 1 |
| 2 | Steel yoke bracket 2 | 1 |
| 3 | Steel yoke bracket 3 | 1 |
| 4 | M6 plain washer | 6 |
| 5 | M6 x 16 mm screw | 6 |
| 6 | M6 nylon locking nut | 6 |
iQ15-WB YOKE VERTICAL MOUNTING
| ITEM | DESCRIPTION | QUANTITY |
| 1 | Steel yoke bracket assembly | 1 |
| 2 | M8 x 25 mm screw | 2 |
| 3 | M8 plain washer | 2 |
| 4 | M8 spring lock washer | 2 |
iQ15-WB Mounting Options
CEILING MOUNTED
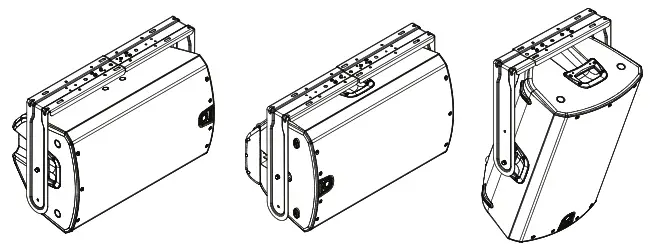 WALL-MOUNTED
IMPORTANT NOTE: The mounting of a permanently installed sound system may be dangerous unless undertaken by qualified personnel with the required experience and certification to perform the necessary tasks. Walls, floors, or ceilings must be capable of safely and securely supporting the actual load. The mounting accessory used must be safely and securely fixed both to the loudspeaker and to the wall, floor or ceiling.
When mounting rigging components on walls, floors, or ceilings, ensure that all fixings and fasteners used are of an appropriate size and load rating. Wall and ceiling claddings, and the construction and composition of walls and ceilings, all need to be taken into account when determining whether a particular fixing arrangement can be safely employed for a particular load. Cavity plugs or other specialist fixings, if required, must be of an appropriate type, and must be fitted and used in accordance with the maker’s instructions. When suspending the components a secondary safety method should be used in accordance with local laws and standards.
The operation of your speaker cabinet as part of a flown system, if installed incorrectly and improperly, can potentially expose persons to serious health risks and even death. In addition, please ensure that electrical, mechanical, and acoustic considerations are discussed with qualified and certified (by local state or national authorities) personnel prior to any installation or flying.
Make sure that speaker cabinets are set up and flown by qualified and certified personnel only, using dedicated equipment and original parts and components delivered with the unit. If any parts or components are missing please contact your Dealer before attempting to set up the system.
Be sure to observe the local, state, and other safety regulations applicable in your country. MUSIC Group, including the MUSIC Group companies listed on the enclosed “Service Information Sheet”, assumes no liability for any damage or personal injury resulting from improper use, installation, or operation of the product. Regular checks must be conducted by qualified personnel to ensure that the system remains in a secure and stable condition. Make sure that, where the speaker is flown, the area underneath the speaker is free of human traffic c. Do not fly the speaker in areas that can be entered or used by members of the public.
Speakers create a magnetic field, even if not in operation. Therefore, please keep all materials that can be affected by such fields (discs, computers, monitors, etc) at a safe distance. A safe distance is usually between 1 and 2 meters.
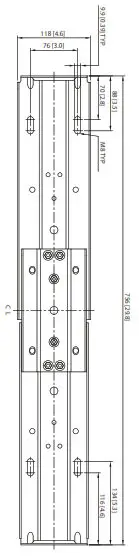
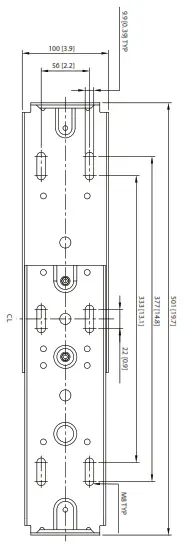
iQ10-WB Drilling Plan
iQ10-WB VERTICAL MOUNTING
| iQ8-WB Drilling Plan iQ8-WB VERTICAL MOUNTING 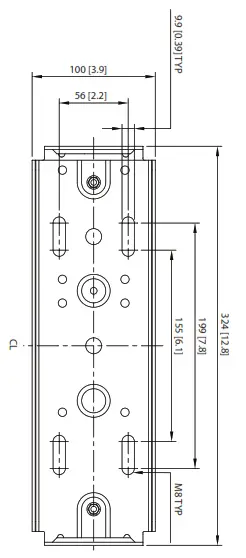 | iQ8-WB HORIZONTAL MOUNTING
|
| iQ10-WB Drilling Plan iQ10-WB VERTICAL MOUNTING 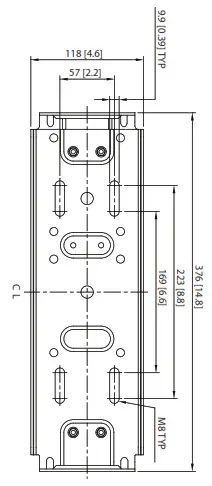 | iQ10-WB HORIZONTAL MOUNTING
|
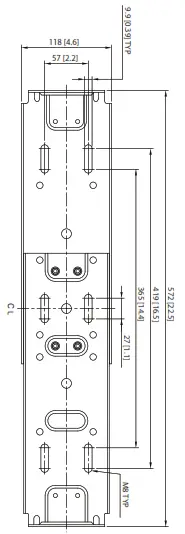
| iQ12-WB Drilling Plan iQ12-WB VERTICAL MOUNTING 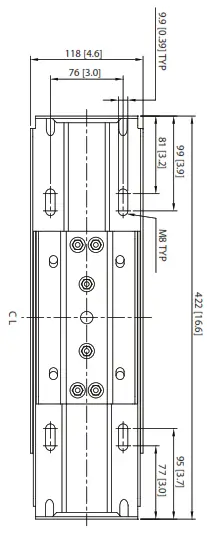 | iQ12-WB HORIZONTAL MOUNTING
|
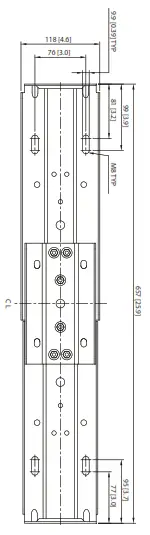
| iQ15-WB Drilling Plan iQ15-WB VERTICAL MOUNTING 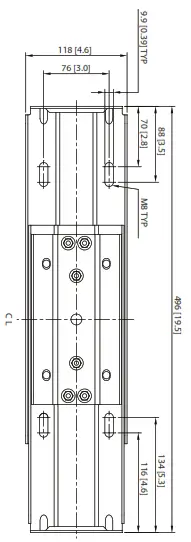 | iQ15-WB HORIZONTAL MOUNTING
|