![]()
 Complete Manual for the
EasyUSB Mixer/Amp
Audio Mixer and Amplifier
Document 411-0036-30 Rev A
February 2019
Overview
This manual covers:
EasyUSB Mixer/Amp Audio Mixer and Amplifier:
- 999-8530-000 (North America)
- 999-8530-001 (Europe/UK)
- 999-8530-009 (Australia/New Zealand)
About this Manual
Information in this manual includes:
- Physical features
- Installation
- Operation
- Updating firmware
- Troubleshooting
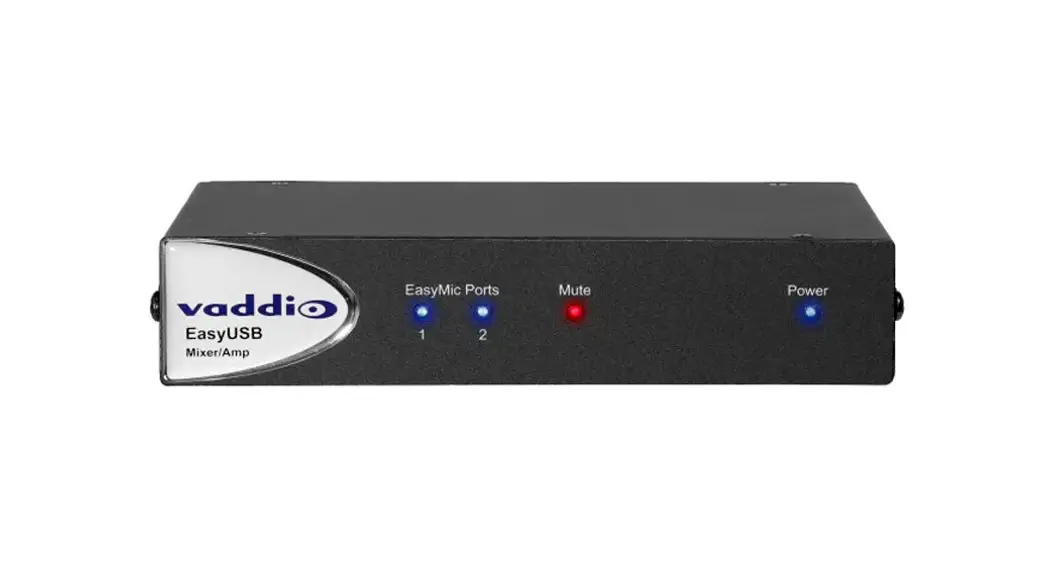
Features
- Master audio device for simple USB conferencing with one microphone or two
- Uses standard UAC audio drivers – computers automatically recognize the EasyUSB Mixer/Amp as a USB audio device
- Integrated audio mixer emulates a single microphone and speaker to the PC
- HD audio with acoustic echo cancellation (AEC)
- Line level audio inputs and outputs for connection to other AV equipment such as videoconferencing codecs
- Professional performance without the complexity of most pro AV equipment
Product Compatibility
The EasyUSB Mixer/Amp maintains compatibility with Vaddio’s EasyMic products, including the new CeilingMIC and TableMIC products. It is not compatible with EasyIP products.
Installation
This section covers:
- Tips for a successful audio installation
- Cabling notes
- Connection diagrams
Preparing for a Successful Audio Installation
Tips for avoiding common audio problems:
- Place microphones closer to the people talking than to the room’s speakers. This helps maintain quality echo cancellation.
- To prevent audio feedback, install microphones at least 4 ft. (1.2 m) from speakers. More separation is better.
Don’t Void Your Warranty!
Caution
This product is for indoor use. Do not install it outdoors or in a humid environment without the appropriate protective enclosure. Do not allow it to come into contact with any liquid.
Do not install or operate this product if it has been dropped, damaged, or exposed to liquids. If any of these things happen, return it to Vaddio for safety and functional testing.
Cabling Notes
Caution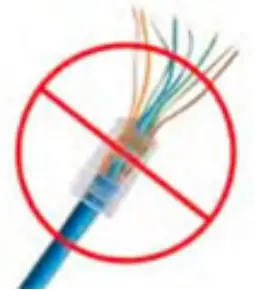 Do not use pass-through RJ-45 connectors when making cables for this product. Poorly crimped connectors of this type can cause intermittent connections and degraded signal quality. They can also damage the connectors on the product, which will void your warranty.
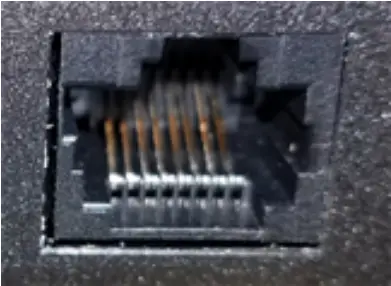 Intact – will make reliable contact with cable connector Intact – will make reliable contact with cable connector | 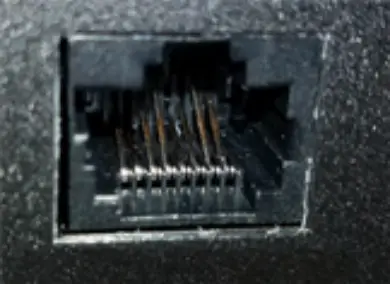 Damaged – Bent contact fingers will NOT make reliable contact Damaged – Bent contact fingers will NOT make reliable contactwith cable connector |
When making cables for this product, use Cat-5e or better cable. We recommend using high-quality connectors and a high-quality crimping tool.

We recommend shielded cabling if the cables will be coiled, run tightly with other cables, or routed near sources of electromagnetic interference such as power lines or fluorescent light fixtures.
Caution
Check your cables. Connecting a cable to the wrong port or using the wrong pin-out can result in equipment damage and will void the warranty.
Pro Tip
Label all cables at both ends.
RS-232 Serial Communication Settings
The RS-232 serial port connects to a third-party device for external control.
| Parameter | Value |
| Communication Speed | 38400 bps when DIP switch 1 is down, 9600 bps when it is up |
| Number of start bits | 1 |
| Number of stop bits | 1 |
| Number of data bits | 8 |
| Parity | None |
| Flow control | None |
RS-232 Connector Pin-Out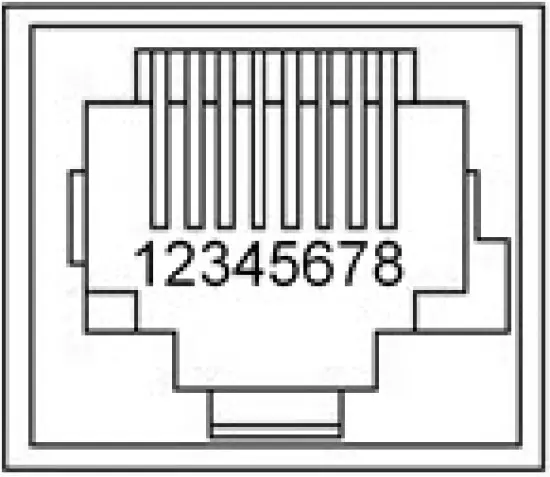
Connector pin-out:
- Pin 1: Not used
- Pin 2: Not used
- Pin 3: Not used
- Pin 4: Not used
- Pin 5: Not used
- Pin 6: GND
- Pin 7: RXD (from TXD of control source)
- Pin 8: TXD (to RXD of control source)
Caution
Check your cables. Connecting a cable to the wrong port or using the wrong pin-out can result in equipment damage and will void the warranty.
Basic Connections
Connection Notes
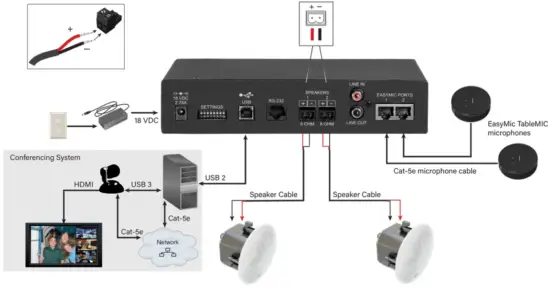
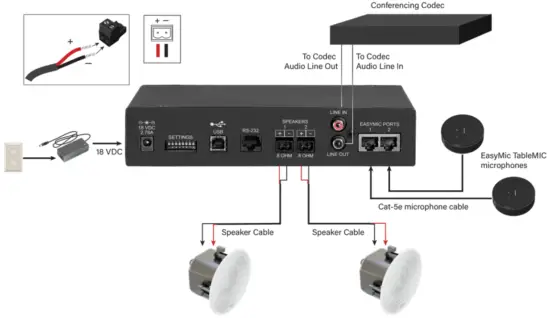
The connection diagrams in this section show EasyMic Table MicPOD microphones. Other Vaddio microphones from the EasyMic product family could be used.
When using an external third-party device controls the room audio, set DIP switch 1 down before connecting power. This selects DTE mode, and sets the RS-232 baud rate to 38400.
This diagram shows a conference room setup in which the EasyUSB Mixer/Amp connects the room audio to a PC for USB conferencing applications.
 This diagram shows an installation for recording or streaming near-end and far-end audio using a Vaddio AV Bridge.
 This diagram shows an installation in which the EasyUSB Mixer/Amp connects speakers and Vaddio microphones to a third-party video conferencing codec.
 Switch Settings
 Switch Settings
The eight-position DIP switch on the rear of the EasyUSB Mixer/Amp provides settings to customize the device for the way you plan to use it. All switches are down for the default configuration, which is recommended for conferencing using a computer-based application.
Disconnect power before changing the positions of the switches. For some settings, the EasyUSB
Mixer/Amp remains in the mode that was in effect at power-up, and does not respond to a change in the switch setting until you turn it off and back on again.
Switch | Settings |
Switch 1 | Down (default): DTE Mode, 38400 baud. For direct connection to a DTE device such as a PC’s RS-232 port or external controller device. Up: For direct connection to a DCE device such as a camera. |
Switch 2 | Down (default): Treats the connected PC as the conferencing device. Up: Bridges the audio between the USB and an external videoconferencing unit connected to the line input and output. |
Switch 3 | Down (default): The line output provides only far-end audio. Up: For recording local and far-end audio. Sends the audio mix for the local EasyMic devices and the USB audio from the far-end out the line output. |
Switch 4 | Down (default): Speaker EQ filter enabled. Makes voices clearer and more intelligible. Up: Disables the filter. |
Switch 5 | Down (default): Adjusts for the dynamic range in conference participants’ voices at the far end, to provide a more consistent speaker output level. Up: Volume is not adjusted to compensate for forceful or quiet participants. |
Switch 6 | Down (default): No delay. Up: Delay speaker output by 25 msec. Use this setting if the video lags behind the audio noticeably. |
Switch 7 | Down (default): Enables Acoustic Echo Cancellation on connected EasyMic microphones. Up: Disables Acoustic Echo Cancellation on connected EasyMic microphones. For non-conferencing applications only. |
Switch 8 | Down (default): Normal operation. Up: Firmware update mode. With this switch up, use Vaddio Loader to update the firmware. Normal operation is disabled in firmware update mode. |
Mixing Modes
The EasyUSB Mixer/Amp supports three audio mixing modes for common conferencing applications in which the product may be used. Each mixing mode automatically configures the internal matrix mixer appropriately. All mixing modes support PC-based audio conferencing.
USB Conference (Default Mode) – all DIP switches down
For use with a computer running a soft conferencing application. Sums the Line Input with the EasyMic audio and sends it to the USB Transmit. The USB Receive is sent to the amplifier output, Line Output, and AEC Reference. In this mode, the computer treats the EasyUSB Mixer/Amp as a device for both USB playback and USB record.
Video Conferencing Bridge Mode – Switch 2 up
For interfacing the EasyUSB Mixer/Amp to a traditional videoconferencing endpoint. In this mode, the internal matrix mixer creates the appropriate routes required to bridge the USB audio and traditional VC endpoint audio signals for proper conferencing operations. This allows both the far end (PC & VC) to hear the local microphone audio. In addition, the local participants will hear the audio originating from the PC and VC far end.
Recording Mixing Mode – Switch 3 up
Sends local and far-end audio to an external recording or streaming device. The recording mixing mode creates an audio mix of the USB far-end audio and the local EasyMic audio signals. This record mix is sent out the Line Out connection.
RS-232 Serial Command API
The EasyUSB Mixer/Amp serial command API uses hex strings similar to those used by Vaddio cameras. “Get” commands (inquiries) return a response string. The format of a “get” response is a 4-digit response code, a space, and a two-digit hex value. Most “Set” commands return the response 4100 (OK), usually followed by a two-digit code indicating the action requested in the command.
For RS-232 communication settings and connector pin-out, see RS-232 Serial Communication.
The following commands and inquiries are available for the EasyUSB Mixer/Amp.
Function | Command | Expected Response |
| Get microphone mute status | 5101 | 4101 00 (not muted) 4101 01 (muted) |
| Get microphone volume (range is 0 to 29, in steps of 1 dB) | 5103 | 4103 vv (vv = volume value, 00 to 1D) |
| Get speaker volume (range is 0 to 58, in steps of 0.5 dB) | 5102 | 4102 vv (vv = volume value, 00 to 3A) |
| Unmute microphones | 6101 00 | 4100 00 |
| Mute microphones | 6101 01 | 4100 01 |
| Decrease microphone volume | 6103 00 | 4100 00 |
| Increase microphone volume | 6103 01 | 4100 01 |
| Decrease speaker volume | 6102 00 | 4100 00 |
| Increase speaker volume | 6102 01 | 4100 01 |
| Disable serial command echo | 6121 00 | (none) |
| Enable serial command echo | 6121 01 | 4100 01 |
Updating Firmware
You will need:
- USB to Serial Adapter
- RS-232 Control Adapter (DB9 to RJ-45)
- Latest firmware from the EasyUSB Mixer/Amp product page on legrandav.com
- Latest version of the Vaddio Loader from the Vaddio tools page at https://www.legrandav.com/tools_and_training/tools/vaddio_tools
Connect to a computer:
- Disconnect power to the EasyUSB Mixer/Amp.
- Connect the EasyUSB Mixer/Amp to a PC as follows:
 Cat-5 cable from the EasyUSB Mixer/Amp’s RS-232 port to the EZ Camera RS-232 Control Adapter EZ Camera RS-232 Control Adapter to the PC’s serial port, if it has one
OR USB to 9-pin adapter cable from the EZ Camera RS-232 Control Adapter to the PC (shown) (The cable colors in this diagram do not represent anything. Your cables may be whatever colors you choose.)
 - Connect power to the EasyUSB Mixer/Amp.
 (The cable colors in this diagram do not represent anything. Your cables may be whatever colors you choose.)
Check communication using Vaddio Loader:
Note
Some of the information displayed in the Vaddio Loader will be different from what is shown in the screen shots below.
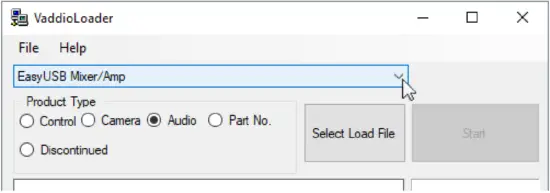
- On the computer, launch Vaddio Loader.
- Specify the COM port connected to the EasyUSB Mixer/Amp, if prompted to do so.
- Under Product Type, select Audio. This populates the product list in the box above the Product Type selection.
- From the product list, select EasyUSB Mixer/Amp.

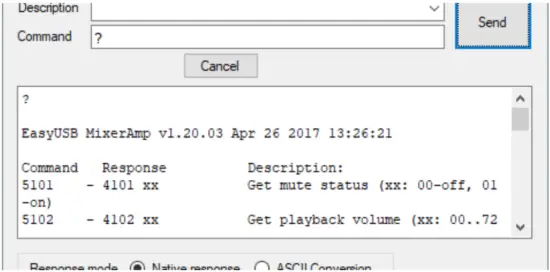
- From the File menu, select Serial Commands. A new window opens.

- In the Command box, enter a question mark and select Send. The EasyUSB Mixer/Amp returns its current firmware version and a list of valid commands. This tells you that the device is connected correctly and that you have selected the correct COM port. If your query times out, returns no response, or returns a different response than expected, contact Vaddio Technical Support to troubleshoot before proceeding.

- Close the Send Serial Commands window to return to the main Vaddio Loader window.

Put the EasyUSB Mixer/Amp in firmware update mode:
- Disconnect power from the EasyUSB Mixer/Amp
- Set DIP Switch 8 to the UP position (firmware update mode).
- Reconnect power and wait for the unit to finish its power-up sequence. The EasyUSB Mixer/Amp is now ready to update.
Install the update:
- From the product drop-down menu of Vaddio Loader, select EasyUSB Mixer/Amp.
- Choose ‘Select Load File’ and browse to the firmware you downloaded.
- Select Start. The squares in the bottom right corner flash and the progress bar on the bottom starts to fill in. The update takes a few minutes.
Caution
Do not disconnect any cables until Vaddio Loader indicates a successful firmware load.
When the Vaddio Loader displays the message “Firmware Load and Install Successful”, the update is complete.
Return the equipment to its normal operating state:
- When all updates are complete, disconnect power from the EasyUSB Mixer/Amp.
- Set DIP Switch 8 to the DOWN position (normal operation).
- Disconnect the EasyUSB Mixer/Amp from the computer, and reconnect all equipment in its usual configuration.
Troubleshooting
What is it doing? | Possible causes | Check and correct |
| Nothing. No audio, power light does not illuminate, connected devices do not recognize the microphone(s). | Power is not connected. | Connect the power supply. |
| The power outlet is not supplying power. | Check to see whether the outlet powers other devices, such as a phone charger. | |
| The power supply is bad. | Call Vaddio technical support. | |
| Connected devices do not recognize one or both of the microphones. | The cable from the microphone or the microphone interface box is not connected, or is bad. | Verify that the cable is connected to the device. Check the cable for correct pin-out and continuity. |
Use, Storage, and Care
Keep this device away from food and liquids. Do not attempt to take this product apart. There are no user-serviceable components inside. Do not operate or store the device under any of the following conditions:
- Temperatures above 104° F (40° C) or below 32° F (0°C)
- High humidity, condensing or wet environments
- Inclement weather
- Severe vibration
- On the surface of Mars
- Dry environments with an excess of static discharge
Vaddio is a brand of
Legrand AV Inc.
www.legrandav.com
Phone 800.572.2011 / +1.763.971.4400
Fax +1.763.971.4464
Email [email protected]
Vaddio is a registered trademark of Legrand AV Inc. All other brand names or marks are used for identification purposes and are trademarks of their respective owners. All patents are protected under existing designations. Other patents pending.
©2021 Legrand AV Inc.
![]()


