
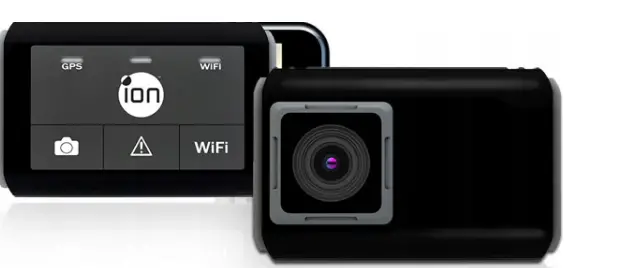
 ion AM-1041 Wi-Fi DashCam
 Key Features
- 125o Wide Angle Lens.
- Automatic Event Video Recording for sudden external impact.
- Continuous loop recording for unexpected incidents.
- Geo-information captured in photo or video files with the built-in GPS sensor. High-quality video recording up to 1296p high-quality videos.
- Photo capture during recording.
- Voice Prompt.
- Wi-Fi Function.
Package Contents
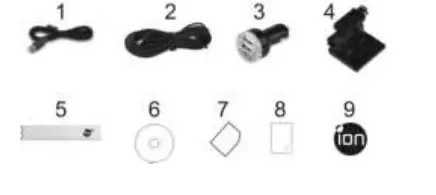
| 1 | USB Cable | 2 | 5M Power Cable |
| 3 | USB Car Adapter | 4 | Windshield Mount |
| 5 | Sensormatic Tag | 6 | DashCam Wi-Fi Software CD |
| 7 | Warranty Card | 8 | QSG |
| 9 | iON label |
Functional Parts
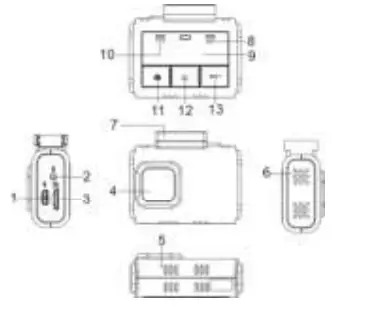
| 1 | Micro USB Port | Connect to PC for file browsing and file transfer |
| 2 | DC in Port | Connect to the provided DC in to USB cable for charging |
| 3 | MicroSD Slot | MicroSD card storage location |
| 4 | Wide Angle Lens | Capture a wide angle view |
| 5 | Reset Button | Reset DashCam Wi-Fi |
| 6 | Speaker Vent | Output the sound |
| 7 | Mounting Socket | Install the windshield mount. You can detach the socket on the top of the DashCam Wi-Fi to mount the DashCam Wi-Fi on the other optional mounting accessories |
| 8 | Wi-Fi LED Indicator | Wi-Fi status indication |
| 9 | Status LED Indicator | Operation status indication |
| 10 | GPS LED Indicator | GPS status indication |
| 11 | CAMERA | Capture a photo during recording |
| 12 | WARNING | Manually trigger an Event Protection Video Recording |
| 13 | Wi-Fi Button | Turn on/off Wi-Fi function |
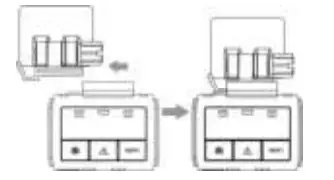
Installing the Windshield Mount & DashCamWi-Fi in a Vehicle
- Clean the area on the windshield.
- Peel off the protective membrane of the 3M adhesive and stick the Windshield Mount to the front windshield inside the car.
- Slip the socket on the top of the DashCam Wi-Fi into Windshield Mount until it is latched.

- The lens of DashCam Wi-Fi should be at the center of the front windshield and be aware not to block thedriver’s visibility.
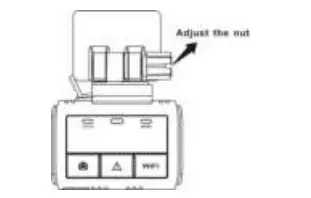
- Adjust the nut on the Windshield Mount for suitable direction and orientation.

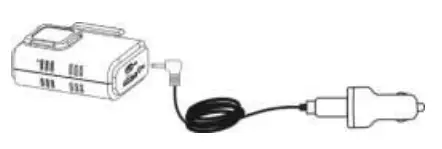
- Connect the DashCam Wi-Fi to the DC Power jack with included DC in to USB cable and the Dual USB CLA. Secure the cable with the cable holder to avoid interference of the driver’s motion.


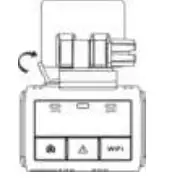
- Press the Windshield Mount side to release and slide the DashCam Wi-Fi off the mount.


LED Indication
| “RED” Status LED ON | DashCam Wi-Fi is under Normal Looping Recording. |
| “RED” Status LED Flashes continuously | Counting down to shut down due to power source being removed. |
| “PURPLE” Status LED ON | DashCam Wi-Fi is under Event Protection Recording. |
| “BLUE“ Status LED ON | DashCam Wi-Fi is connecting to PC through USB cable. |
| Blue & Red status LED alternating flash | 1. No memory card is installed 2. Memory card is less than 8GB 3. Card error |
| “ORANGE” GPS LED ON | GPS signal is received. |
| “ORANGE” GPS LED Flashes | No GPS signal or GPS signal is weak. |
| “GREEN” Wi-Fi LED ON | Wi-Fi is initializing. |
| “GREEN” Wi-Fi LED Flashes slowly | Wi-Fi is ready for connection or enabled. |
| “GREEN” Wi-Fi LED Flashes rapidly | Data is transferring in Wi-Fi mode. |
Using Your DashCam Wi-Fi
Inserting a MicroSD Memory Card (required but not included)
Insert a MicroSD card (not included) to the slot before using the DashCam Wi-Fi. Assure that the DashCam Wi-Fi power is turned OFF before inserting the card. A min 8GB, Class 6 or above card is recommended. 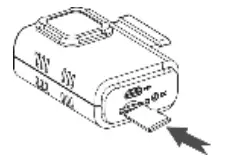
Notes
- The correct direction should be followed to insert the MicroSD card into the slot.
- A new MicroSD card should be formatted before using. You can format the MicroSD card through the DashCam Wi-Fi software.
Turning on/off DashCam Wi-Fi
The DashCam Wi-Fi will detect car ignition vibration and automatically turn on and start Normal Looping Recording. .
Video Recording and Photo Taking
- Normal Looping Recording
The DashCam Wi-Fi will start Normal Looping Recording once turned on. The Red status LED lights up during Normal Looping recording. Video recording is repeatedly creating successive files of 3 min, 5 min or 10 min. The most outdated file will be replaced if the memory is full for continuous recording. - Event Protection Recording Files will be protected from the auto deletion if an impact is detected. The sensitivity of impact detection can be adjusted through the DashCam Wi-Fi software. By pressing during normal recording can also enter the Event Protection Recording mode to protect your video files. The Purple status LED lights up during Event Protection recording. You can store up to 30 Event protection videos to the DashCam Wi-Fi. Each Protected video file length will be 20 sec.
Photo Taking
Press once during recording to take a photo. The Status LED will flash each time a photo is taken. You can store up to 500 photos to the DashCam Wi-Fi.
Please note:
During recording, please do not release MicroSD card from the card slot as this may damage video or photo files.
Connecting the DashCam Wi-Fi via Wi-Fi
Enabling the Wi-Fi Function
- Connect the DashCam Wi-Fi to an external power supply with the included DC in to USB cable. The Wi-Fi mode will turn on automatically.
- The Green Wi-Fi LED indicates the Wi-Fi is warming up.
- Wait for Wi-Fi to initialize. The Wi-Fi LED will flash when the Wi-Fi is active or connected.
- To turn off Wi-Fi, press and hold or disconnect DashCam Wi-Fi from the external power supply.
Connecting the DashCam Wi-Fi to your Computer or Smart Device using Wi-Fi
- Turn on the Wi-Fi mode on DashCam Wi-Fi.
- Go to network settings on your computer or Smart Device to enable the Wi-Fi setting. Search for the “DashCam Wi-Fi” network.
- Enter password “12 3456789” to connect to the DashCam Wi-Fi.
Using the Free App
- Search for iON DashCam app via the Google Play Store or App Store.
- Download and install the app to your smart device.
- Connect the DashCam Wi-Fi to your Smart Device by following the steps in section 7.2.
- Open your iON DashCam app. You may conduct relevant operations in accordance with specific Application interface.
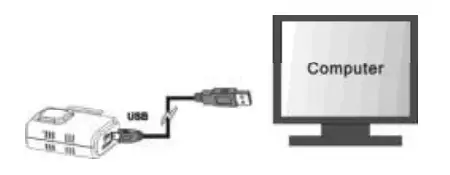
Connecting the DashCam Wi-Fi to a Computer
You may also connect the DashCam Wi-Fi to your computer and view videos and pictures on the computer monitor.
- Connect the DashCam Wi-Fi to your computer with a USB cable to enter into USB mode.
- Your computer will recognize the DashCam Wi-Fi as a “Removable Disk”. The Blue Status LED will light up. Open the disk and go to relevant file folder to view, import, copy, transfer or delete the videos or photos.

Note
If the Removable Device Window did not launch automatically, go to your “My Computer” and find the device under Removable Disk.
Specifications
| Lens | 125 o Wide Angle Lens |
| Still Image Resolution on Recording | 3MP on 1296p 2MP on 1080p 1MP on 720p |
| Video Resolution | 1296P: 2304×1296 P30 1080P: 1920×1080 P30 720P: 1280×720 P30 |
| Video Format | MPEG4 (H.264) .MOV File |
| Photo Format | JPG |
| GPS Sensor | Yes |
| G Sensor | Yes |
| Wi-Fi | Yes |
| USB Port | Micro USB |
| Power | DC in |
| Microphone | Yes |
| Speaker | Yes |
| Language | English |
| Voice Language | English, Mandarin |
| Battery | 185mAh |
| Operation Temperature | -20 to 60 degree |
| Storage Temperature | -40 to 80 degree |
| Dimension (L x H x W) | 63X51X25 mm |
| Weight | 67g+/-2g |
Computer System Minimum Requirements
| Operating System | Windows 7&8 / Vista / XP and Mac OS 10.5 or above |
| CPU | Pentium Ⅲ or above4 / 3.0G or faster recommended |
| RAM | At least 256MB |
| Interface | USB port |
| CD | 4x speed CD ROM or above |
Troubleshooting
| Problem | Cause | Solution |
| Cannot turn on the DashCam Wi-Fi | Low battery power | Connect the DashCam Wi-Fi to a power source by DC or USB cable |
| Cannot find removable disk after connecting the DashCam Wi-Fi to the computer | Connection failure | 1. Make sure all cable connections are secured 2. Restart the computer if necessary |
|
Blurry images | 1. The DashCam Wi-Fi has not been installed steadily 2. The lens of DashCam Wi-Fi is dirty | 1. Reinstall the DashCam Wi-Fi 2. Clean the lens with soft and dry cloth |
FCC Statement
Warning: Changes or modifications to this unit not expressly approved by the party responsible for compliance could void the user’s authority to operate the equipment.
NOTE: This equipment has been tested and found to comply with the limits for a Class B digital device, pursuant to Part 15 of the FCC Rules. These limits are designed to provide reasonable protection against harmful interference in a residential installation. This equipment generates, uses and can radiate radio frequency energy and, if not installed and used in accordance with the instructions, may cause harmful interference to radio communications. However, there is no guarantee that interference will not occur in a particular installation. If this equipment does cause harmful interference to radio or television reception, which can be determined by turning the equipment off and on, the user is encouraged to try to correct the interference by one or more of the following measures:
- Reorient or relocate the receiving antenna.
- Increase the separation between the equipment and receiver.
- Connect the equipment into an outlet on a circuit different from that to which the receiver is connected.
- Consult the dealer or an experienced radio/ TV technician for help.
This device complies with Part 15 of the FCC Rules. Operation is subject to the two conditions:
- This device may not cause harmful interference, and
- This device must accept any interference received, including interference that may cause undesired operation.
Shielded cables must be used with this unit to ensure compliance with the Class B FCC limits.
Questions?
Need Some Help?
This manual should help you understand your new product. If you still have questions, visit our website: www.ioncamera.com
Like Us: www.facebook.com/ioncamera
Tweet Us: www.twitter.com/ioncamera


