![]()
AW920H Tri-Mode Wireless Gaming Headset
User Guide
Alienware Tri-Mode Wireless Gaming Headset AW920H
Regulatory Model: AW920H/ UD2202u
Notes, Cautions, and Warnings NOTE: A NOTE indicates important information that helps you make better use of your computer.
![]() CAUTION: A CAUTION indicates potential damage to hardware or loss of data if instructions are not followed.
CAUTION: A CAUTION indicates potential damage to hardware or loss of data if instructions are not followed.![]() WARNING: A WARNING indicates a potential for property damage, personal injury, or death.
WARNING: A WARNING indicates a potential for property damage, personal injury, or death.
Copyright © 2022 Dell Inc. or its subsidiaries. All rights reserved. Dell, EMC, and other trademarks are trademarks of Dell Inc. or its subsidiaries. Other trademarks may be trademarks of their respective owners. 2022 01
Rev. A00
What`s in the box

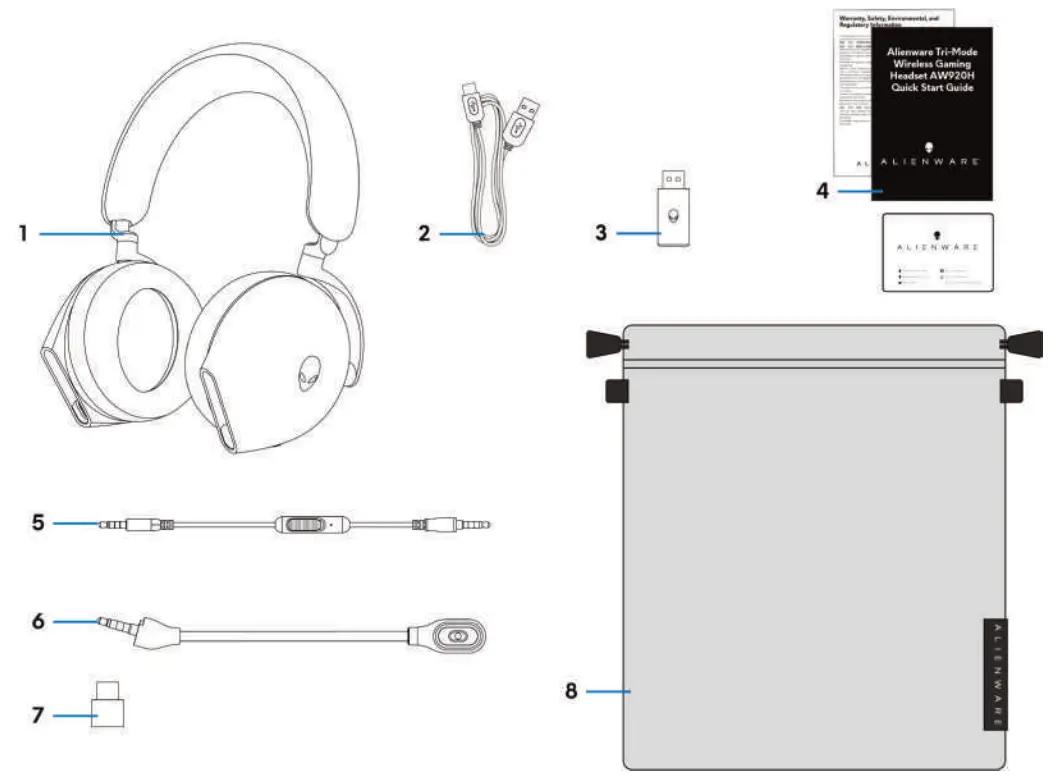
- Alienware Tri-Mode Wireless Gaming Headset AW920H
- USB-A to USB-C charging cable
- USB wireless dongle
- Documents
- 3.5 mm inline audio cable
- Detachable boom microphone
- USB-A to USB-C adaptor
- Soft carry pouch
![]() NOTE: The documents shipped with your headset may vary depending on the region.
NOTE: The documents shipped with your headset may vary depending on the region.![]() NOTE: Soft carry pouch is for protecting the headset and preventing dust.
NOTE: Soft carry pouch is for protecting the headset and preventing dust.
Features
Headset
- Indicator LED
- Power button
- Headset touch control area
- Inline audio cable/Boom microphone port
- USB-C Charging port
- ANC On/Off slider
- Microphone mute button
- 2.4G/BT/BT pairing switch slider
Accessories
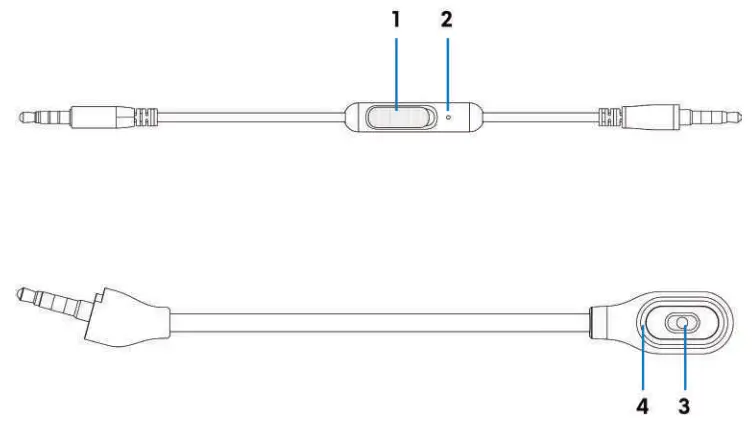
- Microphone mute slider
- Microphone
- Microphone
- Microphone mute LED
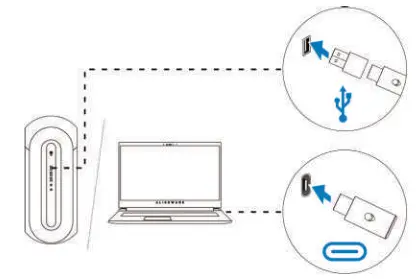
Charging the headset
To charge the headset, connect the USB-C end of the USB-A to the USB-C cable to the USB-C port on your headset. Connect the other end to the USB port on your computer.
![]() NOTE: The headset is safe to use while it is charging.
NOTE: The headset is safe to use while it is charging.![]() NOTE: For best results, ensure that the battery is fully charged when using it for the first time.
NOTE: For best results, ensure that the battery is fully charged when using it for the first time.![]() NOTE: To improve battery life, turn off the power switch when the headset is not used.
NOTE: To improve battery life, turn off the power switch when the headset is not used.
Battery life
The headset battery can last up to 30 hours of gaming/audio playback and 55 hours during Bluetooth mode (with the lights turned off and ANC off). The complete charging of the battery may take less than 2.5 hours. When the headset is not charging, the battery status light indicates the battery status. Battery status
| Fully charged Power LED and Alien head logo lights stay green. | |
| While charging Power LED: LED light changed between amber and green. Alienhead logo: Light changed between amber and green for 12 seconds, then go to the previous lighting effect. | |
| When battery is less than 20% Power LED: LED light slowly blinks in amber. Alienhead logo: Lightfast blinks in amber for 5 seconds, then go dark for 15 seconds. This cycle repeats until the battery is dead. |
Turning on/off your headset
Hold the power button on the right ear cup for two seconds to turn on/off the headset.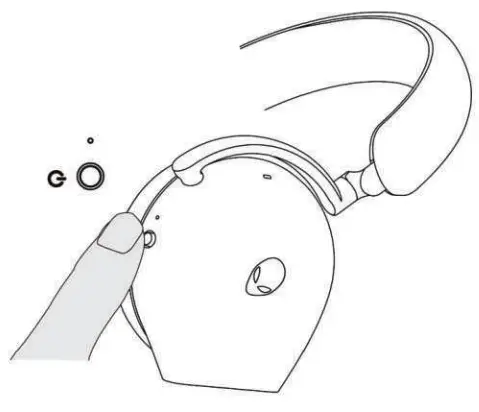 Auto power off
When the USB wireless dongle connection is lost or Bluetooth is connected but inactive (either the computer is turned off or the USB wireless dongle is removed from the USB port), the headset automatically turns off after 30 minutes. To turn the headset on, press the Power button.
Connecting the headset to your device
System requirements
- One USB port for USB wireless dongle
- One USB port for charging (optional)
- Microsoft Windows 10 or Microsoft Windows 11 64-bit/Mobile/PS4/XboxOne
Inserting the boom microphone
Insert the boom microphone firmly into the boom microphone port of the headset. (for connection by wireless dongle or Bluetooth)Connecting the headset to your device using the USB wireless dongle
- Plug the USB wireless dongle into the USB-A to USB-C adaptor, and then connect the adaptor to the USB port on your computer.

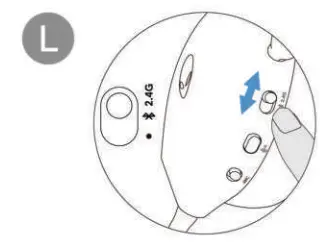
- Slide the pairing switch slider on the headset to 2.4GHz mode. The headset and the USB wireless dongle are pre-paired.

- The LED lights up white when connected.

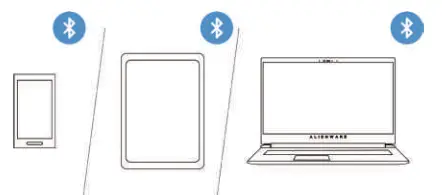
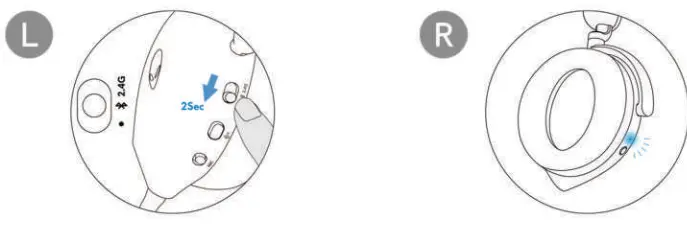
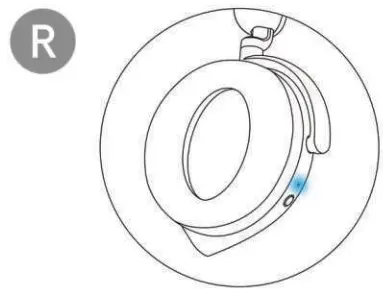
Connecting the headset to your device using Bluetooth
- Turn on the Bluetooth in your computer before connecting the headset using Bluetooth.

- Slide the pairing switch slider to the bottom for two seconds. You will see that the blue light blinks, which indicates pairing mode is on.

- Connect the headset to a computer, laptop, smartphone or tablet, and so on. The LED lights up blue when connected.

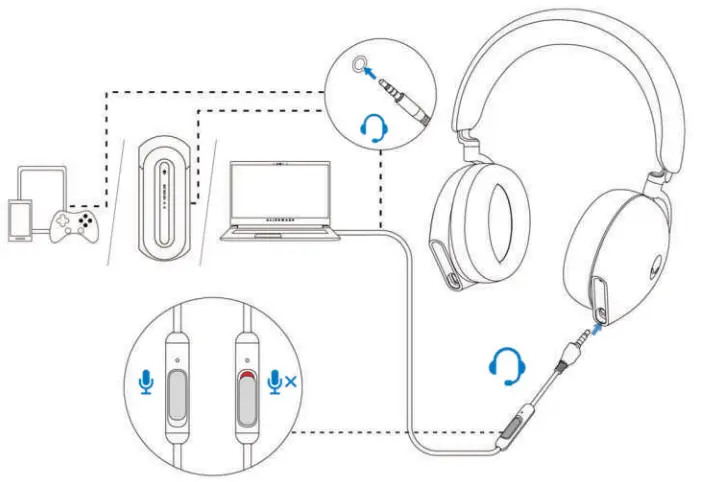
Connecting the headset to your device using the Inline audio cable
- Connect one end of the 3.5 mm inline audio cable to the boom microphone port on your headset, and connect the other end to the audio/headset port on your computer or mobile device.
- The headset speakers and the microphone on the cable continue to work even when the headset is turned off, as long as the headset is connected to a 3.5 mm inline audio cable. The buttons and LEDs stop functioning if the headset is turned off.
- While using the 3.5 mm inline audio cable, the audio source will be provided only by the Inline cable. The 2.4G mode and the Bluetooth mode still continue to work even after removing the audio cable.
- When using the 3.5 mm inline audio cable, the headset will compatible with any device with an audio jack port like mobile, XboxOne, and PS4.

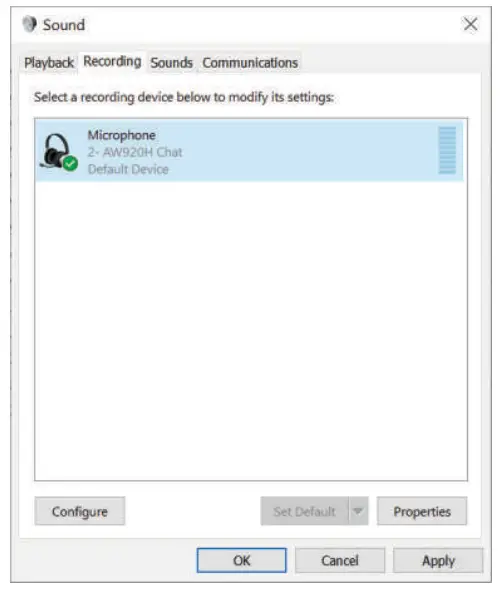
Configuring the headset on your computer
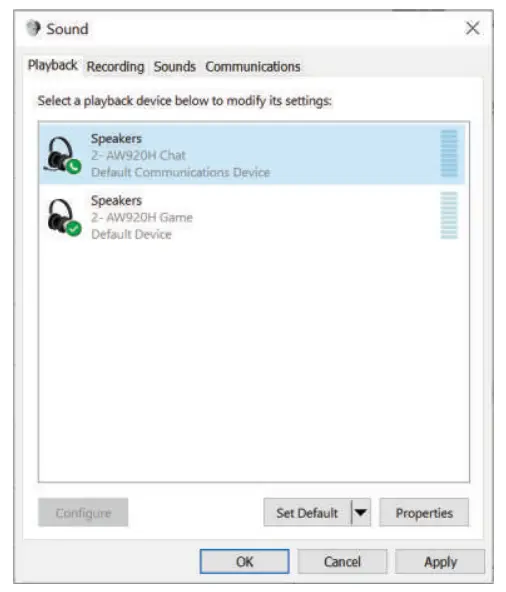
To use your headset for gaming or to listen to music from your computer, it has to be selected as the default playback device and the default recording device in Windows Audio Settings.
- On the taskbar, right-click the speaker icon and click Sounds. The Sounds dialog box appears.

- Click the Playback tab and set the following:
Set AW920H Game as the default playback device.
Set AW920H Chat as the default communication device.
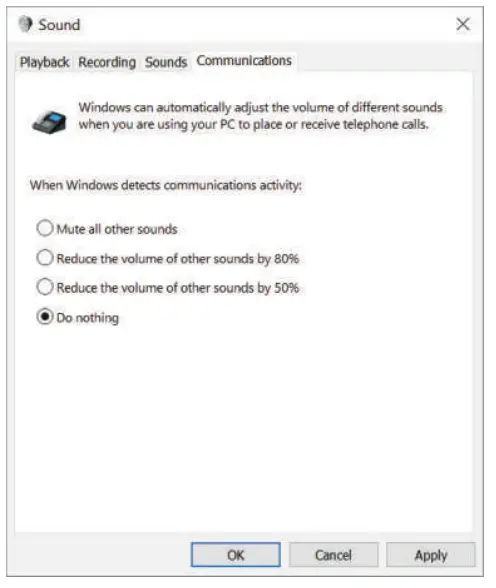
- Click the Recording tab, and set the Alienware AW920H Chat as the default device.

- Click the Communications tab, and select Do nothing. Click OK.


Alienware Command Center (AWCC)
Alienware Command Center (AWCC) provides a single interface to transform your Windows computer into an enhanced gaming environment. This application enables you to perform the following functions:![]() NOTE: You will experience limited functionality in AWCC when your device is connected by Bluetooth.
NOTE: You will experience limited functionality in AWCC when your device is connected by Bluetooth.
- In the FX menu, you can access the following features: View device connection type when it is connected through Bluetooth. View battery level and charging status. Change lighting color and animation in the Lighting tab.
- In the Settings tab, you can access the following settings: View the firmware version and upgrade the device firmware to the latest version under the Update tile. Reset the device settings to factory default.
![]() NOTE: For more information, please see the AWCC application Online Help.
NOTE: For more information, please see the AWCC application Online Help.
Installing AWCC
To use the AWCC features, uninstall Alienware Headset Center (AWHC) if you have already installed AWHC on your computer. You need to install AWCC to configure the features available in Alienware Tri-Mode Wireless Gaming Headset AW920H.
Before installing AWCC on your computer, ensure that your computer is connected to the internet. If your computer is preinstalled with AWCC 5.0 or later, you can configure your Alienware gaming headset through the FX available in AWCC. If your computer is not preinstalled with AWCC 5.0 or later, install AWCC through Windows Update or from the Dell Support website at https://www.dell.com/support. AWCC requires Windows 10 version 16299 or later and Windows 11.
Installing AWCC through Windows Update
- Connect your Alienware USB wireless dongle to your computer through the USB port. The AWCC application is downloaded and installed automatically.
- AWCC installation may take up to 10 minutes to complete.
- Go to the program folder to ensure that the AWCC installation is complete. Then launch AWCC. Perform the following steps to download additional software:
In the Settings window, click Windows Update. Click Check for updates to check the Alienware driver update progress. If the driver update is not responding on your computer, install AWCC from the Dell support website.
Installing AWCC from the Dell Support website
- Download the latest version of the following applications at https://www.dell.com/support/drivers Alienware Command Center Alienware Gaming Headset driver
- Go to the folder where you saved the setup files.
- Double-click the setup file and follow the on-screen instructions to install the application. NOTE: You can customize the mouse features and lighting effects by using the AWCC application.
Activate Dolby Atmos for Headphone
The headset automatically activates Dolby Atmos when connected to Microsoft Windows 10 or Microsoft Windows 11 computer by following the steps below:
- Go to Microsoft Store.
- Download the free Dolby Access app.
- Connect the headset to the computer.
- Once connected, Dolby Access will detect your device and activate Dolby Atmos for Headphones.
Using the headset
Adjusting the headset
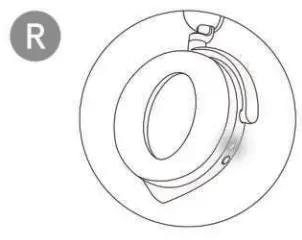
Adjust the headband and ear pads to find the optimal fit for your head. When using a boom microphone, position it approximately two centimeters away from your mouth.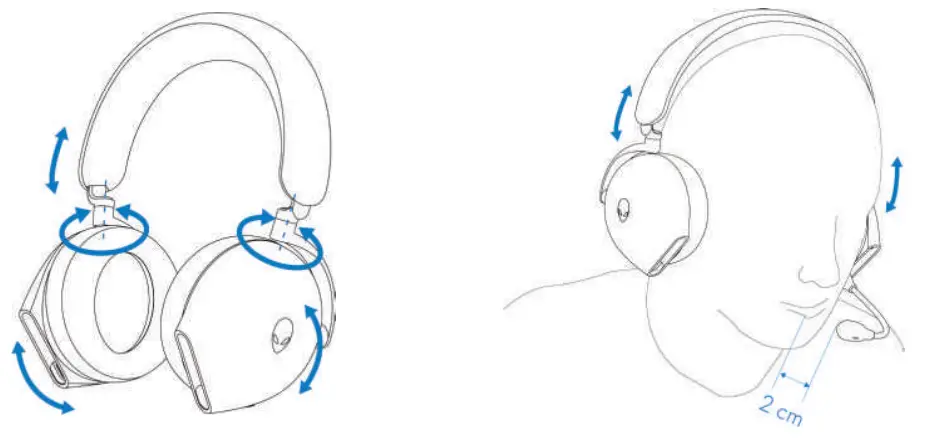 The ear cups can be rotated to wear the headset around the neck comfortably, or for easier storage.
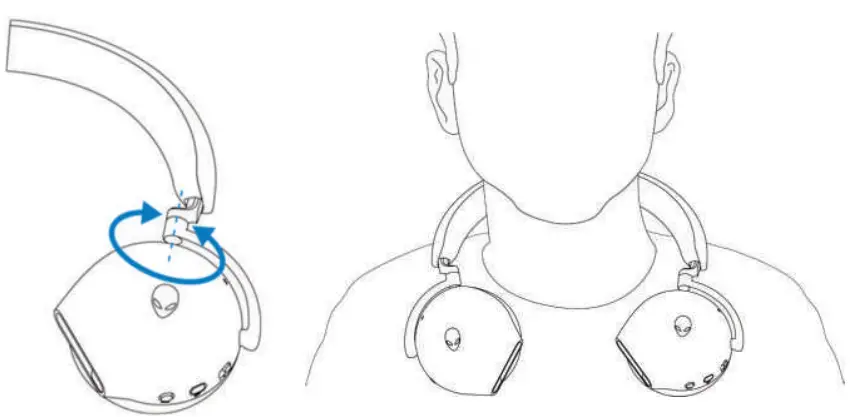
Using features on the headset
Touch control features
Use your finger to touch the effective touch area on right ear cup to control the volume, music play, call answer, call reject, and so on:
Swipe up or down
Swipe up or down for unit volume increment or decrement.
- Using Bluetooth
– When the volume level is at 0 to 10%, unit volume is 5%.
– When the volume level is at 10 to 90%, unit volume is 8%.
– When the volume level is at 90 to 100%, unit volume is 5%. - Using the USB wireless dongle
– The unit volume is 6%.
Swipe up or down, and hold
- Swipe up and hold for continuous increment.
- Swipe down and hold for continuous decrement.
Swipe forward or back
- Swipe forward to the next track.
- Swipe backward to the previous track.
Double-tap
- Play and/or Pause. Answer and/or hang-up calls.
Triple tap
- Turn on/ off the Alienhead lighting.
Tap and hold for three seconds
- Toggle between Active-Noise Cancellation (ANC) and Transparency mode. (no response if ANC is off) Reject the incoming call.

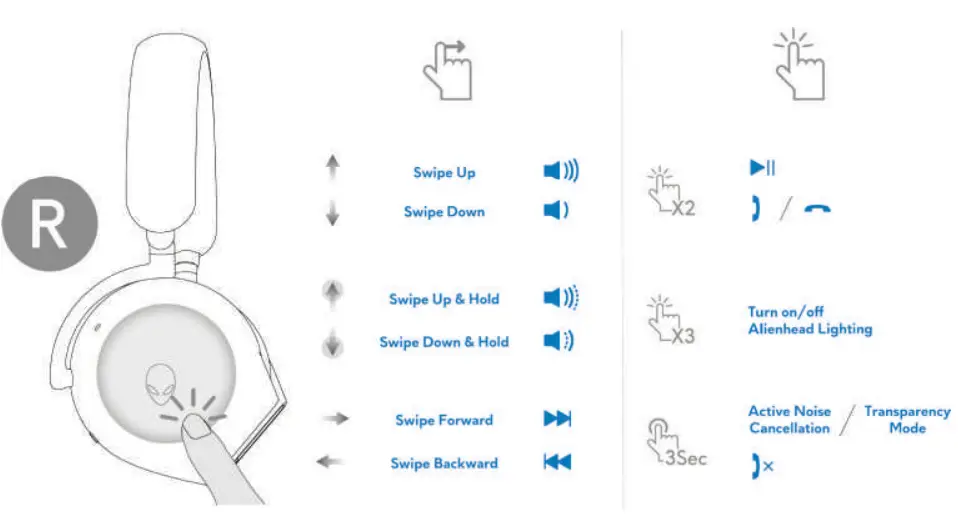
![]() NOTE: Please tap and swipe with one finger only.
NOTE: Please tap and swipe with one finger only.
Muting/unmuting the microphone
Press the mute button on the left ear cup to mute or unmute the microphone. The microphone mute indicative light on the boom microphone turns red when the microphone is muted.
Press the mute button and hold for five seconds to enable or disable the AI-NR (Noise Reduction function is automatically on when turning on the headset) which can identify the user’s voice and remove the surrounding noise during the call.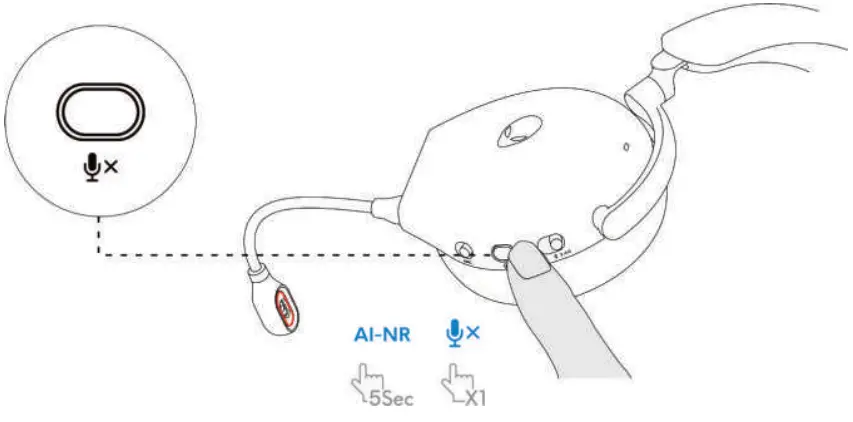 Alternatively, use the mute slider on the 3.5 mm inline audio cable to mute or unmute the microphone when the inline audio cable is connected.
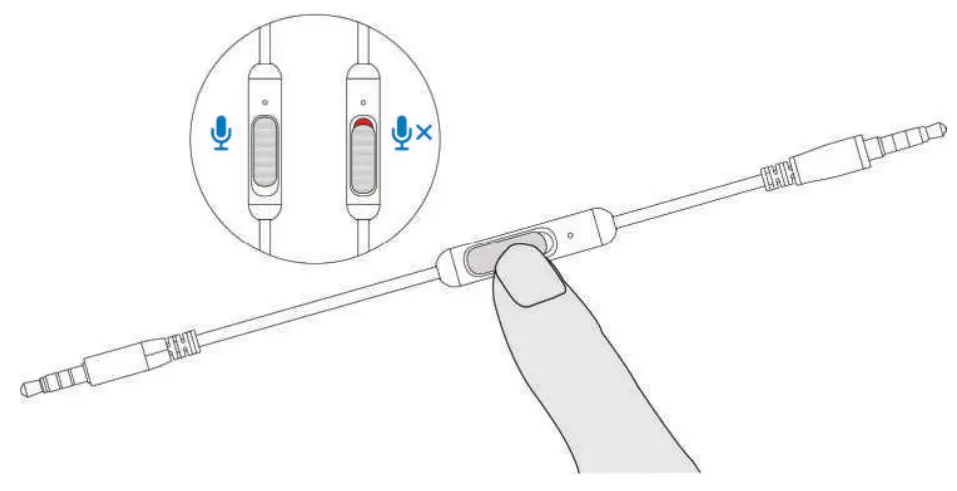 Active Noise Cancellation (ANC) on/off
Use the ANC slider on the left ear cup to turn on/off the ANC.
Replacing the ear pads
To remove the ear pad, hold the ear pad firmly and then pull the ear pad away from the headset.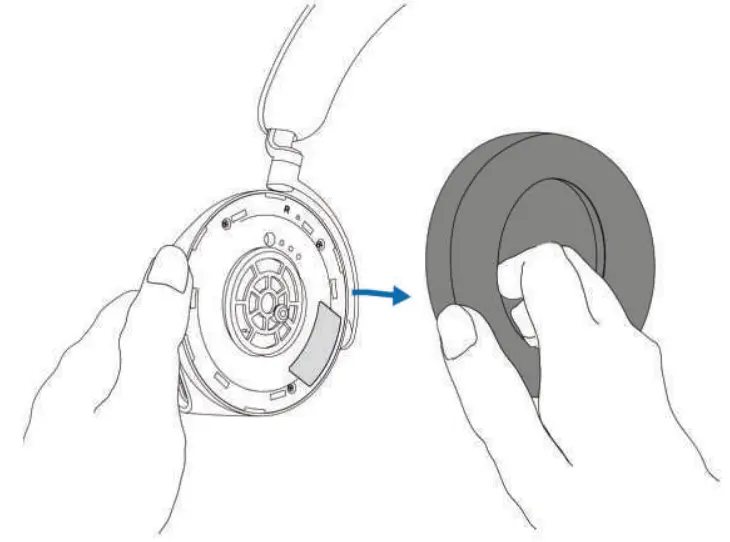 Note that left and right ear pads are different. Fit the triangular marks on the ear pad and the ear cup. Push the hooks of the ear pad directly into the holes of ear cup firmly.
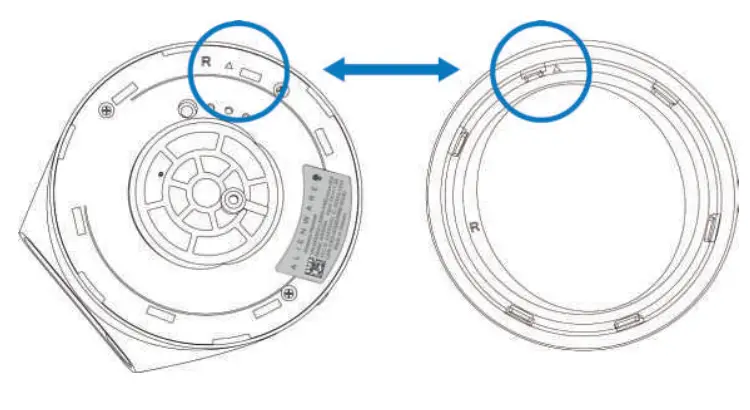
Regulatory label position
There are three regulatory labels attached to the headset. One is on the right ear cup and two are on the left ear cup. Remove the cushion to find their positions.
Left earcup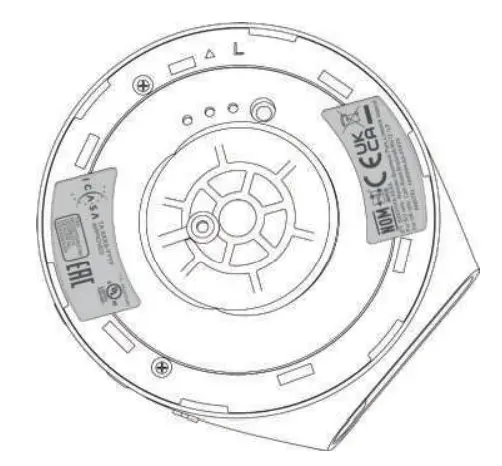 Right earcup
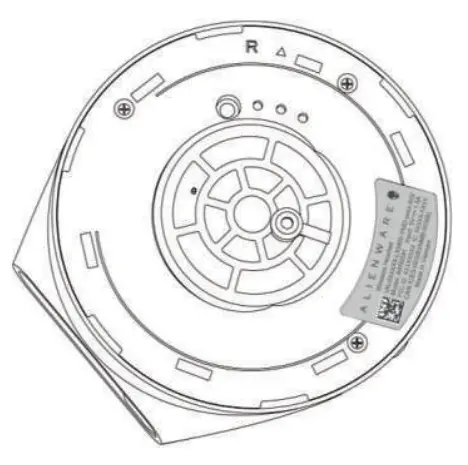
Troubleshooting
| Problems | Possible solutions |
| The headset has no sound | Ensure that the headset is turned on, and properly connected through the wireless dongle, Bluetooth, or inline audio cable. Ensure that the audio player is playing music and that the computer volume and media player volume are on and not muted. Click the volume icon on your computer. Adjust the volume level on the volume bar. Check the playback setting on the computer, and ensure that the default device is set to DEVICE NAME. Check the headset is within range (10 m) of the wireless dongle or connected mobile devices. (if connected through the wireless dongle or Bluetooth) Check wireless connection is good. Check that the Headset is connected to the wireless dongle (recommended mode) on your computer during the game. |
| The person on the other end cannot hear me | Ensure that the microphone is positioned close to the mouth. |
| The abnormal sound is coming out of the headset | Check if something is obstructing the headset. Adjust the volume level up and down, and check if the abnormal sound changes. Ensure that the headset is within range (10 m) of the wireless dongle or connected mobile devices. (if connected through the wireless dongle or Bluetooth) Ensure that the inline audio plug is fully inserted into the audio port of the computer or mobile device. (if connected through the audio cable) |
| Unbalanced sound in the headset | Check the computer volume balance is set correctly. – Right-click the headset icon. – Select playback devices. – Right-click default playback devices, and select Properties. – Select Levels, and click Balance. Ensure that the L and R values are the same. |
| Headset lights do not light up | Ensure that the headset is turned on. Open Alienware Command Center, and ensure that the lights are turned on. |
| The wireless range is too short | Ensure that the wireless dongle or connected mobile devices with Bluetooth is not covered or blocked by metal or electronic objects. Try connecting the wireless dongle to the USB port on the side of your computer, rather than the USB the port at the back of your computer. Ensure that no other USB device is connected adjacent to the wireless dongle. |
| The microphone picks up too much background noise | Ensure that the microphone is positioned close to the mouth. Open Alienware Command Center, and reduce the microphone volume. |
| The microphone mute is not working when connected with an inline audio cable | Ensure that the audio plug end is well inserted into the boom microphone port on your headset and computer respectively. Ensure that the microphone mute button on the inline audio cable is set to MUTE OFF. Ensure that the audio plug end with 5 poles is inserted to the headset port, and the end with 4 poles is inserted to your computer or mobile. Ensure that the microphone mute button on the inline audio cable is set to MUTE OFF. |
| The Alienware command center does not recognize the headset | Ensure that the headset is turned on and the headset is connected to the computer through the USB wire, wireless dongle or Bluetooth pairing. Reconnect the wireless dongle, pair the headset using Bluetooth, or restart Alienware Command Center. |
Specifications
| Specifications | Value |
| Headset weight | 300 g |
| Headset dimensions | Length: 174.15 mm (6.86 inches) Width: 101.04 mm (3.98 inches) Height: 209.73 mm (8.26 inches) |
| Microphones | Noise Reduction microphone |
| Speaker | 40 mm Dynamic PureSound speaker (Hi-Fi) |
| Speaker maximum input power | 50 mW |
| Speaker frequency range | 20Hz — 40kHz |
| Operating temperature | 5°C to 40°C (41°F to 104°F) |
| Storage temperature | -5°C to 45°C (23°F to 113°F) |
| Operating humidity | 5% to 90% relative humidity |
Warranty information
Limited warranty and return policies
The Alienware Tri-mode Wireless Gaming Headset AW920H carries a 2-years limited hardware warranty. If purchased together with a Dell computer, it will follow the system warranty.
For U.S. customers:
This purchase and your use of this product are subject to Dell’s end-user agreement, which you can find at https://www.dell.com/terms. This document contains a binding arbitration clause.
For European, Middle Eastern, and African customers:
Dell-branded products that are sold and used are subject to applicable national consumer legal rights, the terms of any retailer sale agreement that you have entered into (which will apply between you and the retailer), and Dell’s end-user contract terms.
Dell may also provide an additional hardware warranty full details of the Dell end-user contract and warranty terms can be found by going to https://www.dell.com, selecting your country from the list at the bottom of the “home” page, and then clicking the “terms and conditions” link for the end-user terms or the “support” link for the warranty terms.
For non-U.S. customers:
Dell-branded products that are sold and used are subject to applicable national consumer legal rights, the terms of any retailer sale agreement that you have entered into (which will apply between you and the retailer), and Dell’s warranty terms. Dell may also provide an additional hardware warranty full details of Dell’s warranty terms can be found by going to: https://www.dell.com/terms, select your country from the list at the bottom of the “home” page, and then click the “terms and conditions” link or the “support” link for the warranty terms.![]() NOTE: Warranty for soft carry pouch is not covered.
NOTE: Warranty for soft carry pouch is not covered.
Safety information
![]() Keep the volume at optimal levels while in use. Do not listen to high volume levels for a long period. Prolonged exposure to a high volume may cause a high sound pressure and may cause a risk of hearing damage.
Keep the volume at optimal levels while in use. Do not listen to high volume levels for a long period. Prolonged exposure to a high volume may cause a high sound pressure and may cause a risk of hearing damage.
Federal Communication Commission Interference Statement:
This equipment has been tested and found to comply with the limits for a Class B digital device, pursuant to part 15 of the FCC Rules. These limits are designed to provide reasonable protection against harmful interference in a residential installation. This equipment generates, uses, and can radiate radio frequency energy and, if not installed and used in accordance with the instructions, may cause harmful interference to radio communications. However, there is no guarantee that interference will not occur in a particular installation. If this equipment does cause harmful interference to radio or television reception, which can be determined by turning the equipment off and on, the user is encouraged to try to correct the interference by one or more of the following measures:
–Reorient or relocate the receiving antenna.
–Increase the separation between the equipment and receiver.
–Connect the equipment into an outlet on a circuit different from that to which the receiver is connected.
–Consult the dealer or an experienced radio/TV technician for help.
Any changes or modifications not expressly approved by the party responsible for compliance could void your authority to operate the equipment.
RF exposure statements The product complies with the FCC portable RF exposure limit set forth for an uncontrolled environment and is safe for intended operation as described in this manual. Further RF exposure reduction can be achieved if the product can be kept as far as possible from the user body or set the device to lower output power if such a function is available.
Industry Canada statement: This device complies with Industry Canada license-exempt RSS. Operation is subject to the following two conditions: 1) This device may not cause interference, and 2) This device must accept any interference, including interference that may cause undesired operation of the device.
Radiation Exposure Statement: This EUT is in compliance with SAR for general population/uncontrolled exposure limits in IC RSS-102 and had been tested in accordance with the measurement methods and procedures specified in IEEE 1528 and IEC 62209. This device and its antenna(s) must not be co-located or operating in conjunction with any other antenna or transmitter.


