HORT161 Arize Factor Horticulture LED Lighting System
Installation Guide
HORT161 | 99009070
Arize® Factor
Horticulture LED Lighting System
220-240V versions ONLY. Please see HORT 171 for 380-415V versions
50-60Hz IP65
 WARNING
RISK OF ELECTRIC SHOCK
- Turn power off before inspection, installation or removal.
- Properly ground electrical enclosure.
RISK OF FIRE
- Follow all IEC and local building codes.
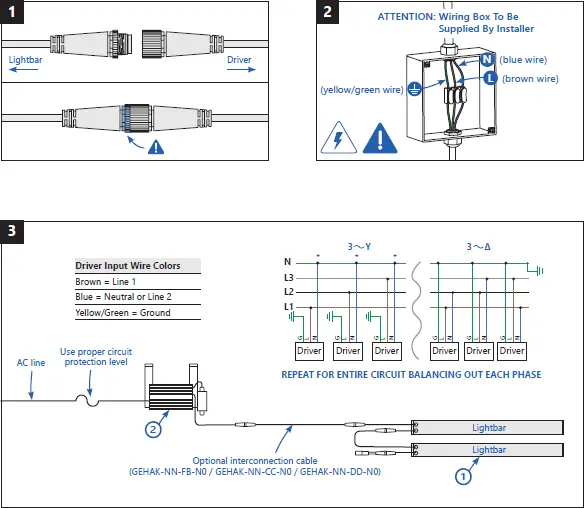
- Use only IEC approved wire for input/output connections. Minimum size 3G 0.75mm2.
![]() The LED luminaire must be connected to the mains supply according to its ratings on the product label.
The LED luminaire must be connected to the mains supply according to its ratings on the product label.![]()
CAUTION
- Do not operate the product with damaged parts.
- Turn off power before inspection, installation or removal.
- Luminaire may fall down if not installed properly.
- Wear work gloves to prevent dirt and oil from being transferred to the luminaire.
- Not for direct exposure to the weather.
- To ensure the product warranty is valid, please ensure all installation instructions and environmental conditions for storage and operation are complied with.
- The light source of this luminaire is not replaceable; when the light source reaches its end of life the whole luminaire shall be replaced.
- Use only in the manner intended by the manufacturer. If you have any questions, contact the manufacturer.
- For safe operation, and to maximize the longevity of the luminaire; ensure that the lightbar and driver are clean and free of dirt, dust, oil, or any other debris.
- Do not apply any kind of film on the lens or otherwise cover the driver or light engine in any way.
- The external flexible cable or cord of this luminaire cannot be replaced; if the cord is damaged, the luminaire shall be destroyed.
Arize Factor Installation Guide
Components

- ML Series lightbars (See Lightbar Specifications table on page 2 for details)
- GEPSC210-600G-ADGEU Series LED Driver
- Suspended Wire Form Support (GEMB-BANE)
1 Lightbar Specifications
| Product Code | Detailed Description | Weight | Series Load per Driver | System Watts per Lightbar |
| GEHF-HPKRW1 | ML900, PKR | 2.6 kg | 2 | 319W |
| GEHF-HPKBW1 | ML900, PKB | 2.6 kg | 2 | 313W |
| GEHF-HPKFW1 | ML900, PKF | 2.6 kg | 2 | 313W |
| GEHF-HBRIW1 | ML900, BRI | 2.6 kg | 2 | 319W |
| GEHF-HBRVW1 | ML900, BRV | 2.6 kg | 2 | 316W |
| GEHF-MPKRW1 | ML900, PKR | 2.6 kg | 4, 5, or 6 | 104W |
| GEHF-MPKBW1 | ML900, PKB | 2.6 kg | 4, 5, or 6 | 104W |
| GEHF-MPKFW1 | ML900, PKF | 2.6 kg | 4, 5, or 6 | 106W |
| GEHF-MBRIW1 | ML900, BRI | 2.6 kg | 4, 5, or 6 | 106W |
| GEHF-MBRVW1 | ML900, BRV | 2.6 kg | 4, 5, or 6 | 106W |
| GEHF-EPKBW1 | ML900, PKB | 2.6 kg | 5, 6, 7, or 8 | 82W |
2 LED Driver Specifications
Product Code | Detailed Description | Weight | Driver Max Input Ratings | |
| Voltage | Current | |||
| GEPSC210-600G-ADGEU-D1XA1 | Cord /w Leads | 3.33 kg (7.3lbs) | 220-240 VAC | 3.5A |
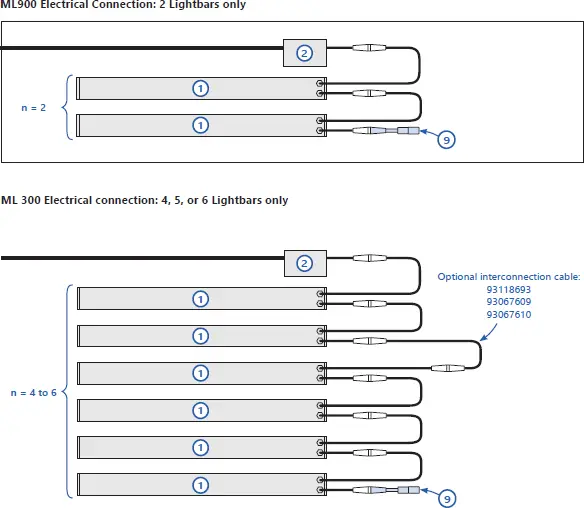
Optional Interconnection Cables Specifications
| Product Code | Detailed Description |
| 93118693 | 900mm Extension Cable |
| 93067609 | 1500mm Extension Cable |
| 93067610 | 3000mm Extension Cable |
Mounting Accessories

Mounting Accessories
| SKU | Product Code | Detailed Description | Weight |
| 93153917 | GEMB-BAW2 | Factor rolling rack mount, 48 inch pitch | 3.69 kg (8.1 lbs) |
| 93153918 | GEMB-BAW1 | Factor rolling rack mount, 24 inch pitch | 1.756 kg (3.86 lbs) |
| 93153914 | GEMB-BANE | Factor suspended mount wireform support | 0.012 kg (0.026lbs) |
| 93153916 | GEMB-FANE | Factor light engine mount | 3.82 kg (8.4 lbs) |
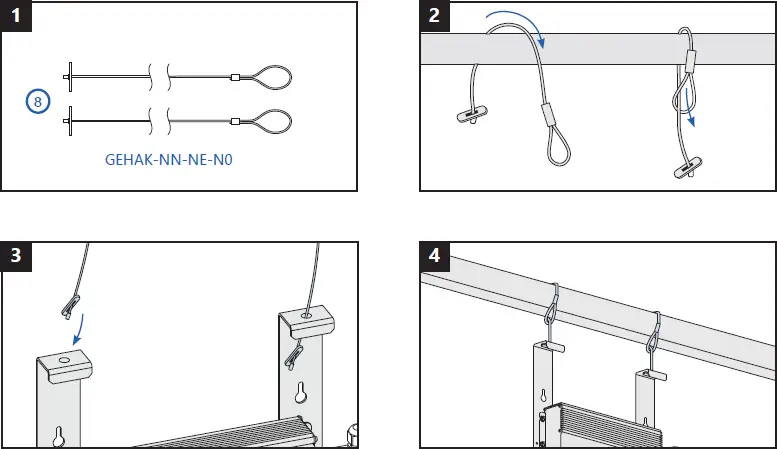
| 95047411 | GEHAK-NN-NE-N0 | Driver universal 1’ remote mount kit | 0.2kg (0.4 lbs) |
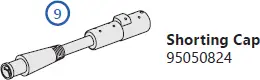
| 95050824 | GEHR-HAR M15 | Shorting cap | 0.05kg (0.11lb) |
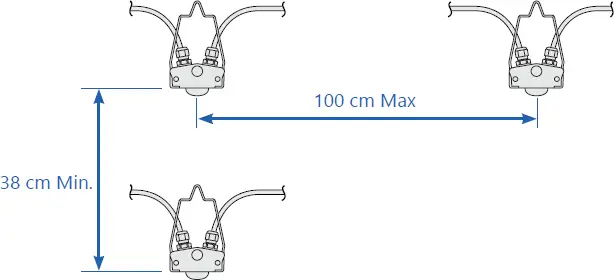
Mounting Distance
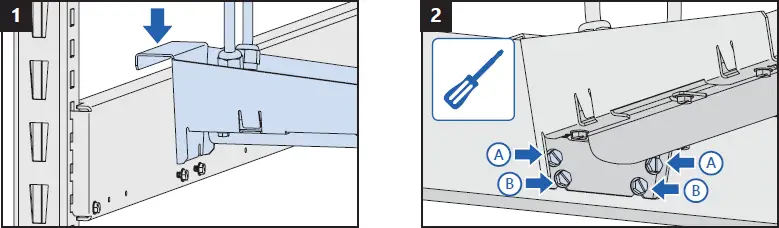
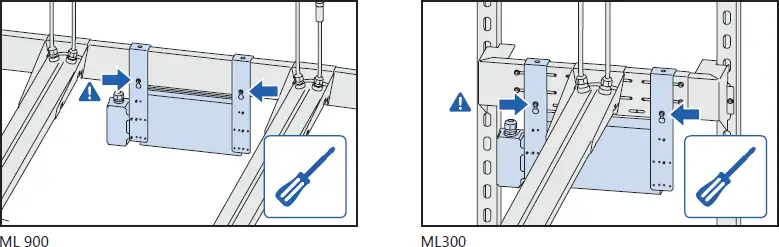
ML Series Rolling Rack Mount
ML900 Rolling Rack Mount
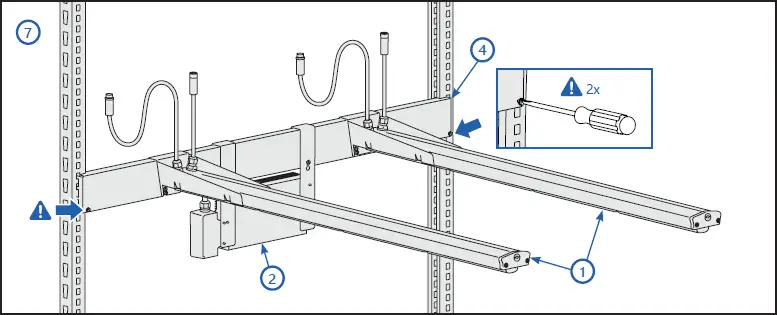
After the horizontal bracket is attached to the strut, secure the bracket to the strut by tightening the two screws located at each end of the bracket.
ML300 Rolling Rack Mount
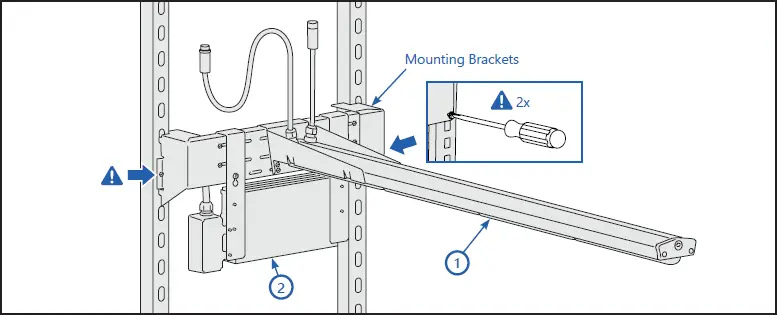
After the horizontal bracket is attached to the strut, secure the bracket to the struts by tightening the two screws, located each end of the bracket.
Rolling Rack Installation Steps
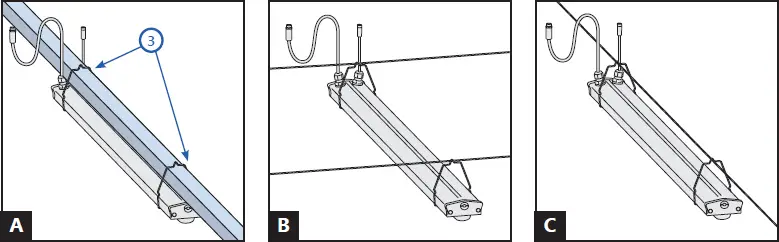
Suspended Mount Installation Steps
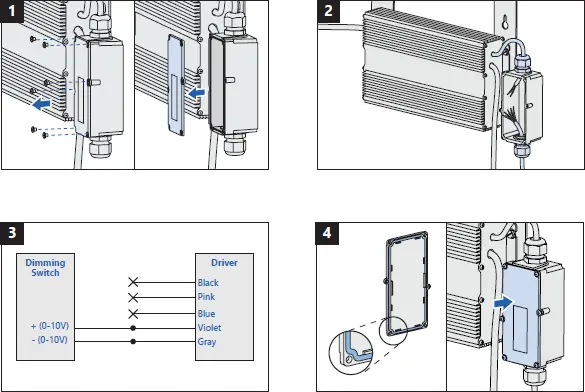
LED Driver Bracket Mount
LED Driver Suspended Mount
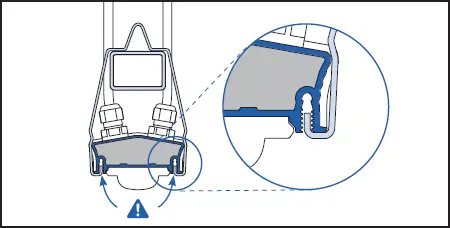
Shorting Cap Installation
![]() RISK OF SAFETY AND PRODUCT DAMAGE. DO NOT MAKE OR BREAK
RISK OF SAFETY AND PRODUCT DAMAGE. DO NOT MAKE OR BREAK
ELECTRICAL CONNECTION WHILE POWER IS APPLIED.
ATTENTION: Before attempting to install units or maintenance, ensure power is off.
ATTENTION: Before attempting to install units or maintenance, ensure power is off.
Wired Dimming Connections (Optional) 0-10v Dimming
Save These Instructions
Use only in the manner intended by the manufacturer. If you have any questions, contact the manufacturer.
For the latest install guides for your product go to:
https://www.gecurrent.com/indoor-lighting/horticulture-led-grow-lights/arize-ml900
https://www.gecurrent.com/indoor-lighting/horticulture-led-grow-lights/arize-ml300
[email protected]


