![]()
SOLTECH FLUX 6W 20W Multifunctional Flood Light
Introduction
Thank you for purchasing FLUX Multifunctional Flood Light Products.
Important
Please read these instructions before installation to ensure optimum results and longevity of your lights. The solar panel should be charged in full sunlight for 8 to 9 hours before initial first use to provide optimum results.
Features
- Eliminates trenching, cabling, and electricity costs
- Solar panel bracket is 360 degrees adjustable, and the light module is 270 degrees adjustable. Adjusting the solar panel angle maximizes solar energy collection, and allows snow, dirt, and other debris to slide or wash off
- Large battery capacity of 7,680 mAh enables long run times and high light output
- Wall-mounting and post-mounting accessories available
- The latest advanced Li-ion battery lasts 2000+ charging cycles.
- 7 operating modes are programmable via remote control or controls on the fixture
- IP66 rated protection from water, dirt, and dust
- The easiest way to bring lighting to any outdoor application
- Photo and motion sensors, wide angle 360° detection, high sensitivity
Notice & Warning
- The FLUX will provide optimal usage where there is enough sunshine.
- Please note the lighting time depends on sunshine duration and weather.
- The lamp will light up automatically at dusk.
- Built-in intelligent IC is with over-charge, over-discharge and over-voltage protection.
- Non-professional please do not disassemble the lamp.
- Please do not dispose of the battery with household garbage to avoid an explosion.
Please Note
During continuous rainy or cloudy days, run time may be reduced as the battery will not be fully charged.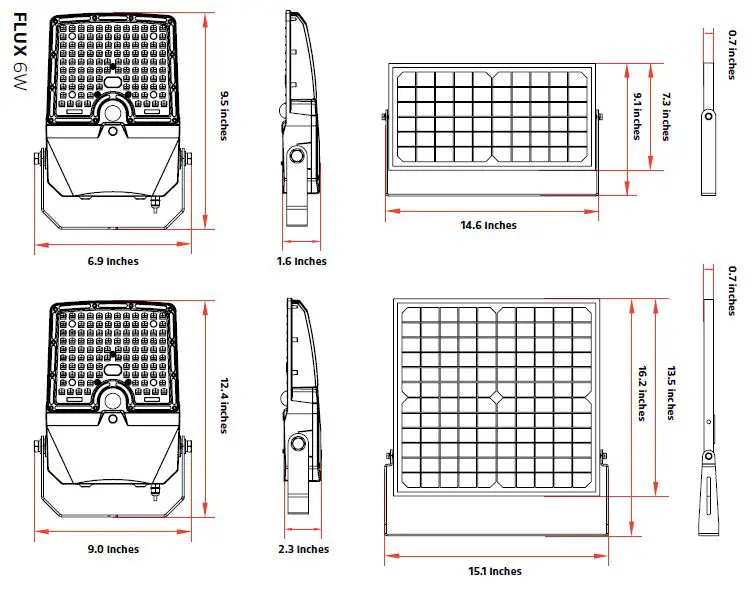
Specification
| Specifications | FLUX 6W | FLUX 20W |
| LED Nominal Power | 6W | 20W |
| Solar Panel | Mono-Crystalline 10V 10W | Mono-Crystalline 10V 20W |
| LiFePO4 Battery | 6.4V 3AH | 6.4V 12AH |
| CCT | 4,000K | 4,000K |
| Lumen Output@4000K | 1,020 | 3,400 |
| CRI | > 70 | > 70 |
| Product Size | Light Head 9.5 X 6.9 X 1.6 Inches Solar Panel 7.3 X 14.6X 0.7 Inches | Light Head 12.4 X 9.0 X 2.3 Inches Solar Panel 13.5 X 15.1 X 0.7 Inches |
| Beam Spread | >130°, NEMA type 7 Very Wide | >130°, NEMA type 7 Very Wide |
| Cable Length | 16.5 ft | 16.5 ft |
| IP Rating | IP66 | IP66 |
| Casting | PC & Aluminum | PC & Aluminum |
| Efficiency@4000K | 170 lm/W | 170 lm/W |
| * Charging Time | 6hrs (1000W/m2) | 6hrs (1000W/m2) |
| Run Time (@Full Charged) | 5–7 Rainy Days | 5–7 Rainy Days |
| Operation Mode | 7 Operating Modes | 7 Operating Modes |
| PIR Sensor Angle / Distance | 360° / 16.4 ft | 360° / 16.4 ft |
| * Operating Temperature | -4 °F to 122 °F | -4 °F to 122 °F |
| * Charging Temperature | -32 °F to 149 °F | -32 °F to 149 °F |
Ordering Information Chart
| SERIES | WATTAGE | COLOR TEMPERATURE | MOUNTING OPTIONS | FINISH |
| STL-FLX=FLUX | 6=6W 1,020 Lumens 20=20W 3,400 Lumens | 4=4,000K | WM=Wall Mount PM=Pole Mount | GY=GRAY BZ=BRONZE |
Installation
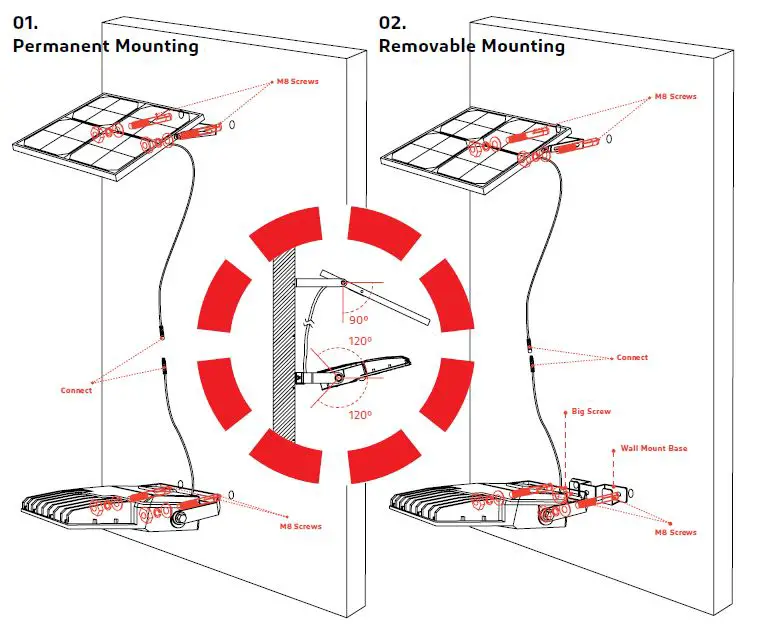
First mount the solar panel
- Drill two holes into the wall surface then use the screw kit to secure the solar panel bracket on the wall.
- After you secure the solar panel bracket, attach the solar panel to the bracket.
Then mount the fixture: - Drill two holes into the wall surface. Attach the bracket to the fixture then secure to the wall surface with the screw kit.
- Connect the light and solar panel cables.
First, mount the solar panel:
- Drill two holes into the wall surface, then use the screw kit to secure the solar panel brack-et on the wall.
- After you secure the solar panel bracket, attach the solar panel to the bracket.
Then mount the fixture: - Drill two holes into the wall surface, then screw in the wall mount base to the wall.
- Attach the bracket to the fixture and then hang the bracket on the wall mount base. Lastly, use the big screw nob to hold them together.
- Connect the light and solar panel cables.
POLE MOUNT
First, mount the solar panel to the pole:
- Use the screw kit to secure the pole mount base and the solar panel bracket to the pole.
- Then attach the solar panel to the bracket.
Then, mount the fixture: - Attach the bracket to the fixture.
- Use the screw kit to secure the fixture bracket to the pole mount base on the pole.
- Connect the light and solar panel cables.

Check List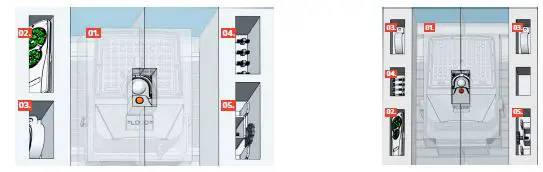
FLUX 6W
- Fixture
- Remote Control
- Pole Mount
- Screw Kit (M8 X 4, M8*35 X 4)
- Wall Mount Base
FLUX 20W
- Fixture
- Remote Control
- Pole Mount
- Screw Kit (M8 X 4, M8*35 X 4)
- Wall Mount Base
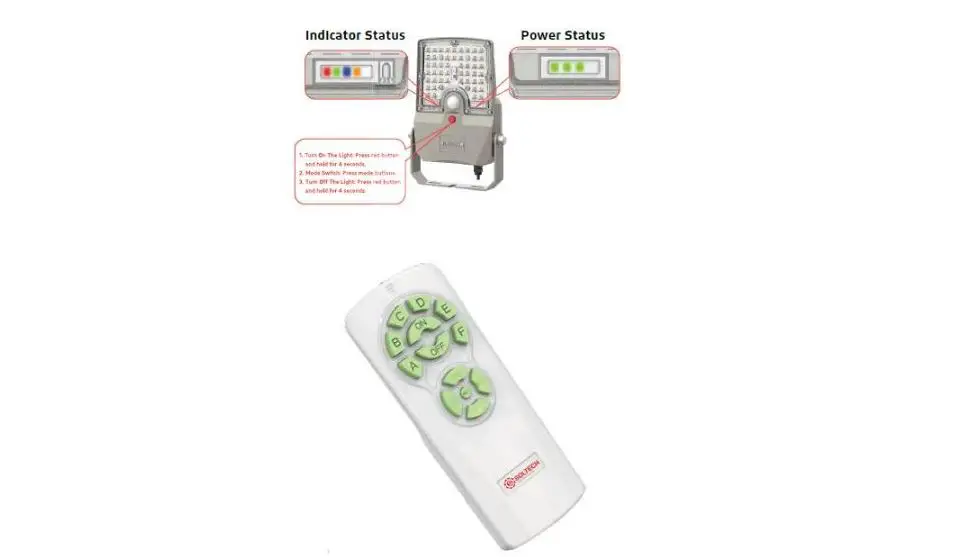
Remote Control
MOTION SENSOR MODES
- Light on 100% if motion is detected, stand-by period is 60 seconds. Light will turn off when no motion is detected.

- Light on 100% if motion is detected, stand-by period is 60 seconds. Light will dim down to 5% output when no motion is detected
- Light on 100% if motion is detected, stand-by period is 120 seconds. Light will turn off when no motion is detected.
- Light on 100% if motion is detected, stand-by period is 120 seconds. Light will dim down to 5% output when no motion is detected
 Light on 50% for 3 hours (Sensor disabled), then returns to motion sensor mode. If motion detected, stand-by period is 60 seconds. Light will turn off when no motion is detected.
- Light on 50% for 3 hours (Sensor disabled), then returns to motion sensor mode. If motion detected, stand-by period is 60 seconds. Light will dim down to 5% output when no motion is detected.

- Light on 50% for 2 hours, then dims down to 20% for 6 hours, then dims down to 10% untill dawn (Sensor disabled).


 Light on 50% for 3 hours (Sensor disabled), then returns to motion sensor mode. If motion detected, stand-by period is 60 seconds. Light will turn off when no motion is detected.


REMOTE CONTROL INSTRUCTIONS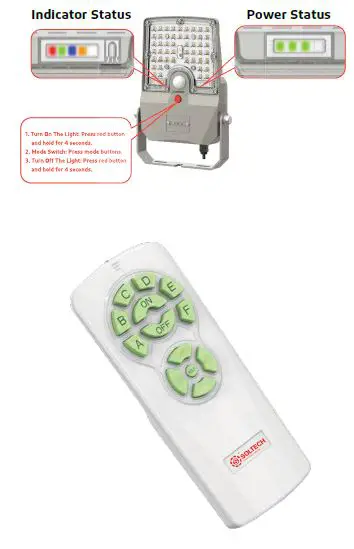
| Remote Buttons | Indicator Status |
| A | Red |
| B | Green |
| C | Red+Green |
| D | Blue |
| E | Blue+Red |
| F | Blue+Green |
Additional Notes
- The floodlight “Turn On” time depends on the client’s local time (Turn-on Light Level:< 20Lux).
- A, B, C, D, E, and F modes have memory functions. For example, if you press mode A and then press the OFF button, Mode A will still be activated when you turn the light on again until end-user resets the mode.
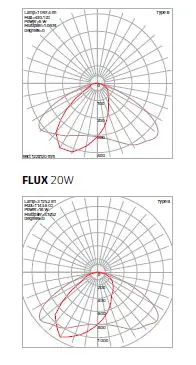
Panel Angle

IES Light Distribution
FLUX 6W
Warranty
FLUX is covered by a 3 year limited warranty. SOLTECH urban light warrants to the original purchaser that this product is free from defects in materials and workmanship for the period of 3 years from date of purchase. To obtain
warranty service please contact your local distributor or sales rep for further instruction.
SOLTECH Provides
Advanced LED
Technology Powered
With Eco-friendly,
Clean, Solar Energy.


