resideo PROSIXSMOKE-EU Wireless Smoke Detector
The PROSIXSMOKE-EU is a wireless smoke detector intended for use with Control Panels that support SiX™ series devices.
NOTE: Installation shall be done in accordance with local regulations.
To remove the detector cover from the mounting bracket, turn the top of the detector 15 degrees counterclockwise and separate the cover from the mounting bracket.
ENROLLING
You must enroll the device in the Control Panel. Set the Control Panel in the Programming Mode and when prompted, perform the following:
Note: For detailed programming instructions refer to the Installation Instructions for the Control Panel with which this device is used.
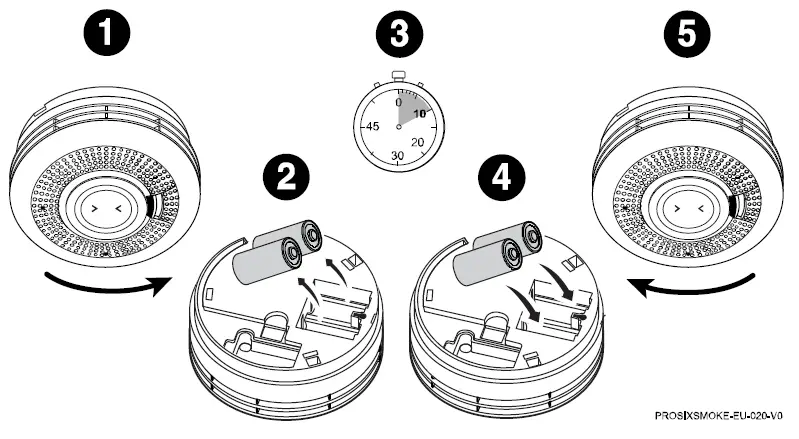
- Remove the detector cover from the mounting bracket (turn cover 15 degrees counterclockwise).
- Carefully remove (and discard) the battery tab to activate the device and begin the enrollment process for the smoke zone. (If already powered, press the Test button to enroll.
- The Green LED flashes rapidly during enrollment (up to about 20 seconds*). The detector sends data and the Control Panel registers the detector.
NOTE: Enrollment time varies depending on the signal strength between the device and the panel. Enrollment is confirmed when the Green LED is ON for 3 seconds and the device chirps. - Enrollment is confirmed when the green LED is on for 3 seconds.
- Select Save and enable/disable the smoke services as desired.
If the detector is not successfully registered during the enrollment period, the LED will go out and the device will be turned off. Activate the tamper or press the test button to restart the enrollment process.
NOTE: After enrollment, the device cannot be used with another Control Panel until it is removed from the current panel. Refer to the panel instructions.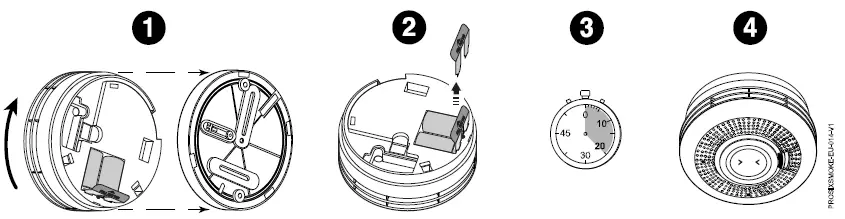
PROGRAMMING
Consult the Control Panel instructions to program the device in the system. This detector reports the following signals to the panel:
- Smoke detection: Alarms sounds when smoke is detected.
- Percentage of obscuration (smoke or dirt in the detector).
- Tamper mode: The detector can be made tamper-proof to prevent unauthorized removal from its base.
- LED Indicator shuts off after 10 minutes to conserve battery life.
- One-Go-All-Go: all smoke detectors in the system that are programmed as one-go-all-go devices will sound an alarm.
- Supervision: according to panel configuration.
TAMPER-PROOFING
The detector can be made tamper-proof to prevent unauthorized removal from its base as follows:
- Break off the small pillar from the base as shown. This causes the detector to unlatch to the base.
- Use a small screwdriver to release the catch (push catch towards the base) and twist the detector counterclockwise to remove it.
- If necessary, a tamper-proof screw can be added to prevent removal from the base.
Note: To remove the detector from the ceiling after it has been made tamper-proof without triggering an alarm, remove the screw first, and then twist off counterclockwise.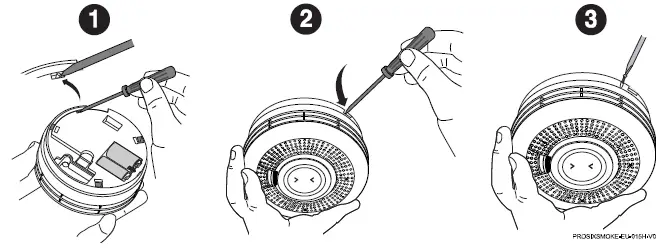
MOUNTING
Refer to the local regulations for detailed information on detector spacing, placement zoning, and special applications”)
NOTE:
Before mounting the detector permanently, conduct a sensor test (see the panel instructions) to verify adequate signal strength and adjust the device location and orientation as necessary.
The detector can be mounted on a ceiling or on a wall (if local ordinances permit).
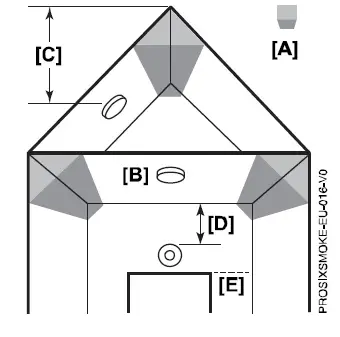
- Hot smoke rises and spreads out, so a central ceiling position is the recommended location. The air is “dead” and does not move in corners, therefore the detector must be mounted away from any “Dead Air Space” corners [A].
- Mount the detector at least 30 cm from walls and corners [B].
- Mount the detector at least 60 cm from the apex of the ceiling [C].
- If ceiling mounting is impractical, smoke detectors may be mounted on a wall, provided that:
- The top of the detector is between 15 and 30 cm below ceiling [D].
- The bottom of the detector is above the level of any door opening [E].

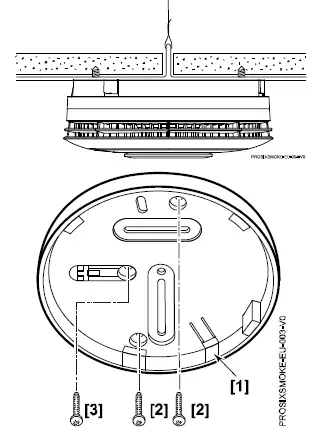
IMPORTANT! Do not attach the detector to removable ceiling panels. Attach the detector across panel support.
- Select a location and secure the rear mounting plate [1] to the ceiling or wall with two screws [2].
- If necessary, install a tamper screw [3].

TESTING
The detector should be tested immediately after installation and at least once a year.
Recommended:
To prevent unwanted alarms, notify the Central Station that the smoke detector system is undergoing maintenance before testing begins. Test Mode can be activated remotely from the Control Panel (see the panel instructions), or on-site by pressing the test switch.
Tests and testing methods:
- Test Switch – Press and hold the test button for 3 seconds to test the sounder and send a smoke and heat alarm to the Control Panel. The device will emit a temporal tone) to the Control Panel.
- Smoke Entry Test (canned smoke*) – Follow the instructions on the can and spray smoke directly into the vent area. This will test the sounder and send a smoke alarm to the Control Panel.


Use only locally-approved canned smoke.
Signal Strength
Signal strength information is sent with every communication to the Control Panel and is viewable through the AlarmNet 360™’s cloud-based management platform (www.alarmnet360.com).
To silence the detector:
Press the test switch or disarm the system at the Control Panel. The detector sounds again after 5 minutes if the alarm condition continues. When programmed in one-go-all-go mode, the detector can only be silenced from the panel.
LEDS AND SOUNDER
The device has one bi-colored LED and an 85 dBa sounder. Refer to the following table for the operation of these features.
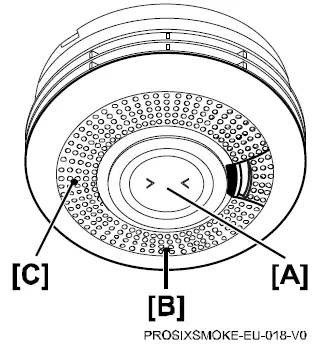
- [A] – Test Button
- [B] – Red/Yellow LED
- [C] – Green LED

LED and Sounder Indication Table
| Normal Operation | Action | Green LED | Red LED | Yellow LED | Sounder | Reaction |
| Power Up | Pull Battery Tab | 1 Flash | 1 Flash | 1 Flash | Off | |
| Enrollment into System | Program into Control | Rapid flashing up to 30 seconds, Then on 3 seconds | Off | Off | Single Chirp | Install into system |
| Delete from System | Delete from Control | Rapid flashing for 5 seconds | Off | Off | Off | Uninstall from system |
| Processing Control Queries | Slow flashing | Off | Off | Off | ||
| Tamper | Remove from base | Slow flashing 10 minutes | Off | Off | Off | |
| Standby – Normal | 1 flash every 60 seconds | Off | Off | Off | ||
| Sensing Smoke | Smoke Condition | Off | Rapid flashing | Off | Temporal 3 | Evacuate Premises |
| One-Go-All-Go | Fire / CO Alarm from Control | Off | Off | Off | Fire Temporal 3 / CO Temporal 4 | Evacuate Premises |
| Alarm Hush | Action | Green LED | Red LED | Yellow LED | Sounder | Reaction |
| Silence Sounding Alarm | Press & Release Button | Off | 1 flash every 8 seconds | Off | Off for 10 mins | |
| Silence Low Battery | Press & Release Button | Off | Off | Off for 12 hours | Beep once per hour for 12 hours | Replace both batteries |
| Silence Faulty Sensor (only possible once) | Press & Release Button | Off | Off | 2 flashes every 48 seconds | Off for 12 hours | Replace unit |
| Silence End of Life (up to 30 days) | Press & Release Button | Off | Off | Off for 72 hours | Off for 72 hours | Replace unit |
| Self-Diagnostics | Action | Green LED | Red LED | Yellow LED | Sounder | Reaction |
| Low Battery | Automatic every 16 minutes | Off | Off | 1 flash every 48 seconds | 1 beep with 1 flash | Replace both batteries |
| Faulty Smoke Sensor | Automatic every 16 seconds | Off | Off | 2 flashes every 48 seconds | 2 beeps with 2 flashes | Replace unit |
| End of Life | Automatic every 4 hours | Off | Off | 3 flashes every 48 seconds | 3 beeps with 3 flashes | Replace unit |
| Maintenance | Automatic every 16 seconds | Off | Off | 4 flashes every 48 seconds | Off | Clean unit; see Cleaning section |
| Test Button | Action | Green LED | Red LED | Yellow LED | Sounder | Reaction |
| Detector Status Good – Normal Alarm | Press & Hold Button | Off | Rapid flashing | Off | Temporal 3 | Release button |
| Low Battery | Press & Hold Button | Off | Off | 1 flash then rapid flashing | 1 beep then Temporal 3 | Replace both batteries |
| Faulty Sensor | Press & Hold Button | Off | Off | 2 flashes then rapid flashing | 2 beeps only | Replace unit |
| End of Life | Press & Hold Button | Off | Off | 3 flashes then rapid flashing | 3 beeps then Temporal 3 | Replace unit |
| Maintenance | Press & Hold Button | Off | Off | 4 flashes then rapid flashing | 4 beeps then Temporal 3 | Clean unit; see Cleaning section |
| Alarm Memory | Action | Green LED | Red LED | Yellow LED | Sounder | Reaction |
| 24 Hour Memory | After Alarm | Off | 2 flashes every 48 seconds for 24 hours | Off | Off | Press & Hold Button for Long Term Memory |
| Long Term Memory | Press & Hold Button | Off | Rapid flashing | Off | Rapid chirping | Memory is reset after releasing the test button |
CLEANING
It is important to always keep the smoke detector in proper working condition. As part of the periodic maintenance, the detector should be cleaned regularly.
Note:
To prevent unwanted alarms, notify the Central Station that the smoke detector system is undergoing maintenance before cleaning the detector.
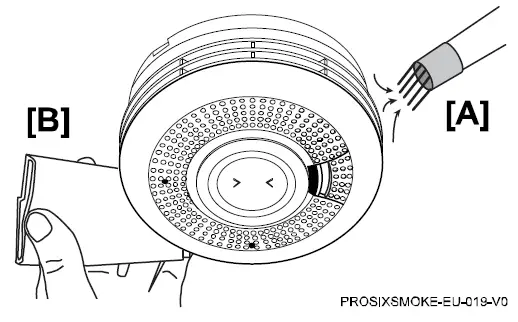
- Use a soft bristle brush or the brush attachment of a vacuum cleaner to remove dust and cobwebs from the side vents where the smoke enters [A].
- Using a damp cloth, wipe the cover and side vents and dry thoroughly [B].

BATTERY REPLACEMENT
When the battery power is low, and replacement is necessary, the smoke detector will “beep” and the yellow light will flash at the same time about every 48 seconds for at least 30 days. The battery must then be replaced. Also, replace the battery if the alarm does not sound when the test button is pressed. When you replace the battery, you must press the test button to verify that the alarm is functioning correctly.
Note: If installed, remove the tamper-proof screw.
- Twist the front cover counterclockwise and separate the cover from the mounting bracket.
- Remove two batteries.
- Wait 10 seconds.
- Insert two new batteries.
NOTE: See the Specifications section for recommended replacement batteries. Do not mix old and new batteries, battery types, or manufacturers. - Reattach to the detector to the mounting plate.

BATTERY CAUTION:
Risk of fire, explosion, and burns. Do not recharge, disassemble, heat above 55° C, or incinerate. Dispose of used batteries properly. Keep away from children.
SPECIFICATIONS
- Batteries: Two 3V Lithium
- EVE CR123A
- Panasonic CR123A
- RF Frequency: 2.4GHz
- Tamper: Cover
- Sounder: 85 dBa @ 3.0m
- Operating Temperature: -10° to +55° C
- Relative Humidity: 95% max. non-condensing
- Maximum Spacing: 15.2 x 15.2 m
- Dimensions (mm) / Weight: 120 (D) x 46 (H) / 205 g
- Material: ABS Plastic
The product should not be disposed of with other household waste. Check for the nearest authorized collection centers or authorized recyclers. The correct disposal of end-of-life equipment will help prevent potential negative consequences for the environment and human health.
NOTE: Smoke detectors are not to be used with detector guards unless the combination is evaluated and found suitable for that purpose.
This system must be checked by a qualified technician at least once every year
Any attempt to reverse-engineer this device by decoding proprietary protocols, de-compiling firmware, or any similar actions is strictly prohibited. REFER TO THE INSTALLATION INSTRUCTIONS FOR THE CONTROL WITH WHICH THIS DEVICE IS USED, FOR DETAILS REGARDING LIMITATIONS OF THE ENTIRE ALARM SYSTEM
SUPPORT & WARRANTY INFORMATION
For the latest documentation, warranty, and support, please go to: www.resideo.com.
- Ademco 1 Ltd., 200 Berkshire Place Winnersh Triangle, Berkshire, RG41 5RD – UNITED KINGDOM
- Sécurité Communications SAS (SECOM) 1198, Avenue du Docteur Maurice Donat 06250 Mougins – FRANCE.


 Detector Installation Guide")


