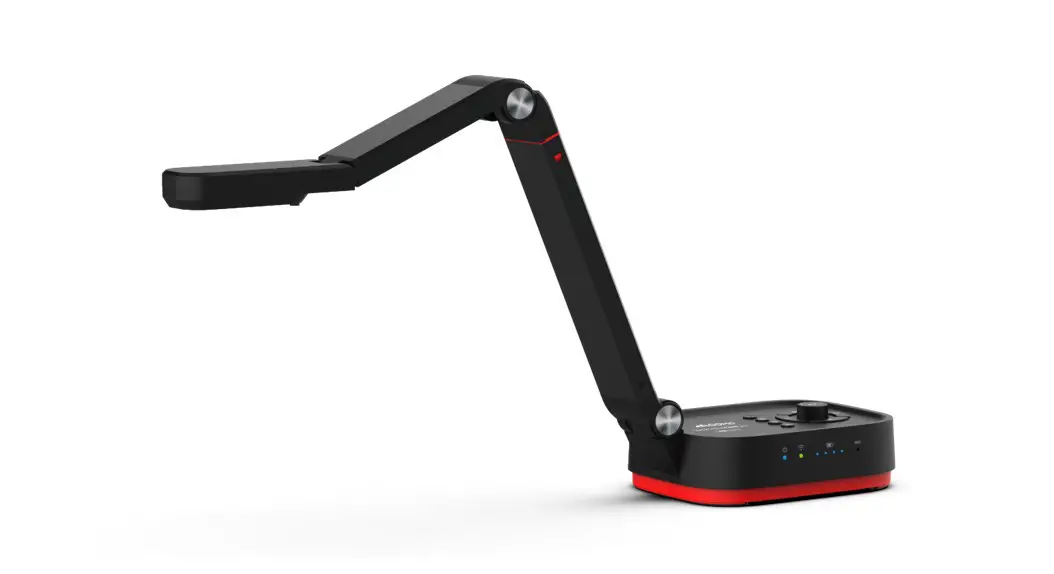
![]() Wandercam pro
Wandercam pro
QPC100W
4K Wireless Document Camera
Wi-Fi Connection
Instructions Manual
QPC100W Smart Document Camera
Step 1: Download the QCapture Pro Software
- Download the software from the QOMO website: https://qomo.com/download/qcapture-pro-7-3/
Step 2: Connecting your document camera to your computer wirelessly
Note: If this is not your first time setting up the camera and you are resetting it to a different network, you may have to reset your camera using the reset button on the back of your camera.
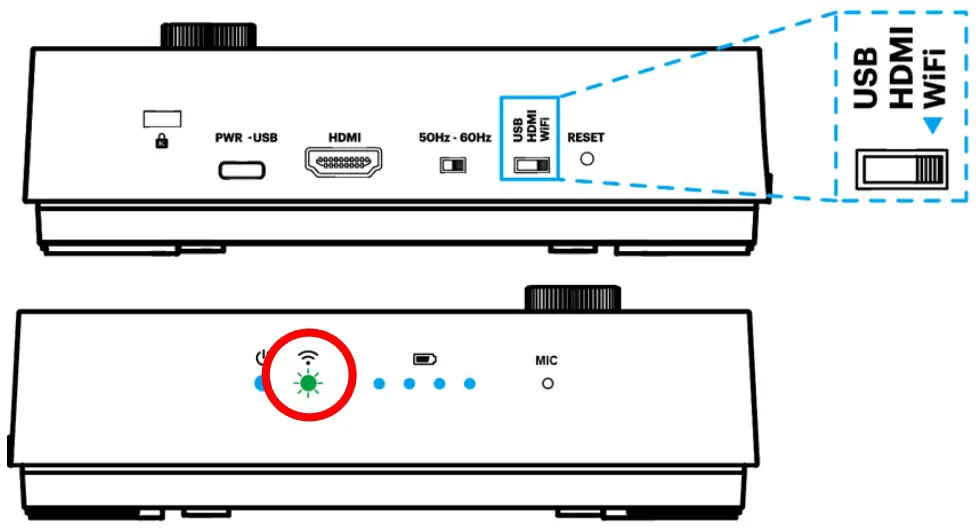
- Toggle the switch on the side of the unit to the Wi-Fi mode. The Wi-Fi LED indicator will emit a green flashing light.

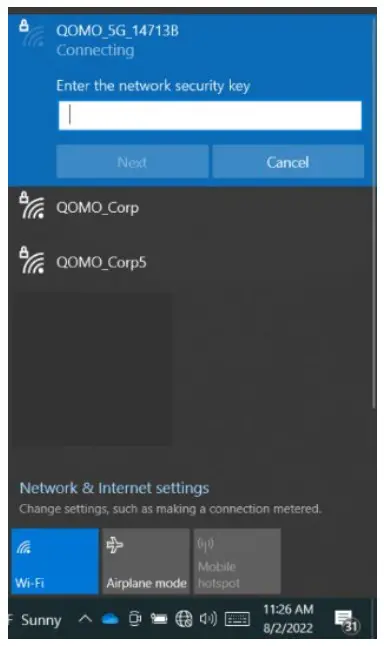
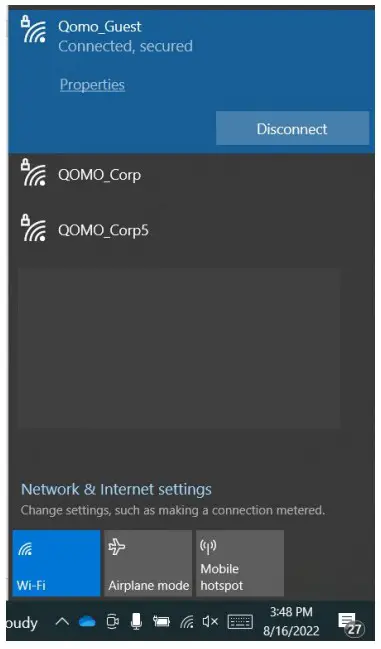
- Open the wireless network list on the computer then select the [QOMO_5G_xxxxxx] in the network list and input the password (default: 88889999) to start the connection.

- When the connection is successful, the Wi-Fi LED indicator will emit a solid green light and your network will show connected

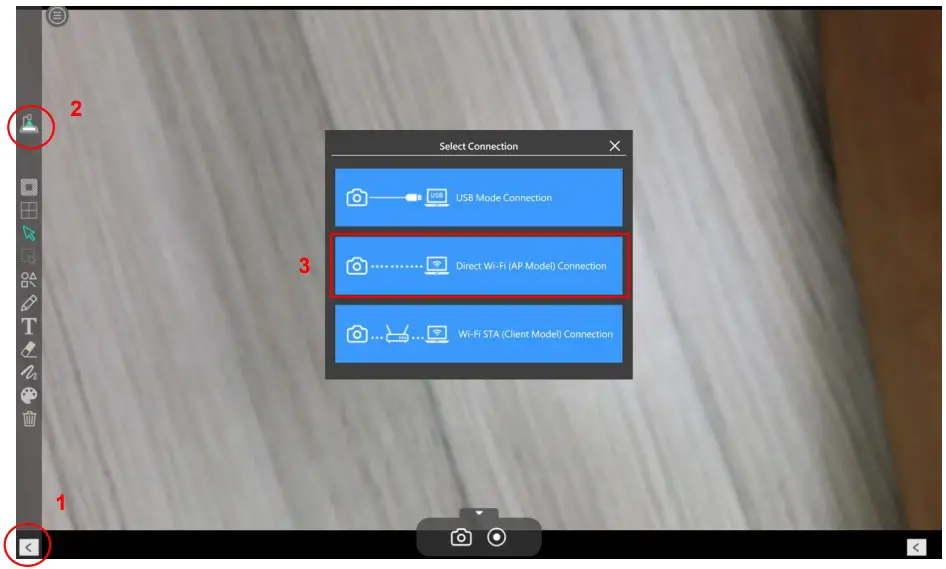
- Launch the QView Wireless Pro software, (1) click left arrow key if left menu is not visible, (2) click on “device connection”, and (3) select the mode “Direct Wi-Fi (AP Mode) Connection”.

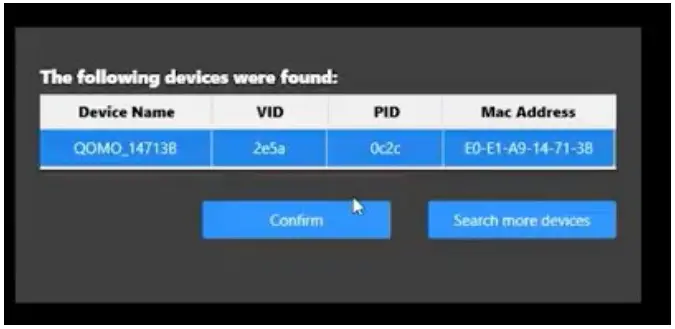
- You will see your device on the list and select “confirm”. You are now able to view your document camera.

Please note: When you are connecting your computer directly to your document camera in this mode, the Internet will be disconnected. You may access internet with an external wireless card adaptor.
Step 3: Connecting your document camera to your existing network to gain access to internet and the wireless document camera at the same time
Note: If this is not your first time setting up the camera and you are resetting it to a different network, you may have to reset your camera and start at “Step 2: Connecting your document camera to your computer wirelessly”
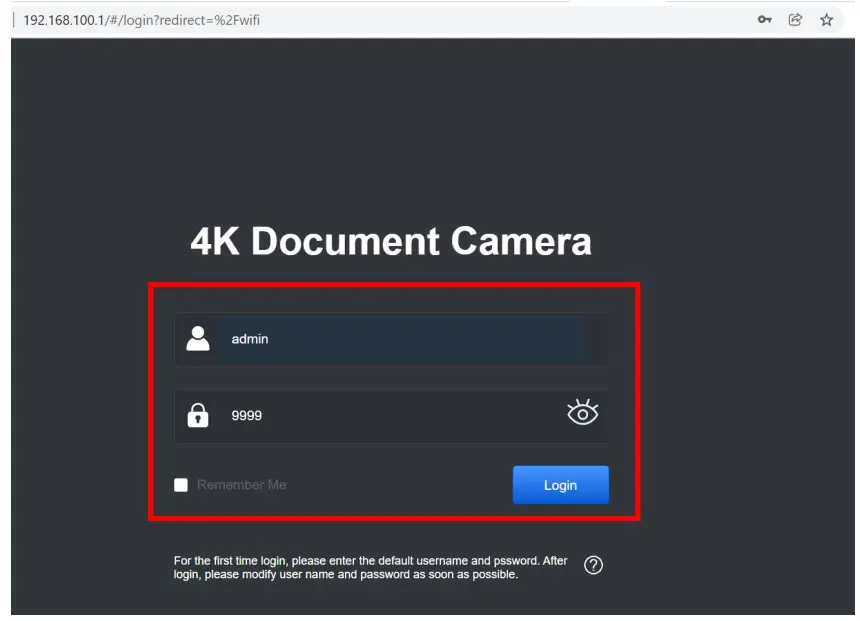
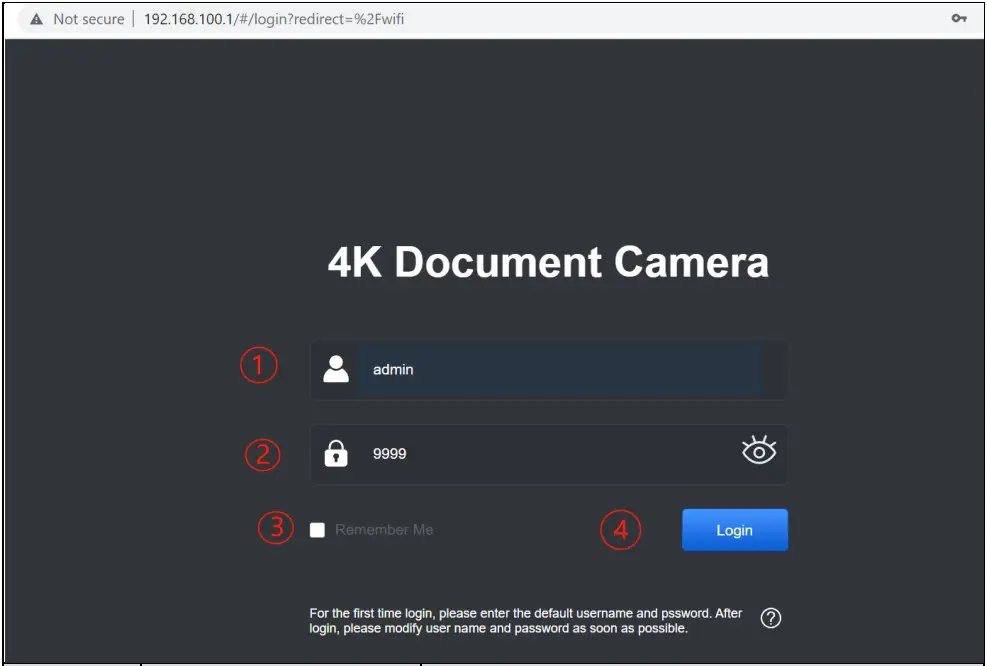
- Open the web browser and enter the default IP [192.168.100.1] in the address bar.

- Enter the login account [admin] and default password [9999] and click Login.

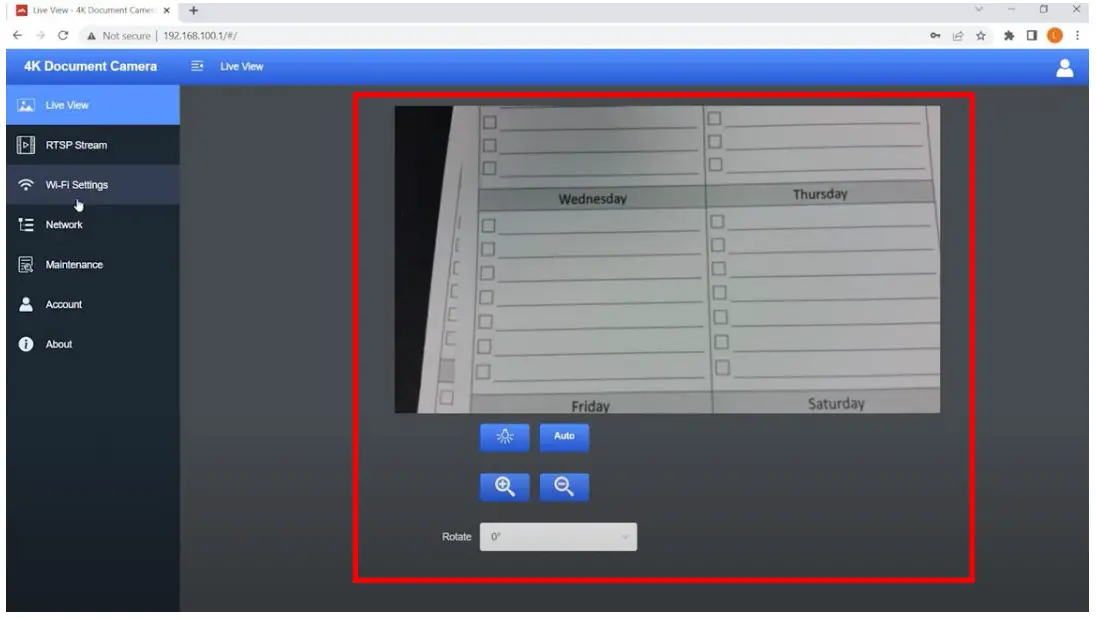
- After logging in to the web page, you can access a live preview and configure the settings on the web page.

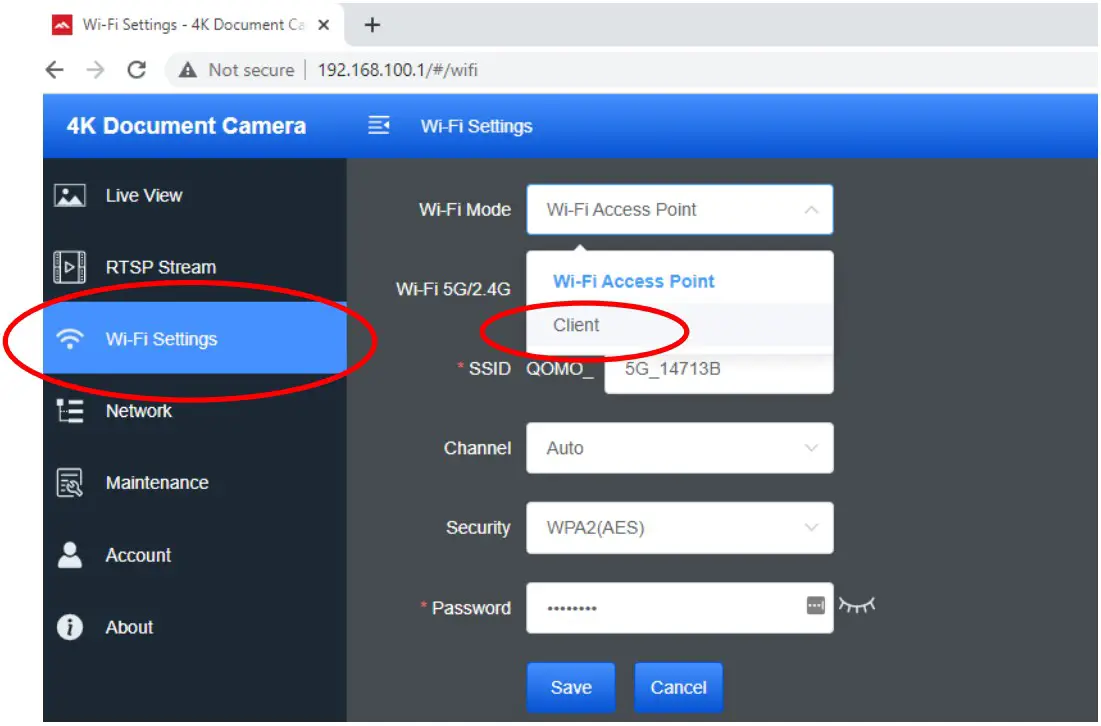
- Click on the “Wifi-Settings” in the left menu and configure to “client” mode by selecting client

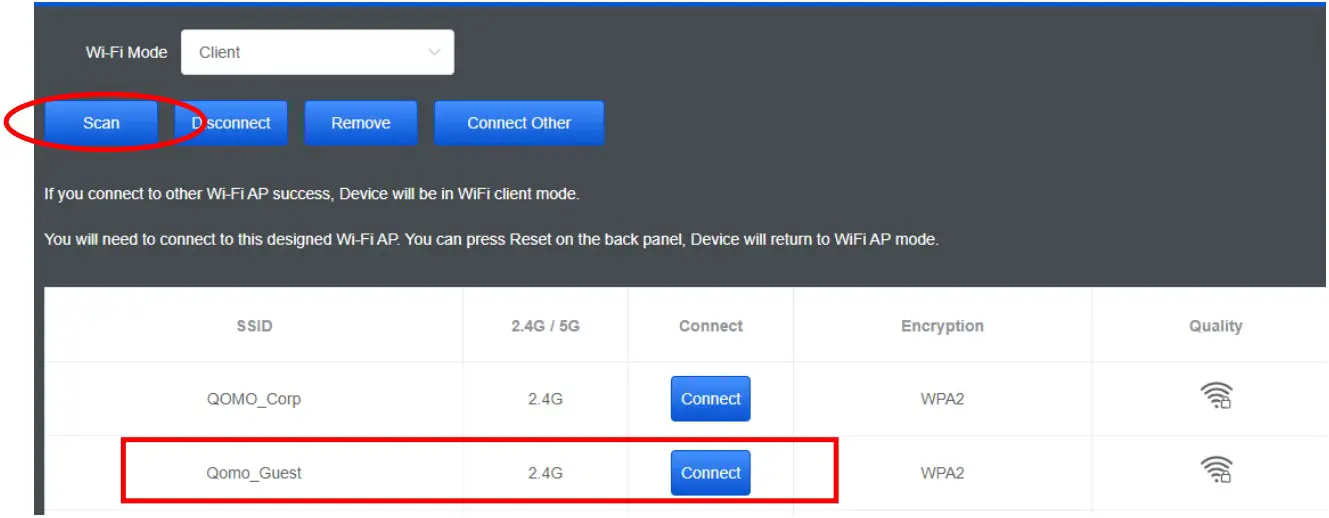
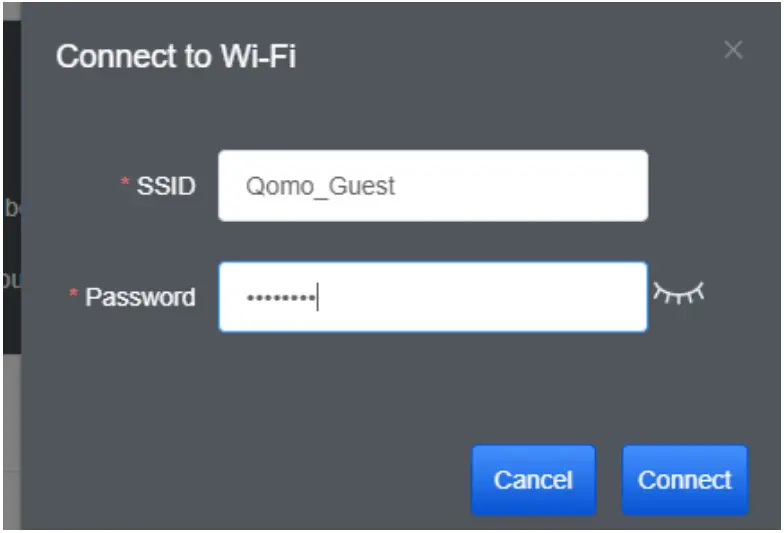
- Click “scan” and connect to your desired wifi network. This is the wifi network that you normally connect to on your computer to use the internet.

- Enter in the password of your wifi network

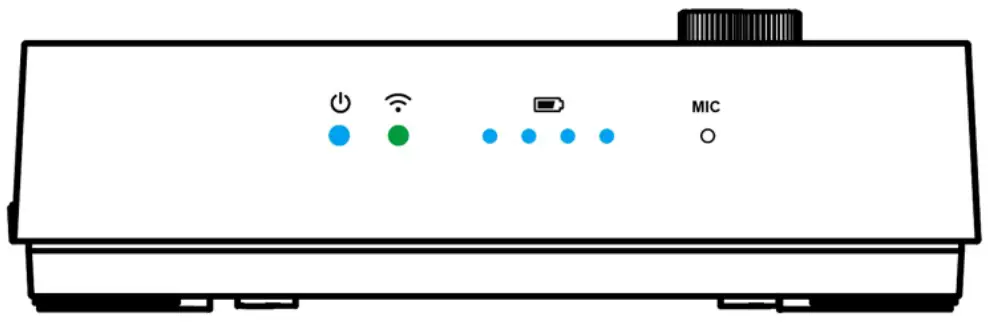
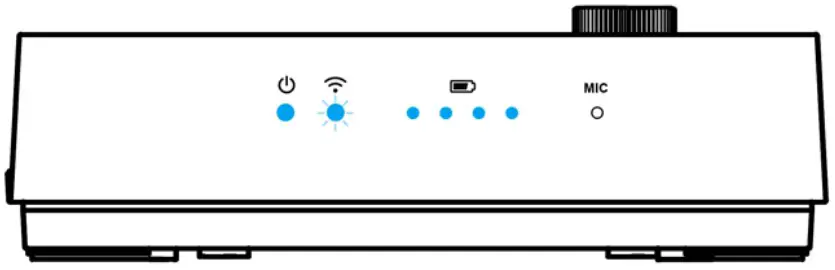
- After successfully connecting your document camera to your wifi network, you will see the light on your document camera turn solid blue. Your document camera is now on your wifi network, which means you can access your internet and the document camera at the same time with your computer.

- Now launch the QCapture Pro software and select the mode “WiFi STA (Client Mode) Connection”.

- Now that you have paired your document to your network, it will be connected to that network until you reset the camera.


Step 4: Using the camera again post set-up
- Make sure you are connected to the wifi network that your camera is connected to

- Turn on the camera, make sure the camera is in wifi mode, and see that a solid blue light appears under the wifi symbol on your document camera.
 a. Trouble shooting connection:
i. If the light under the wifi symbol on your document camera is blinking blue, then you are not connected to the correct wifi network on your computer.
ii. If the light indicator is flashing green, then your camera has not been set up and you will have to go to Step 2
iii. If your light indicator is solid green, then your computer is connected to the document camera. If you would like to connect your camera to your desired wifi network, you will need to go to Step 3. - Launch your QCapture Pro software. The camera should automatically connect to the software. If it does not, go to the left doc cam symbol and select Client mode.

 a. Trouble shooting connection:
Client Mode Web Page Settings Guide
V1.1
Web Page Menu Function Description
1. Login Screen
a. If you have not connected your document camera to your network, then your camera will have the default IP address of 192.168.100.1
b. If you have connected your document camera to your network, you can find your document camera’s ip address by going to your connected device through the QCapture Pro Software (![]() ⇒ “device”) and viewing IP address of the device.
⇒ “device”) and viewing IP address of the device.
| No | Item | Function Descriptions |
| 1 | User Login Account | Enter user login account (default: admin) |
| 2 | User Password | Enter user password (default: 9999) |
| 3 | Remember user account and password | Save user login account and password to the browser. When you log in next time, there is no need to re-enter them |
| 4 | Login | Log into the administrator screen on the website |
2. Live Viewing
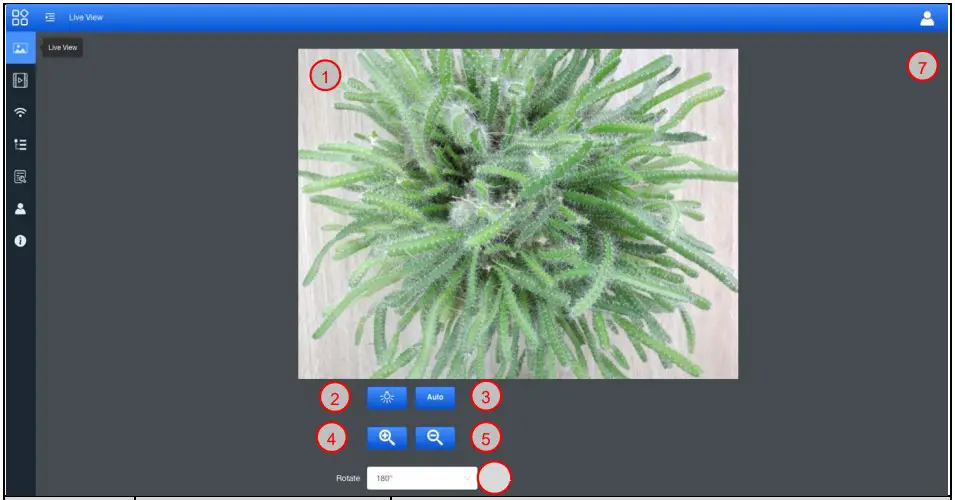
| No | Item | Function Descriptions |
| 1 | Preview window | Display the live preview image captured by the QPC100W |
| 2 | Autofocus | Automatically adjusts the image for the optimal brightness and focus |
| 3 | Lamp mode toggle switch | Click lamp mode to toggle the light switch: off / brightness 1 / brightness 2 / brightness 3 |
| 4 | Zoom In | Zoom in image |
| 5 | Zoom Out | Zoom out image |
| 6 | Rotate the image | Rotate the image: 0° / 90° / 180° / 270° / Flip / Mirror |
| 7 | Logout | Log out of the web page |
3. RTSP Streaming Settings
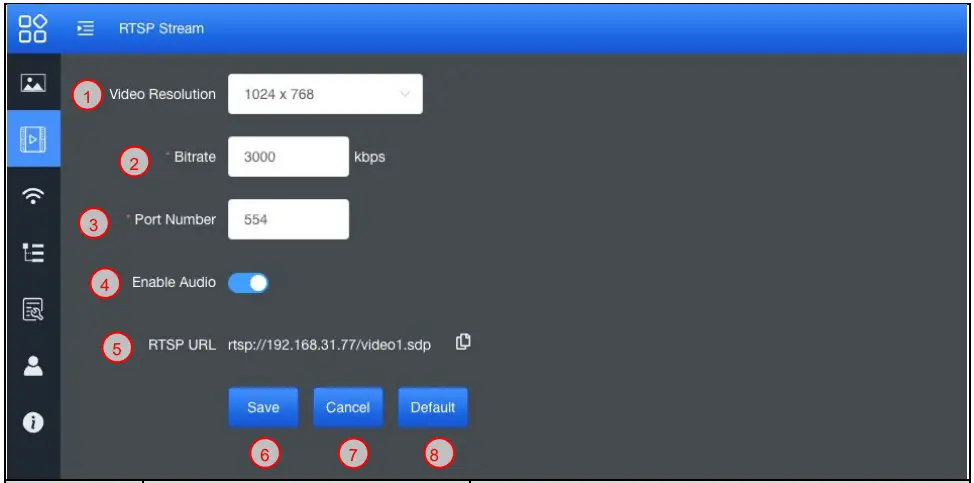
| No | Item | Function Descriptions |
| 1 | Resolution | Show or set the RTSP output resolution and fps |
| 2 | Bit Rate (kbps) | Show or set the RTSP Bit rate (0 ~ 20000) |
| 3 | Port Number | Set the RTSP port (0 ~ 10000) |
| 4 | Audio Setting | Turn on/off RTSP audio |
| 5 | RTSP URL | Show current RTSP URL connection |
| 6 | Save | Save and change the RTSP streaming settings |
| 7 | Cancel | Cancel without saving |
| 8 | Default | Restore to default settings |
4. Wi-Fi Setting (Access Point Mode)
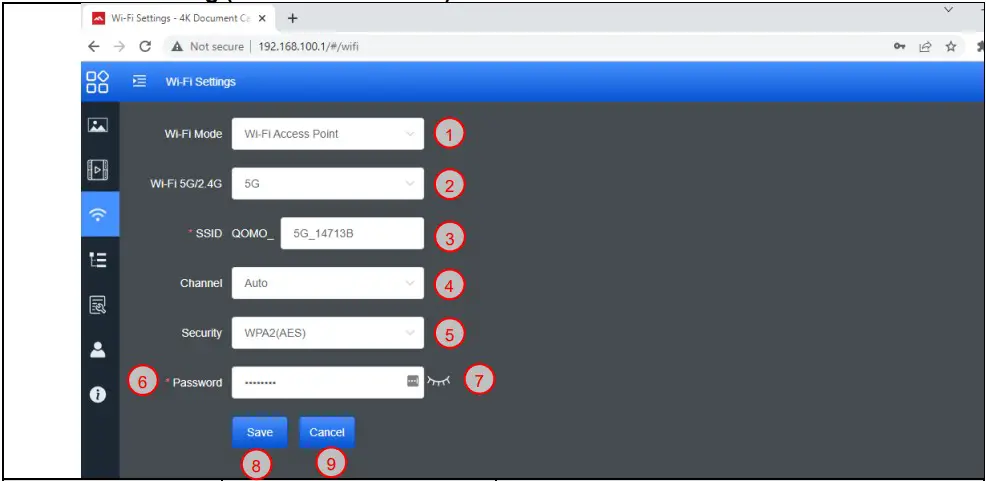
| No | Item | Function Descriptions |
| 1 | Wi-Fi Mode | Select Access Point or Client Mode |
| 2 | Wi-Fi 5G/2.4G | Switch between 5G / 2.4G under Wi-Fi Access Point mode |
| 3 | Device Name (SSID) | Device name of wireless network |
| 4 | Channel | Select the channel based on different regions |
| 5 | Security | Wi-Fi encryption setting |
| 6 | Password | Connect the Wi-Fi SSID password |
| 7 | Show Password | Show the Wi-Fi SSID password |
| 8 | Save | Save and change the wireless network settings |
| 9 | Cancel | Cancel without saving |
5. Wi-Fi Setting (Client Mode)
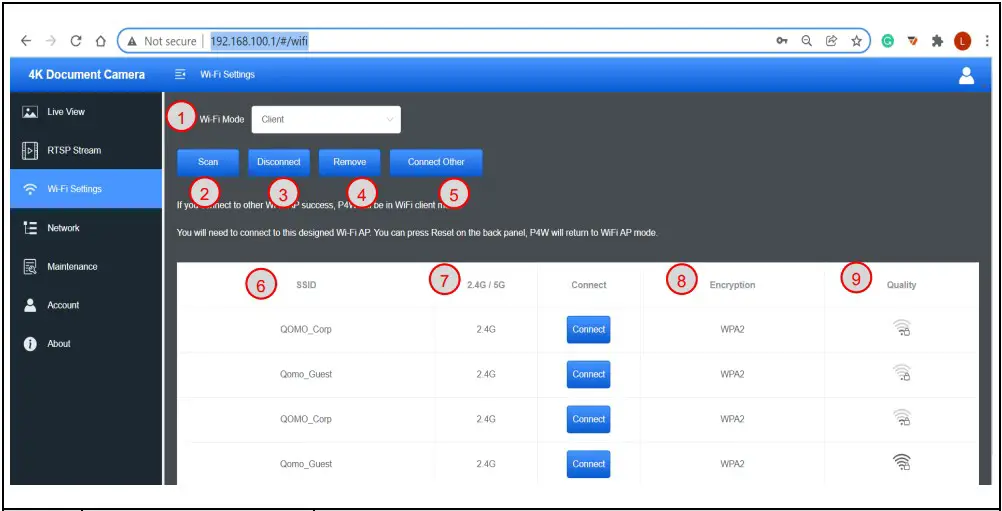
| No | Item | Function Descriptions |
| 1 | Wi-Fi Mode | Select Access Point or Client Mode |
| 2 | Scan | Scan nearby wireless network devices |
| 3 | Disconnection | Disconnect from current wireless network device |
| 4 | Remove | Remove the selected wireless network device from the list |
| 5 | List of Wi-Fi Wireless Network Device Names | Click the wireless device and the following image will be displayed. Enter the password to connect to various wireless network devices 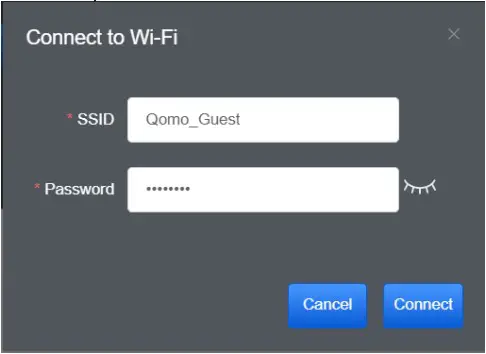 |
| 6 | Device Name | Device name of wireless network |
| 7 | Connection Status | Display the wireless network device to which QOMO QPC100W is currently connected to. If connected, the corresponding field of the wireless device will display “Connected”, otherwise it will stay blank |
| 8 | Encryption | The current encryption setting of the wireless network device |
| 9 | Signal Status | Show the degree of the Wi-Fi signal |
6. System Network Information
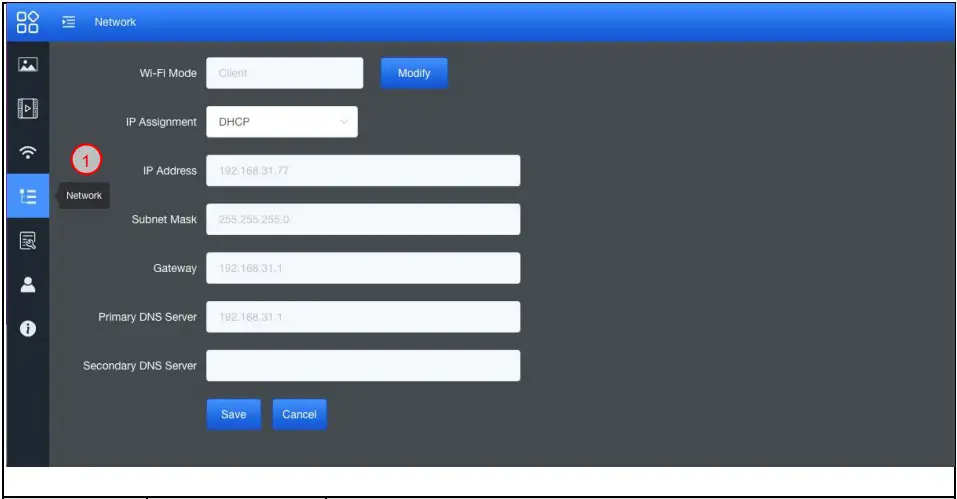
| No | Item | Function Descriptions |
| 1 | Network | The network setting of the QPC100W device. When the DHCP function is closed, click edit to enter edit mode and change the network setting. |
7. Maintenance
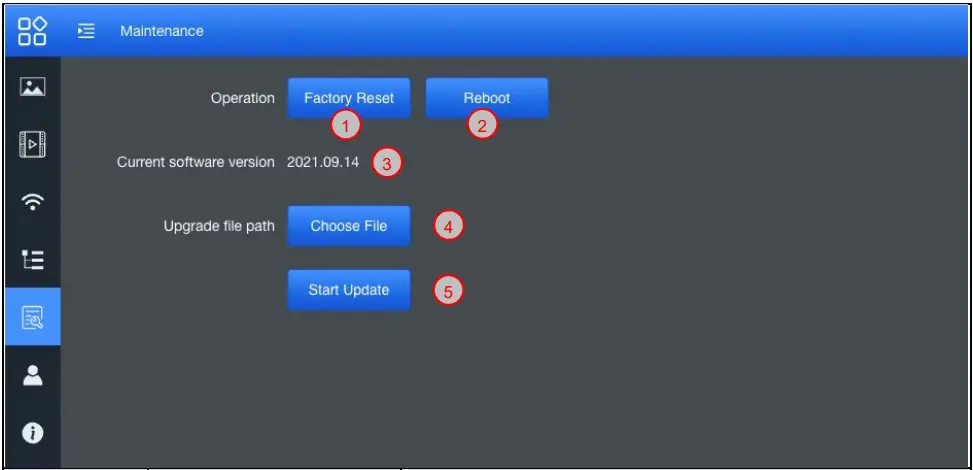
| No | Item | Function Descriptions |
| 1 | Reset to the default value | Select the reset button to resume the factory default setting as the web page setting |
| 2 | Reboot | Click the reboot button and reboot the device |
| 3 | Current Firmware version | Display current firmware version |
| 4 | Upgrade file path | Choose firmware *.appsw file |
| 5 | Start Update | Click and start update the firmware |
8. User Account

| No | Item | Function Descriptions |
| 1 | User Name | Allow modify the user login account (default: admin) |
| 2 | Password | Allow modify the login password (default: 9999) |
| 3 | Save | Save and change the wireless network settings |
| 4 | Cancel | Cancel without saving |
9. About
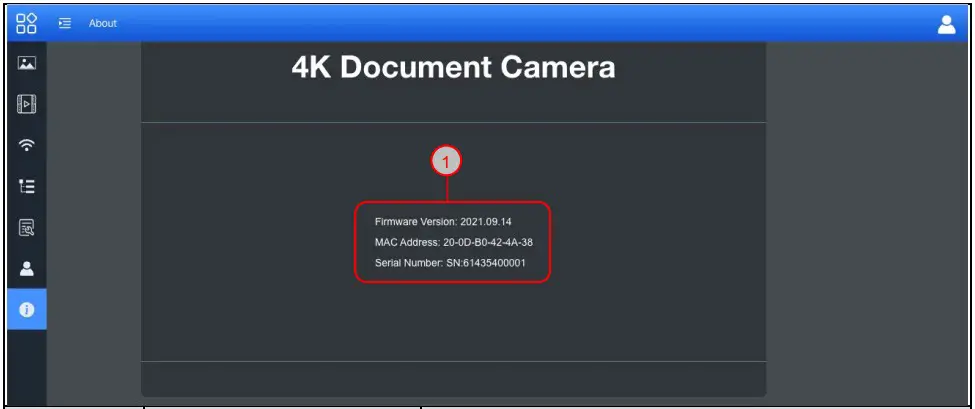
| No | Item | Function Descriptions |
| 1 | Related Information | Display information about this device. |
V1.2


