CamCasle Q10 Device Camera User Manual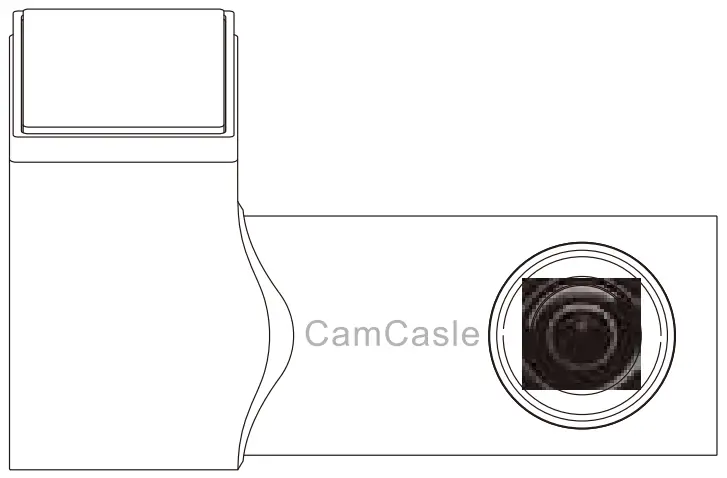
Introduction
Thank you for purchasing Cam Casle products. Please read this instruction manual carefully before use and keep it for your convenience. If you have any questions or comments, please contact us via our official email address: [email protected].
The followings are the precautions for using the dash cam:
- This product only supports charger with 5V voltage, otherwise the machine may be damaged.
- Insert or unplug the Micro SD card in the off state. Otherwise it will cause abnormal or damage to the device.
- Please use the high-speed Micro SD card that meets SDHC specifications and with the brand logo.
- Please use the 16GB-128GB Micro SD card.
- Video files may be lost or damaged if the Micro SD card is removed during recording.
- Video files may be lost or damaged if the camera is dropped or crashed.
- Micro SD card must be installed correctly to ensure proper function and video recording.
- Please use the original accessories, and do not disassemble the product.
- Please abide by the relevant national laws and regulations, and do not use this product for any illegal purposes.
- If you have any questions or need more support with the product, please contact our after-sales staff.
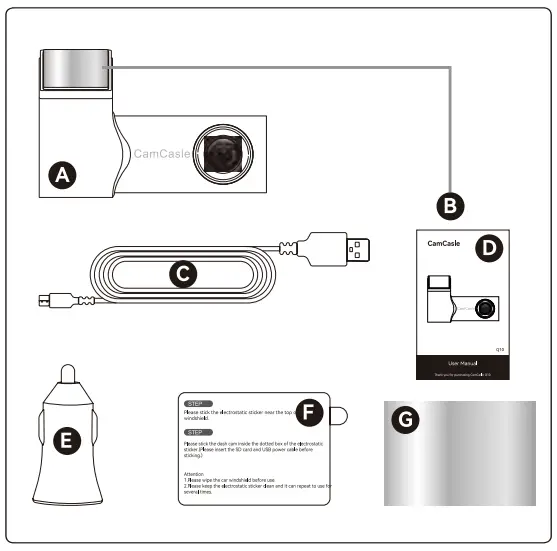
Package Contents
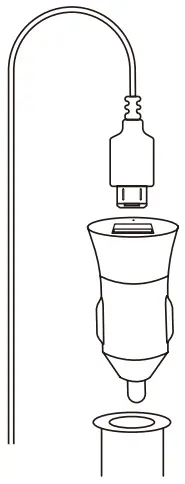
- CamCasle Q10 *1
- 3M Adhesive Base *1 (Mounted On The Dash Cam)
- 11.48ft USB Data Cable *1
- CamCasle Q10 User Manual *1
- Car Charger *1
- Electrostatic Sticker *2
- Spare 3M Adhesive *2 (Base Not Included)

Operation Instruction
Camera Overview
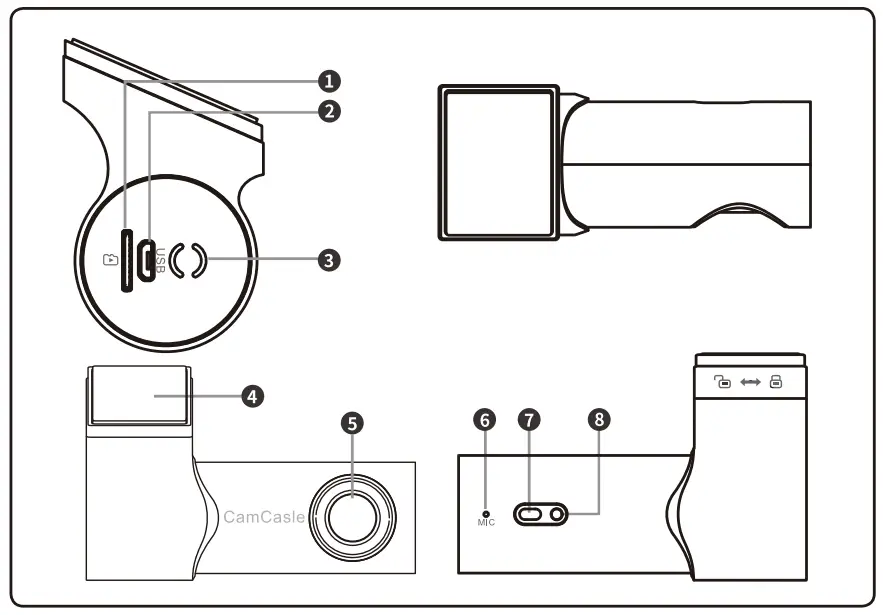
| NO. | IName s | Description |
| 0 | Micro SD Card Slot | SD card location |
| 0 | Micro USB Port | Connect the power cable |
| CD | Speaker | Voice announcements |
| ED | Detachable Adhesive Base | Place the dash cam to a different position |
| 0 | Camera Lens | Formation of images |
| © | MIC | MIC audio jack |
| © | Reset Button | Long press to reset (restore factory settings) |
| © | LED Indicator | Indicates the status of the dash cam |
Product Installation
SD Card Installation
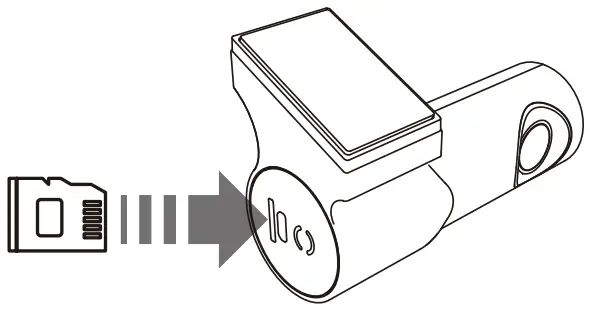
- Insert the Micro SD Card
Insert the Micro SD card as shown in the picture until it clicks.
(The Micro SD card maximum supports up to 128 GB.)
- Remove the Micro SD card
Press the Micro SD card inward and remove it from the slot.- Use of the Micro SD Card a.
Please check the insertion direction of Micro SD card, incorrect insertion direction may damage the camera and Micro SD card. - Please use a high-speed Micro SD card that meets SDHC specifications; high-speed Micro SD card will have the Class 10 logo.
- For your better experience, we recommend you to format the SD card before you start using it. Steps to format:
- use the card reader and format the SD card on the computer. (you can repeat the format several times)
- insert the SD card into the Q10 dash cam and format it again in the APP page.
- Please note that the SD card is a consumable product, and its service life decreases with the number of times that the data is read. It is recommended that you replace the SD card regularly.
- In order to extend the service life of SD card, you can format the SD card once every two weeks. Do not plug and unplug the SD card frequently, which will cause damage to the SD card.
- Please make sure to insert and remove the SD card when the power is off.
- It is recommended to use a 16GB-128GB SD card.
- Use of the Micro SD Card a.
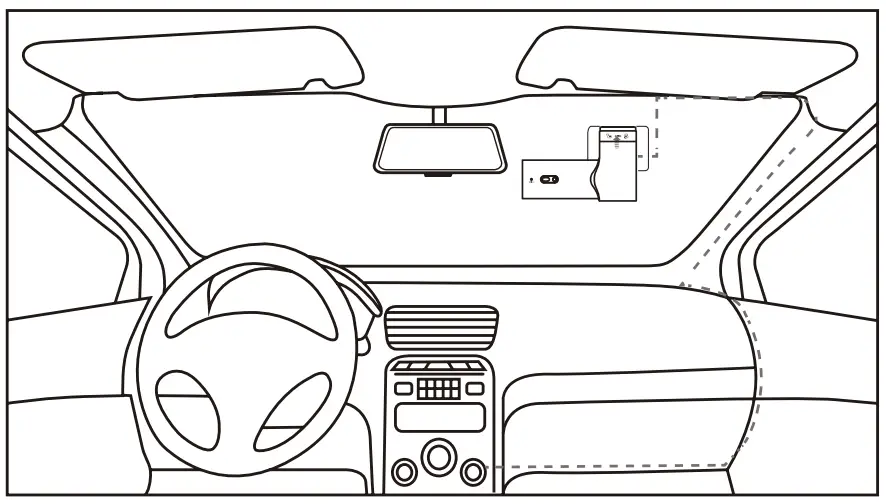
Dash Cam Installation
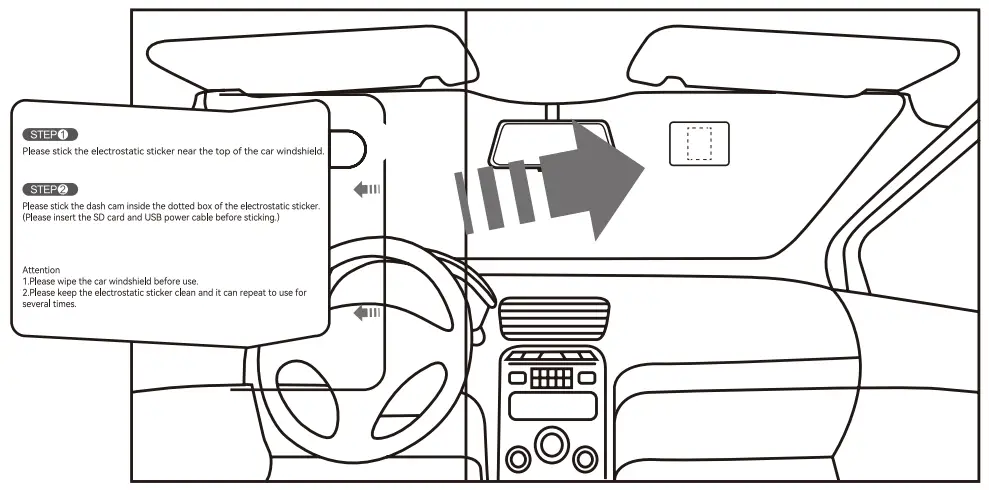
- Wipe the place that need to be installed and ensure the window is clean.

- Stick the electrostatic sticker near the top of the car windshield.

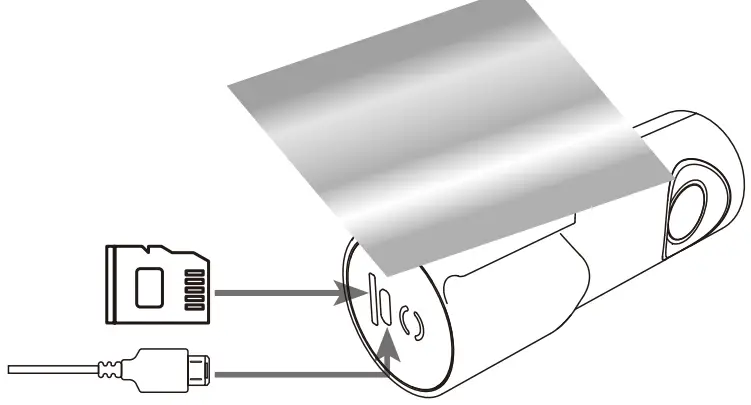
- Insert the SD card and USB Cable in the dash cam.

- Remove the 3M adhesive film from the base, and stick the dash cam in the dotted box of the electrostatic sticker.

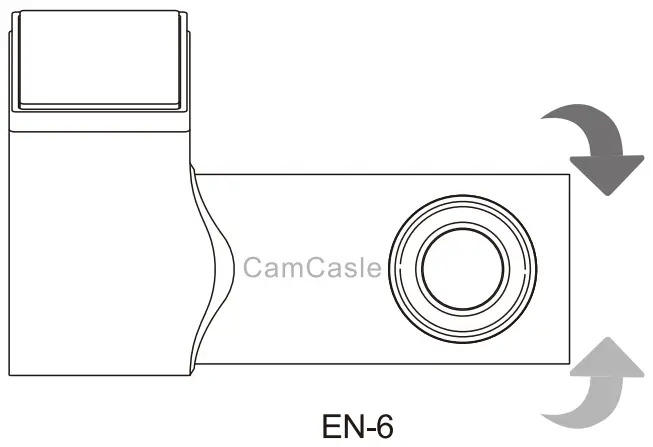
- Rotate the dash cam to adjust the angle of the lens. It is recommended to adjust the lens slightly downward to ensure that the camera’s view is parallel to the horizontal ground. (Suggestion: the ground/sky ratio is approximately 6:4.)

- Plug the end of the USB cable into the car charger, and insert the car charger into the cigarette lighter.

- After the dash cam is installed and connected to the power supply, the recorder automatically turns on and records video, and the work indicator lights up, indicating that it enters working condition.


LED Indicator Description
| LED Indicator Status | Status Description |
| Light out | OFF |
| Green Light Always On | Powered on (Not recording) |
| Green Light Flashing | Recording In Progress |
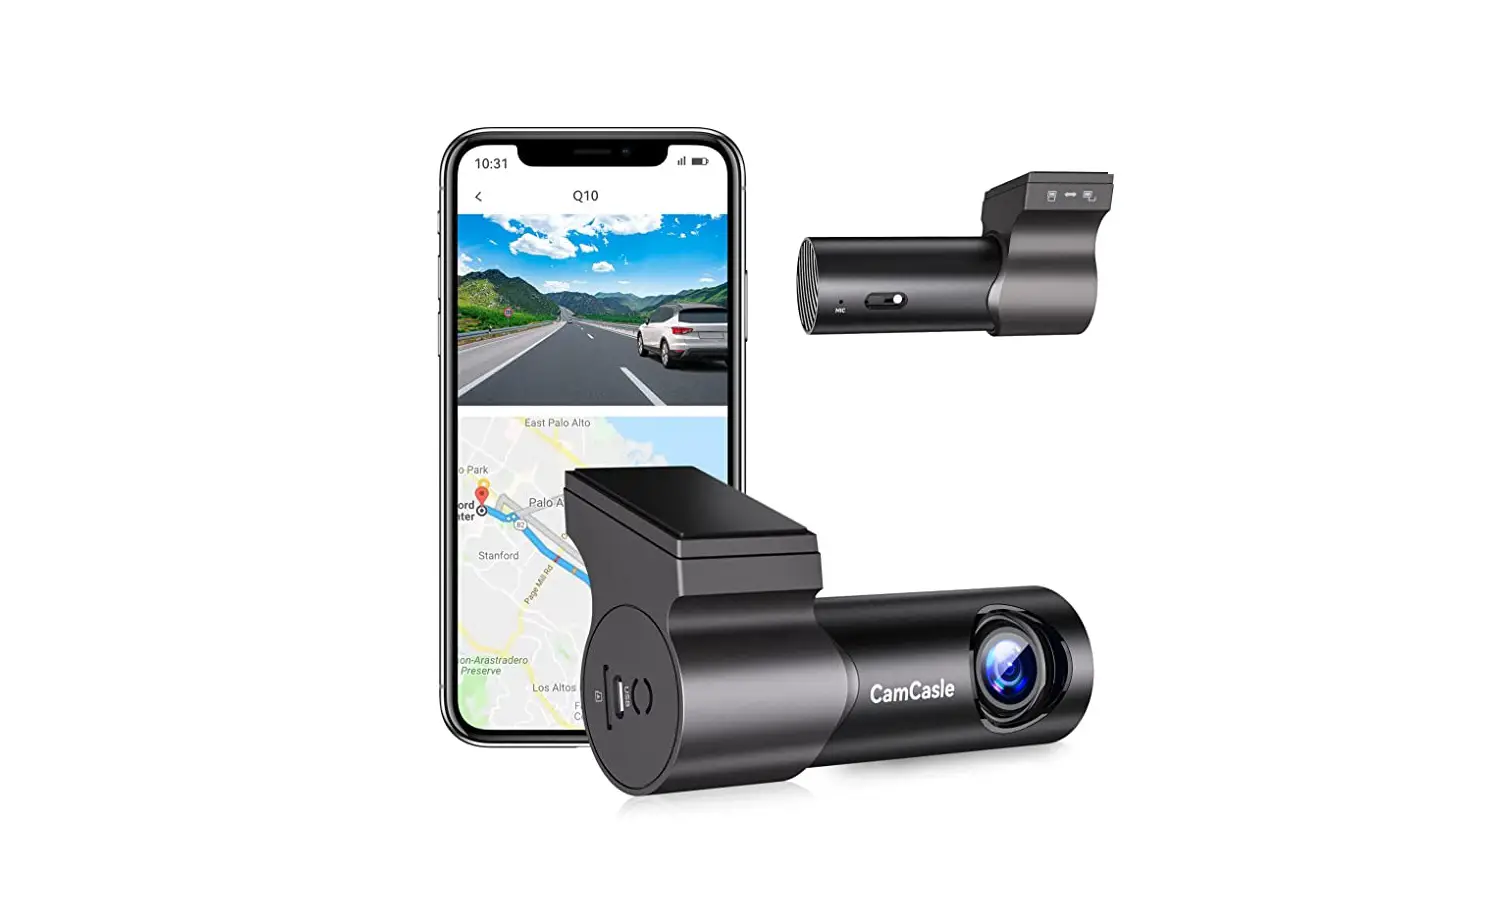
App Connection
- Scan the QR code to download the “CamCasle” APR
Android
App store
- Make sure the dash cam is powered on.
- Open “CamCasle” APP, click “connect DVR” on the page of APR
- Enter the WiFi setting page.
- Select the WiFi name “CamCasle-Q10-XXXX” in the WiFi list to connect (default password: 12345678).
- Change the password: Enter the new password and click OK. After password changed, reconnect the dash cam and manually enter the new password. (Please take a screenshot to save your updated password, change password is not recommended.)
Attention
The dash cam WiFi is an APP hotspot that provides a wireless connection to the device for access only. The camera does not have networking capabilities. The smartphone will not actively select the dash cam’s WiFi for connection.
Special Note
If the WiFi is disconnected, please re-connect it again. Special Note The “CamCasle” App is produced by CamCasle and is part of CamCasle products. If you have any questions or comments about the use of the app, please feel free to contact us via our official email address. Thank you for your support to CamCasle.
APP Introduction
APP Main Interface Introduction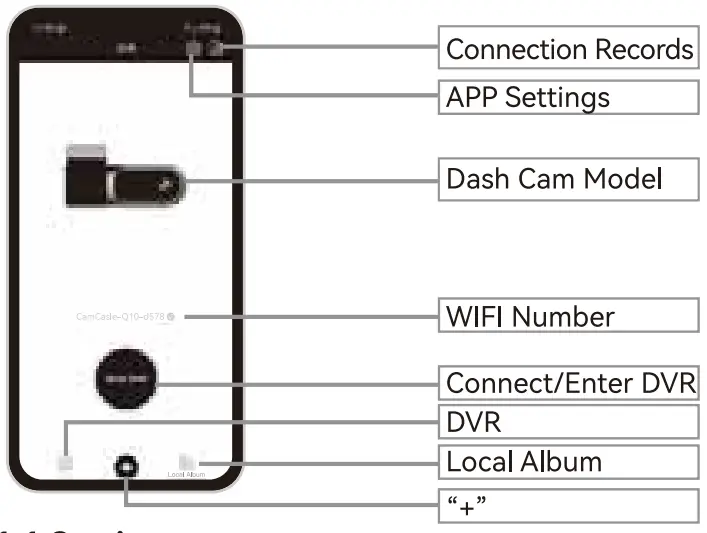
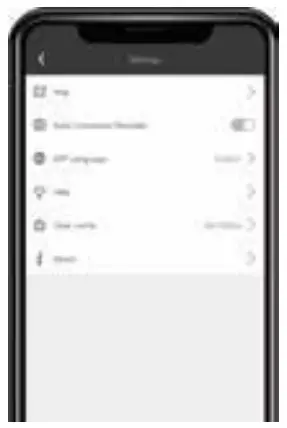
Settings
- Map
The driving tracks can be viewed on the map. - Auto
Connected Recorder ON/OFF (Default: ON) With WiFi connection, the APP can automatically connect to the device. - APP Language
APP includes more than 20 languages. (Default: Mobile System Language) The operation pages of the APP displays the language you have selected. - Help
The Common Q&A For Dash Camera. If you have any questions, please send them to our official email address ([email protected]), we have professional technical support and customer service team at your service. - Clear Cache
Displays the current cached data capacity of the APP and can be cleared. (Attention: the cache refers to the data such as video thumbnails, not including the videos in the SD card) - About
CamCasle APP Version Information. If you want to upgrade your app, you can go to the app store or contact us to download it.
View & Delete the Connection Records
Long press to view the WiFi information of the dash cam connected by CamCasle APP. Swipe to the left to delete the connection records.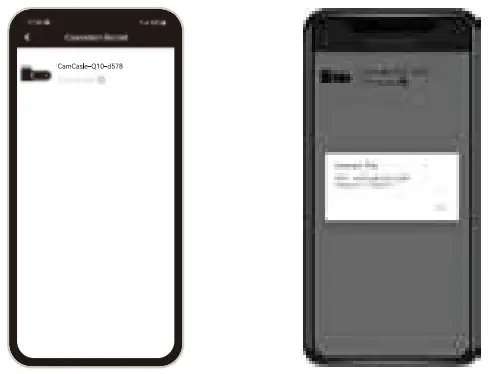
DVR
Click “Enter DVR” to connect to the Q10 dash cam.
1.4 “+”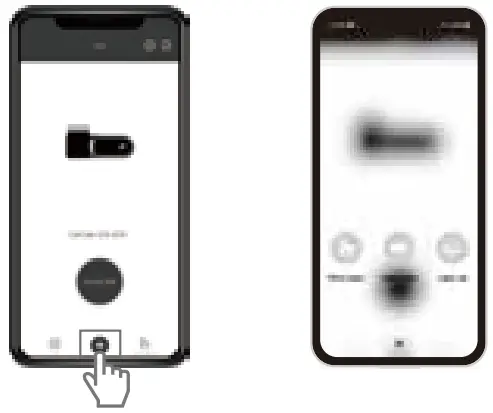
- Photo Share
Share the photos to social media platform. - Video Share
Capture 10-second video to share. (Only support 10-second video)
Attention
If you need to share the full video, download the video file to your own mobile album, and then share it through your mobile album. - Track List
Share the driving tracks and map information to social media platform. Attention You can refer to User Manual 3.5 for the specific sharing process.
Local Album
- Loop
In the APP file, the dash cam records regular video. - Event
In the APP file, the dash cam records emergency video. (locked video) - Photo
In the APP file, the dash cam shows the taken photos.
Note
Need to download the files from SD card to APP, please refer to User Manual 3.2
App Function Introduction
(After Connecting)
Icon Function Introduction
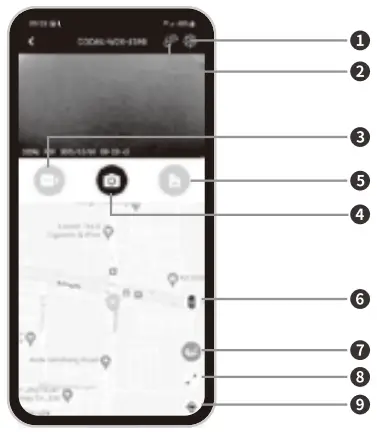
| NO. | Name | Description |
| 1 | Settings | Dash cam settings |
| 2 | Disconnection | Disconnect from dash cam |
| 3 | 10-Second Video | Record a 10-second video |
| 4 | Photo Shoot | Take a picture |
| 5 | Album | View files stored on SD card |
| 6 | Road Condition Monitoring | Monitor the map to show real-time road conditions |
| 7 | Action Track | Record location change tracks |
| 8 | Mop Full Screen | Display full screen map |
| 9 | Location | Keep the current location centered on the page |
Disconnect
Click to disconnect the CamCasle APP from the dash cam.
Dash Cam Settings
- Settings (Click the settings icon to enter this page)
- Resolution
Select table recording resolution: 1080P 30FPS / 720P 30FPS. (Default: 1080P 30FPS) - Looping
Video This function determines the recording length of each video, select from: 1 Minute / 3 Minutes / 5 Minutes. (Default: 3 minutes) - Record
Audio Select this function, start recording. When turned off, stop recording. (Default: ON) - Volume
This function determines the volume level of voice prompts. Select from four settings:OFF / Low / Medium / High. (Default: Medium) - WDR
This function reduces the brightness difference of the recorded screen and adjusts the over-bright and over-dark areas, so the video effect will be clearer. (Default: ON) - Light Frequency
Default Frequency 50 Hz.
- Resolution
- Time Setting
This function displays the current recording time. - EV Setting
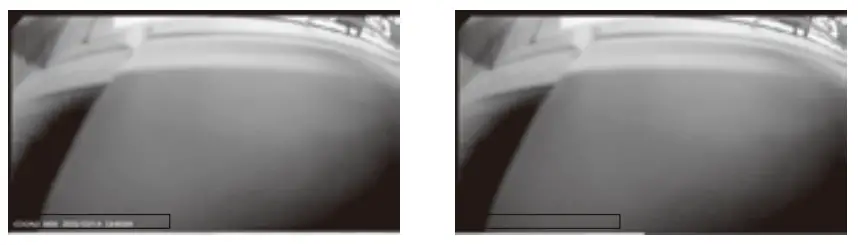
This function can change the EV value of the dash cam. The adjustment range is from 2 to -2. If the brightness is too high, it is recommended to lower the EV value. (Default: 0) - Stamp Setup
Turn on this function, the recorded video shows watermark. (Default: ON)
- Format TF
Card Click to delete all the files in the SD card. Note: Files cannot be recovered after formatting. Please download and save important files in advance.
Related Information:- TF Card Available Space
Check the remaining capacity of the SD card. - Version
Check the version information of the dash cam.
- TF Card Available Space
- Camera Settings Reset
Click to restore the dash cam system settings to the factory state. All settings will be restored to their default values.
- EV Setting
Main Function Description
Collision Detection
- Turn on collision sensitivity (off, low, medium, high switchable), and the default is Medium.
- When vibration or collision detection is triggered during driving, dash cam will lock the current video into the emergency folder, the locked file will not be overwritten, so important events will be saved and can be used as evidence.
- The locked files will be saved in the emergency folder, which will automatically overwrite the earliest locked files when that folder is full. When the “Emergency Files” folder accumulates to 40% of the card capacity, the camera will overwrite the earliest video. Attention
- Please transfer important videos to your PC or other storage location (e.g. external hard drive) regularly.
- To maintain good read performance, the Micro SD card should be formatted every 1-2 weeks.
Seamless Recording
There will be no time interval between each two consecu-tive recorded videos. If the loop recording length is selected as 1 minute, then the recorded video periods, for example, will be 06:00:00-06:01:00, 06:01:00-06:02:00, and 06:02:00-06:03:00.
View Files on the Micro SD Card
Click “Enter DVR” to enter this page. Continue to click the icon of the picture below to view photos and videos.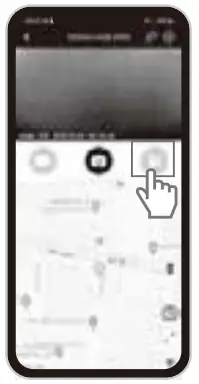
Save Files from the Micro SD Card to APP’s Local Album
Select from Loop/Event/ Photo files that you want to share in the SD card file, click download, and the file can be saved to APP’s local album.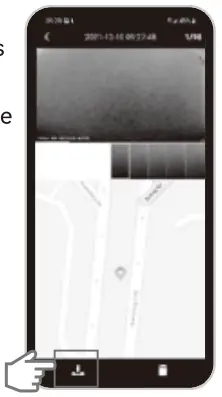
Click the icon in the picture to share photos or 10-second video clips.
Crop Video (10s)
Edit Video (10s)
Share Video (10s)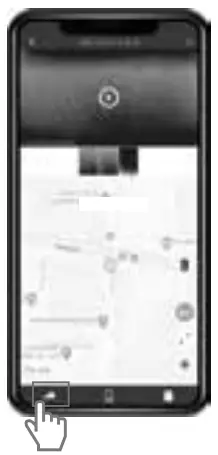
Save App Files to Your Phone Album
Directly save the photos or videos to your phone album.
Share the photos and videos in your phone album.
Attention
The Wi-Fi of the car recorder has no networking function, if you need to access the Internet, please switch the network.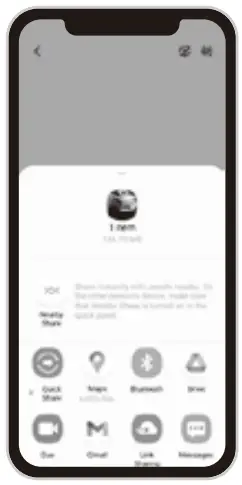
Specification
| Device model | Q10 |
| Processor | NT96672 |
| Sensor | GC2053/200W |
| Aperture | F2.0 |
| Video Resolution | 1080P 30fps/720P 30 fps |
| Photo Format | JPG |
| Video Format | MP4 |
| Micro SD Maximum Support | 128GB |
| Mic | Built-in Microphone |
| Speaker | Built-in Speaker |
| Product Color | Black and Silver |
| Dimensions | 12W*1-1=3.869.69*1.18 inches |
| Light Source Frequency | Default 50HZ |
| G-Sensor | Built-in G-Sensor |
| Automatic Recording | 4′ |
| Collision Detection | V |
| Date and Time Stamp | 1 |
| Emergency File Protection | I |
| Seamless Loop Recording | I |
| Power Supply Interface | Micro USB |
| Operating Temperature | -10°C – 60°C / 14°F-140°F |
| Storage Temperature | -20°C – 70°C / -4°F-158°F |
FAQ
| Failure | Cause | Solution |
| Unable to Loop Video | Check if the Micro SD card is full | Connect the APP and format the Micro SD card (back up the last video and picture before formatting) |
| Screen Stuttering | Micro SD card does not match | Check if the Micro SD card is a high-speed card with Class 10S rate and the capacity is not less than 16GB. |
| Unable to Take Pictures or Videos | Check if the Micro SD card is full | Connect to APP and format the Micro SD card (back up the last video and picture before formatting) |
| Stop Autocraticaly When Recording | HD video data is huge, SD card is not suitable | Use SDHC compatible high speed Micro SD card, high-speed micro SD card will have C10 logo. |
| Prompt “File Error” | Error occurred when storing data on the Micro SD card, resulting in incompatible files | Connect the APP and format the Micro SD card. |
| Foggy Image | The lens is stained | Wipe the lens clean. |
| Other reasons | Please contact after-sales service. | |
| Downtime | Downtime | Short press the reset button to restart. |
Warranty
The Q10 is covered by a 1-year manufacturer warranty. For more information, please visit www.camcasle.com
WARRANTY CARD
ATTENTIONS:
- Please read the return procedures and warranty policy carefully on www.camcasle.com before sending items back to point-of-purchase.
- Please fill the card and send it to your reseller together with the product if your product’s warranty is valid.
| S.N: | |
| Date of Purchase: | |
| Product Model: | |
| RMA Number | |
| Return Reason: | |
| Customer Name: | |
| TEL: | |
| E-mail: | |
| Address: |
FCC Statements

NOTE: This equipment has been tested and found to comply with the limits for a Class B digital device, pursuant to part 15 of the FCC Rules. These limits are designed to provide reasonable protection against harmful interference in a residential installation. This equipment generates uses and can radiate radio frequency energy and, if not installed and used in accordance with the instructions, may cause harmful interference to radio communications.
However, there is no guarantee that interference will not occur in a particular installation. If this equipment does cause harmful interference to radio or television reception, which can be determined by turning the equipment off and on, the user is encouraged to try to correct the interference by one or more of the following measures: –
- Reorient or relocate the receiving antenna.
- Increase the separation between the equipment and receiver.
- Connect the equipment into an outlet on a circuit different from that to which the receiver is connected.
- Consult the dealer or an experienced radio/TV technician for help
Changes or modifications not expressly approved by the party responsible for compliance could void the user’s authority to operate the equipment.
This device complies with Part 15 of the FCC Rules.
Operation is subject to the following two conditions:
- This device may not cause harmful interference, and
- This device must accept any interference received, including interference that may cause undesired operation.
RF Exposure Warning Statements:
This equipment complies with FCC radiation exposure limits set forth for an uncontrolled environment. This equipment shall be installed and operated with minimum distance 20cm between the radiator & body.


