![]() PF1005
PF1005
Digital Photo Frame
User Manual
Introduction
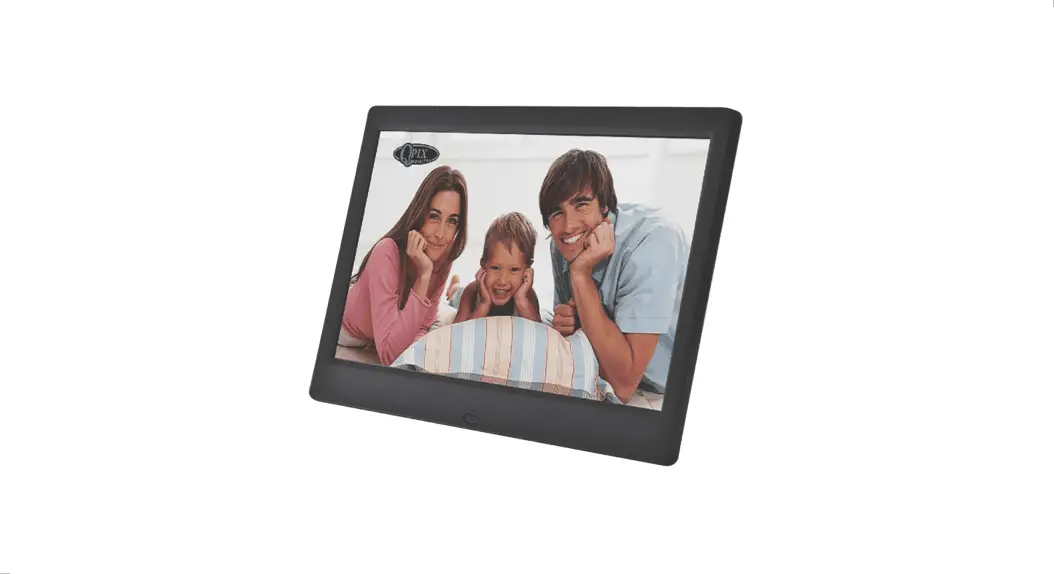
Thank you for selecting the QPIX Digital Photo Frame. Displaying your favorite picture is easy and fun.
1.1 Features
- 10.1″ TFT LED panel with 1024 * 600 pixels resolution, 16:9 aspect ratio.
- Supports most photo formats: JPG, JPEG, BMP, PNG, and more.
- Supports most movie formats: MPEG-1, MPEG-2, MPEG-4 (AVI/Xvid), M-JPEG, and more.
- Supports most audio formats: MP3, WMA, WAV, and more.
- Supports photos with background music.
- Supports viewing pictures in thumbnail mode.
- Convenient features for daily life include an alarm clock, calendar, video player, and music player.
- Slots for SD/MMC/SDHC memory card and USB memory stick.
- Stereo speaker, earphone output.
- Adjustable photo slideshow interval with 9 transition effects.
- Auto power on and off.
- 8 GB built-in memory
1.2 What’s in the Box
- Digital Photo Frame (PDF)
- AC Power Adaptor
- Remote Control
- Back Stand
- User Manual
- Warranty Card
1.3 Product Overview
1.3.1 Function Buttons on Back Side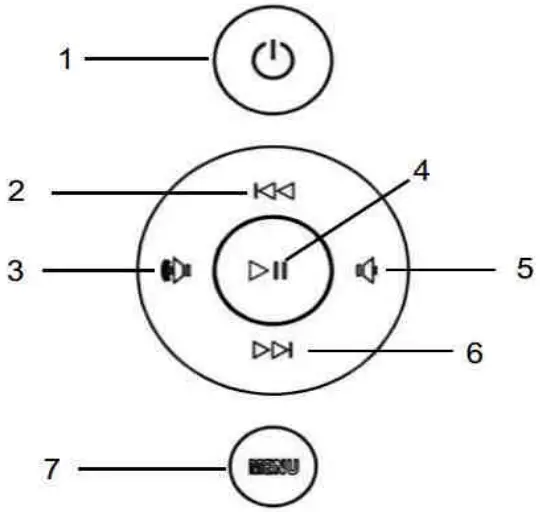
- Power On/Off
- Previous File/Up
- Volume Up/Left
- Enter/ Play/Pause
- Volume Down/Right
- Next File/Down
- Press to return to the next level of the current function, press and hold to enter the setup menu
1.3.2 Interface on the Right Side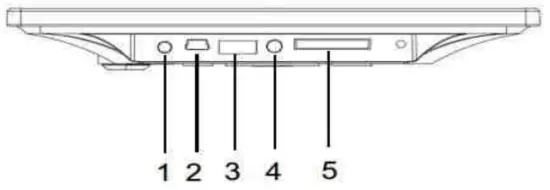
- DC Port
- Mini USB
- USB Port
- 3.5mm Earphone Jack
- SD/MMC/SDHC Memory Card Slot
1.3.3 Remote Control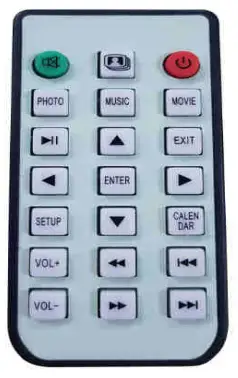
| Icon | Description |
Power On / Off | |
| Mute |
| Photo and Music Play Mode |
CALENDAR | Calendar |
PHOTO | Photo Play Mode |
| MUSIC | Music Play Mode |
MOVIE | Video Play Mode |
Up | |
| Down |
Left | |
| Right |
| ENTER | Enter |
VOL + | Volume Up |
| VOL – | Volume Down |
| Fast Forward |
Fast Backward | |
| Play Previous File |
Play Next File | |
| Play or Pause |
| SETUP | Setting |
The PDF has a built-in remote control sensor in the bottom middle of the frame.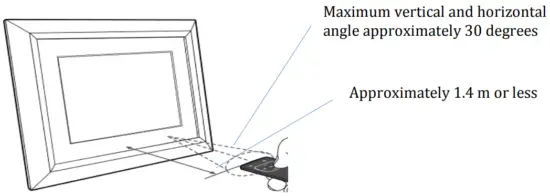
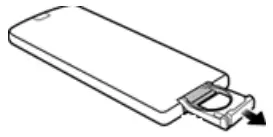
Replacing the remote control battery
- On the back of the remote control, pull out the battery holder.

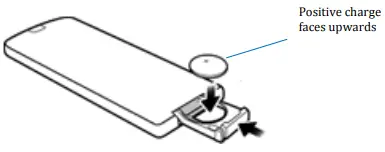
- Insert the new battery into the holder. The battery must be placed with the positive charge facing upwards, as shown in the illustration below.

- Slide the battery holder into the remote control.
Important Safety Instructions
Always follow these basic safety precautions when using your Digital Photo Frame (PDF). This will reduce the risk of fire, electric shock, and injury.
Caution: To reduce the risk of fire or shock hazards, do not expose this product to rain or moisture.
Do not remove the cover. There are no user-serviceable parts inside. Refer all servicing to qualified personnel.
- Keep the remote control out of the reach of children. Button batteries pose a serious hazard to children. If swallowed, in addition to presenting a choking hazard, a button battery can get stuck in a child’s throat and cause a chemical reaction that burns through the tissue causing catastrophic bleeding. Serious injury can occur in as little as two hours.
- The PDF is for indoor use only.
- Unplug the PDF before performing care and maintenance.
- Do not block the ventilation holes on the back of the PDF at any time.
- Keep your PDF out of direct sunlight and heat sources.
- Route the power cable so that it is not likely to be walked on or pinched by items placed on or against it. Pay particular attention to the point where the cable attaches to the PDF.
- Only use the AC adapter included with the PDF. Using any other power adapter will void the warranty.
- Unplug the power cord from the power outlet when the unit is not in use.
Cleaning the PDF
Treat the screen gently.
To clean fingerprints or dust from the LCD screen we recommend using a soft, non-abrasive cloth such as a camera lens cloth.
If you use a commercial LCD cleaning kit, do not apply the cleaning fluid directly to the LCD screen. Clean the LCD screen with the cleaning solution applied to the cleaning cloth. Clean the outer surface of the PDF with a soft cloth dampened with water.
Getting Started
3.1 Connecting to Power
- Insert and gently push up the back stand.
- Remove the protecting film on the panel.
- Place the PDF on a flat surface.
- Press plug the AC power adapter into the photo frames DC power jack and an electrical wall outlet.
- Press the button on the remote control.
3.2Start up the PDF
After powering on the PDF for the first time, change the system language and local time if necessary:
Change System Language
- Press the SETUP button.
- Press the
 button on the System Setup menu and press the ENTER button.
 - Press the ENTER button and use the button or the
 button to select your language. Press the ENTER button to save the change.
 - Press the EXIT button.
Change Local Date & Time
- Press the SETUP button.
- Press the button on the Date & Time menu and press the ENTER button.
- Press the ENTER button and use the
 button or the button to adjust the year. Press the button to highlight the month or the day field, and adjust the month and day accordingly.
 - Press the ENTER button to save the change.
- Move to the Adjust Time menu and adjust the local time.
Using the QPIX Digital Photo Frame
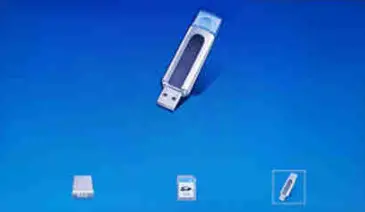
4.1 Select Input Source
There are two input sources: SD (SDHC/MMC) memory card or USB memory stick (up to 32 GB).
- Insert the USB memory stick or SD (SDHC/MMC) memory card.
- Press the EXIT button twice and use the button and the
 button to select the input source.
 - Press the ENTER button.

4.2 Main Menu
Use the ![]() button and the
button and the ![]() button to select the function or press the function button on the remote control.
button to select the function or press the function button on the remote control. 4.3 View a Photo/Slideshow
In the photo mode, press the ![]() button and the
button and the ![]() button to select an individual photo by pressing the ENTER button. Wait for a while, your favorite slideshow will start automatically.
button to select an individual photo by pressing the ENTER button. Wait for a while, your favorite slideshow will start automatically.
IMPORTANT: Please ensure you save photo files in the compatible format for playing on your PDF.
Tips: Adjust photo transition time interval and effect via System Setup > Photo Setup > Transition Interval/Transition Effect.
4.4 Music
Press the MUSIC button to open the music player. Use the
 ![]() button to Play/Pause. Press the
button to Play/Pause. Press the ![]() button to previous and the
button to previous and the ![]() button to next tracks. Adjust the volume by the VOL + and VOL – buttons on the remote control or the controls on the back of the frame.
button to next tracks. Adjust the volume by the VOL + and VOL – buttons on the remote control or the controls on the back of the frame.
IMPORTANT: Please ensure you save music files in the compatible format for playing on your PDF.
Tips: Adjust music display mode and repeat mode via System Setup > Music Setup > Display Mode/Repeat Mode.
4.5 Movie
Press the MOVIE button to open the video player.
Use the ![]() button to Play/Pause. Press the
button to Play/Pause. Press the ![]() button to Previous and the
button to Previous and the ![]() button to Next tracks. Adjust the volume by the VOL + and VOL – buttons on the remote control or the controls on the back of the frame.
button to Next tracks. Adjust the volume by the VOL + and VOL – buttons on the remote control or the controls on the back of the frame.
Or select the movie to play via Main Menu > Video by pressing the SETUP button, the ![]() button, and the ENTER button on the remote control.
button, and the ENTER button on the remote control.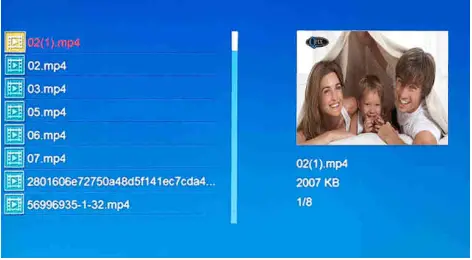
IMPORTANT: Please ensure you save video files in the compatible format for playing on your PDF.
Tips: Adjust video display mode and repeat mode via System Setup > Video Setup > Display Mode/Repeat Mode.
4.6 Calendar
Press the CALENDAR button on the remote control to see a fullscreen month-by-month calendar and clock display. If there are pictures under the current input source – i.e. USB memory stick, SD (SDHC/MMC) memory card, or built-in memory, pictures will be displayed automatically.
Tips: Adjust photo transition via System Setup > Photo Setup > Transition Interval.
4.7 Clock / Alarm
Press the SETUP button and select the Date & Time menu.
Press the ENTER button and select the Alarm Setup menu.
Press the ENTER button and change it to ‘On’.
Press the ENTER button and move to the Alarm Time menu.
Press the ENTER button and set up the alarm.
Press the ENTER button and move to the Alarm Frequency menu.
Press the ENTER button and change the alarm frequency.
Press the ENTER button to save the change.
An alarm window will show when the time is up. Press EXIT to close the alarm window.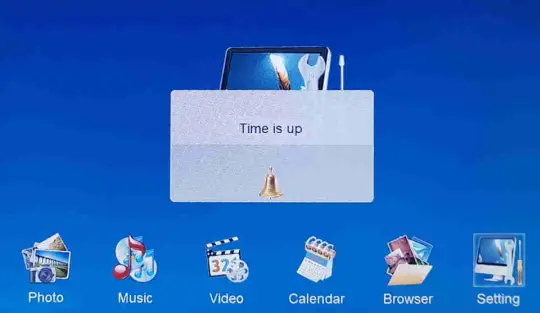 Tips: Setup an alarm via System Setup > Date & Time > Alarm Setup/Alarm Time/Alarm Frequency.
Adjusting the Settings
Using the control buttons
Press the ![]() button to move up to the previous menu or option.
button to move up to the previous menu or option.
Press the ![]() button to move up to the next menu or option.
button to move up to the next menu or option.
Press the ENTER button to change or confirm the change.
Press the EXIT button to exit.
Overview
Item/Menu | Sub-Menu | Options |
| Photo Setup | Display Mode | Full Screen, Scale, Original Size |
| Background Music | On, Off | |
| Repeat Mode | Repeat All*, Sequence, Random | |
| Transition Interval | Off, Ss, 10s, the 30s, 1 min, 10min, 30min, 1 hour, 12 hours, 24 hours | |
| Transition Effect | Normal and the other 8 kinds | |
| Date & Time | Adjust Date | |
| Clock Mode | 12-hours, 24-hours | |
| Adjust Time | ||
| Alarm Setup | On, Off | |
| Alarm Time | ||
| Alarm Frequency | Weekend, Mon. to Fri., Once | |
| Video Setup | Display Mode | Original Size, Scale, Full Screen |
| Repeat Mode | Repeat One, Sequence, Random, Repeat All | |
| Music Setup | Display Mode | Spectrum, Lyric Display |
| Repeat Mode | Repeat One, Sequence, Random, Repeat All | |
| System Setup | Language | English and other 8 languages |
| Backlight Brightness | ||
| Brightness | ||
| Contrast | ||
| Saturation | ||
| Auto Power On | On, Off | |
| Auto Power On Time | ||
| Auto Power Off | On, Off | |
| Auto Power Off Time | ||
| Auto Power Frequency | Mon. to Friday, Once, Everyday, Weekend | |
| Auto Copy | On, Ott | |
| Start-Up Mode | Mixed Play | |
| Reset Default Settings | ||
| Version |
*Repeat All means repeat play among photos, music, and video.
Browser
List all the files in the USB memory stick or SD (SDHC/MMC) memory card.
Move the ![]() button or the
button or the ![]() button to see the details of the file. Picture and video will be shown in a thumbnail.
button to see the details of the file. Picture and video will be shown in a thumbnail.
Press the ENTER button to play the highlighted file.
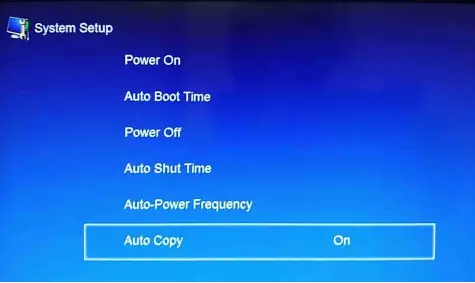
Copy Files to Built-in Memory Card
Files from the USB memory stick can be copied to the built-in memory,
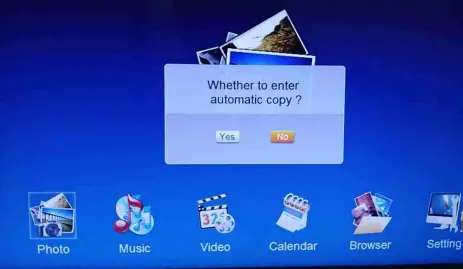
- Set the Auto Copy as ‘On’ under System Setup> System Setup>Auto Copy.

- Insert a USB memory stick and wait for a while, the below window will appear. Press ‘Yes’ to confirm. Files from a USB memory stick will be copied to the built-in memory.

- Set the Auto Copy as “Off”.
IMPORTANT:
- Please ensure you have backed up all the old files in the built-in memory since they will be deleted.
- The capacity of built-in memory is 8 GB. Not all the files in the USB stick memory will be copied over when the total size of the files in the USB memory stick is bigger than 8 GB.
Frequently Asked Questions (FAQ)
![]() Why no photo is displayed in my calendar?
Why no photo is displayed in my calendar?![]() There is no photo under the current input source – i.e. USB memory stick, SD (SDHC/MMC) memory card, or built-in memory. Use the Browser function to check and select the input source with the photo file as the current input source. Then select the Calendar function again.
There is no photo under the current input source – i.e. USB memory stick, SD (SDHC/MMC) memory card, or built-in memory. Use the Browser function to check and select the input source with the photo file as the current input source. Then select the Calendar function again.
![]() When I insert a USB memory stick and SD (SDHC/MMC) memory card, files in SD (SDHC/MMC) memory cards will be played first?
When I insert a USB memory stick and SD (SDHC/MMC) memory card, files in SD (SDHC/MMC) memory cards will be played first?![]() Correct. If you want to play files on the USB memory stick, press the ENTER button twice and select the USB memory stick as the input source.
Correct. If you want to play files on the USB memory stick, press the ENTER button twice and select the USB memory stick as the input source.![]() What other media formats can the Digital Photo Frame support? Why will it not play all images?
What other media formats can the Digital Photo Frame support? Why will it not play all images?![]() The Digital Photo Frame will support most picture formats but may not read all images.
The Digital Photo Frame will support most picture formats but may not read all images.![]() I have a memory card in the Digital Photo Frame, but it’s not reading the card. What should I do?
I have a memory card in the Digital Photo Frame, but it’s not reading the card. What should I do?![]() First, make sure that you are using a memory card that is supported by the Digital Photo Frame. Second, ensure that the memory card is inserted all the way into the correct slot. Third, press the EXIT button until you reach the “Select Input Source” page. If the memory card is properly inserted into the slot, that memory card icon will be highlighted.
First, make sure that you are using a memory card that is supported by the Digital Photo Frame. Second, ensure that the memory card is inserted all the way into the correct slot. Third, press the EXIT button until you reach the “Select Input Source” page. If the memory card is properly inserted into the slot, that memory card icon will be highlighted.
Note:
Some digital cameras save images in non-standard formats. Please refer to your camera’s operating manual for specifics or transfer the files to the formats supported by this PDF.![]() Why do some photos load faster than others?
Why do some photos load faster than others?![]() Higher resolution photos load slower. Using a lower resolution will speed up loading time when taking photos.
Higher resolution photos load slower. Using a lower resolution will speed up loading time when taking photos.![]() Why are my photos/videos appearing upside down?
Why are my photos/videos appearing upside down?![]() The PDF is placed upside down. Please rotate the frame.
The PDF is placed upside down. Please rotate the frame.![]() Can I connect my PDF directly to my computer?
Can I connect my PDF directly to my computer?![]() You can connect the PDF directly to your computer via a mini USB cable (not supplied as a standard accessory, please purchase from QPIX if necessary).
You can connect the PDF directly to your computer via a mini USB cable (not supplied as a standard accessory, please purchase from QPIX if necessary).
Customer Support
Many questions regarding the operation of your QPIX product can be answered by reading the instruction manual packaged with this product.
If this product is deemed to be defective and is under warranty, you may return the product to the following address for repair or replacement. For support / technical assistance, contact us at:
QPIX PTY LTD
Unit 10, 573 Burwood Highway
Knoxfield, Victoria, Australia, 3180
Email: [email protected]
Product Specifications
| LCD Type | 10.1″ TFT LCD |
| Backlight type | LED |
| Screen Resolution | 1024 * 600 pixels |
| Aspect ratio | 16:9 |
| Photo Format | JPG, JPEG, BMP, PNG, and more |
| Music Format | MP3, WMA, WAV, and more |
| Video Format | MPEG1, MPEG2, MPEG4 (Xvid/AVI), M-JPEG, and more |
| Media Slots | SD (SDHC/MMC) memory card up to 32 GB USB memory stick up to 32 GB |
| Clock/Calendar | Yes |
| Input power | AC100-240V |
| Output power | DC5V 1.5A |
Limited Warranty
Your QPIX product is warranted to be free from defects in materials or workmanship under normal use for 1 year starting on your date of purchase. Your dated sales or delivery receipt is your proof of purchase. You may be required to provide proof of purchase as a condition of receiving warranty service.
During the warranty period, if a defective QPIX product covered by this Limited Warranty is returned to the QPIX service center, it will be repaired or replaced. If your QPIX product has recurring failures, at the option of the service center, you will be furnished with a different product that is equivalent in performance.
When permitted by local law, QPIX products and any replacement products or parts may contain new materials or used materials equivalent to new in performance and reliability. Replacement products or parts will have functionality at least equal to that of the product or part being replaced. Replacement products and parts are warranted to be free from defects in materials or workmanship for 90 days, or for the remainder of the warranty period for the QPIX product which they are replacing or in which they are installed, whichever is longer.
Exclusions
This Limited Warranty does not cover cosmetic damage, loss or damage in transit, or damage resulting from (a) accident, misuse, abuse, or other external causes; (b) product elements not supplied by QPIX; (c) modification or service by anyone other than QPIX, a QPIX service center or another QPIX-authorized service provider.
Printed in China


