 MELCAM P100-B-32 Digital Photo Frame
Foreword
Thanks for choosing our digital photo frame.
Please read this user manual carefully before using, and keep it for future reference.
Feature
| Internal storage | No |
| External interface | Support SD, MMC, U disk, Maximum support 128 GB. |
| Image Format | JPEG, BMP, PNG |
| Audio format | aac, alac, amr, ape, atrc, cook, flac, mp3, ogg, wav(pcm), sipr |
| Video format | MKV, AVI, MOV/MP4, TS, ASF, FLV, PMP, RMVB, MPG/VOB, WMV |
| Timer switch | 24 hours, time switch |
| Auto play | None/Mix-Play/Movie/Music/Photo/ Music Photo |
| Sound output | One-channel stereo, 2W amplifier power output |
| Screen size | 8/10/12/15/17 inches |
| OSD language | Multilingual |
| Power management | 5V/2A(P801/P101/P120); 12V/1.5A(P150/P170) Normal operating mode |
| Screen material | LED |
| Working current | Max720ma / Min670ma |
Appearance
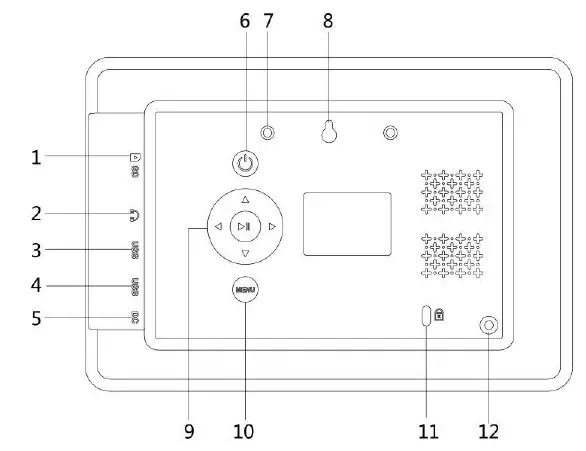
- For 8/10/12-inch photo frames

Number Key/Button Function 1
SD/MMC card slot
Insert the SD/MMC card according to the icon besides the interface 2 3.5mm headphone jack
Headphone jack 3 USB output interface Insert U Disk 4 Mini USB input interface For software upgrade (only for factory use) 5 DC input interface Power connector 6 Power Button Turn on/off the photo frame 7 Wall hanging hole 1 For wall hanging 8 Wall hanging hole 2 For wall hanging 9 Up/down/left/right/ OK button
For menu selection 10 Menu button Press this button to enter menu setting
11 Security lock Anti-theft security lock(only for dealer use)
12 Support rod hole Install the support rod here - For 15/17-inch photo frames

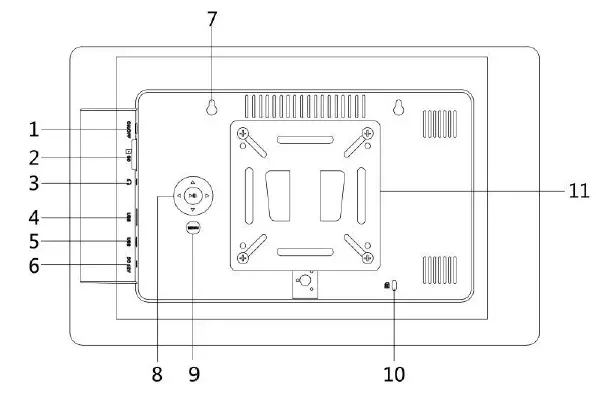
Number Key/Button Function 1 Power Button Turn on/off the photo frame
2
SD/MMC card slot
Insert the SD card according to the icon besides the interface
3 3.5mm headphone jack Headphone jack 4 USB output interface Insert U Disk 5 Mini USB input interface
For software upgrade (only for factory use)
6 DC input interface Power connector 7 Wall hanging hole For wall hanging 8 Up/down/left/right/OK button
Menu selection 9 Menu button Press this button to enter menu setting
10 Security lock Anti-theft security lock(only for dealer use)
11 Wall bracket Install the photo frame on the wall
Note: The 3.5mm headphone jack only supports headphone without mic. It is not suitable for headphone with mic. As the picture is shown below:

Installation
- For 8/10/12-inch photo frames
Screw the support rod into the hole correctly, as the picture 1 shows below:
- For 15/17-inch photo frames
If users want to place the photo frame on the table, install the bracket ring on the back of the photo frame in the correct direction, as shown in figure2.
If users want to hang the photo frame on the wall, first fix the photo frame wall hanger on the back of the digital photo frame with the corresponding screws( as the picture 3 shows below.), then Install the smaller wall mount on the wall, please make sure the direction of the two wall hangings is the same. Then users could hang the photo frame on the wall.
Main Interface
Press the power button, the digital photo frame enters the main interface:
Enjoy the Photo
In the main interface, select “Photo” and press the OK button to enter the photo list interface, select your favorite photo, and press OK button to view it.
Enjoy the Music
Select “Music” on the main interface, press the OK button to enter the music playlist interface, press the Up/Down button to select your favorite music, press OK button to play the music, and you can use the remote control to adjust the volume.
Enjoy the Video
Select “Movie” on the main interface, press the OK button to enter video list interface, choose one of them and press the Up/Down/Left/Right button to select your favorite video, press OK button to play the video. Press the up/down button to skip to the previous or the next video, press the left/right button to increase or decrease the volume. Note:
Note:
- Please make sure there is at least one picture/video/music in the memory card or USB device. If there is no file, the photo frame will not play the file.
- Please insert the SD/MMC card correctly according to the direction icon besides the card slot.
Calendar and Clock
Select “Calendar”, and press the OK button to enter the calendar and clock display interface. There are time and date displaying, and the photos are played in the form of a slide show, as shown in the figure below:
System Settings
Select “Setting” on the main interface and press the OK key to enter the system setting interface. Press the Up/Down button to move the setting item, press the left/right button to adjust the setting, and the system will automatically save the settings before exiting the settings interface, as shown in the figure below:
Attention:
Motion sensor: PIR function is a timing display function saving power through human body induction. The human body has a constant body temperature which is usually 37 degrees, so it emits infrared light with a specific wavelength of about 10 μm. The passive infrared probe is a Fresnel lens that works by detecting infrared rays of about 10 μm emitted by the human body. The light of the interference filter is focused on the photosensitive surface of the silicon photodiode detector, and the photo frame is turned on by photoelectric conversion. You will find a plastic black/white hat on each PIR, which is the Fresnel lens. The inside of the small hat is engraved with a tooth pattern. Fresnel lenses should not be wiped with any organic solution, such as alcohol. When removing dust, rinse with distilled water or ordinary clean water first, then use absorbent cotton.
Remote Control
Packing list
- Digital photo frame ×1
- Support rod(8/10/12 inch) ×1
- Charger ×1
- User manual ×1
- Remote control ×1
- Wall hangings(15/17 inch) ×1
NO.: QZ(P801/P101/P120/P150/P170) 20201230


