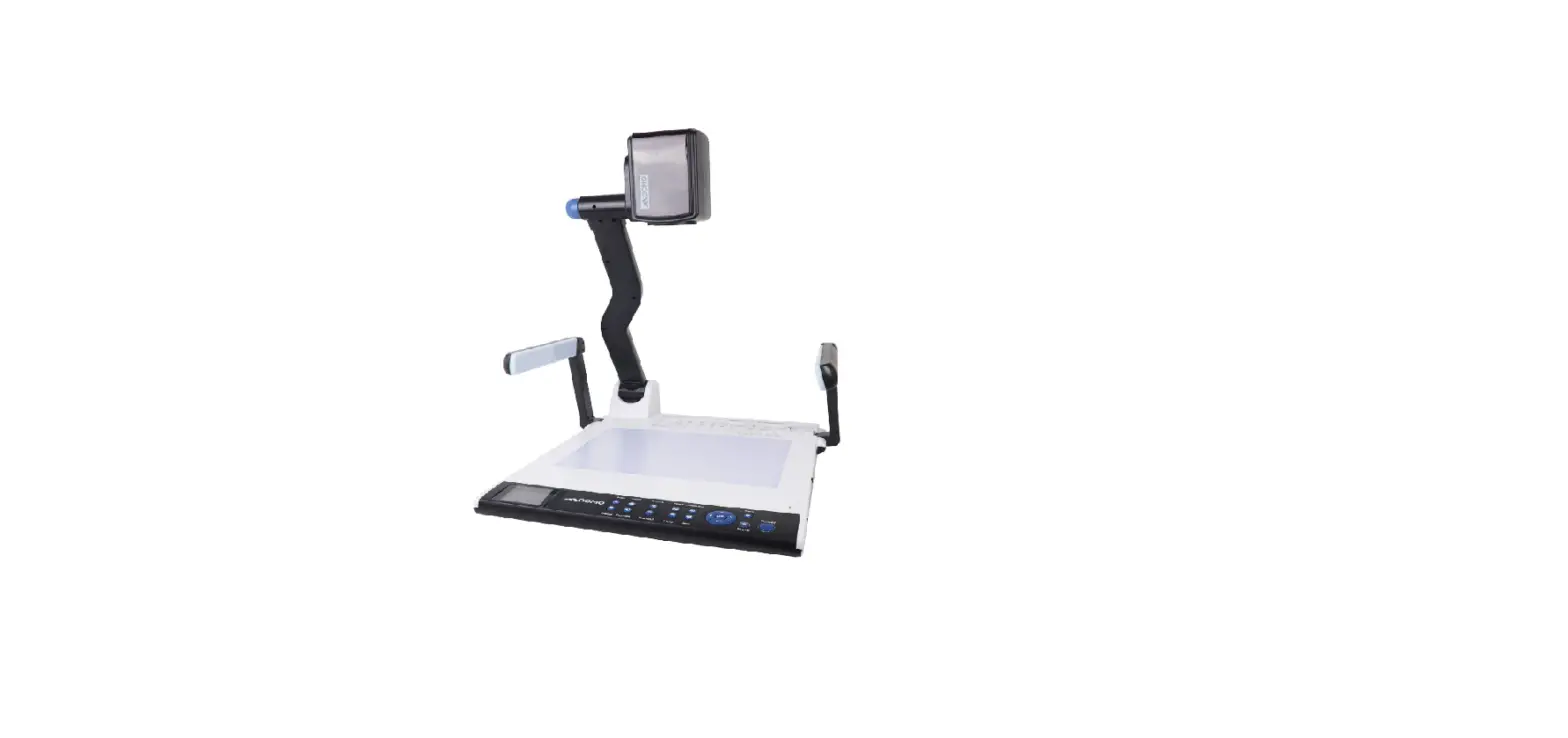
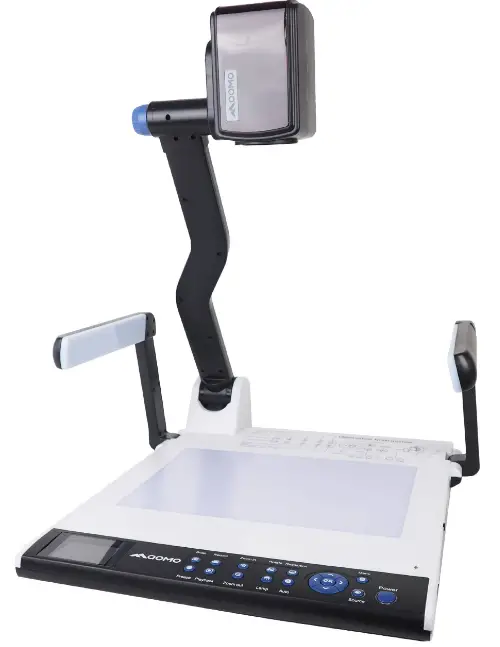
QOMO 5000 UHD 4K Desktop Document Camera
Precautions
WARNING
- Risk of electric shock
- Dangerous voltage inside
Please follow these precautions
- To prevent fire or shock hazards, do not expose the unit to rain or moisture.
- To prevent electrical shock, do not open the cabinet. Refer to qualified personnel for service only.
- Do not use the unit continuously for more than 24 hours with camera autofocus on. It may cause damage to the camera lens.
- Be careful not to spill water or other liquids onto the unit, or allow combustible or metallic objects to get inside the cabinet.
- Unplug the visualizer from the wall outlet when it is not in use for an extended period.
- Clean the cabinet with a soft cloth lightly moistened with a mild detergent. Clean the lens carefully with an air spray or soft dry cloth to avoid scratching. When lamps flash or become dark, they should be replaced with new ones. Avoid interchanging arm lamps and bottom lamps frequently.
Parts Identification
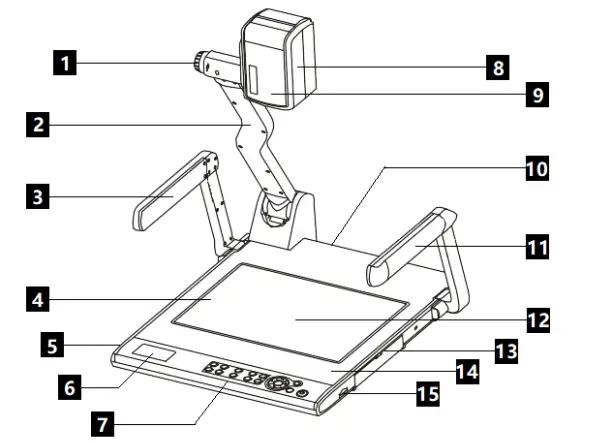
- Zoom in/Zoom out Knob
- Camera Stand
- Left Arm Lamp
- Bottom Lamp
- Remote Control Slot
- Preview screen
- Control Panel
- Camera Case
- Infrared Receive Area
- Rear Connector
- Right Arm Lamp
- Work Stage
- Side Connector
- Built-in Microphone
- SD Card Slot
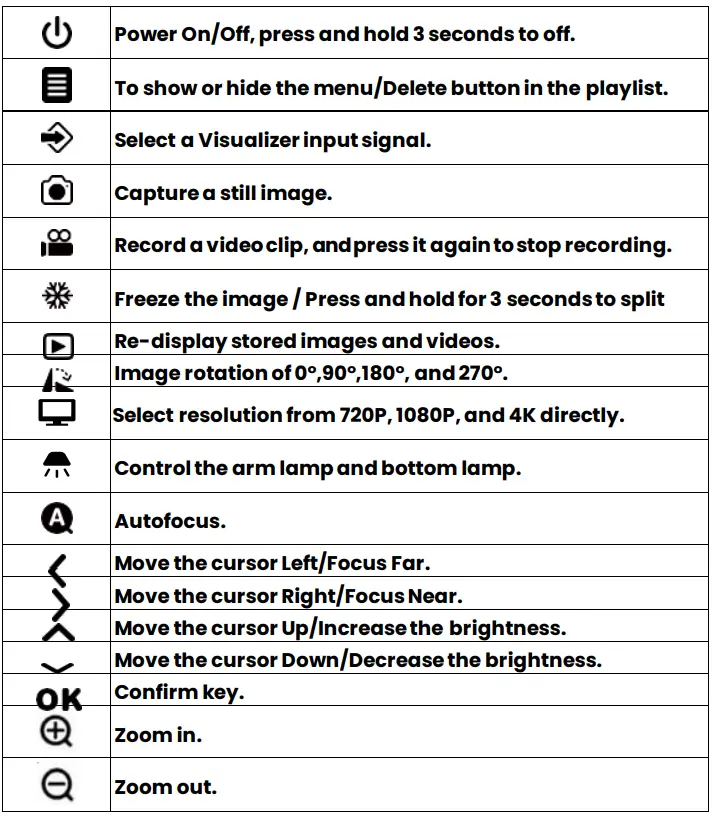
Control Panel
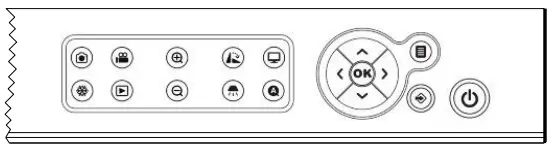
Button operation instruction
Remote Control
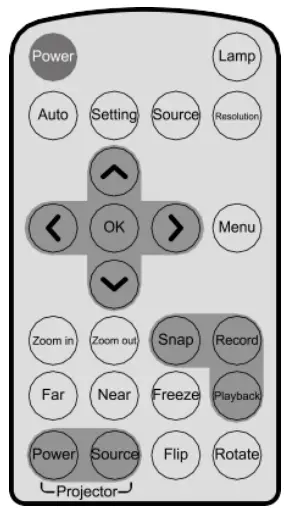
| Power | Control the visualizer on/off |
| Lamp | Control the arm lamp and bottom lamp |
| Auto | autofocus |
| Setting | Select the Visualizer input signal |
| Source | Select the Visualizer input signal |
| Resolution | Select resolution from 720P,1080P, and 4K directly |
| Move the cursor Left, Right, Up, Down/Confirm | |
| Menu | Invoke menu |
| Zoom in/ Zoom out | Increase and decrease magnification |
| Snap | Capture a still image |
| Record | Record a video clip |
| Far/Near | Focus near or far |
| Freeze | Freeze the image, press again to unfreeze |
| Playback | Re-display stored imaged and videos |
| Flip | V-Reverse the image |
| Rotate | Imagerotationof 0°,90°,180°,270° |
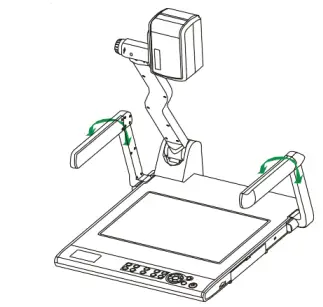
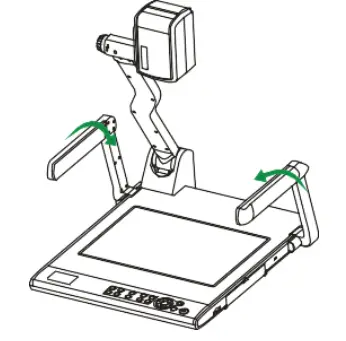
Basic Preparations
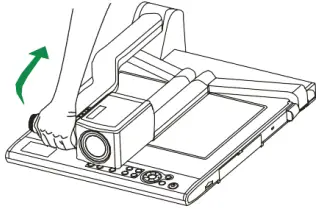
- Place one hand firmly on the base of the visualizer, while carefully lifting the camera stand using the other hand.

- Open the arm lights and rotate the camera head until they are properly positioned.
Making Connections
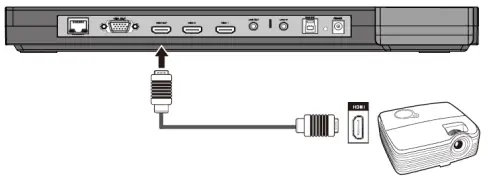
- Connect to the projector or monitor

- Use the HDMI cable to connect the HDMI out port to the projector’s or monitor’s HDMI input port.
- WARNING: You can also connect the VGA OUT Port to the matching port
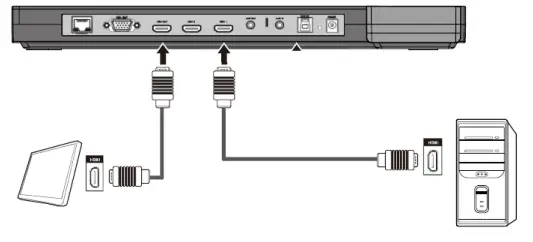
- Connect to a desktop computer

- Use the HDMI cable to connect the HDMI out port to the monitor’s HDMI input port.
- Use the HDMI cable to connect the HDMI in 1 port to the computer’s HDMI out port.
- Now You can switch sources to display the computer or camera screen.
- Connect power source

- Connect the power cord to the 12V IN connector.
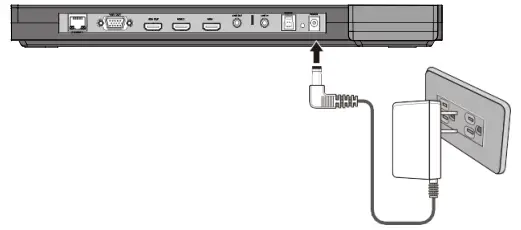
WARNING: Before making any connections, turn off all the power. Please ensure that the visualizer along with all other equipment to be connected are turned off.
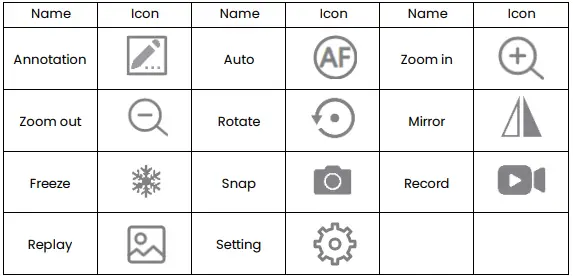
Mouse Operating Instructions
Move the mouse guide to the bottom middle of the screen, and the operation menu will pop up, and the menu functions are as follows:
| Name | Icon | Selection | Functions Description |
| Function |
| Resolution | 720P/1080P/2160P |
| Focus Mode | Auto Focus/ Manual Focus | ||
| Mask | Activate the Mask function | ||
| Split | Activate the Split function | ||
| Image Setting | Photo Resolution | 3840*2160 | |
| Recording Resolution | 2160P@30FPS/1080P@30FPS/ 720P@30FPS | ||
|
System Setting | 
| Language | Support Chinese, English |
| System Time | / | ||
| Time Setting | User-defined | ||
| Display Information | Set to display the information on top of the display or not. | ||
| File Manager | Copy to external storage | ||
| Delete all | |||
| Format external storage | |||
| Connect USB Drive to PC | |||
| Connect SD card to PC | |||
| System Reset | Ensure/ Ignore | ||
| System Upgrade | Ensure/ Ignore | ||
| Lens FW upgrade | Ensure/ Ignore | ||
| PC Control | USB/DB9/PS2 | ||
| User Profile | User 1/User 2/User 3 | ||
|
Effect Setting |
| Mask Setting | 10%-80% |
| Mirror | Normal | ||
| Left-right Mode | |||
| Up-down Mode | |||
| Effect | Normal | ||
| Black-white Mode | |||
| Negative Mode | |||
| Flicker | Auto/50HZ/60HZ/Disable | ||
| Brightness, Sharpness, DNR, Contrast, Saturation |
Use ( | ||
| Time-lapse Photo | ON/OFF | ||
| Interval | User-defined |
Basic Operation
Device power on
- After connecting the power source, please wait for the source indicator to turn off, only the red light of the power button is on, and then press the power button.
Working on the stage
- Place your material on the platform.
- Select the enlargement required using the “zoom in/zoom out” knob.
- Adjust the focus of the “AUTO” button.
Working outside the stage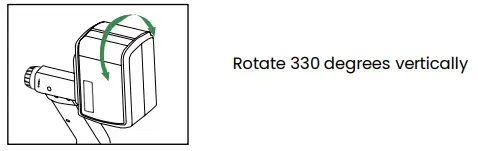
To show a 3-dimensional object using the visualizer, place the object on the working surface and adjust the “zoom in/out” and “AUTO” keys. If the object is too large for the stage or if you would like to show it from one of its sides, or a different angle, just place the object behind or in front of the unit and manually tilt the camera head (remove the close-up lens before titling the camera head).
Light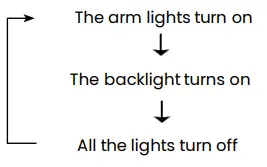
- The arm lights are powered on when the power is turned on. Each time you press the “LAMP” button, the lighting changes occur as demonstrated.
Adjusting image size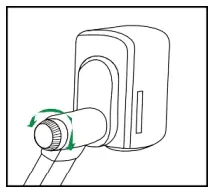
- To reduce or enlarge the image size displayed on the screen, rotate the Zoom in or Zoom out knob, or use the buttons on the control panel.
Quickly switch resolutions
- The factory default resolution is 1080P, switch the device between 2160p, 1080P, and 720P by clicking the “Resolution” button on the control panel.
WARNING: When using HDMI OUT to output video signal, when setting 2160p resolution, please make sure your monitor supports the display 4K screen. Otherwise, there will be no screen display, please press the “Resolution” button to switch to other resolutions.
Working with negatives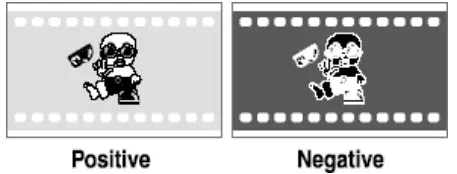
The visualizer is automatically set to display normal materials on the screen when the power is on. To display negatives, turn on the backlight by pressing the “LAMP” button, and then select (Effect Setting) in the menu-(Effect)-select “Negative” to display the film negatives. In the (Effect) list select “Normal” to display normal materials in the color mode.
Focusing
When the visualizer is turned on the focus automatically adjusts to the stage, press the “AUTO” button to autofocus. You can also manually adjust the focus with the near focus button or the far focus button.
Freezing image
- To show a still image on the screen, press the “Freeze” button. The frozen image cannot be adjusted (Zoom in/out, color adjustment, etc.).
Recording videos and Play
- Press the “Record” button to Record a video clip, and press it again to stop recording.
- Press the “Playback” button, The latest video will be displayed, Use the “up/down/Left/Right” buttons to select the file to be displayed, then press the “OK” button to play the video.
WARNING: Recorded videos are automatically saved every 20 minutes.
Camera / HDMI / VGA inputs
Press the “Source” button to switch between VGA, HDMI, and Camera signals. Each time the “Source” button is pressed, it provides seamless transitions among different sources such as VGA, HDMI IN 1, HDMI IN 2, and Camera.
WARNING
- HDMI IN signals can only output from HDMI OUT.
- VGA IN signals can only output from VGA OUT
Image rotation
To rotate the image, press the “Rotate” button once, and the displayed image will be rotated 90,180,270 degrees clockwise. Continue to press the “Rotate” button to restore the image to its initial position.
Infrared remote control
The visualizer’s remote control can control the camera from different angles. On the left side of the visualizer stage, there is a built-in remote control storage compartment where you can store the remote control when it is not in use. Please note that an infrared remote control can only be used up to a certain distance from the unit. Objects situated between the visualizer and the infrared remote control and a weak battery may interfere with the reception.
Installing visualizer software QCamera
The visualizer is a standard UVC camera – you can use it with a variety of software that supports a UVC camera connection. The visualizer is compatible with the third-party video conferencing software Zoom, Microsoft Teams, or Google Meet. However, to better experience the 4K UHD visualizer UVC function, we’d recommend using it with the QCamera and you can download this free from the QOMO website at the link below. https://www.qomo.com/qcamera
WARNING
- When the UVC function is in use, only Zoom in/out, Near, Far, lamp, brightness, Flip, and Autofocus functions are available on the panel and remote control
- To get the visualizer out of UVC mode, please manually disconnect the Camera from the software or exit the software , do not unplug the USB cable directly.
Controlling visualizer by computer
You can connect the DB9 (RS232) interface/PS2 interface/USB-type B interface on the visualizer to a computer to control the visualizer. For example, control via the DB9 interface:
- Connect the computer and the visualizer using the RS232 cable.
- select (System Setting) in the menu-(PC Control)-select “DB9” to control the visualizer.
- Use any serial port debugging software to control.
RS232 code list
| Baud rate: 9600bps Stop bit: 1-bit Data bits: 8-bit Odd-even check: none Communication encoding: Hex code | |
| Function | Required Commands (Hex) |
| Power ON | 48 02 28 01 54 |
| Power OFF | 48 02 18 02 54 |
| Up | 48 02 28 1e 54 |
| Down | 48 02 28 1f 54 |
| Left | 48 02 28 20 54 |
| Right | 48 02 28 21 54 |
| OK | 48 02 28 22 54 |
| Menu | 48 02 28 14 54 |
| Bottom menu | 48 02 28 1d 54 |
| Focus Far | 48 04 17 08 00 02 54 |
| Focus Near | 48 04 17 08 00 03 54 |
| Autofocus | 48 02 18 03 54 |
| Zoom in | 48 04 17 07 00 04 54 |
| Zoom out | 48 04 17 07 00 05 54 |
| Arm lamp | 48 04 16 09 00 01 54 |
| Bottom lamp | 48 04 16 09 00 02 54 |
| All lamp Off | 48 04 16 09 00 00 54 |
| Brightness Inc | 48 04 17 14 00 02 54 |
| Brightness Dec | 48 04 17 14 00 03 54 |
| Capture | 48 02 28 04 54 |
| Replay | 48 02 28 07 54 |
| Record | 48 02 28 05 54 |
| 720P | 48 04 16 12 00 ac 54 |
| 1080P | 48 04 16 12 00 10 54 |
| 2160P | 48 04 16 12 00 11 54 |
| B & W | 48 04 16 10 00 01 54 |
| Color | 48 04 16 10 00 00 54 |
| Rotate | 48 04 17 0a 00 01 54 |
| Mirror | 48 04 16 0b 00 01 54 |
| Freeze | 48 04 16 0c 00 01 54 |
| Switch the source to VGA | 48 04 16 13 00 01 54 |
| Switch the source to HDMI2 | 48 04 16 13 00 02 54 |
| Switch the source to HDMI1 | 48 04 16 13 00 03 54 |
| Switch the source to Camera | 48 04 16 13 00 00 54 |
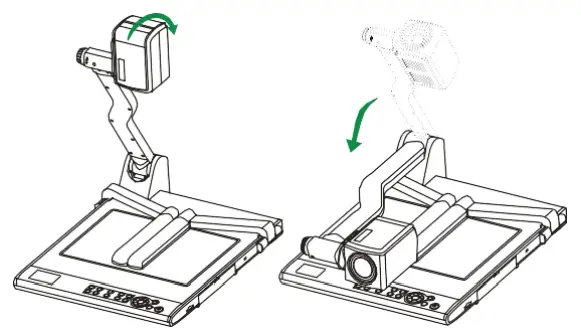
Folding The Unit
- Fold the right arm light down first onto the base, then the left arm down. Rotate the camera head clockwise until the camera head is parallel to the camera stand.

- Carefully fold the camera stand down to the front panel.
WARNING
- Do not lay the unit down flat.
- Do not try to stand it on its rear or sides.
- Do not try to pick up this unit by pulling the camera.
Problems And Solutions
| Problem | Possible causes | Solutions |
| The device does not turn on in the normal condition. | The power adapter is not connected correctly to the device or the power socket. | Make sure the power adapter r is connected correctly to the device and power socket. |
|
After the device is connected, there is no image output. | The device is not connected to the external equipment correctly. | Re-connect the device with the external equipment. |
| The external equipment is not selected correctly. | Select the correct external equipment. | |
| The resolution of the external equipment is set incorrectly. | Reset the resolution of the external equipment. | |
| The device is not switched to the correct source of signals. | Switch to the correct source of signals. | |
| The computer transfer key (VGA) is activated. | Press the source of the signal (CAM). | |
| HDMI is activated. | Press the source of the signal (CAM). | |
| The image can not be moved around. | The image can not be moved around because the Freeze function of the device is activated. | Press again the Freeze function key on the control panel or the remote control to deactivate the function. |
|
The remote control does not respond. | The battery runs out. | Please replace the battery. |
| Objects are located between the remote control and the device and block the communication signals. | Please remove the objects that block the communication signals. | |
| The distance between the remote control and the device is too far. | Please shorten the distance between the remote control and the device. |
Specifications
| Lens | 10X Optical Zoom 10X Digital Zoom |
| Shooting Area | A4 |
| Video Resolution | 720P: 1280 x 720 1080P: 1920 x 1080 2160P: 3840 x 2160 |
| Image sensor Resolution | 8.3 Mega UHD |
| Frame Rate | 4K@30fps max |
| Camera Rotation | Vertically 330° |
| Image Rotation | 0°/90°/180°/270° |
|
Input Connector | HDMI 1.4b x 2 USB2.0 TYPE A x 1 RS232 DB9 x 1 RS232 PS2 x 1 VGA x 1 VGA AUDIO x 1 Line in x 1 RJ45 x 1 |
| Output Connector | Line out x 1 USB3.0 Type B x 1(UVC) HDMI 1.4b x 1(4K@30fps) VGA x 1(1080P@60ps) |
| Microphone | Built-in |
| USB (UVC) | Yes |
| Video Output | Yes |
| On board Memory | Yes |
| Memory card | SD |
| LCD Preview | Yes |
| Focus | Auto/Manual selectable |
| White balance/exposure | Auto |
| Image split | Yes |
| Negative/positive conversion | Yes |
| Black/white and color selection | Yes |
| Image Freeze | Yes |
| Mirror | Yes |
| Remote Controller | Yes |
| Annotation | Yes |
| Mouse control | Yes |
| Ethernet | Yes |
| Lights | Arm Lamp: 1.5W LED lamps x 2 |
| Bottom Lamp: 2.5W LED lamps | |
| SD Card Slot | Yes (64GB max) |
| USB Memory Slot | Yes |
| Power Requirements | 12V 2A external AC adapter |
| Dimension (W x D x H) | Folded: 510 x 410 x 120mm |
| Setup: 510 x 530 x 570mm | |
| Packing: 600 x 200 x 480mm |
Note: Specifications are subject to change without notice.
CONTACT
- Qomo.com
- 1-866-990-7666
- [email protected]
V1.0.2


