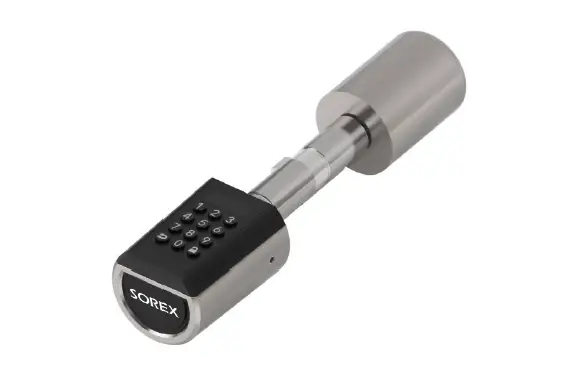
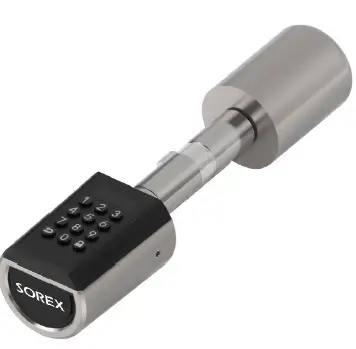
 SOREX B08W5CZ4X1 FLEX Electronic Door Lock
Return Policy
We regret that you decided to return our FLEX Pin-Code Cylinder.
Due to the products’ security features we cannot reset the cylinder and delete all admin fingers by ourselves. Therefore we would ask you to reset the cylinder like follows:
Reset cylinder
- Press any key on the keypad. The keypad & display lighten up.
- Enter the combination + <administrator code> + .
- To reset the cylinder to delivery condition, press 6 + , then 6 + .
- To the question if you really want to reset the cylinder press 1 + .
Otherwise we cannot accept the returned product.
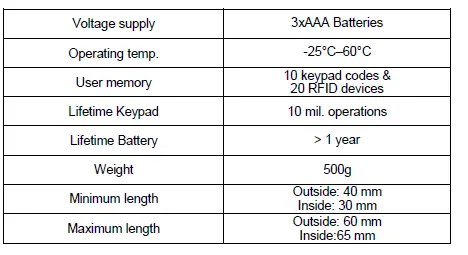
Technical data
To avoid this please turn the knob a few millimeters left and right after each lock process to resolve the jam up.
Product description
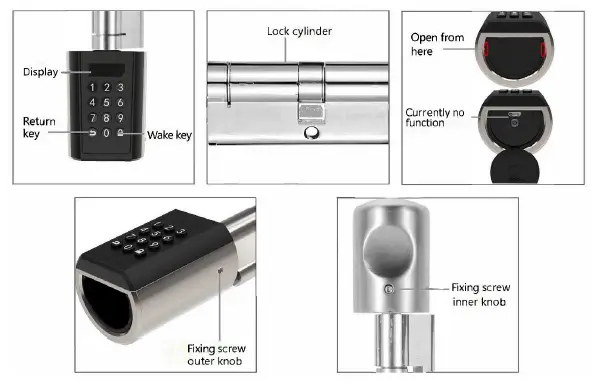
Installation of batteries
- Remove the fixing screw from the outer knob.
- Remove the metal sleeve.

- Open the plastic cover and remove the screw inside (if available).
- Open the battery compartment and insert 3 AAA batteries.
Step by step guide
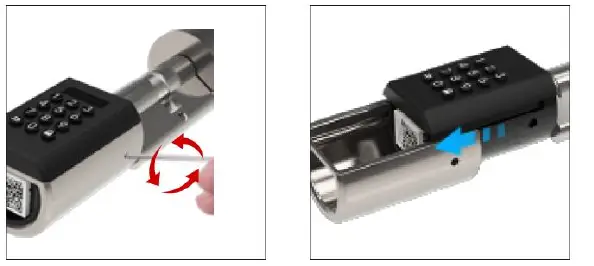
Step – Remove the metal sleeve of the outside of the cylinder (= Side with the keypad)
Unscrew the small screw with the enclosed screwdriver and remove the metal sleeve cautiously.
Step – Remove the battery cover
You can now remove the black battery cover by gently pressing down the cover and pulling it in the direction of the arrows.
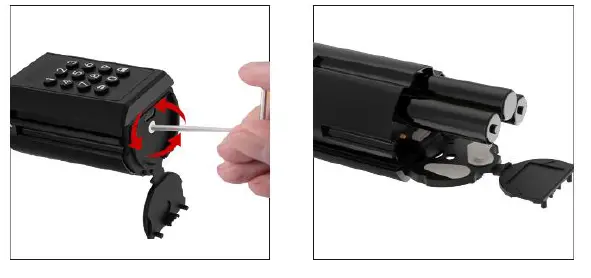
 Step – Adjust the length of the cylinder
Depending on the required cylinder length you can adjust the exterior length by loosening the screw with the screwdriver and then pulling out the fingerprint-handle upon need. A complete removal of the knob is NOT possible.
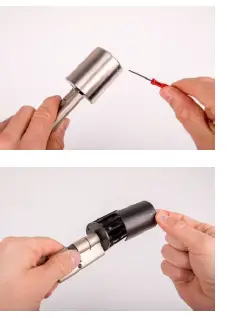
 Step – Remove the knob on the inside
Now you can adjust the cylinder length on the other side (the inside) as well upon need. Loosen the screw with the screwdriver and remove the knob completely. This is necessary for the installation at the door.
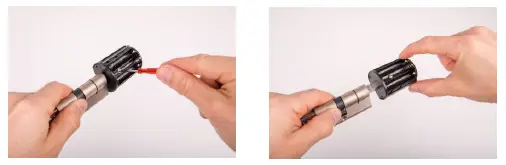
 Step – Installation at the door
Before you can start with the installation you need to remove the old cylinder. To do so remove the screw inside the red circle (as shown in the first picture below). After doing so you’re able to pull out the old cylinder (as seen in the pictures beneath). 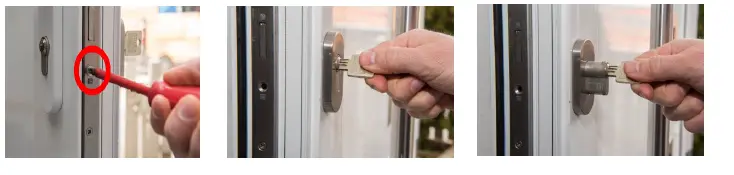 Now you can push the FLEX pincode cylinder through the lock, from the outside to the inside. Pay attention that the keypad handle is on the outside of the door. When the cylinder is attached to the door you need to screw down the cylinder as shown in the 2 pictures below.
 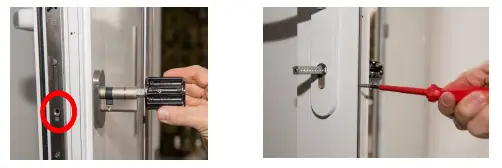 Step – Attach the cylinder on the outside
Now you can fix the cylinder. Adjust the length with the screwdriver and tighten the screw afterwards. Insert the three AAA batteries, put on the battery cover, attach the metal sleeve and screw in the small screw to fix the sleeve. 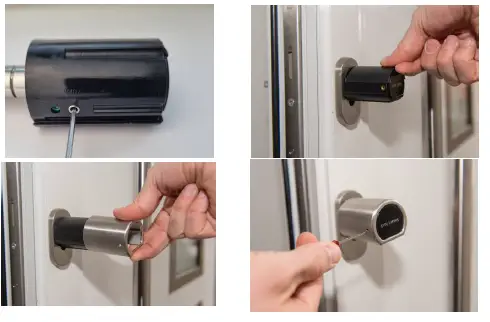 Step – Attach the cylinder on the inside
Put on the metal knob on the pole and fix the screw with the screwdriver. 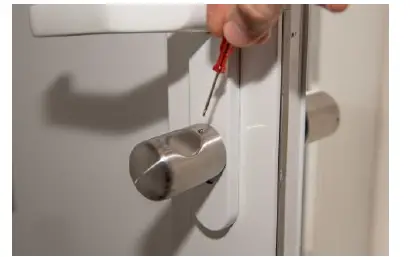
Operation
Note: There can be up to 10 codes and 20 RFID devices linked to the digital cylinder. There can only be one administrator code.
Note: Keypad codes have to be at least 6 digits long.
Note: Before an administrator code has been configured, the cylinder is in delivery condition. While in delivery condition, it is always possible to cause an opening action with the combination 123456 or any RFID medium.
Configure administrator code
Note: The cylinder has to be in delivery condition, before an administrator code can be configured.
Press any key on the keypad. The keypad & display lighten up.
Press the key ![]() and enter the combination 123456. Confirm your entry with
and enter the combination 123456. Confirm your entry with ![]() .
.
Add a user code
Note: Write down the order in which the user codes are configured! The codes are assigned internally with an ID number, according to the order they are configured. E. g. the second code that is configured is assigned with the ID number 2.
Note: Before a user code can be configured, an administrator code has to be existent.
- Press any key on the keypad. The keypad & display lighten up.
- Enter the combination
 + <administrator code> + .
 - To teach in a user code, press 1 + , then 2 + .
- Enter your desired code and confirm with . Enter your code again and confirm with .
Delete a user code
- Press any key on the keypad. The keypad & display lighten up.
- Enter the combination + <administrator code> + .
- To delete a user code, press 1 + , then 3 + .
- Now enter the ID of the code you want to delete and confirm with .
Note: The ID number of the code corresponds to the order it was configured. E. g. the second user code that has been configured is assigned with the ID number 2.
Add RFID media
Note: Write down the order in which the RFID media are configured! The media are assigned internally with an ID number, according to the order they are configured. E. g. the second medium that is configured, is assigned with the ID number 2.
Note: Before a RFID medium can be configured, an administrator code has to be existent.
Press any key on the keypad. The keypad & display lighten up.
- Enter the combination + <administrator code> + .
- To add a new RFID media, press 2 + , then 1 + .
- Hold a RFID medium near to the keypad.
- Leave the configuration mode with
Note: Multiple RFID mediums can be configured, until the configuration mode is left, by the pressing , or until the memory is full.
Delete RFID media
Press any key on the keypad. The keypad & display lighten up.
- Enter the combination + <administrator code> + .
- To delete a RFID medium, press 2 + , then 2 + .
- Now enter the ID of the RFID medium you want to delete and confirm with .
Note: The ID number of the RFID medium corresponds to the order it was configured. E.g.: the second RFID medium that has been configured is assigned with the ID number 2.
Delete all RFID media
- Press any key on the keypad. The keypad & display lighten up.
- Enter the combination + <administrator code> + .
- To delete all RFID media, press 2 + , then 3 + .
- To the question if you really want to delete all media press 1 + .
Delivery condition reset
Note: Through this action all keypad user and RFID media will be deleted.
- Press any key on the keypad. The keypad & display lighten up.
- Enter the combination + <administrator code> + .
- To reset the cylinder to delivery condition, press 6 + , then 6 + .
- To the question if you really want to reset the cylinder press 1 + .
Change locktime
- Press any key on the keypad. The keypad lights up.
- Enter the combination + <administrator code> + .
- To change the locktime, press 6 + , then 4 + .
- Now enter the desired locktime in seconds (05 – 14 seconds).
Opening through code
- Press any key on the keypad. The keypad & display lighten up.
- Enter a valid code and confirm with .
Opening through RFID media
- Press any key on the keypad. The keypad & display lighten up.
- Hold a valid RFID medium near the keypad.
Battery warnings
There are two different battery warnings:
- At low battery level, the red LED near the keypad flashes.
- At critically low battery level, the beeper additionally rings.
Replace the batteries as soon as possible. Depending on your installation, it may be possible that no entry is possible when the batteries are empty.
Lock-out state
To avoid brute force attacks, the cylinder refuses all user input, after a few unsuccessful entry attempts. In this state, the red LED flashes 10 times and for 3 minutes no entries are possible.
Impressum
Version 1.0
© Copyright: Juli 2021
SOREX wireless Solutions GmbH
Technologie- und Forschungszentrum WN Viktor-Kaplan-Straße 2B
A-2700 Wiener Neustadt
Österreich
T +43 2622 320130
F +43 2622 3201315
[email protected]
www.sorex.eu


