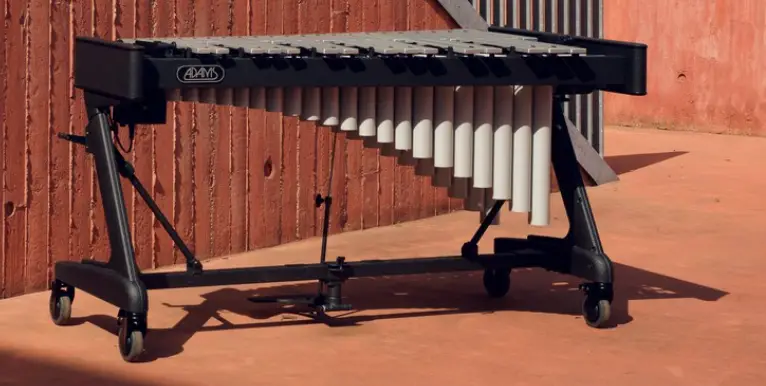
ADAMS ADM-VSWA31S Apex Frame 3.1 Octave Soloist Vibraphone with Motor
 NOMENCLATURE
 NOMENCLATURE
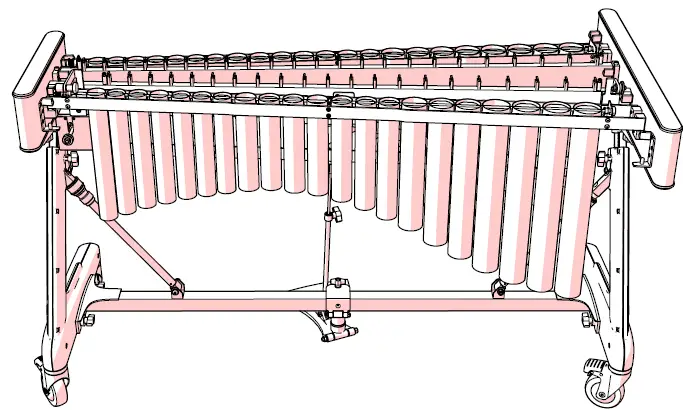
Vibraphone Concert 3.0, Vibraphone Soloist 3.1
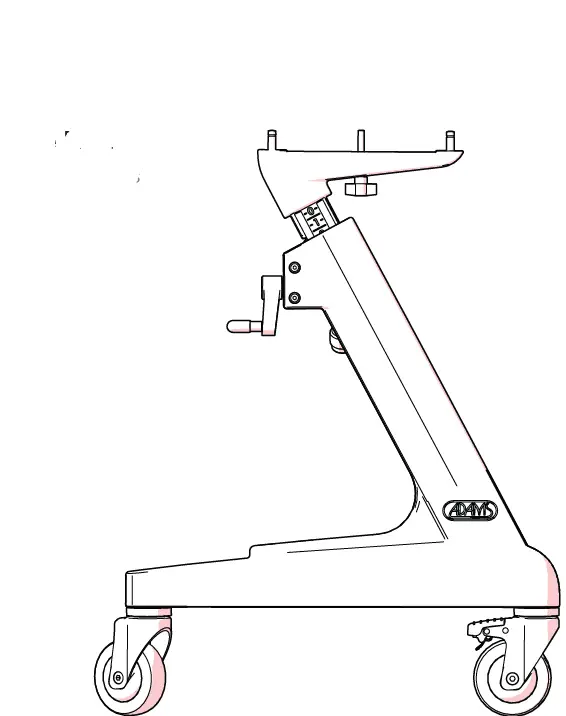
VCWA30 is used for illustrative purposes in this manual. The VSWA31 will differ in appearance from the illustrations, but the assembly process, use, and care are the same.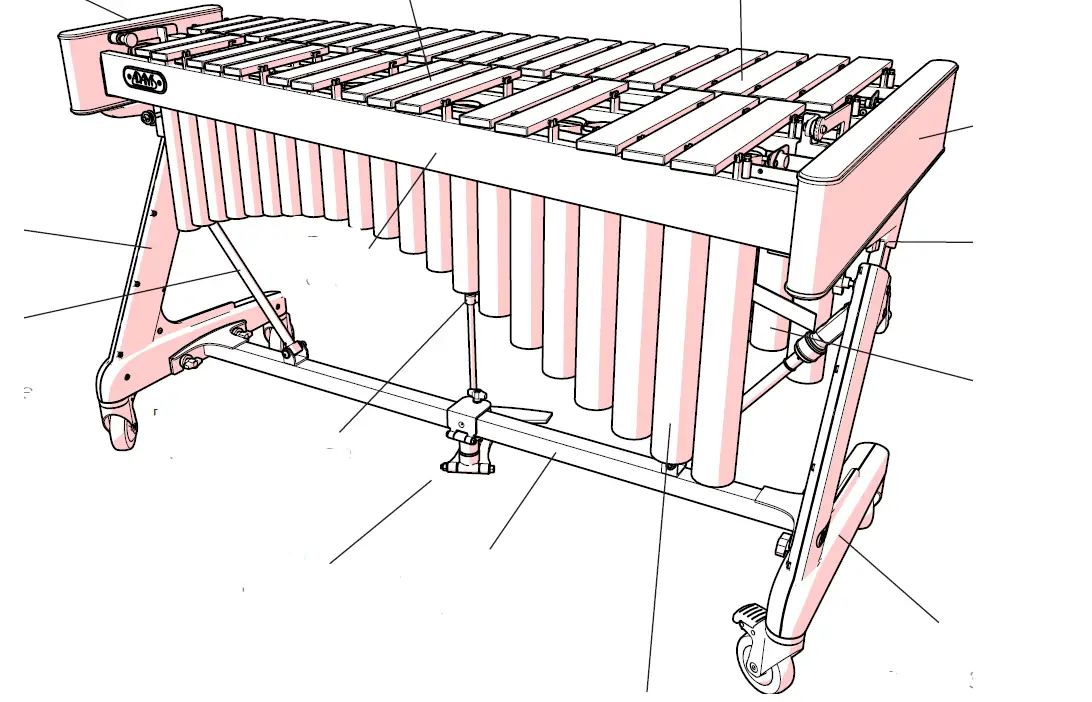
- Accidental Tone Bars
- Small End Piece
- High End Side Piece
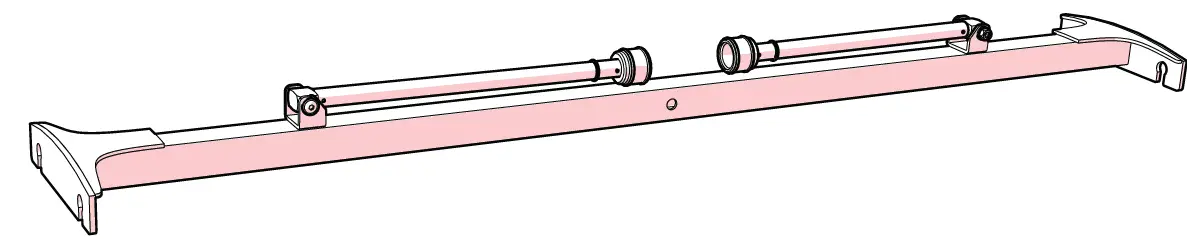
- Shore Brace
- Rail
- Pedal Pull Rod Pedal
- Pedal
- Connection Rod
- Accidental Resonators
- Low End Side Piece
- Natural Resonators
- Height Adjusting Bracket
- Large End Piece
- Natural Tone Bars

- Dampening Mechanism

- Dampening Bar
- Bar Support
- Corner Pin
- Cord
Confirmation of packing contents
The cartons of your new instrument contain the components pictured below.
- Accidental Resonators

- Natural Resonators

- Accidental Tone Bars

- Large End Piece
- Small End Piece

- Dampening Mechanism

- Threaded Connection Piece

- Dampening Bar

- Pedal Pull Rod
- Pedal

- Low End Side Piece

- High End Side Piece

- Connection Rod

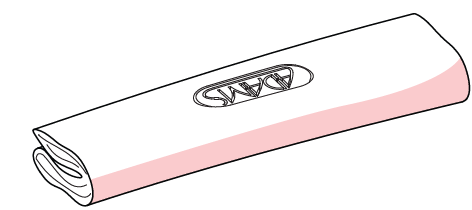
- Cover

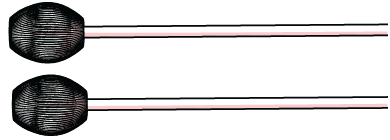
- Mallets for Vibraphone Instruments

- Rail 1
- Rail 2
- Rail 3
- Rail 4

- Models with Motor
- Motor Control Panel & Adapter Kit

- Motor / Timing belts


ASSEMBLY AND ADJUSTMENT
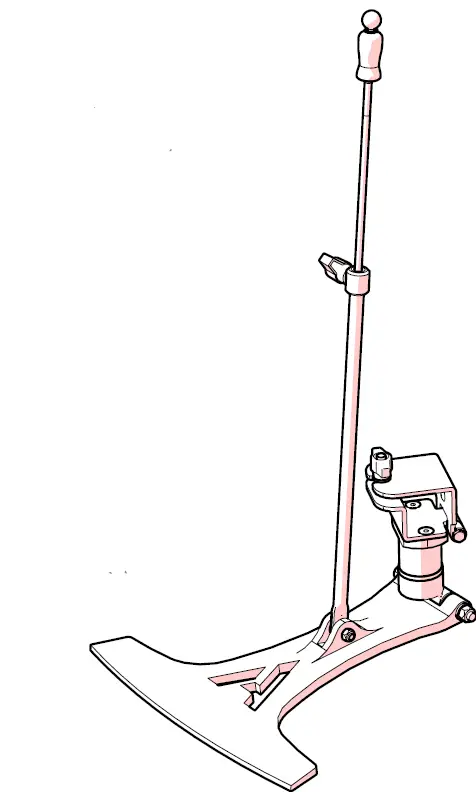
Assemble Apex Frame
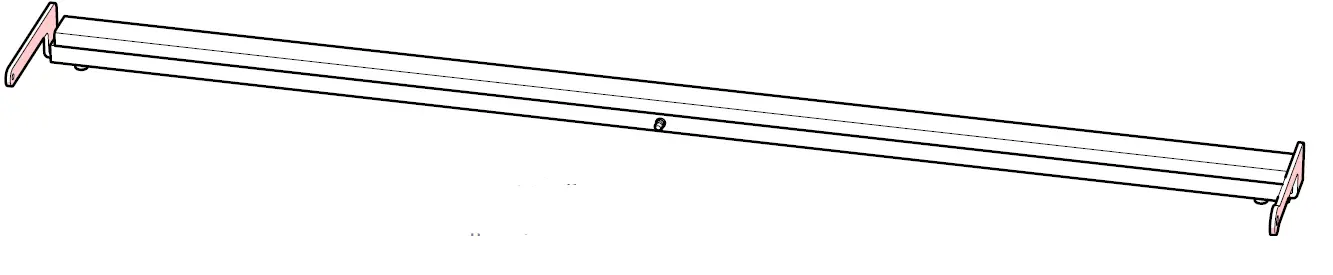
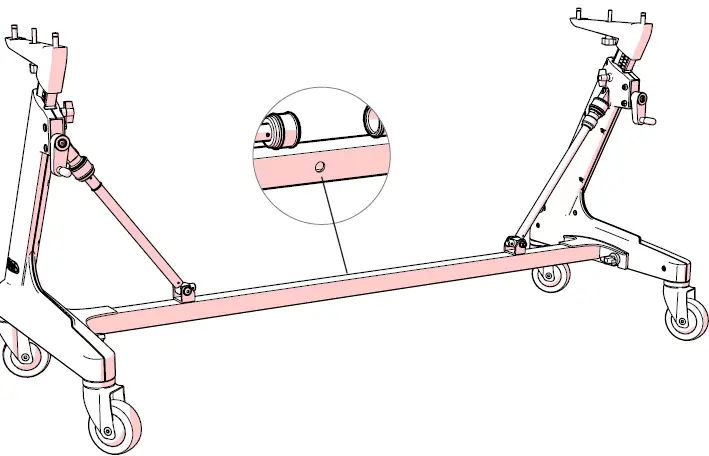
Attach the connection rod to the side pieces. Release the wing screws and then insert the end of the rod between the washers and the side piece. Tighten all wing screws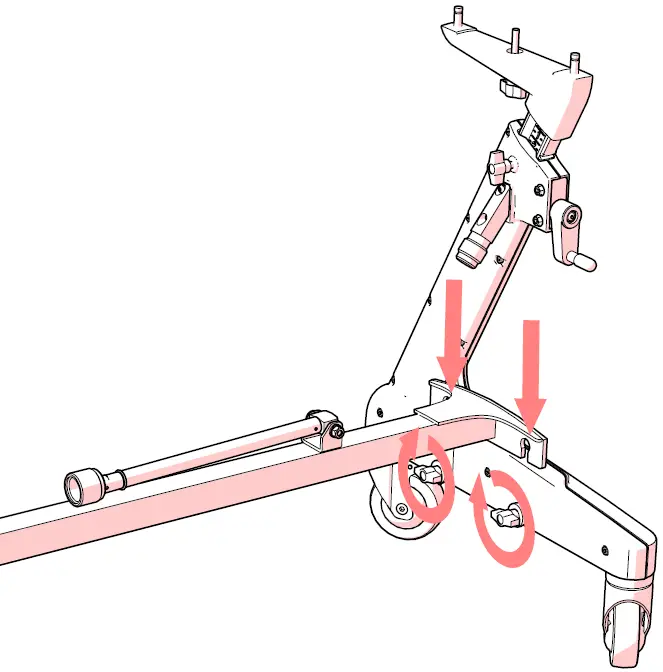
Attach the integrated shore braces to the side pieces. Rotate the shore into position and tighten the screw fitting. The receiving hole in the connection rod faces the position of the audience.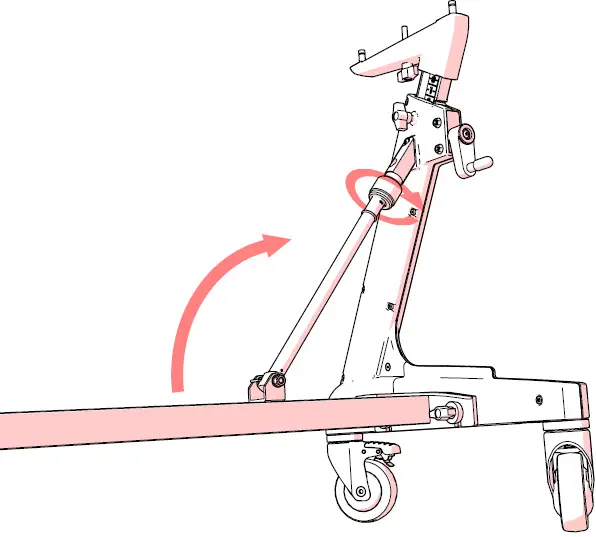
Assemble Upper part
Attach motor to small end piece. Secure in place with thumb screw.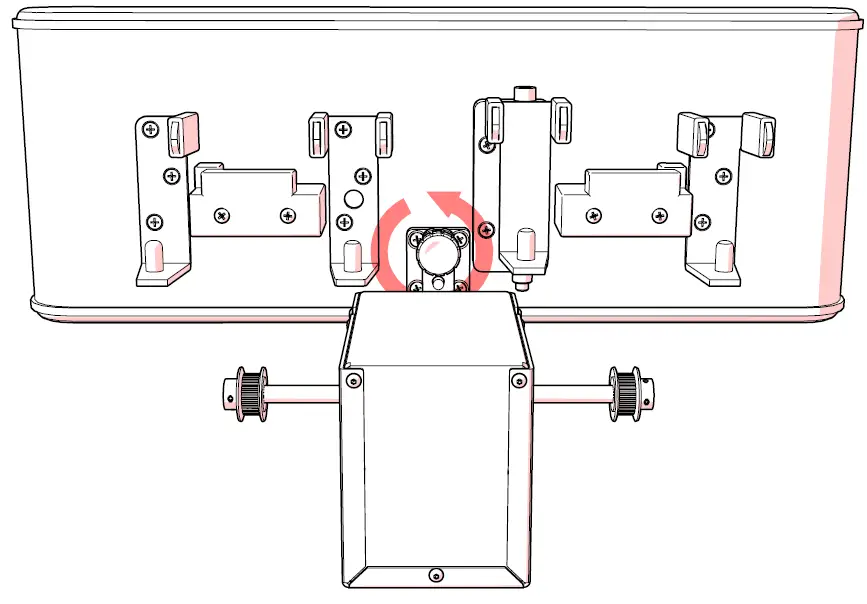
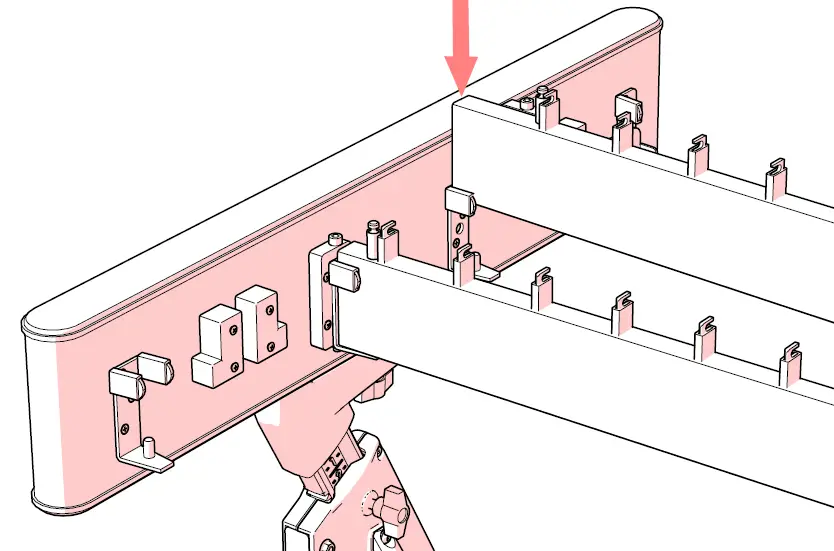
Install Large and Small End Pieces.
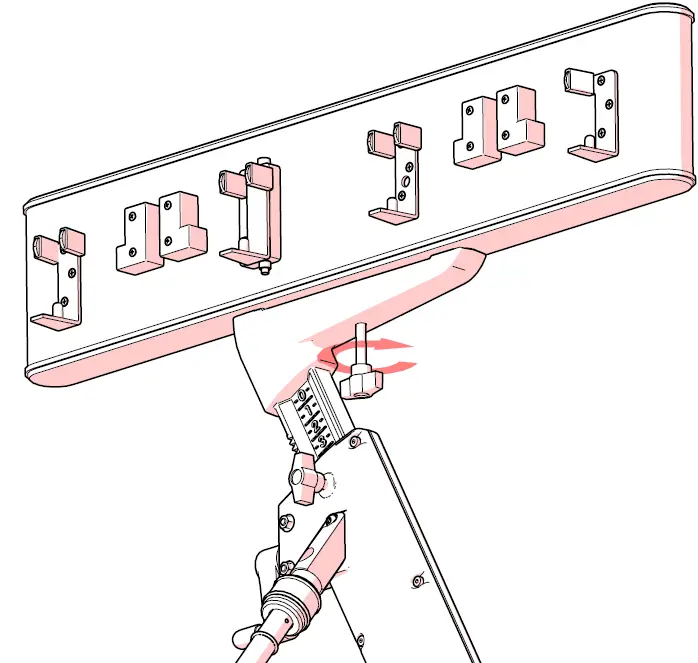
Install Rails 2 and 3.
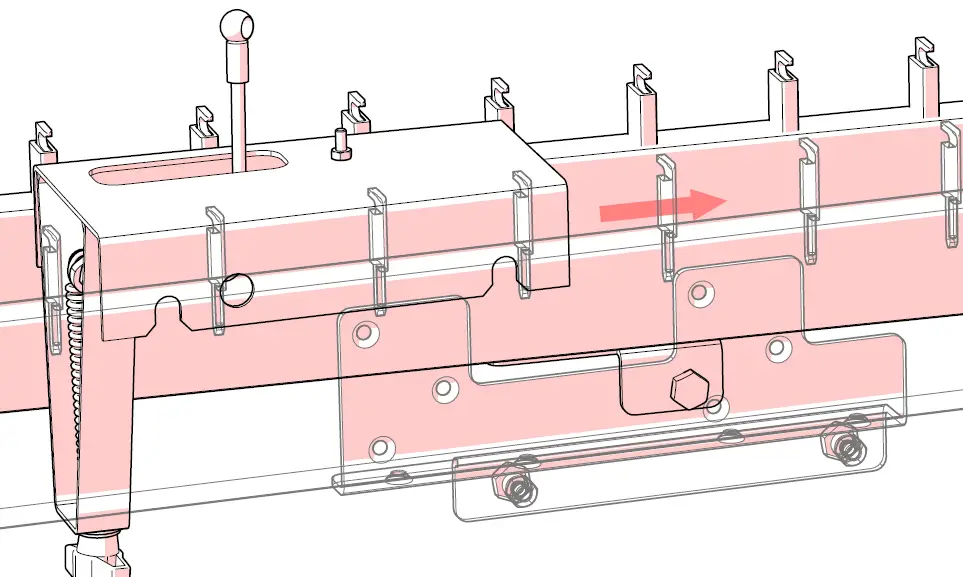
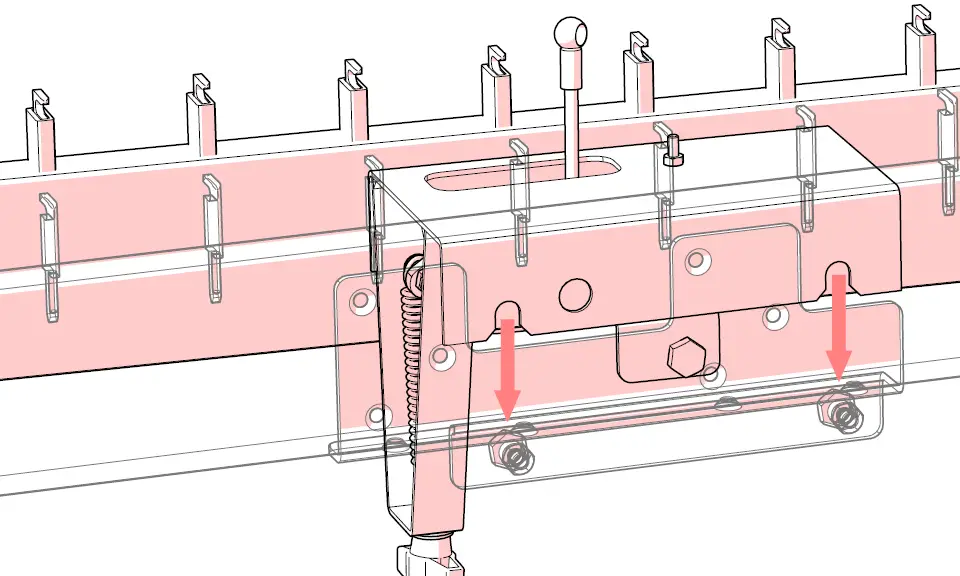
Install dampener mechanism. Attach connection piece to dampening lever. Slide the dampening mechanism onto the mounting bolts on the rails.
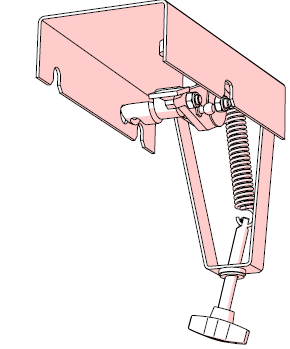
Install pedal: Attach the pedal mechanism to the connection rod with the clamp. Insert the pedal rod into the holder.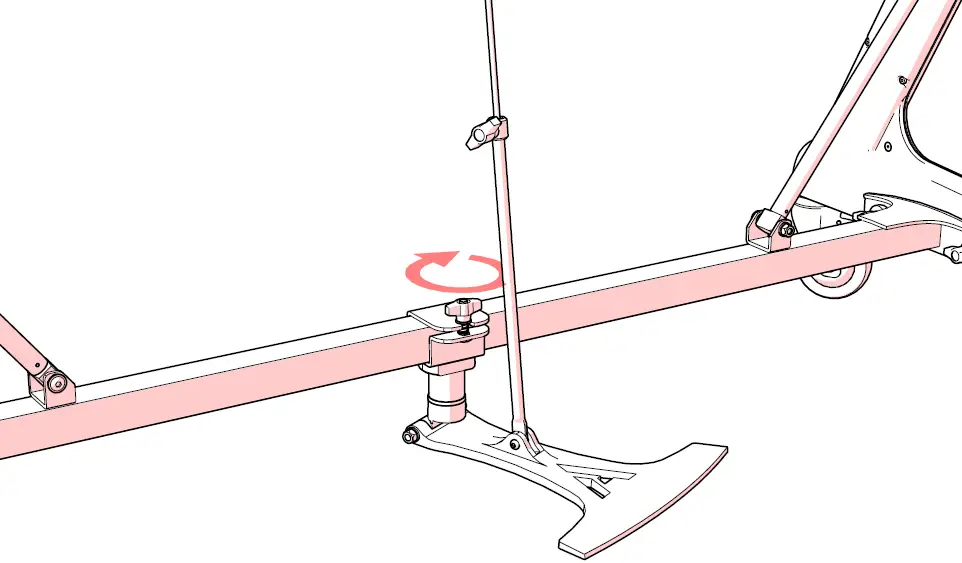
Attach pedal rod to dampening mechanism.

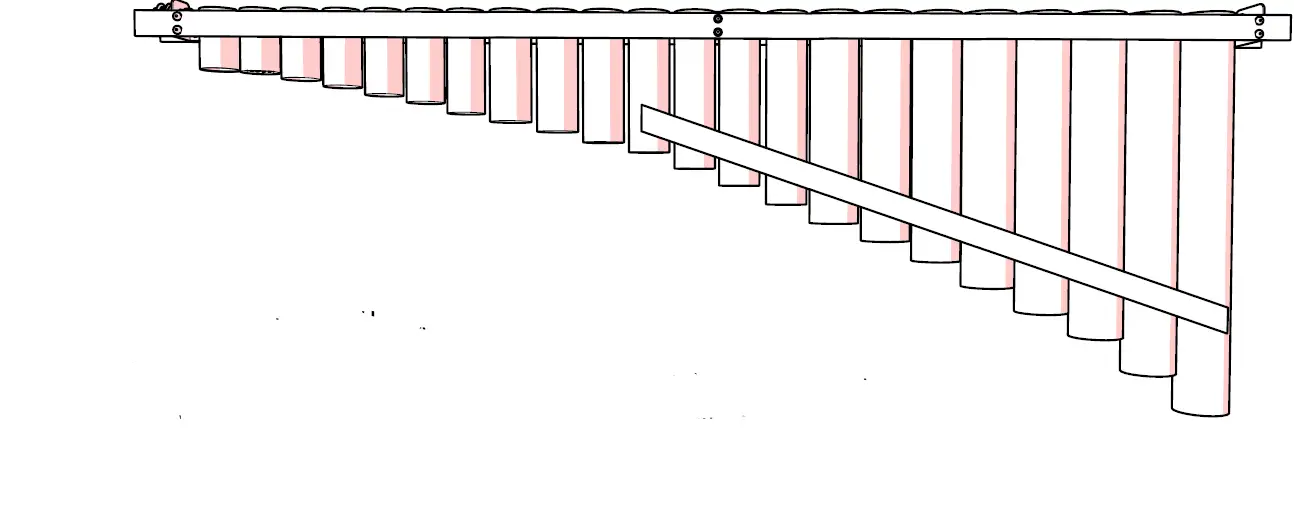
Install resonators on end piece supports.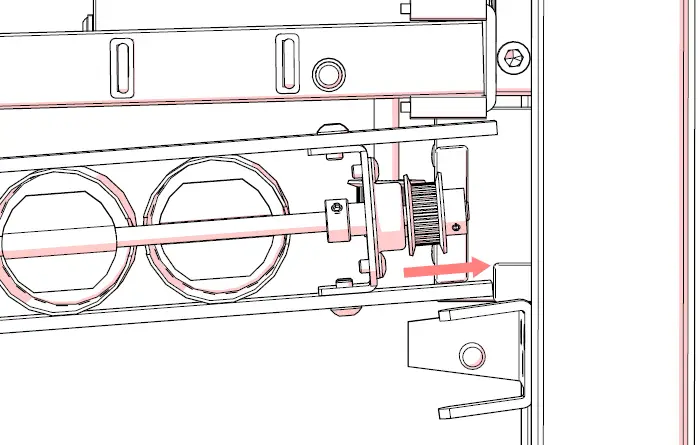
Install rails 1 and 4 and connect all rail spacers.
Install dampener bar. Attach dampening mechanism to dampener bar with connection piece.

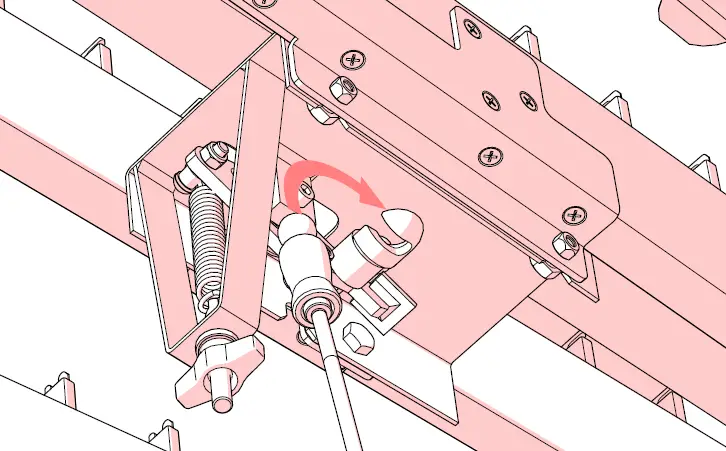
Adjust pedal position: Loosen wing screw, adjust position, and secure in place with wing screw.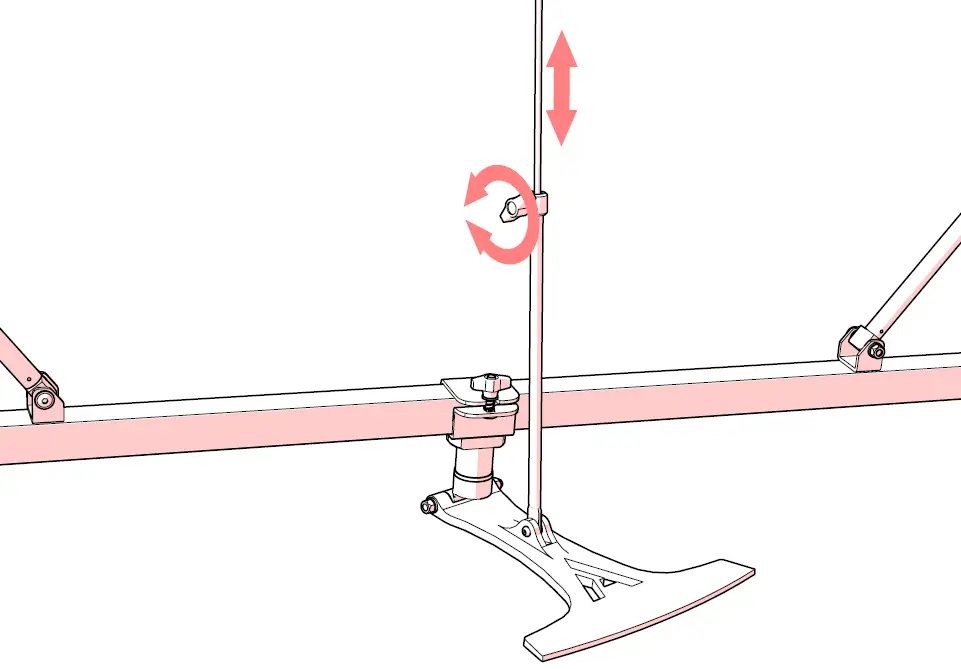
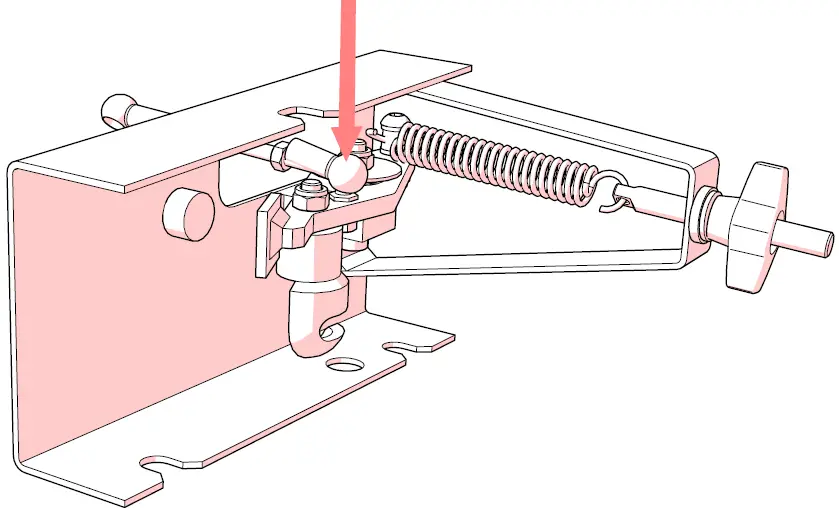
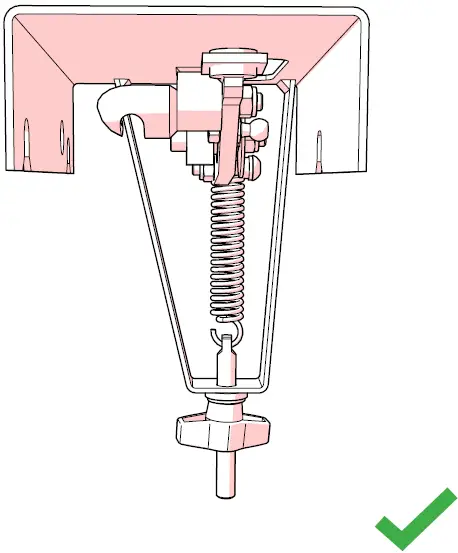
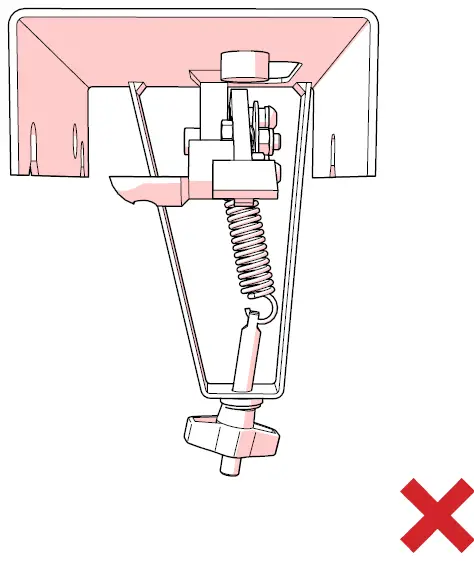
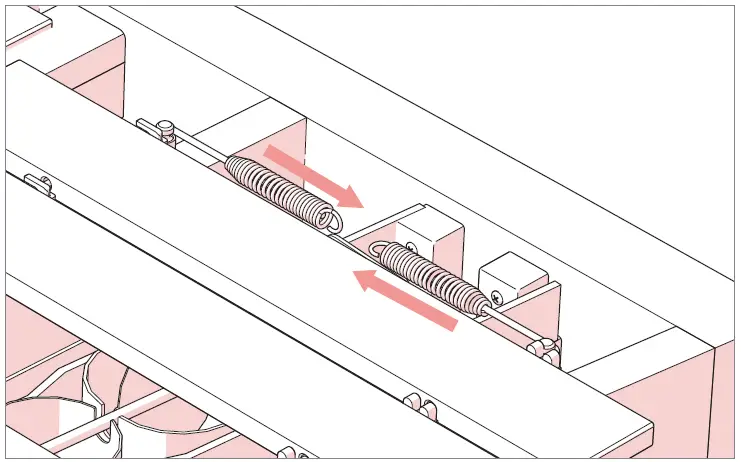
Adjust pedal tension: Use the wing screw under the dampener mechanism to adjust the resistance in the pedal pressure.
The spring requires a minimum tension to function correctly. If there is not enough tension in the spring, the dampener bar will not apply enough pressure against the bars. The pedal tension must be set before adjusting the dampener bar in Step 4.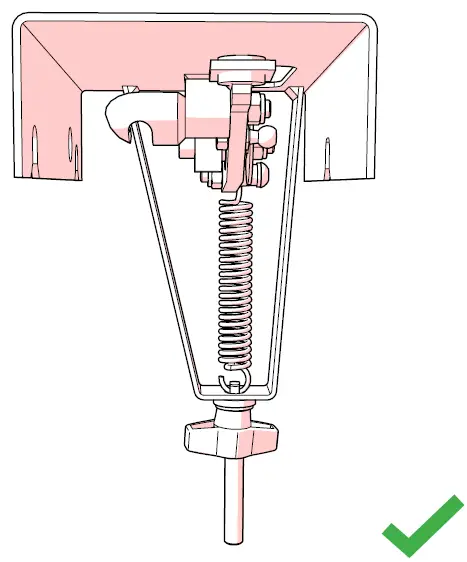
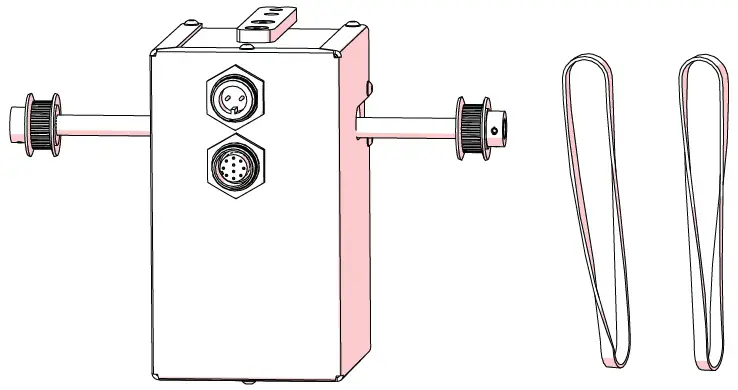
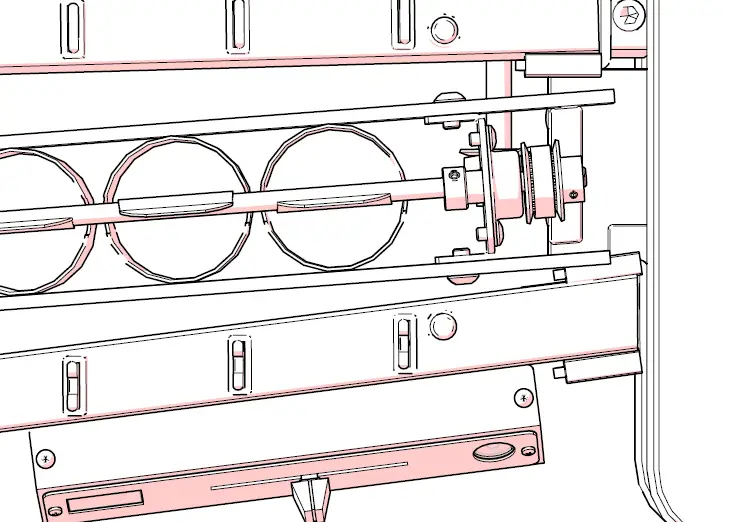
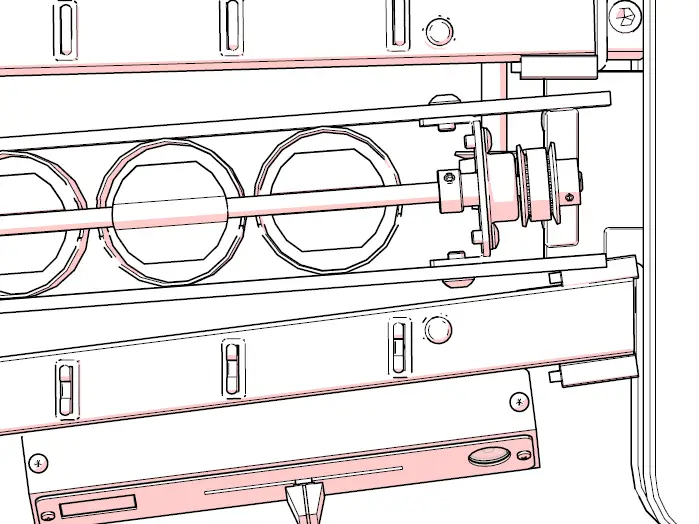
Models with motor: connect motor drive and power.
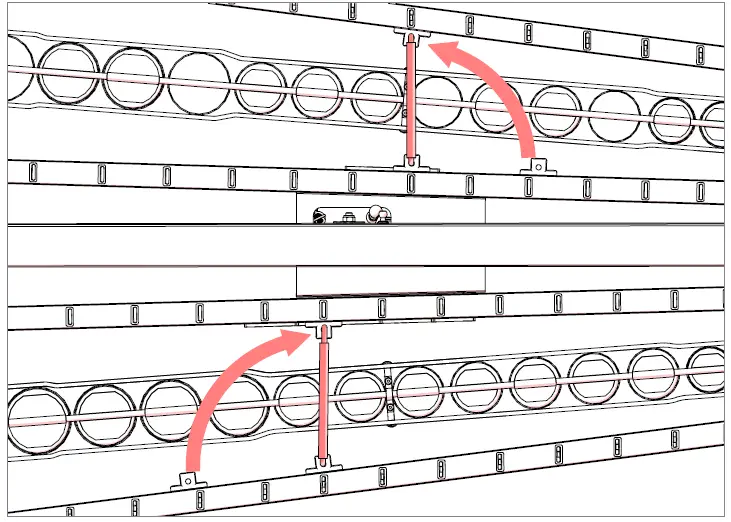
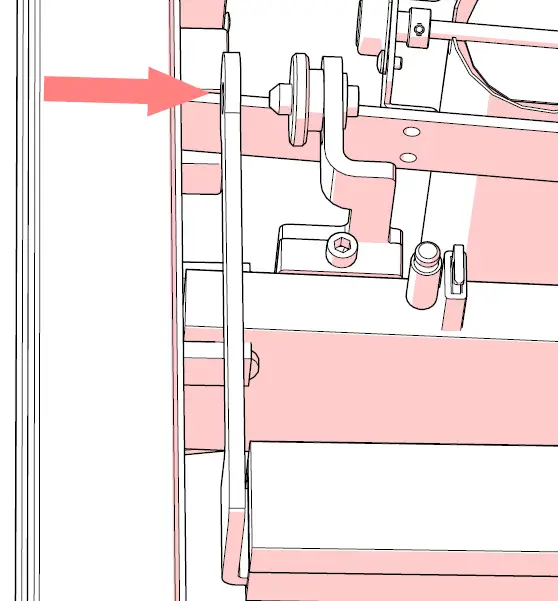
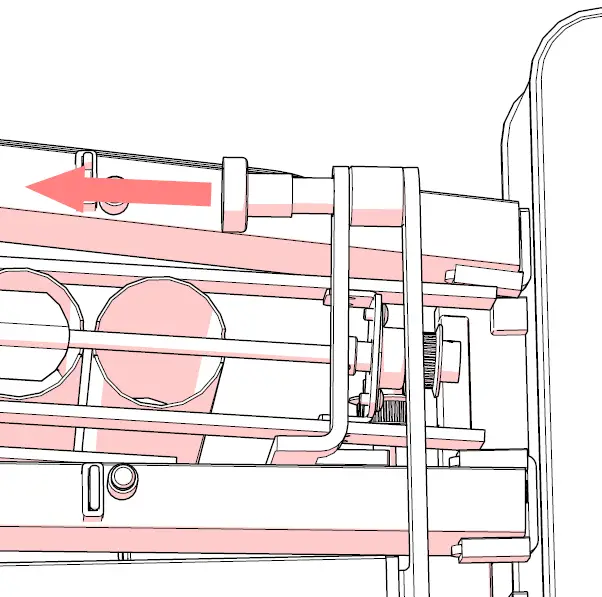
Attach timing belts to motor and fans. The belts must twist in the same direction so that the fans turn in the same direction. If necessary, lift the axle to place the belts in position.
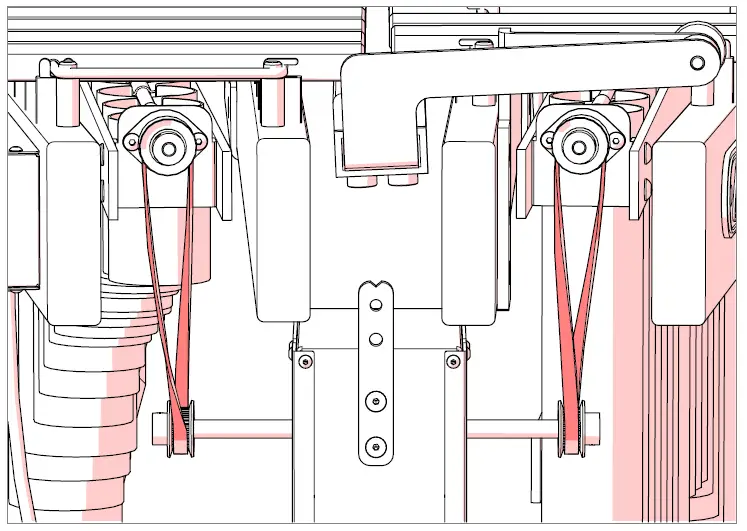
The timing belts will consistently stop the fans in the same position. Adjust the fans to either the open or closed position as desired.
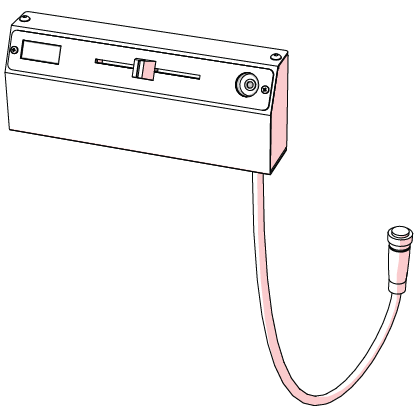
Attach the control panel to Rail 1. Connect control panel to the motor.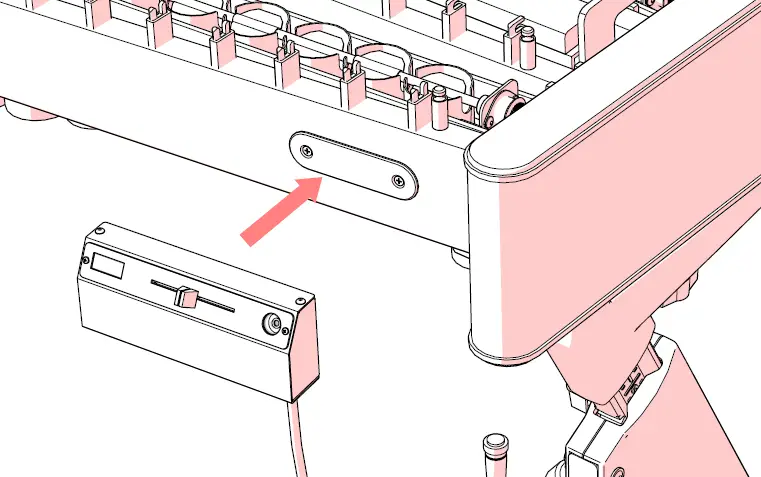
Select appropriate electrical plug and attach to the adapter. Connect to power.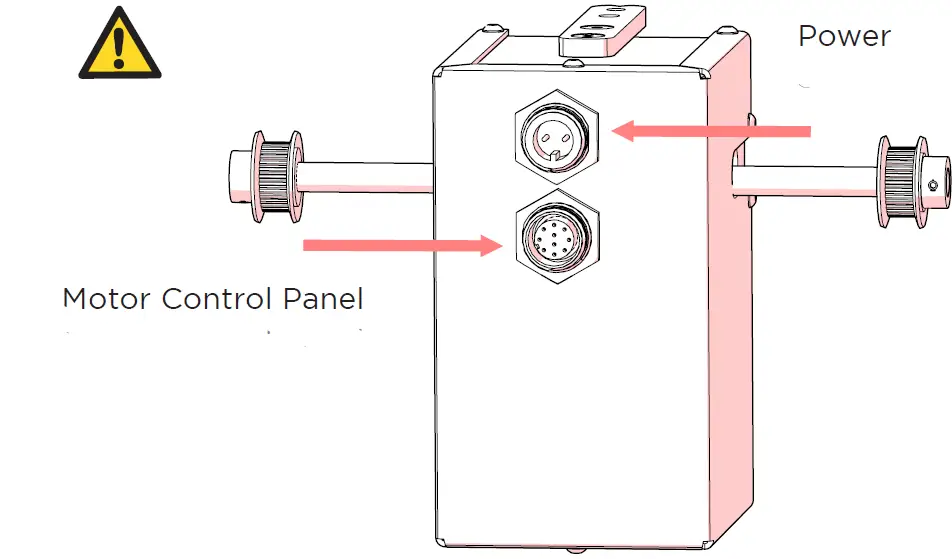 Calibrate motor electronics: For best results, calibrate the motor directly after connecting to power.
- Hold the power button down. When the display reads “CAL,” release the power button.
- The motor will run from slow to fast, eventually reaching maximum speed. When the motor reaches maximum speed, the motor will stop and the display will return to the RPM value of the position of the slider. This process can take up to one minute to complete.
- Disconnect the motor from power.
- Make sure that the valves are in the correct position and reconnect to power. The motor is now calibrated.
Install bars and adjust dampening system.
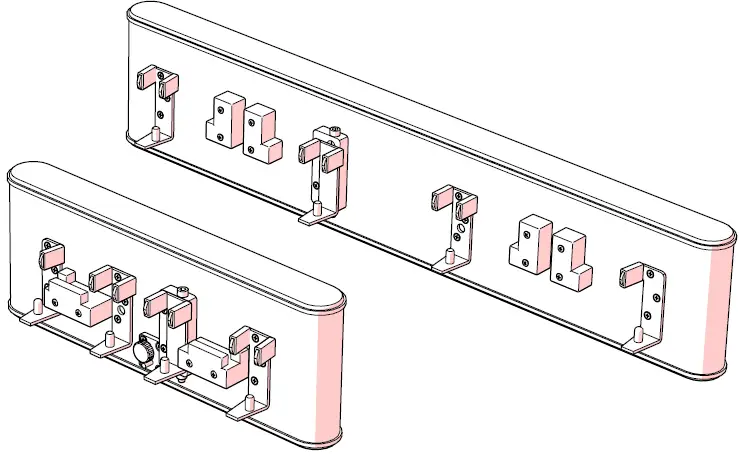
Dampening Mechanism Overview
Adams Vibraphones feature a precision dampening system. When adjusted correctly, the unique dampening system dampens all bars on the instrument at precisely the same time.
The dampener bar, threaded connection rod, and rail 2 must be adjusted during assembly. This process will take 10-15 minutes to complete. Use the hex/Allen wrench located on the inside of Rail #1 to adjust rail positions.
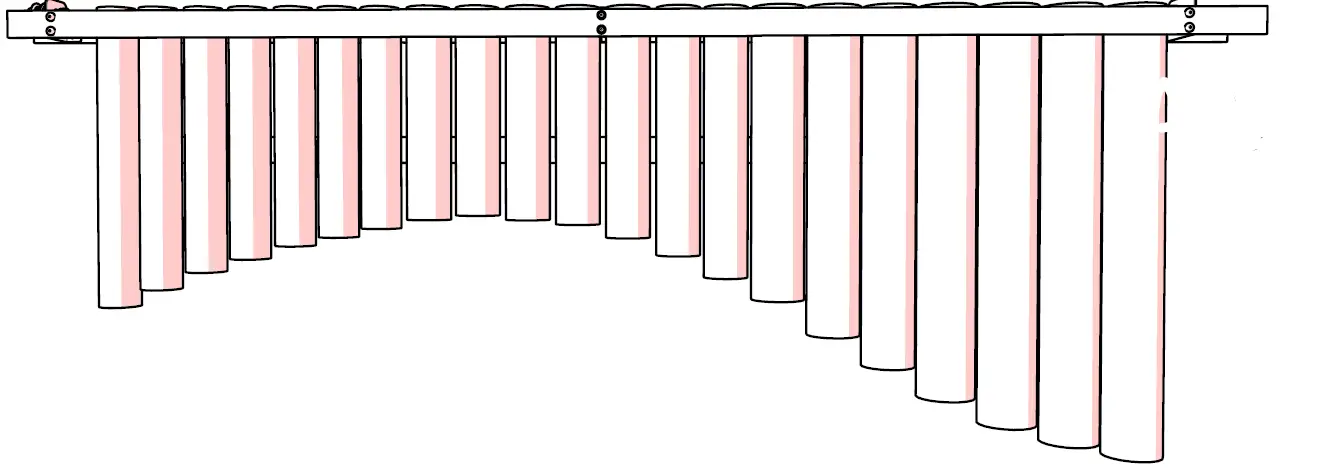
Install the accidental bars. Pull the slack out of the cord and connect end springs.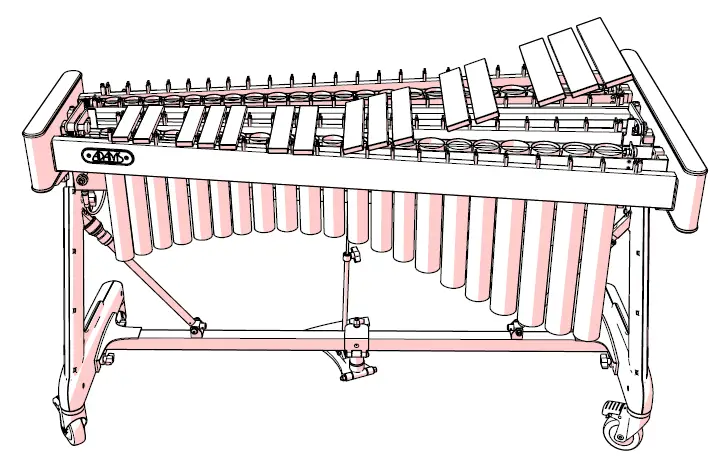
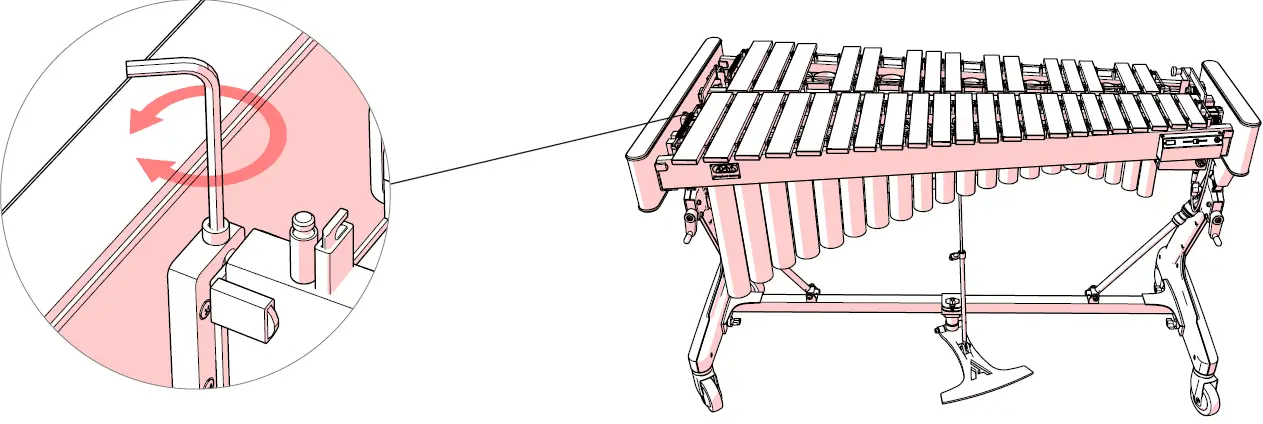
Level the dampener bar: Make G#3 and C#6 dampen at the same time.
- Press pedal down to allow the bars to ring.
- Play G#3 and C#6 at the same time.
- Slowly release the pedal and listen to the tones dampen.
- If C#6 rings longer than G#3, turn the bolt on rail 3 to the left.
- If G#3 rings longer than C#6, turn the bolt on rail 3 to the right.
- Make a small adjustment of a half turn and evaluate the result. Adjust as necessary until the tones dampen at the same time.
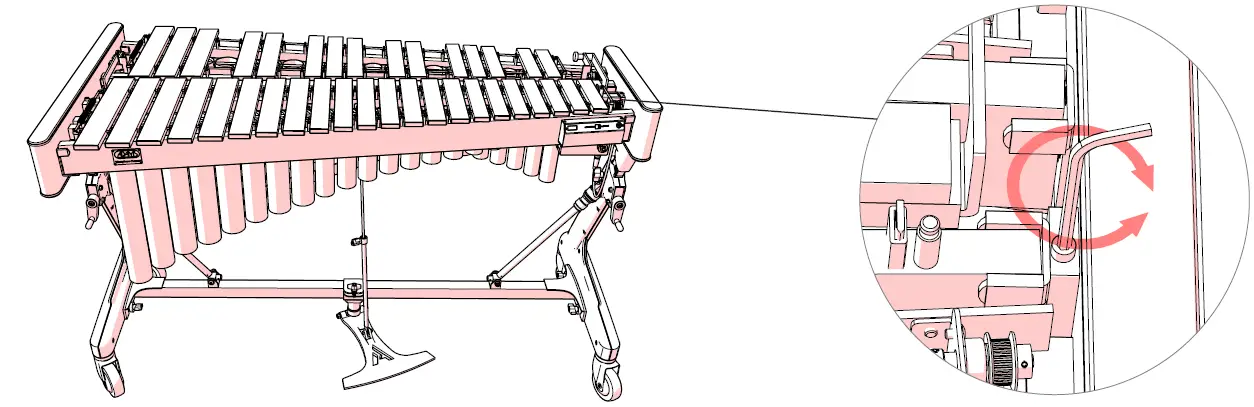
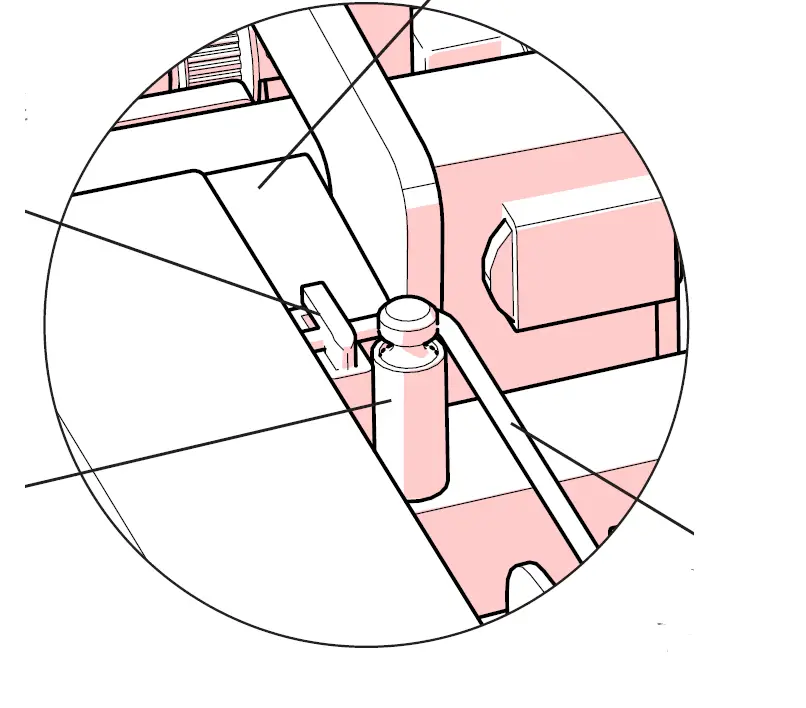
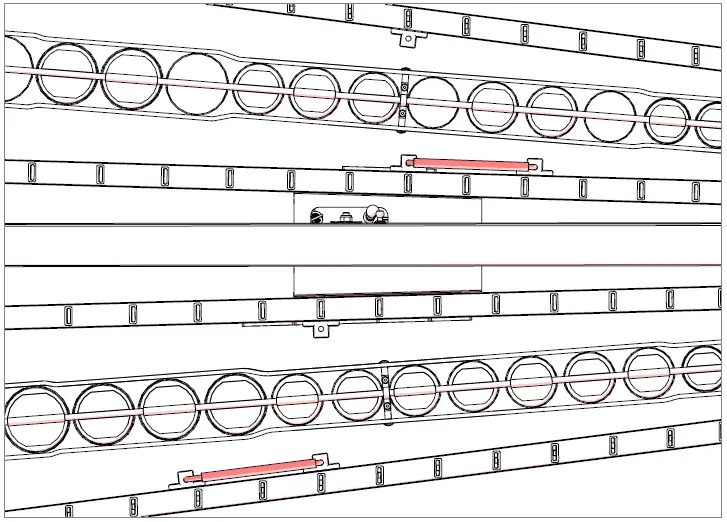
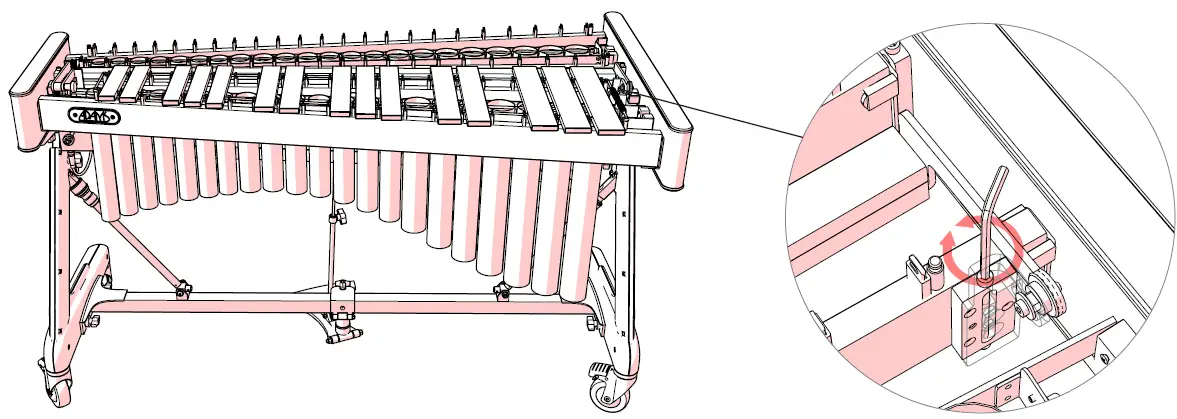
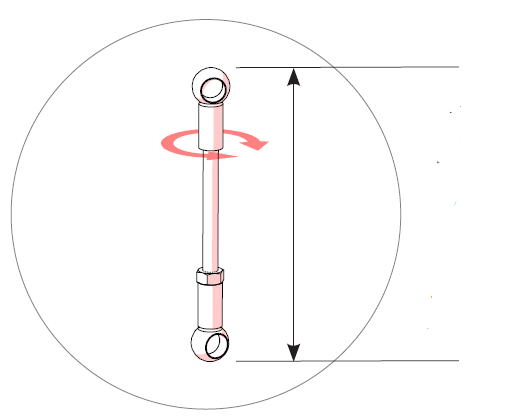
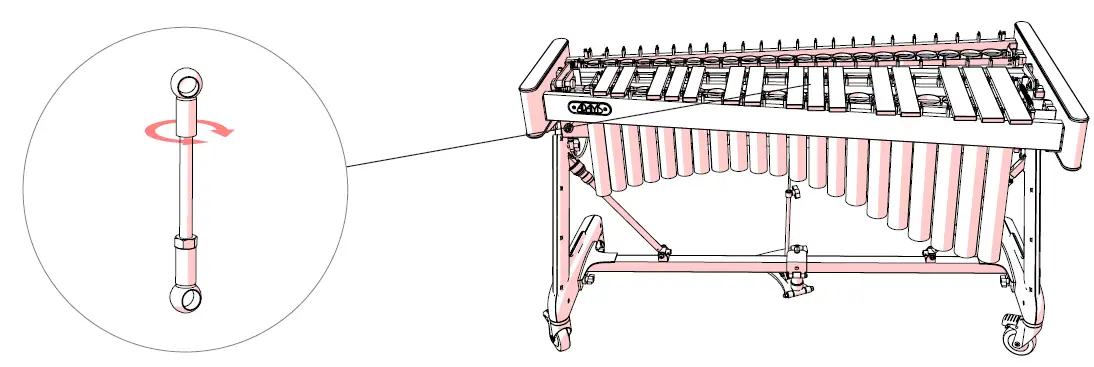
Adjust the dampener bar position.
The threaded connection piece sets the dampener bar position. This adjustment controls the length of the sound while dampened.
- The default total length is
- 110mm from end to end.
Play the accidental keys while dampened.- For a shorter dampened sound, lengthen the connection piece.
- For a longer dampened sound, shorten the connection piece.
- Make a small adjustment of a whole turn and evaluate the result. Make another adjustment if necessary.
Adjusting the connection piece will require removing the accidental bars.Install the natural bars. Pull slack out of cord and connect end springs.
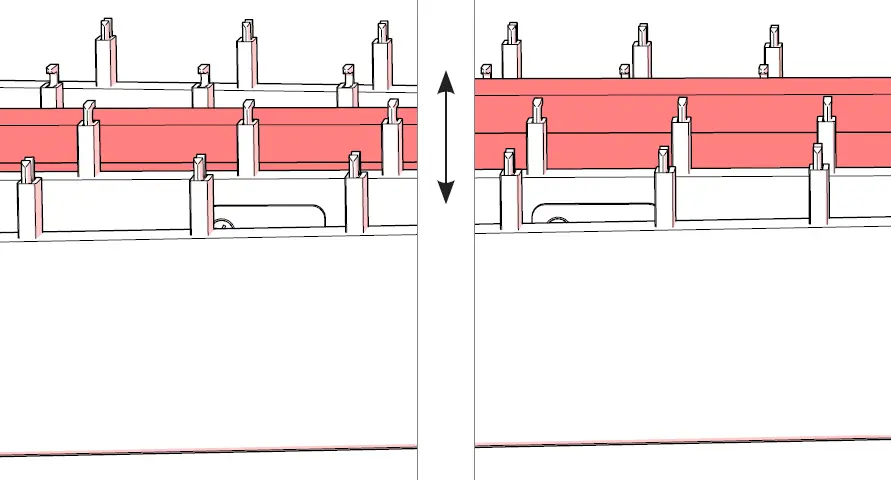
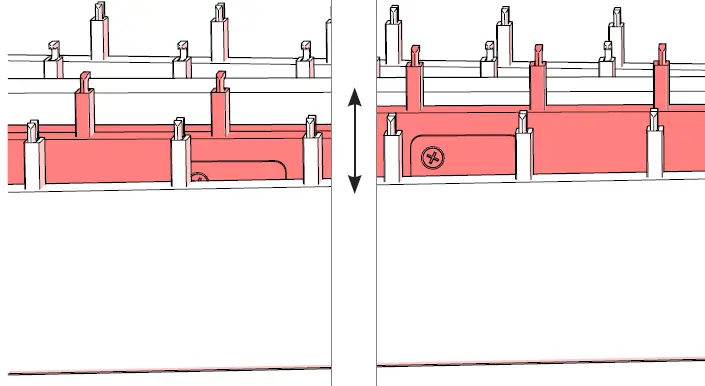
Rail 2 is height adjustable. This adjustment matches the dampening of the natural bars to the dampening of the accidental bars. This must only be adjusted after the dampener bar position is set.
- If the accidental keys ring freely after adjusting rail 2, then rail 2 has been positioned too low. The lowest position of rail 2 can push the dampener bar lower and move the dampener bar away from the accidental keys. Raise rail 2 and begin Step 4.5 or 4.6 again.
Adjust the low end of rail 2: Make G3 and G#3 dampen at the same time.
- Press the pedal down to allow the bars to ring.
- Play G3 and G#3 at the same time.
- Slowly release the pedal and listen to the tones dampen.
- If G3 rings longer than G#3, turn the rail 2 low end bolt to the left.
- If G#3 rings longer than G3, turn the rail 2 low end bolt to the right.
- Make a small adjustment of a half turn and evaluate the result. Adjust as necessary until the tones dampen at the same time.
Adjust the high end of rail 2: Make E6 and G3 dampen at the same time.
- Press the pedal down to allow the bars to ring.
- Play G3 to E6 at the same time.
- Slowly release the pedal and listen to the tones dampen.
- If E6 rings longer than G3, turn the rail 2 high end bolt to the left.
- If G3 rings longer than E6, turn the rail 2 high end bolt to the right.
- Make a small adjustment of a half turn and evaluate the result. Adjust as necessary until the tones dampen at the same time.
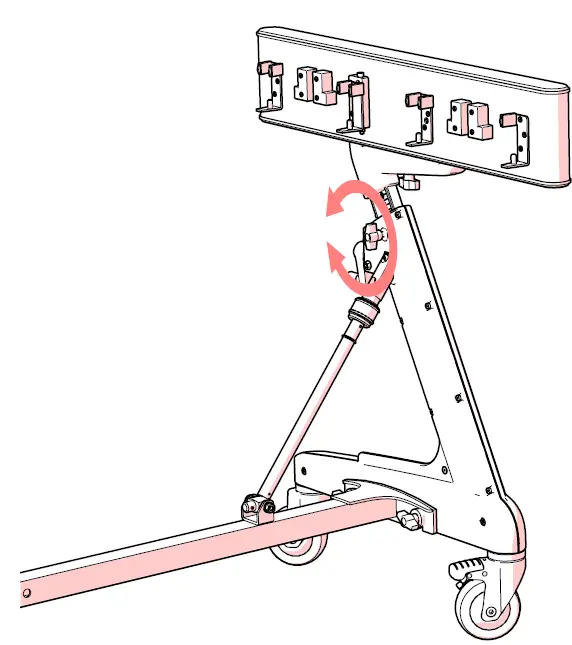
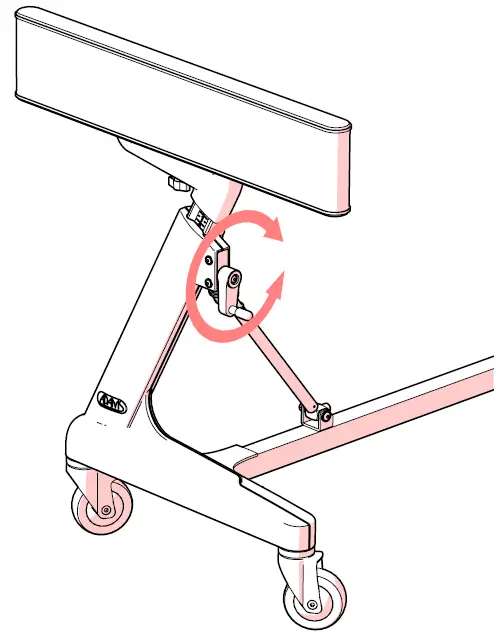
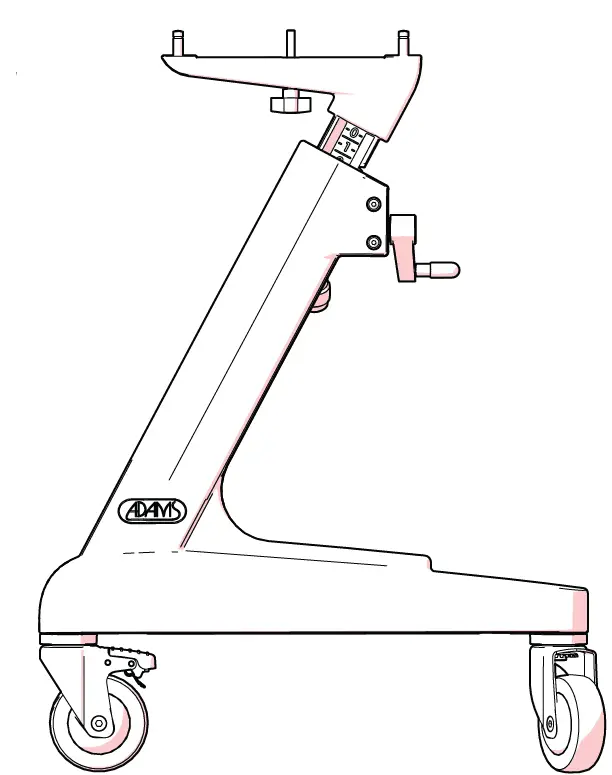
Height Adjustment
Loosen the wing screws, adjust to playing height, and secure in place again with the wing screws.
The Apex Height Adjustment Mechanism allows for easy and precise adjustment to the player’s height.
Do not adjust one side of the instrument more than 4 marks at one time without equal adjustment on other side.
EXAMPLE:
If adjusting from 0 to 8, adjust one side from 0 to 4, the other side from 0 to 4, and then repeat the process from 4 to 8.USE AND CARE
As with any fine musical instrument, routine care and maintenance is important to ensure a long lifetime for your instrument. As necessary, Adams Musical Instruments recommends the following for your instrument:
- Mallets: Only use the appropriate mallets for your instrument. Using excessively hard mallets will cause denting or damage that is not covered by warranty
- Bars: As necessary, clean your bars with a soft, lint-free cloth. Do not use oil or wax based polish that can add moisture to the bar. Never use any type of thinner, benzene, or glass cleaner to clean the bar, as it can remove the lacquer finish.
- Rails: Apply a fine furniture cleaner with a soft, lint free cloth, and buff clean.
- Stand: Clean the metal stand of dust and debris with a soft, lint free cloth.
- Bar Cord: Replace the Bar Cords when they show signs of wear.
- Use and Storage: Do not use or store your instrument in environments that are excessively hot or cold, excessively humid or dry, or have excessive dust.
Transport:
- Use good judgment when moving the instrument: avoid stairs and sloped surfaces, and secure the instrument by its frame during transport.
- Make sure that the caster brakes are disengaged for movement—damage can result to the wheels when the brake is not released
- Always carefully lift the instrument over rough or uneven surfaces
- When moving the instrument by vehicle, disassemble and secure each component separately and reassemble at the new location.
Specifications – Concert
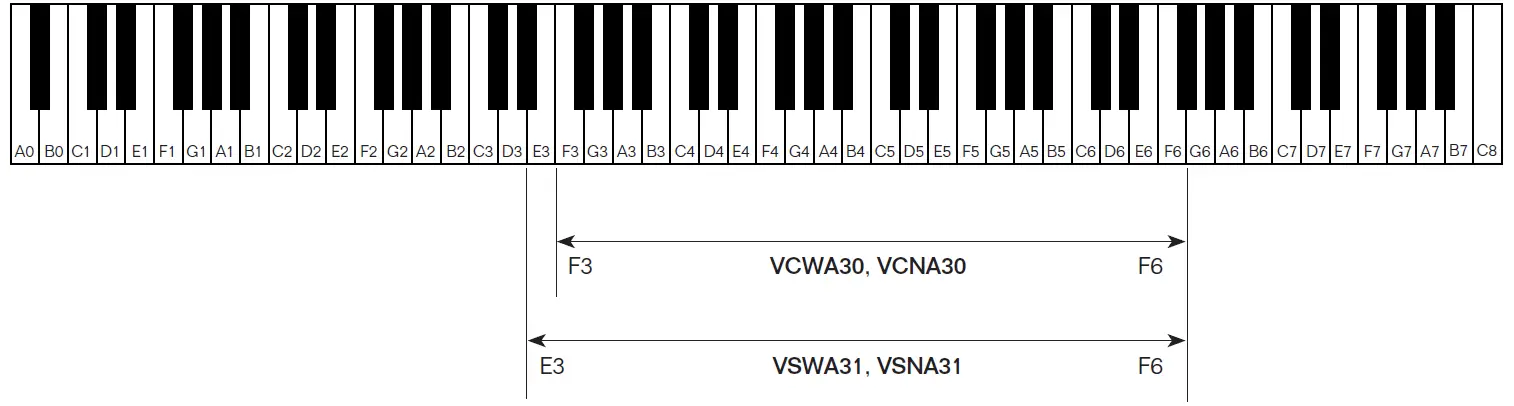
VCWA30 VCNA30 VSWA31 VSNA31 RANGE TONUMFANG
3.0 Octave (F3-F6) 3.0 Octave (F3-F6) 3.1 Octave (E3-F6) 3.1 Octave (E3-F6) TUNING*
STIMMUNG*
442 Hz 442 Hz 442 Hz 442 Hz BAR MATERIAL
KLANGPLATTENMATERIAL
Aluminum Aluminum Aluminum Aluminum Aluminum Aluminum Aluminum Aluminum BAR SIZES
57-38 mm 57-38 mm 50-38 mm 50-38 mm MOTOR
MOTOR
Motor, 40-140 RPM No motor Motor Motor, 40-140 RPM No motor Kein Motor FRAME OPTION RAHMENMÖGLICHKEIT
Apex Apex Apex Apex DIMENSIONS**
ABMESSUNGEN**
Low Width 760mm
High Width 560mm
Length 1500mm
Low Width 760mm
High Width 560mm
Length 1500mm
Low Width 760mm
High Width 560mm
Length 1520mm
Low Width 760mm
High Width 560mm
Length 1520mm
HEIGHT ADJUSTMENT***
HÖHENVERSTELLUNG***
855-1015 mm 855-1015 mm 855-1015 mm 855-1015 mm
- 442 Hz Standard. 440, 441, 443, 444 by special order
- Low and High Width as measured in the lowest height position
- Maximum height of instrument as measured to the top of the accidental bars
Specifications subject to change without noticeACCESSORIES
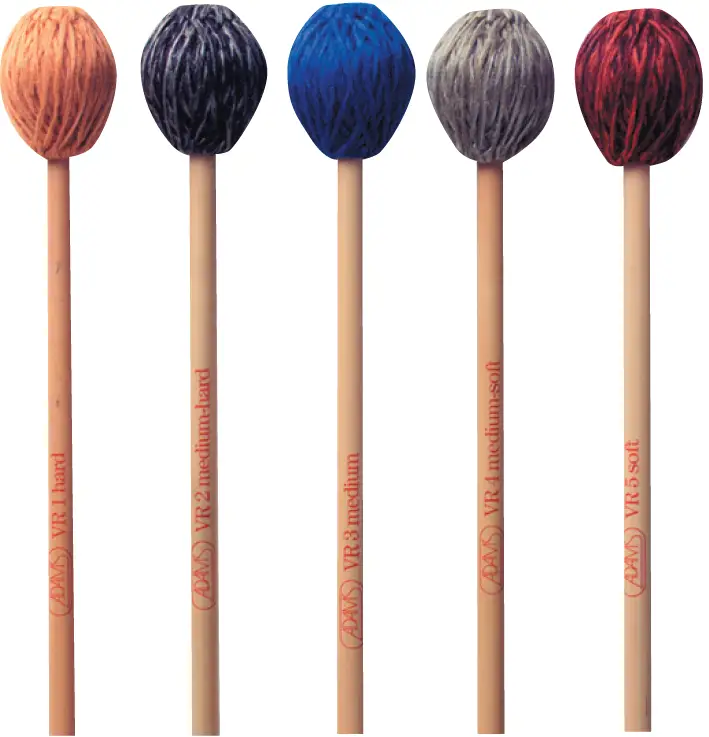
- Vibraphone mallet hard VR1
- Vibraphone mallet medium-hard VR2
- Vibraphone mallet medium VR3
- Vibraphone mallet medium-soft VR4
- Vibraphone mallet soft VR5
- PV018
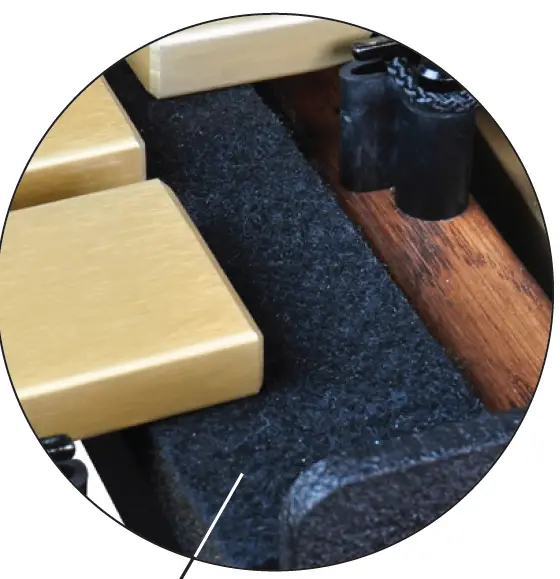
- Dampener Felt
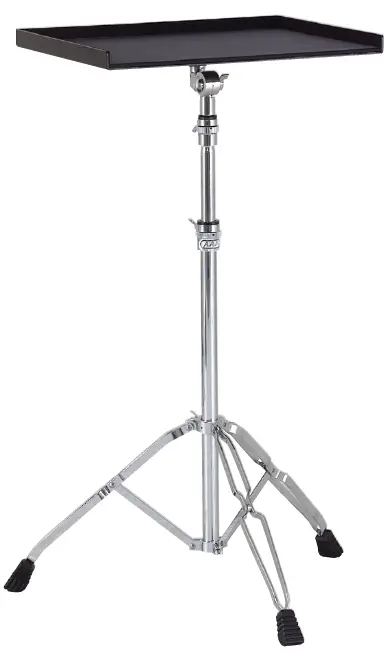
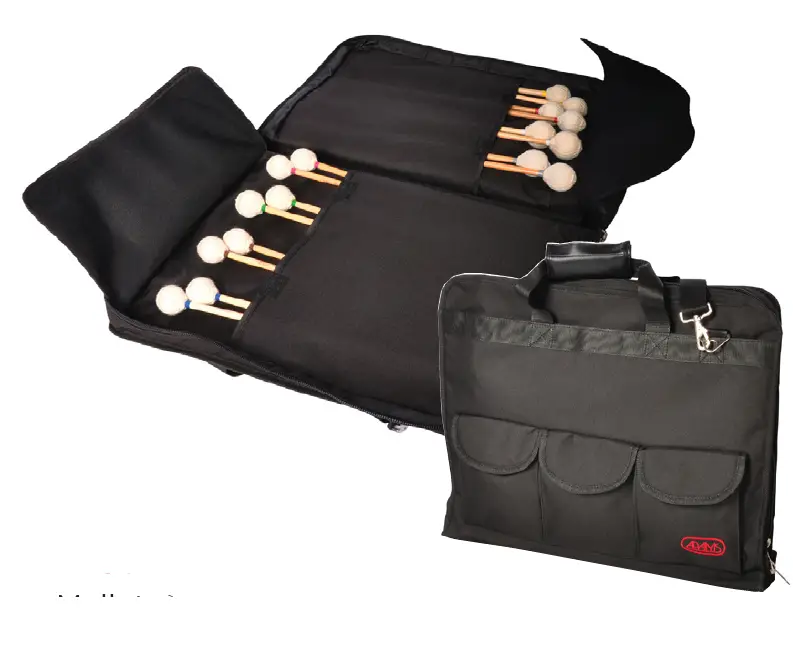
- 4MTST
Table for Mallets and Accessories
- 4MLTASSP
Mallet Smart Bag Smart- 4MLTASLBB
Mallet Bag – Bogdan
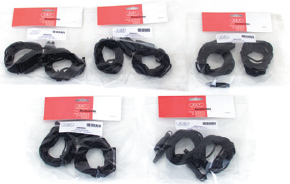
- Concert and Solist Vibrapones: 4XMCD351
Cord SetsWARRANTY
Adams Musical Instruments is pleased to guarantee all Percussion Instrument for a period of one year from the original purchase date from your authorized Adams dealer.
This warranty specifically excludes:
- Wear from normal use
- Damage from neglect, abuse, accident, or improper maintenance
- Exposure to extremes in temperate or humidity
- Heads, Mallets, and Keyboard Bars
Adams Musical Instruments reserves the right to determine whether the asserted defects were caused by the above mentioned conditions or not. Please contact the authorized Adams dealer from which your instrument was originally purchased for warranty service. Warranty coverage may vary from country to country; please contact your dealer/distributor for relevant details.
 Install the natural bars. Pull slack out of cord and connect end springs.
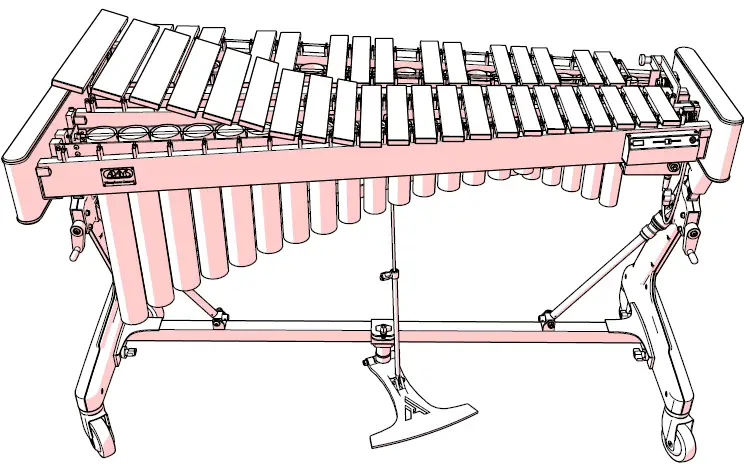 Rail 2 is height adjustable. This adjustment matches the dampening of the natural bars to the dampening of the accidental bars. This must only be adjusted after the dampener bar position is set.
 Adjust the low end of rail 2: Make G3 and G#3 dampen at the same time.