![]() USER MANUAL
USER MANUAL
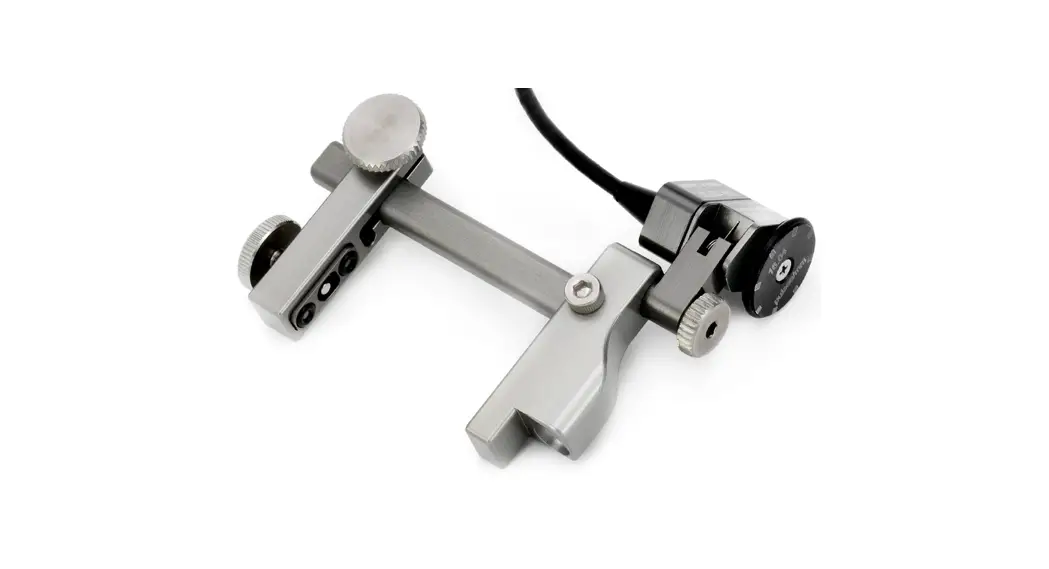
ODI-II Two Probe Modular Encoder
KEEP THIS MANUAL – DO NOT LOSE
THIS MANUAL IS PART OF THE ODI-II SYSTEM AND MUST BE RETAINED FOR THE LIFE OF THE PRODUCT. PASS ON TO SUBSEQUENT OWNERS.
Ensure any amendments are incorporated with this document.
 WARNING! DO NOT DISASSEMBLE. No user-serviceable parts.
Disassembling any of the components in this product, beyond the instructions in this user manual, could void the regulatory certifications and/or effect the safety of the product.![]() The WEEE symbol indicates that the product must not be disposed of as unsorted municipal waste, but should be collected separately.
The WEEE symbol indicates that the product must not be disposed of as unsorted municipal waste, but should be collected separately.
INTENDED USE
The ODI-II is a mini encoder designed to provide the encoded position of two probes along the scan axis.
SPECIFICATIONS
| Clamp width: | 45 mm (1.75 in) |
| Encoder wheel diameter: | 20.37 mm (0.8 in) |
| Encoder resolution: | 16.00 counts/mm (406.4 counts/inch) |
| Environmental sealing: | Watertight (submersible), Contact JIREH for details |
| Weight: | 0.36 kg (0.8 lb) |
| Operating environment: | -20°C (-4°F) to 50°C (122°C) |
MAINTENANCE
Wipe the scanner clean as required. Do not soak or submerge the scanner in cleaner or solvent of any kind.
PREPARATION FOR USE
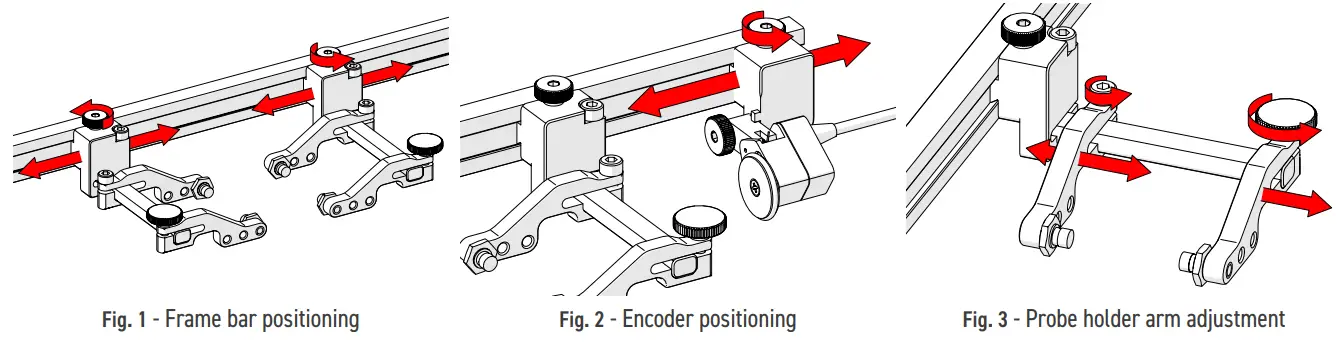
4.1. Probe Holder Setup
- Loosening the probe holder adjustment knobs (Fig. 1) allow the probe holders to be positioned along the frame bar.
- The encoder position may be adjusted by loosening the encoder adjustment knob (Fig. 2).
- Position the probe holder arms after loosening the arm clamp screw or probe holder arm adjustment knob (Fig. 3).
- Loosen the probe holder arm adjustment knob to remove the probe holder arm (Fig. 3).

- Place the wedge on the inner probe holder arm’s button and clamp in place with the outer probe holder arm (Fig. 4). Tighten the probe holder arm adjustment knob.
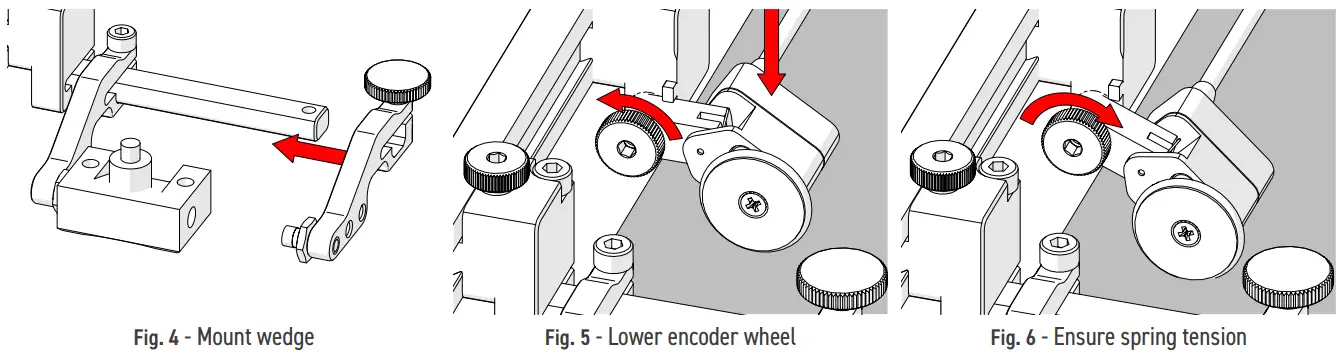
4.2. Encoder Setup
- Loosen the encoder’s thumb screw and lower the encoder wheel’s pivot joint towards the scan surface (Fig. 5).
- Tighten the encoder thumb screw and ensure adequate spring tension of the encoder wheel to the scan surface (Fig. 6).
TROUBLESHOOTING
Encoder not incrementing
Encoder wheel not in contact with scan surface
Rotate pivot joint until wheel is in contact with scanning surface and spring joint is slightly depressed.
(see 4.2. Encoder Setup)
Encoder connector not properly connected to scanning device
Check scanning devices instructions to properly connect an encoder.
SPARE PARTS
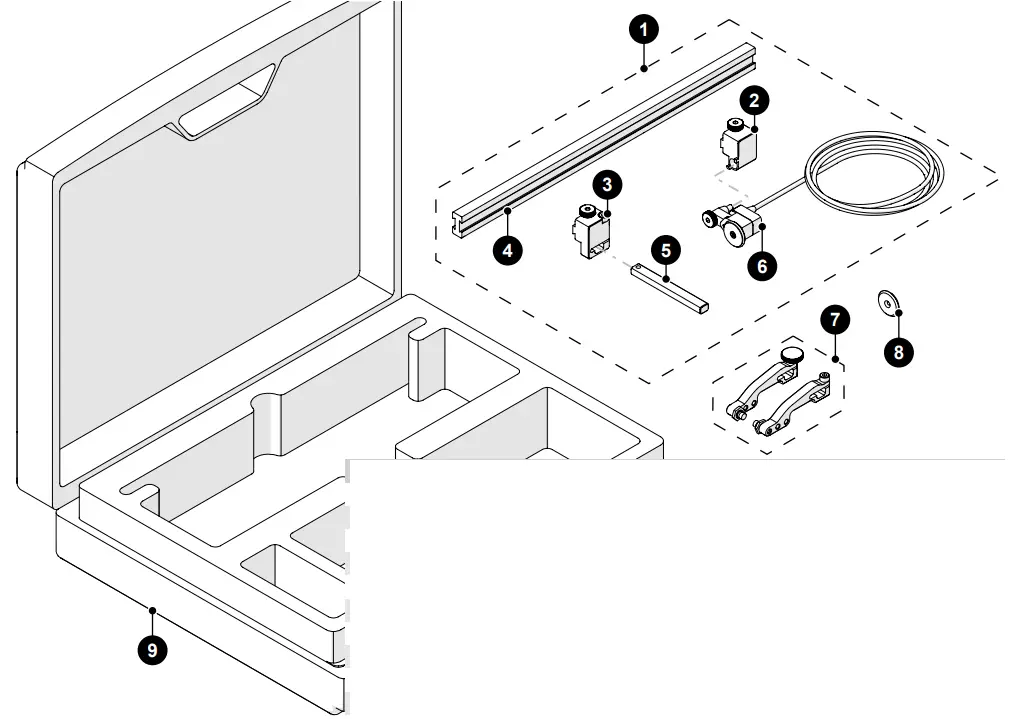
| BOM ID | Part # | Description |
| 1 | CKS010-X-05 | Base ODI-II (various encoder connector types) |
| 2 | CKS015 | Encoder Clamping Mount |
| 3 | CKS014 | Yoke Clamping Mount |
| 4 | CK0047-X | Dovetail Slide Frame Bar (30 mm, various lengths available) |
| 5 | CK0018 | Clamp Arm (70 mm, various lengths available) |
| 6 | CKS011-X-05 | Encoder Assembly (various encoder connector types) |
| 7 | PHG0XX-BXX | Probe Holder Arm Set (various styles available) |
| 8 | CK0064 | Heat treated stainless steel encoder wheel |
| 9 | CKA010 | ODI-II Case |
For information on various options, contact [email protected] or visit jireh.com
![]() 780.922.4534
780.922.4534
jireh.com
CK0063 – Rev 03.3


