ZENDURE V6400 SuperBase Power Station

Before You Begin
The information contained herein is subject to change without notice.
For the latest version, please visit https://zendure.com/poges/download-center.
Specifications
| General | |
| Weight | • 130Ibs / 59.0kg |
| Dimensions | 28.7 x 13.6 x 17.4in / 730 x 346 x 442mm |
| Capac ity | 6,438Wh (126Ah/51.1V) |
| Wireless Type | Bluetooth, Wi-Fi |
| Outputs | |
| AC Outlet (4) | 120V~60Hz, Total 3800W |
| Zen AC Outlet (2) | 240V~60Hz or 120V~60Hz*, Total 3800W |
| Car Outlet (1) | 12.6V= 10A,126W Max** |
| DC5521 (2) | 12.6V= 3A |
| Andersen (1) | 12.6V= 30A, 378W Max |
| USB -Cl, USB-C2 | 5V= 3A, 9V = 3A, 12V = 3A, 15V= 3A, 20V= 5A, each port 100W Max, Total 200W*** |
| USB-C3, USB-C4 | 5V=2.4A, 9V= 2.22A,12V= l .67A, each port 20W Max |
| USB-Al, USB-A2 | 5V =2.4A, each port 12W, Total 12W (Max) |
* Zen AC Output support either 240V or 120V output at a time.
* * 126W refers to the combined maximum output power of the Car Outlet and the DC5521 ports together.
* ** Total USB-C Output 200W Max.
| Inputs | |
| AC Inlet (1) | 120V~60Hz, 1800W Max or 240V~60Hz, 3600W Max |
| XT90 (1) | 12V-150VDC=25A, 3000W Max |
| Battery | |
| Cell Chemistry | Semi-solid State Battery |
| Cycle Life | 3,000+ cycles |
| Temperature* | |
| Optima l Operating Temperature | 59°F to 95°F (15°C to 30°C) |
| Discharge Temperature | -4°F to 140°F (-20°C to 45°C) |
| Charge Temperature | -4°F to 110°F (-20°C to 45°C) |
| Storage Temperature | 14°F to 95°F (-10°C to 35°C) |
Safety Guidelines
Usage
- Store product in a cool and dry place.
- Do not dispose of the product in heat or fire.
- Do not expose to moisture or submerge it in liquid.
- Do not use around strong static electricity or magnetic fields.
- Do not disassemble the product. Consult official Zendure channels when service or repair is required. Incorrect disassembly or reassembly may result in a risk of fire or injury to persons.
- When using the product, please strictly follow the operating environment temperature range specified in the user manual. If the temperature is too high, it may
result in a fire or explosion; if the temperature is too low, the product performance may be severely reduced, or the product may cease to work. - Do not block or obstruct the fan during use or place the product in an unventilated
or dusty area. - Ensure the product is not hit, dropped, or heavily vibrated. Securely fasten the product when transporting to ovoid damage. If severely damaged, turn off the power
source immediately and discontinue using the product. - If you accidentally drop the product into water during use, please place it in a safe open area, and stay away from it until it is completely dry. The dried product should not be used again and should be properly disposed of according to the Disposal Guide
section of this manual. - Only clean the ports with a dry cloth.
- Place on a flat surface to keep the product from falling over. If the product is overturned and severely damaged, turn it off immediately, place the battery in an open area, keep it away from people and combustibles, and dispose of it in accordance with local laws and regulations.
- Keep out of reach of children and pets.
Disposal Guide
- When possible, fully discharge the battery before disposing of it. Consult your local laws on battery recycling and disposal.
- If the battery cannot be fully discharged due to product failure, contact a professional battery recycling company far further processing.
- When disposing of secondary cells or batteries, keep cells or batteries of different electrochemical systems separate from each other.
Important Tips
- It is recommended to use this product in an environment of 15°C~35°C, away from water, fire and other sharp objects.
- For long-term storage, please charge and discharge this product once every 3 months. That is, discharge the product to 30% first, and then recharge it to 60%.
- For safety reasons, do not store this product in an environment above 45°C or 450C below O”C for a long time.
- If the power of this product is lower than 1% after use, please charge it to 60% .
- Do not disassemble the product. When service or repair is required, please consult official Zendure channels. Improper disassembly or reassembly may result in a risk of fire or personal injury.
Getting Started
What’s In the Box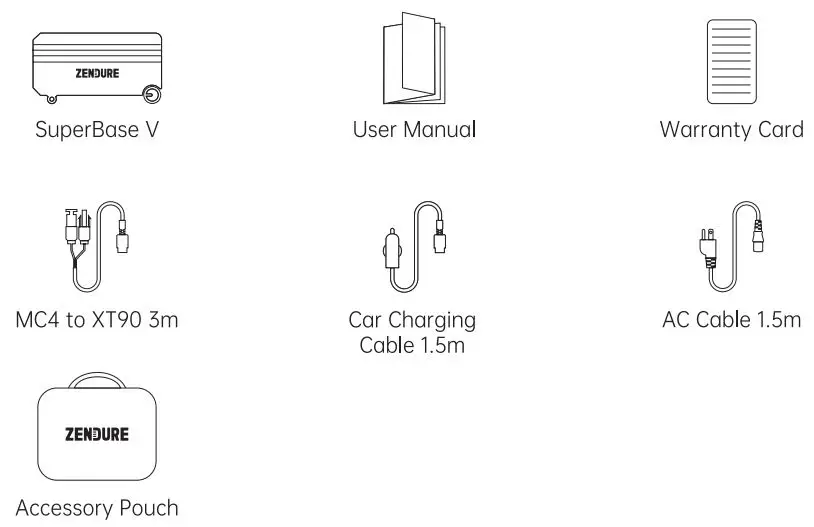
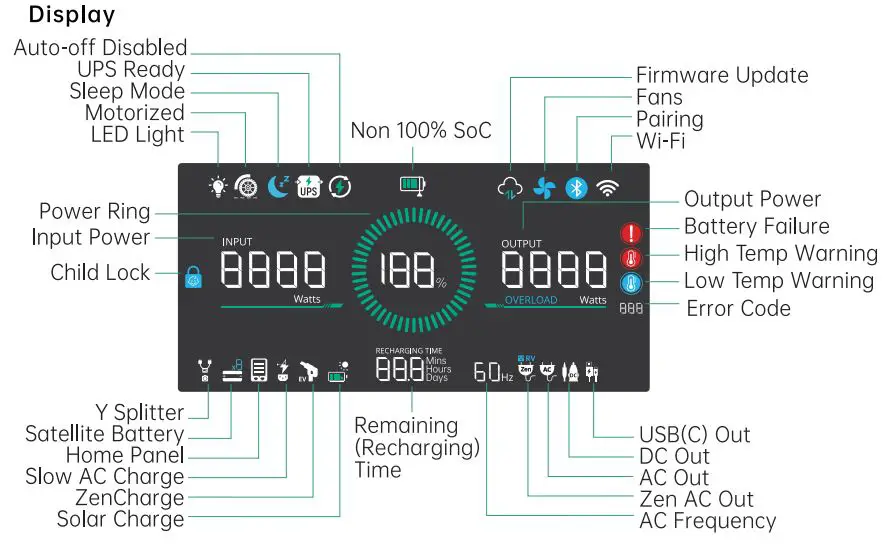
Product Overview Interface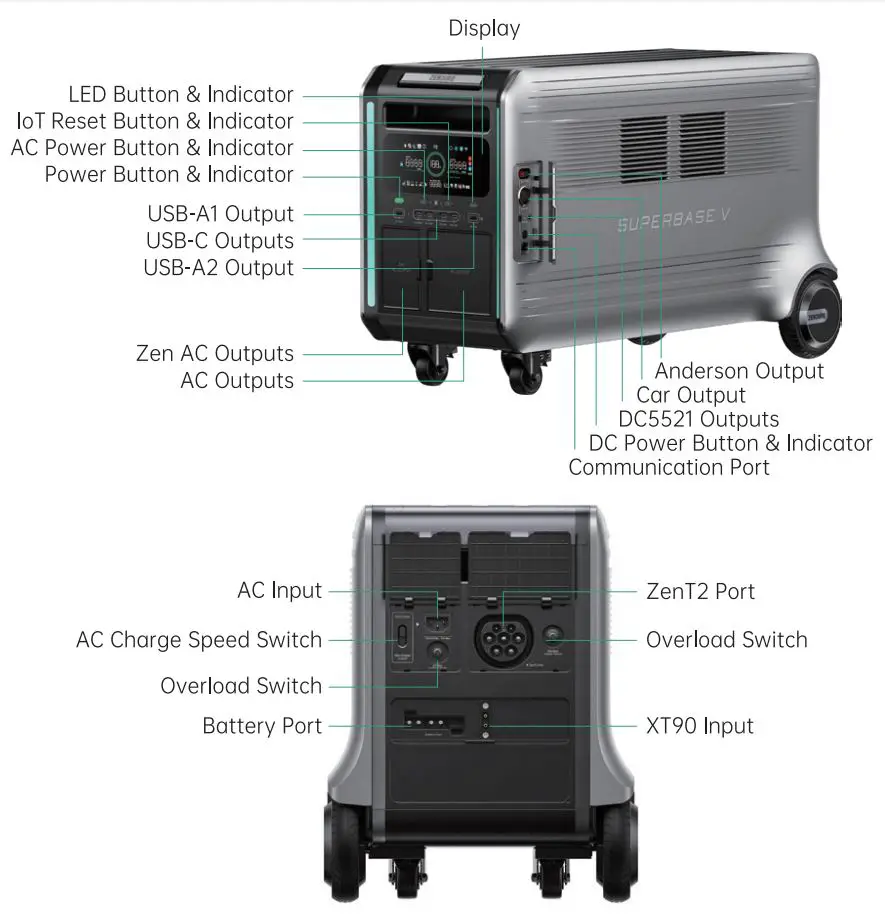
Operation Guideline
| Item | Button (operation) | Indicator | Display |
| Power ON | Press Power Butt on for 1 second | Power Indicator on | on |
| Power OFF | Press and hold Power Button for 3 seconds | Power Indicator off | off |
| Display off | Briefly press Power Button or time’s up | Power Indicator an | off |
| Pairing | Press and hold loT Reset Button for 3 seconds | loT Indicator flashes | Pairing icon flashes |
| Pair ing completed | loT Indicator on | Pairing icon on | |
| Wi-Fi status | Online | loT Indicator on | Wi-Fi icon on |
| Offlin e | Wi-Fi icon flashes | ||
| AC outputs on | Briefly Press AC Power Button | AC Power Indicator on | AC Output & Zen AC Output icon on |
| AC outputs off | Briefly Press AC Power Button | AC Power Indicator off | AC Output & Zen AC Output icon off |
| Switch AC outputs modes | Press AC Power Button for 1 second | Zen AC Output ” 6-20r “or RV* icon on | |
| DC outpus on | Briefly press DC Power Button | DC Power Indicator on | DC Out icon on |
| DC outpus off | Briefly press DC Power Button | DC Power Indicator off | DC Out icon off |
| Slow AC Charge | AC Charge Speed Swi tch toggles to the bottom | Slow AC Charge icon on | |
| Turn on LED Light | Briefly press LED Button | LED Indicator on | LED Light icon on |
| Turn off LED Light | Briefly press LED Button | LED Indicator off | LED Light icon off |
| Switch LED Light modes | Press LED Button for 1 second (Amb ent, Illumination, SOS) | LED Indicator on | LED Light icon on |
| Child Lock | Press AC Power and loT Reset Button together for 1 second | Child Lock icon on |
When there is AC or ZenCharge recharging, RV Mode will exit (Zen AC Output RV icon off).
Connect with Soteilite Battery
SuperBose V con be connected to Satellite Battery for capacity expansion. A Battery
Cable* (not included) is needed. One SuperBose V con connect with max 4 Satellite Battery units. It’s recommended stocking ONLY one Satellite Battery on top in case
crushed.
Refer to the user manual of the Satellite Battery for detailed instructions.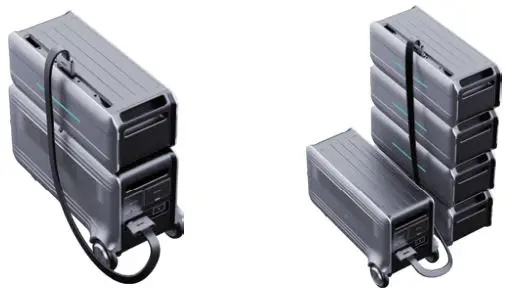
Tips:
- It’s recommended that both SuperBase V and Satellite Battery are turned off before connection .
- The Satellite Battery icon will show up on display after connection; then you can start charging or discharging .
- Do not connect the SuperBase V to the battery during charging/discharging process .
- Do not touch the metal pins of the ports by hands or other objects. Gently clean them with a dry cloth when necessary .
- Tightly connect the Battery Cable with SuperBase V and Satellite Battery. Failing to comply may heat the connection ond affect the device’s performance or lead to a fire.
* The Battery Cable has 2 different ports at each end.
Connect with Home Panel
ZENDURE Home Panel with EV Outlets (referred to as Home Panel) is a smart load side transfer switch. It’s also a fast-charging dock for SuperBase V and features two EV outlets. A Home Panel can be connected to one or two SuperBose V units’ ZenT2 Port. Refer to the user manual of the Home Panel for detailed instructions.
Press AC Power Button for 3 seconds for connecting with Home Panel. Refer to the latest Zendure App for more information.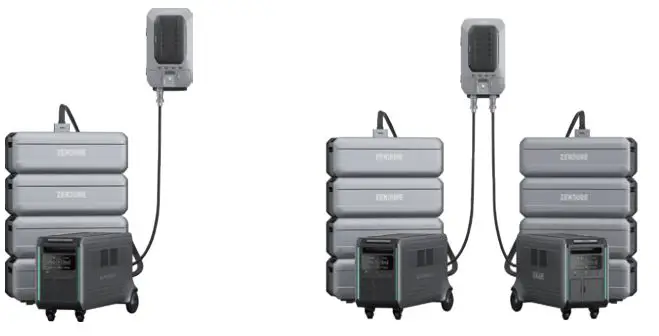
Tips:
- it’s recommended that both SuperBase V(s) and Home Panel are turned off before connection .
- The Home Panel icon will show up on display after connection; then you can start charging or discharging .
- Do not connect them during charging/discharging process .
- Do not touch the metal pins of the ports by hands or other objects. Gently clean them with a dry cloth when necessary.
Connect with ZenY Cable
ZenY Coble* can connect two SuperBose V units together for higher output up to 7200W. Then it can connect to a L14-30p power inlet for a regular transfer switch. It’s a solution to replace fuel generators.
Refer to the user manual of the ZenY Cable for detailed instructions.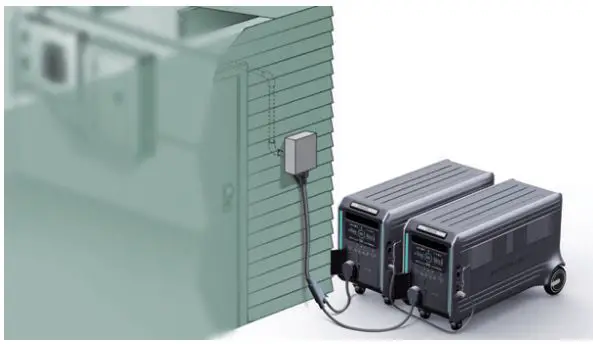
* Only available for US version now.
Recharging
AC Recharging
Zendure’s GridFlow 2.0 Real-Time Bidirectional Inverting Technology is specifically for AC recharging, offering or 7800W @120VAC or 3600W @240VAC of maximum input power. In case of unusual situations where the AC input current remains higher than 20A, the AC Input port will initiate a self-protection function, and the Overload Switch on the product will automatically pop up. After confirming that there is no product failure, you can press the Overload Switch to resume charge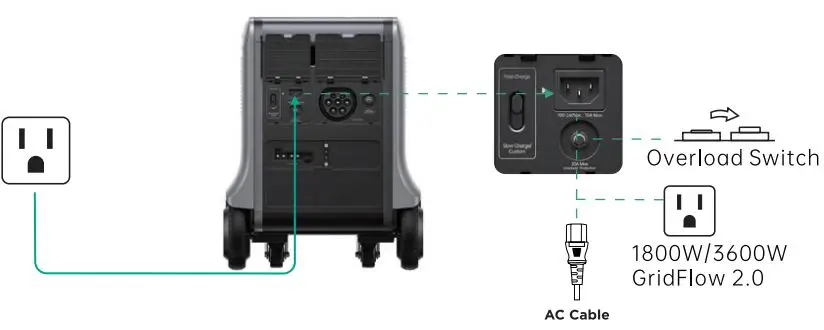
You can control the charging power through the AC Charge Speed Switch. The default Slow AC Charge is 400W, which can be modified in the Zendure opp. 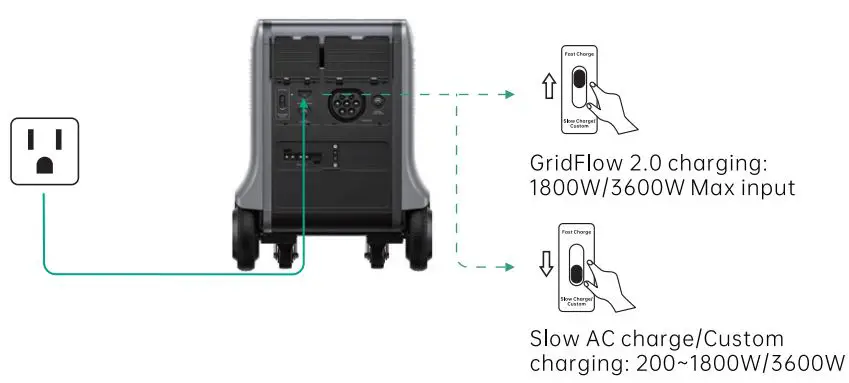
Tips:
. Plea se use t he AC Cha r g ing Ca ble* in t he box. Plug dir ect ly int o a n AC w a ll out leta nd ma ke sur e tha t t he w a ll out let a nd cir cuit ore rated for mor e t ha n 15A. Otherwise, reduce the unit charging speed via the Zendure App. Zendure assumes no responsibility for any consequences of product misuse, including but not limited.
Solor Recharging
Users can connect solar panels as shown in the figure to recharge the product. The product supports 12-150VDC* input, 25A max current, and 3000W max charging power.
Wire max 3 solar panels in series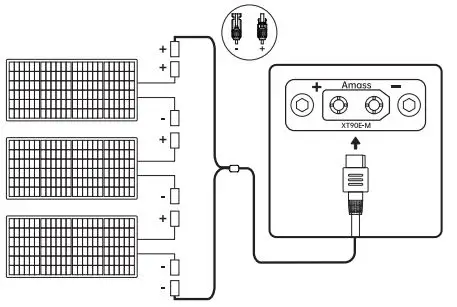
Wire max 3 series group solar panels in parallel**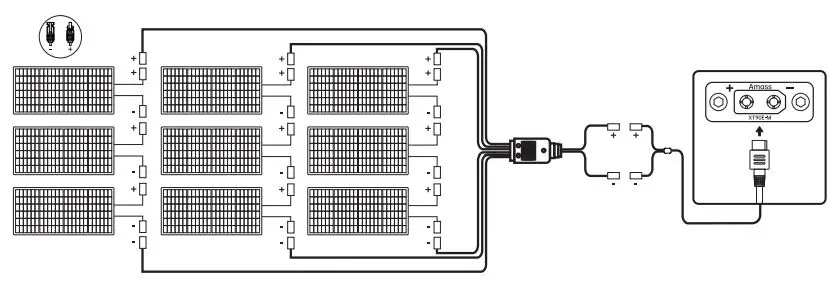
Tips:
. When using Zendur e 200W or 400W Sola r Pa nels (sold sep a ra t ely) to cha r g e t he product , p lea se follow t he inst r uct ions t ha t come wit h t he sola r panels.
Befor e connect in a sola r panel, p lea se ensur e t ha t the sola r pa nel’s out put volt a g e
:*Mi ! t ;i r1:i t ibg 1 o sn -a:; a g ; d.tOp en prCir cutit Volt a g e is 150VDC.
Car Recharging
User s ca n r echa r g e t he product t hr oug h t he ca r cig a r et t e lig ht er socket . This product sup p or t s 12V/24V ca r cha r g ers wit h a 10A defa ult cha r g ing cur r ent .
Plea se r echa rg e using t he ca r cha r g er only while t he ca r ‘s eng ine is r unning , t o o void dra ining your ca r’s ba t t er y . In a ddit ion, p lea se ma ke sur e tha t t he cig aret t e lig ht er p ort of the Ca r Out let a nd t he Ca r Cha r g ing Ca ble ore in g ood condit ion. Zendur e
a ssumes no resp onsibility for a ny loss, da ma g e, or injuries ca used by misuse.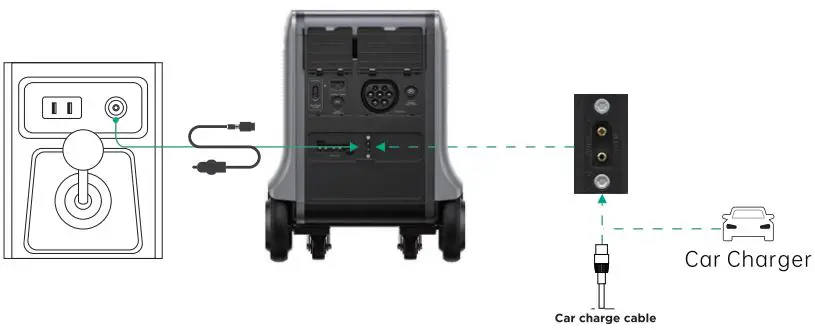
ZenCharge Recharging
Zendure’s ZenCharge Technology is specifically for ZenT2 Port recharging from a level 1 or level 2 EV charging station, offering or 1800W @120VAC or 3600W @240VAC of maximum input power.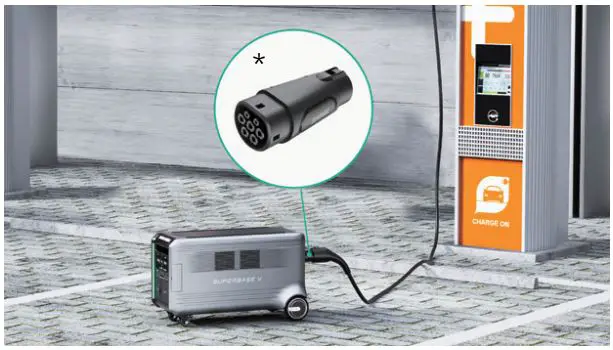
* EV Tl Adopter is required for use in the North America.
Dual Recharging
Solar recharging or Car recharging can work together with AC recharging or ZenChorge recharging. Combining solar and AC or ZenCharge power, SuperBose V can be recharged up to 5150W on its own, or 6600W when connected to a Satellite Battery.
AmpUp, Seamless UPS, Motorized Wheels
AmpUp
With Zendure AmpUp technology, the product con power a S0OOW max device while the roted output power remains 3800W, avoiding operation failure due to overload protection.
Tips:
AmpUp is not available when the AC output is turned on in a recharging state (in bypass mode).
AmpUp is not applicable for all electrical appliances; it’s incompatible with appliances that hove strict voltage requirements and a rated power over 3800W. Appliances with voltage protection (such as precise instruments) ore not supported. AmpUp is more suitable for heating devices. When using AmpUp with on untested device, please monitor its performance for any irregularities.
Seamless UPS
This product supports seamless UPS (Uninterruptible Power Supply). When you connect the grid power to the AC Input Port of the product through on AC coble, you con power electrical devices through the AC Output Ports (AC power will come from the grid and not the power station in this situation). The UPS Ready icon will show up on display ofter connection. In case of a sudden blackout, the product con automatically switch to the battery-powered supply mode within 13ms, among which the 2 NEMA 5-20 outlets at the bottom of the US version con achieve Oms switching time. Please test and confirm compatibility before using the product as a UPS. We recommend that you only charge one device at a time and ovoid using multiple devices simultaneously to ovoid triggering overload protection. Zendure assumes no responsibility for any device failures or data losses caused by misuse of this product.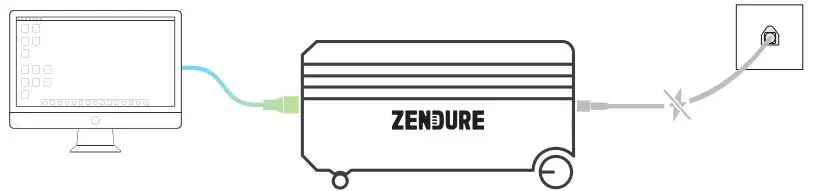
Motorized Wheels
SuperBose V’s rear wheels are motorized to help lighten the load. Pull the handle and move it even on inclined surfaces.
Press and hold DC Power Button for 3 seconds to turn ON (or OFF) Motorized mode, then you can trigger the motorized wheels by pulling them rotating for 3 seconds. The default speed is 1.8mph or 3km/h, which can be modified via Zendure App. You can stop the motorized output by blocking it for 3 seconds.
Once your turn on AC or DC outputs or there is any recharging, it will turn OFF Motorized mode (icon flashes) in case any accidents.
Tips:
- Keep out of reach of children and pets .
- No more than 10 degree slope is recommended. Zendure assumes no responsibility
Firmware Update, Voice Control
Firmware Update
When using it for the first time, please check ond update to the latest firmware. Zendure App supports over-the-air (OTA) update.
Voice Control
SuperBose V is easy to integrate with your existing Google or Alexa voice assistant.
Just say the word for hands-free status and controls.
Reod the Zendure App user guide ond access the download link here:
https://zendure.com/poges/downlood-center

Privacy Policy
By using Zendure Products, Applications and Services, you consent to the Zendure Terms of Use and Privacy Policy, which you con access via the “About” section of the “User” page in the Zendure App
Tips:
- Do Not turn off the device during the firmware updating .
- Please update the firmware when the capacity is more than 20%, in order to hove enough power to complete the update.
FAQs
- 0: Can SuperBase V6400 (or V4600) connect with Satellite Battery 84600 (or 86400)?
- A: No, it can’t, as they are different battery types.
- 0: How many Satellite batteries can be connected to a single SuperBase V? A: For each SuperBase V, you con connect up to 4 Satellite Battery units.
- 0: Con I run a 240V device on the US version?
- A: Yes, SuperBase V has dual voltage feature can handle both 120V&240V AC output within 3800W.
- 0: Can SuperBase V be charged with solar panels from o different brand?
- A: Yes, SuperBase V can be charged by other solar panels with voltage ranging from 12V to 150V; Zendure’s 200W and 400W Solar Panel has been thoroughly tested and remain our recommendation.
- 0: How to store SuperBase V?
- A: For long-term storage, please charge and discharge this product once every 3 months. That is, discharge the product to 30% first, and then recharge it to 60%.
Troubleshooting
| Issue | Troubleshooting | |
| OVERLOAD | Overload Protection | Normal operation will be resumed automatically after you remove the overloaded device and restart the product. Electrical appliances should be used within rated power. |
 | High Temperature Protection | It can be resumed automatica lly after the battery cools down. |
 | Low Temperature Protection | It can be resumed automatica lly after the battery temperature rises above 32°F (0°C). |
 | ||
| Battery Failure | Contact Zendure Customer Service for further information. | |
| Error Code | Refer to the Zendure App for detalls | |
 |
Reset | Reset: Press and hold AC Power Button and LED Bu t ton at the same time for 3 seconds. Cases that may require a reset 1.Can’t connect to the internet; 2.Failed to bind the SuperBase V: 3.The display can’t be on but the indicator is on; 4. There is no output from the USB(C) ports: 5. The display is abnorma l; 6. The display is frozen; 7. Crash |
| Inaccurate Battery Level | Calibration: After firmware updated, discharge the product to 0% power and then chorge it to 100% power when it’s 200W or below. |
FCC Caution
FCC STATEMENT
- This device complies with Part 15 of the FCC Rules. Operation is subject to the following two conditions:
- This device may not cause harmful interference, and
- This device must accept any interference received, including interference that may cause undesired operation.
- any Changes or modifications not expressly approved by the party responsible for compliance could void the user’s authority to operate the equipment.
NOTE:
This equipment has been tested and found to comply with the limits for a Class B digital device, pursuant to Part 15 of the FCC Rules. These limits are designed to provide reasonable protection against harmful interference in a residential installation.
This equipment generates uses and con radiate radio frequency energy and, if not installed and used in accordance with the instructions, may cause harmful interference to radio communications.
However, there is no guarantee that interference will not occur in a particular installation. If this equipment does cause harmful interference to radio or television reception, which con be determined by turning the equipment off and on, the user is encouraged to try to correct the interference by one or more of the following measures:
- Reorient or relocate the receiving antenna.
- Increase the separation between the equipment and receiver.
- Connect the equipment into an outlet on a circuit different from that to which the receiver is connected.
- Consult the dealer or an experienced radio/TV technician for help.
FCC Radiation Exposure Statement
This equipment complies with FCC radiation exposure limits set forth for an uncontrolled environment. This equipment should be installed and operated with minimum distance 20cm between the radiator & your body.
Zendure USA Inc.
Phone: (800) 219-0960 (US)
Office Hours: Mon – Fri 9:00 17:00 PST
Support / Contact: www.zendure.com/support
Website: www.zendure.com
and 2022 Zendure USA Inc. All Rights Reserved.
Printed on recycled materials. MADE IN CHINA


