infiRay Mini Series ML19 Thermal Imaging Monocular User Manual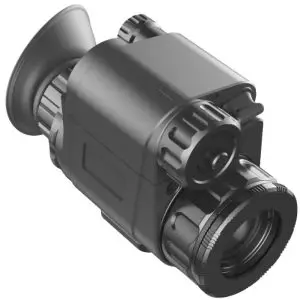
Overview
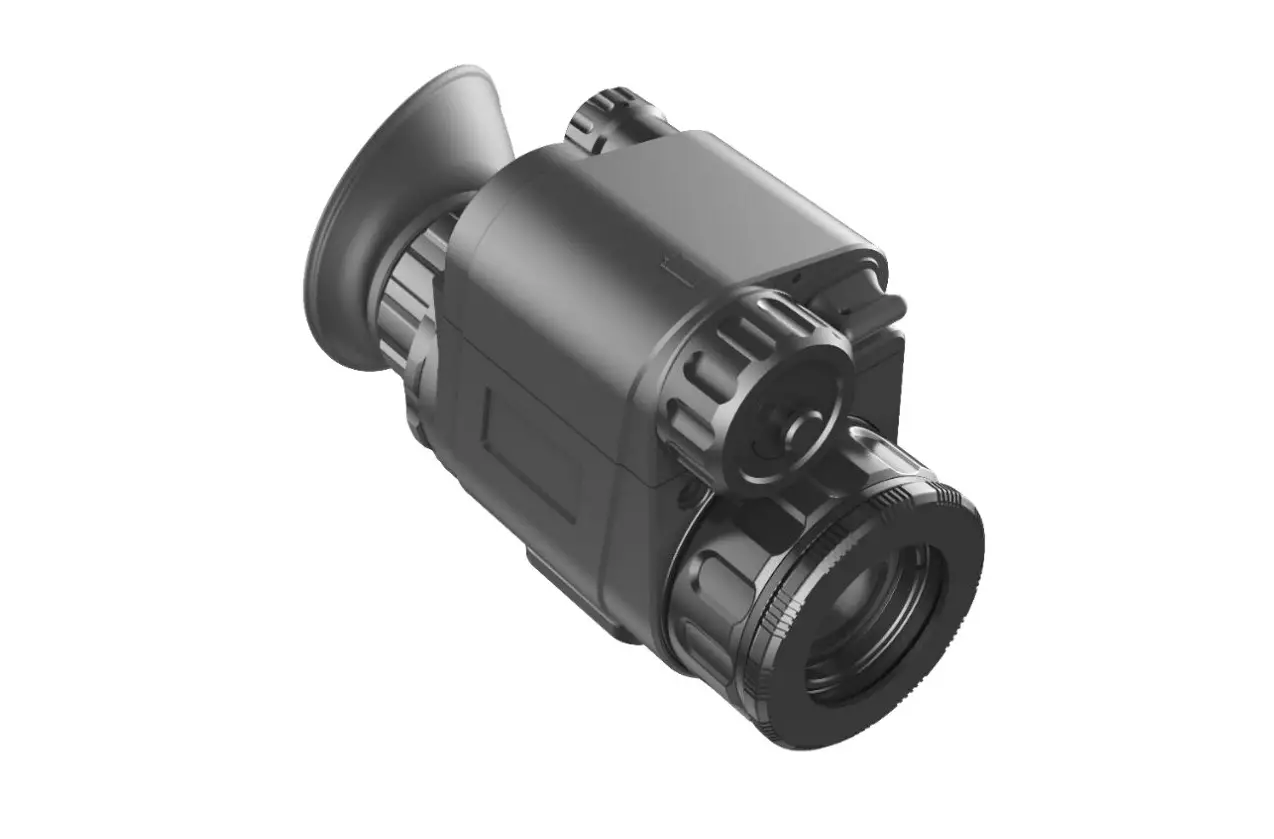
The Mini series is a multifunction thermal imager with built-in VOx uncooled infrared focal plane array detector. Mini series has small size, light weight, high performance, various purpose and many other strengths. Moreover, a variety of sensors are equipped and it not only can be used as Monocular hand-held thermal imager or portable infrared thermal image sight but also can be used as wearable device when installed on the helmet. Mini series can be widely used in investigation, security, search and rescue, outdoor sports and other application fields.
Figure 1-1. Mini series multifunction thermal image
Features
Table 1. The features of the Mini series multifunction thermal imager
| Model | ML19 | MH25, ML25, PM3, PM6 | ||||
Detector Parameter | ||||||
| Resolution | 384×288 | 640×512 | ||||
| Pixel Size | 17μm | 12μm | ||||
| Response Spectra | 8~14μm | 8~14μm | ||||
| NETD | ≤40mK@25℃,f#1.0 | ≤40mK@25℃,f#1.2 | ||||
| MRTD | ≤500mK@25℃,f#1.0 | ≤600mK@25℃,f#1.2 | ||||
| Frame Rate | 50Hz | 50Hz | ||||
Optical Parameter | ||||||
| Objective Lens | 19mm | 25mm | ||||
| Focus Mode | Manual | Manual | ||||
| Field of View | 19°×15° | 17.5°×1 4° | ||||
| Digital Zoom | 1.0~4.0× | 1.0~8.0× | ||||
| Eye Relief | 20mm | 20mm | ||||
| Exit Pupil | 5mm | 5mm | ||||
| Diopter Adjustment | -4D~+3D | -4D~+3D | ||||
Display | ||||||
| Type | LCOS | LCOS | ||||
| Resolution | 1280×960 | 1280×960 | ||||
Function | ||||||
| Digital Compass | √ | √ | ||||
| Motion Sensor | √ | √ | ||||
| Laser Pointer(650nm) | √ | √ | ||||
| Rangefinder | √ | √ | ||||
| PIP | √ | √ | ||||
| Palette | Black hot/White hot/Red | Black hot/White hot/Red | ||||
| hot/Pseudo Color | hot/Pseudo Color | |||||
| Remote Control | Bluetooth | Bluetooth | ||||
Physical Parameter | ||||||
| Battery | CR123/16340(Recommend) /16650 | CR123/16340(Recommend) /16650 | ||||
| Max. Battery Life | CR123——2.5 hours 16340——up to 4 hours 16650——up to 6 hours | CR123——2 hours 16340——up to 3 hours 16650——up to 4.5 hours | ||||
| Operating Temperature | -10℃~+50℃ | -10℃~+50℃ | ||||
| Power Consumption | <1250mW | <1700mW | ||||
| IP Rating | IP67 | IP67 | ||||
| Weight (without battery) | <225g | <245g | ||||
| Dimension | 121mm×70mm×45mm | 128mm×70mm×45mm | ||||
| External Mount | 2*M3 threaded holes (two sides) | 2*M3 threaded holes (two sides) | ||||
System Functions
- Image calibration:Background calibration/Shutter calibration;
- Image mode:Black hot/White hot/Red hot/Pseudo Color;
- Image electronic magnification: ×1.0 ~ ×4.0;
- Image brightness/sharpness/contrast adjustment;
- Motion sensor adjusts the forward image;
- Electronic compass;
- Dip measurement;
- Laser designation;
- Probability rangefinder;
- Picture in picture;
- Bluetooth remote controller;
- Four presets for different guns;
- Automatic standby;
- Supply power and transmitting data through Type-C interface;
- Output analog video in PAL format;
- The installation interface can be expanded(Picatinny rail,helmet).
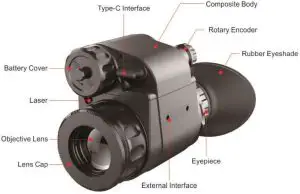
Product Components
The main components of the Mini series are shown in figure 4-1.
Operation Functions
The related function such as switch, peripheral, menu and other functions can be implemented through operating the rotary encoder. And all the operations can exit through pressing the encoder for 3 seconds.
Switching on/off
The product will be switched on and display start up logo after pressing encoder for 3 seconds.
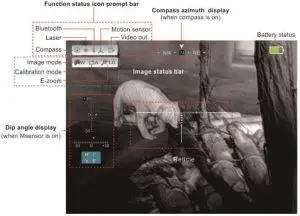
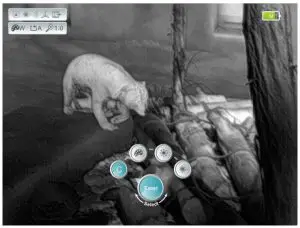
The status indicator icon is displayed in the upper left corner of the image and the battery power icon is displayed in the upper right corner. As shown in figure 5-1 of normal display.
- Switching off the encoder by putting the lens straight down and pressing the encoder for 3 seconds.
Electronic Magnification
- When there is no menu, rotating the encoder can zoom image. The image will be zoomed in with clockwise rotation and zoomed out with anticlockwise rotation between 1.0 and 4.0;
- Slowly rotating the encoder, the magnification is adjusted with a step of 0.1 and rapid rotation is amplified by x1.0, x2.0, x3.0 and x4.0;
- The current magnification is displayed on the upper left icon;
- The center of image is enlarged when there is no reticle and the center image of reticle is enlarged when the reticle is displayed.

Figure 5-1. Normal display interface
When there is no menu, short press the encoder to call up the context menu, as shown in figure 5-2. The four functions clockwise are image correction, image mode, brightness and laser. Rotating encoder can achieve switch function and short press encode can start up the executive function. If there is no operation within 5 seconds, it will exit the context menu automatically. Or it will exit after pressing the encoder for 3 seconds.
- Image correction:Short press the encoder to perform the background correction while the lens is facing down and other orientations to perform shutter correction.
- Image mode:W(white hot)、B(black hot)、R(red hot)、C(pseudo color).
- Brightness:Screen brightness adjustment. There are 1~5 levels can be adjusted.
- Laser:Turn on/off the laser designation.

Figure 5-2. Context menu
When there is no menu, long press the rotary encoder for 3 seconds to call up the advanced menu (when long press the encoder, don’t let lens vertically down, otherwise the Mini series will be shutdown). The advanced menu includes five functions which are Device, Function, Reticle, Calibration and Setting. Each function contains several options and corresponding options item po out when select a certain function, as shown in figure 5-3.
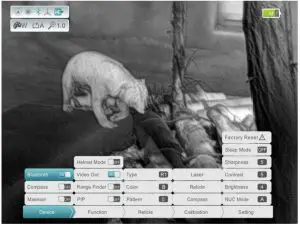
Figure 5-3. Advanced menu
Operation:
- After entering the advanced menu, short press the rotary encoder to switch among functions.
- After a certain function item is selected, rotating the encoder to switch among the option items and a short press locks the certain option or adjusts the parameters.
- After locking an option item, rotating the encoder to adjust the parameters and short press performs the option and unlocks the option item.
- If there is no operation within 15 seconds, the advanced menu will exit automatically. Or long press rotary encoder for 3 seconds can also exit the advanced menu. The functional details of the advanced menu are shown in table 5-1 and the relevant operation status is shown in figure 5-4, 5-5, 5-6 and 5-7.
Table 5-1. Details of Mini series advanced menu
FunctionHelmet Mode Reticle Type
| Function items | Option items | Function | Operation | Status |
| Device | Bluetooth | ON/OFF | Support bluetooth remote control. | The upper left icon turns blue. |
| Compass | ON/OFF | The field of view is automatically updated according to the geomagnetic direction. | The upper left icon turns blue, and the azimuth bar appears above. | |
| Msensor | ON/OFF | Measuring the pitch angle and | The upper left | |
| horizon angle of the product relative to the ground. | icon turns blue, and the dip angle scale appears at the left. | |||
| ON/OFF | —— | —— | ||
| Video Out | ON/OFF | Video outputs through the attached type-c data cable. | The upper left icon turns blue. | |
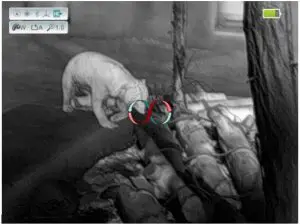
| Rangefinder | ON/OFF | Align the ranging line to the top (or bottom) of the target and press to record position 1. Then align the ranging line to the bottom (or top) of the target and press to record position 2. | The special Rangefinder interface is shown in figure 5-4. | |
| PIP | ON/OFF | When the reticle is turned off, capturing the center of image and magnify to twice. When the reticle is turned on, capturing the center image of reticle and magnify to twice. | Display in the upper of image in pixel size of 192*144. | |
| Four optiona calibration gun types | After the cursor selects a certain option item, pressing the encoder to lock the item and rotating the encoder to adjust the parameters. Then pressing the encoder to unlock the item after parameters adjustment is finished. | Real-time display | ||
| Color | Three optional reticle colors : W(white)、B(black)、C(colors) | Real-time display | ||
| Pattern | Four optional reticle styles. “OFF” —Turning off the reticle. | Real-time display | ||
| Laser | Laser calibration | After entering the calibration interface, short pressing encoder to switch X/Y orientation. Rotating the encoder to move calibration reticle and then long pressing the encoder to exits the calibration interface. | Laser calibration interface is shown in figure 5-5. | |
| Reticle | Reticle center calibration | Reticle center calibration interface is shown in figure 5-6. | ||
| CalibrationLaser | Compass | Compass calibration | After entering the compass calibration interface, wave the Mini series to make the “infinity” turn according to the icon, to the prompt icon automatically disappear and complete the calibration. | Compass calibration interface is shown in figure 5-7. |
| Setting | Factory Reset | Restore factory settings | After the cursor selects this option, short pressing the encoder and the inquiry dialog box is popped up. Selecting “Yes” to execute, and selecting “No” to cancel. | Dialog prompts |
| Sleep Mode | Turn on/off the sleep mode. The standby time can be 5min, 15min or 30min. | When the cursor selects a certain option, short pressing the encoder to lock the option and rotating the encoder to adjust the parameters. Then pressing the encoder to unlock. | —— | |
| Sharpness | Image sharpness adjustment between 1and 9 level. | Real-time display | ||
| Contrast | Image contrast adjustment between 1and 9 level. | Real-time display | ||
| Brightness | Image brightness adjustment between 1and 5 level. | Real-time display | ||
| NUC Mode | Automatic correction (A) and manual correction (M) | When the cursor selects this option, short pressing the encoder to switch between A and M. | Displaying in the upper left corner |
- Figure 5-4. Rangefinder interface

- Figure 5-5. Laser calibration interface
- Figure 5-6. Reticle calibration interface

- Figure 5-7. Compass calibration interface


Remote Control
The Mini series is built-in bluetooth module. Through bluetooth, the Mini series can be connected with the special bluetooth remote controller or smartphone APP. The bluetooth connection method is as follows:
- Turn on the bluetooth function on the Mini series, and the bluetooth icon will be flashing;
- Then turn on the bluetooth of the remote controller (or smartphone) within 1 minute, to complete the automatic connection between remote controller (or APP) and Mini series. The bluetooth icon on Mini series interface will stay on after successful connection. The Mini series will automatically turn off bluetooth if there is no remote equipment is connected within 1 minute, and the bluetooth icon will turn grey.
- When the remote controller (or APP) is powered off, or out of the prescribed connection distance, Mini series will automatically turn off the bluetooth within 30 seconds.
Preventative Maintenance
Battery Replacement
- It is necessary to power off before replacing the batteries;
- The battery power icon is displayed on the upper right side of the interface and there are four levels of power.
- When the battery icon turns to red, it means that the power is less than 25% and please replace the battery or connect to external power.;
- Rotating the battery cap anticlockwise and replacing battery. Please pay attention to the positive and negative terminal of battery and install the battery correctly.
Product Cleaning and Maintenance
- It is prohibited to clean the product body with the cleaning product which is corroded or scratched to optical glass.
- The product body can be scrubbed with soft cloth dipping certain mount of alcohol.
- Optical glass devices such as eyepiece lens and objective lens, dust should be blown first, and then use charcoal pen or fat-free cotton dipping non methylated alcohol to wipe slightly.
General Trouble Shooting
Please contact with our company or sellers as soon as possible if there are some abnormalities that cannot be ruled out. Private demolition is strictly prohibited.
Table 2. Mini series general trouble shooting
| Trouble description | Probable reason | Trouble shooting |
| Image blurring | The focal length of objective lens does not match. | Adjusting the focal length of objective lens until the image becomes clear. |
| Long time no image correction. | Performing image correction. | |
| Blurred vision | Eye relief does not match | Adjusting the Eye relief until the image becomes clear. |
| No analog video output | Analog video is not open | Open analog video output. |
| The data cable does not match. | Replace data cable. | |
| Fail to start up | Wrong battery installation or low power. | Check the battery installation and battery power. |
| Insufficient external supply voltage. | Check the voltage of external power supply. | |
| Fail to shutdown | The lens is not facing down. | Long pressing shutdown when the lens faces down. |
Safety Regulation
- Please use batteries regularly. Do not throw the batteries away or put them into fire after use;
- Please use standard charger to prevent the product from damages;
- No short circuit;
- It is prohibited to expose the product in the high temperature environment more than 60℃;
- It is prohibited to put the product into fire.
FCC Caution
§ 15.19 Labeling requirements.
This device complies with part 15 of the FCC Rules. Operation is subject to the following two conditions: (1) This device may not cause harmful interference, and (2) this device must accept any interference received, including interference that may cause undesired operation.
§ 15.21 Information to user.
Any Changes or modifications not expressly approved by the party responsible for compliance could void the user’s authority to operate the equipment.
§ 15.105 Information to the user.
Note: This equipment has been tested and found to comply with the limits for a Class B digital device, pursuant to part 15 of the FCC Rules. These limits are designed to provide reasonable protection against harmful interference in a residential installation. This equipment generates uses and can radiate radio frequency energy and, if not installed and used in accordance with the instructions, may cause harmful interference to radio communications. However, there is no guarantee that interference will not occur in a particular installation. If this equipment does cause harmful interference to radio or television reception, which can be determined by turning the equipment off and on, the user is encouraged to try to correct the interference by one or more of the following measures:
- Reorient or relocate the receiving antenna.
- Increase the separation between the equipment and receiver.
- Connect the equipment into an outlet on a circuit different from that to which the receiver is connected.
- Consult the dealer or an experienced radio/TV technician for help.
The device has been evaluated to meet general RF exposure requirement. The device can be used in portable exposure condition without restriction.


