DNT000010 Video-Digitizer Grabstar AV
Please read these instructions before installing and commissioning and retain the instructions for later use. If you hand over the the device to be used by other people, be sure to include this user manual.
Features
The video digitizer enables easy recording and playback of analogue video sources on an USB storage device or a SD memory card. This means that the video digitizer can digitize content from analogue media, such as from a video recorder or camcorder. The ability to digitize with the higher quality S-video* signal also enables high-quality digitization results.
- – Saves recordings directly to SD/SDHC memory card** (up to 128 GB),
USB stick (up to 128 GB) or external USB hard drive (up to 4 TB) - Supports FAT32, NTFS***, exFAT***
- Works with PAL and NTSC formats
- Recording resolutions****: 720 x 576p, 720 x 480p, 640 x 480p
- Video format: MP4
- RCA connector (RCA) and S-video input with separate Y/C signal transmission (luminance/chrominance)
- 8,9-cm-color-display (3.5″) for checking/playing back the recordings
- Integrated video player can playback digitized A/V-recordings on TV
- Integrated device speakers
- 5 VDC/1 A power supply
- Auto-Stop-Function: 60/90/120/150 min
- Table and wall mounting possible
* Compared to CVBS, S-Video is based on the separate transmission of brightness signals (lu-minance, Y) and color signals (chrominance, C) each on its own signal wire. This means that the signals do not have to be mixed as with CVBS and filtered out on the receiver side. This reduces interference that can occur in CVBS filtering due to the mutual influence of brightness and color signals, and leads to more detailed and color-qualitative reproduction of the analogue media.
** SD cards with a file volume of 64 GB and above can only be used with exFAT and NTFS format.
*** MAC users should note that NTFS or exFAT is not supported by MacOS and the storage medium will show no content if NTFS or exFAT is selected as file format. The same applies to Linux users. Please select FAT32 as file format for formatting the storage medium.
**** Please keep in mind that higher recording resolutions are not useful because the native re-solutions of the analogue source material are typically very low. Recordings with higher recording resolutions do not provide better quality and usually cause significantly worse digitization results!
Area of Application and Delivery
- The video digitizer Grabstar AV is intended for the stand-alone digitization of analogue audio-video data and storage on or playback from a SD card and USB storage media.
- Any other use is not in accordance with the intended purpose and leads to exclusion of warranty and liability. This also applies to conversions and changes on the device.
Content of delivery:
- Video digitizer Grabstar AV
- 5 VDC USB power supply
- USB cable for power supply connection
- Audio-video cable for composite, 3x Cinch/RCA to 3x Cinch/RCA
- User manual
Operation, Maintenance and Safety Instructions
Warning
Is used to indicate safety instructions or to draw attention to special dangers and risks.
Note
Is used to indicate additional information or important information.
- Do not leave packaging material lying around carelessly! Plastic foils/bags, polystyrene parts etc. could become a dangerous toy for children.
- The device is not a toy. Do not keep in area accessible to children.
- They do not be kept or operated in the access area of children.
- Avoid heavy mechanical stress such as pressure or vibration.
- Only clean the device with a dry linen cloth, which should be slightly damp if heavily soiled. Do not use solvent-based cleaning agents for cleaning. Make sure that no moisture gets inside the device.
- The device may only be operated in dry indoor areas and only with the power supply specified in the technical data.
We accept no liability for damage to property or personal injury caused by improper handling or non-observance of the safety and operating instructions. In such cases, all warranty claims expire! For further damages we do not accept liability.
Do not open the device, do not attempt to repair it, make no modifications or changes – this will invalidate the warranty. For further damages we do not accept liability.
Overview, Description
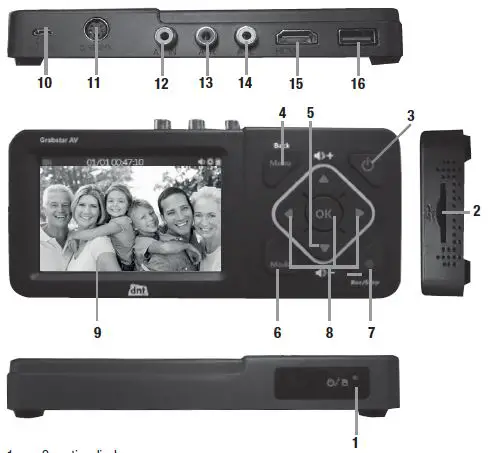
- Operating display:
Blue: Device is switched on
Flashing blue: Storage medium space will soon be exhausted - SD card slot: Slot for an SD card
Control buttons: - Power: Press >2 s – device will be switched on;
With the switched-on device: Press briefly (<2 s) – screen on/off;
press longer (approx. 2 s) – device will be switched off; - Menu/Back: Select/exit menus
- Vol +/–: Speaker level setting
- Mode: Press briefly to switch between record/photo***** and playback preview mode; Press and hold to delete a currently selected file in the playback preview mode
- Rec/Stop: Press briefly to manually start a recording in the recording preview mode; press and hold to take a single picture in preview mode
- Navigation buttons and OK-confirmation button
- LC display: Control display for recording preview and playback
- DC input 5 V/1 A: Power supply connection, micro USB port
- S-Video: S-Video-input
- AV In: Video input for composite signal (CVBS)
- A-R: Audio input right, for CVBS and S-Video
- A-L: Audio input left, for CVBS and S-Video
- HDMI: HDMI output for connecting a HDMI monitor/TV
- USB: USB2.0-port (typ A) for USB storage devices
***** In the photo mode you can take a screenshot/image of the currently shown live video scene. This function does not work during a live recording process. The recorded image files can be found on the storage medium (photo folder).
Note
When connecting an external hard drive to the USB port, it has to be supplied with its own power supply – the power supply included with the Grabstar AV is not designed to supply an external hard drive.
Note
Please always check whether you are using the latest firmware version. You can check your current firmware version in the Grabstar AV device menu. The latest device firmware can be found on the manufacturer‘s website www.dnt.de
Operation
Please note:
An SD/SDHC memory card or microSD-card with SD-adapter of class 10 should be used as a memory card to ensure trouble-free recording.
With recordings, the file names are automatically generated according to the pattern: date+index.mp4.
The Grabstar AV supports the FAT32, NTFS and exFAT file systems.
If a recording file is larger than 4 GB, it is automatically divided into several max. 4 GB files.
Connection and commissioning
- Remove the screen protector from the Grabstar AV.
- Connect the power supply to the DC connection (10).
- Connect the video source to the S-Video (11) or AV-In input (12).
- Connect the audio outputs of the video source to the audio inputs (13/14).
- Connect an HDMI monitor or a TV to the HDMI output (15).
- Connect or insert a USB mass storage medium (stick/hard disk) to the USB port (16)
or insert an SD card (2) until it clicks into place. Make sure that the contacts point upwards (control panel). Do not insert by force!
Device Settings (Setup)
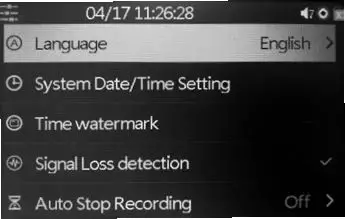
– Select the main menu with the „Menu“ button. Use the arrow keys and the menu/back key to move through the menus, use the arrow keys q and p to set values and confirm your settings with the OK key:
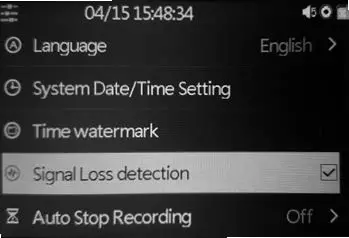
Language: Set menu language
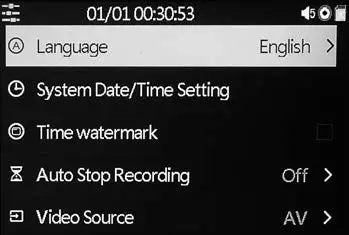
Set date/time: date and time settings for the system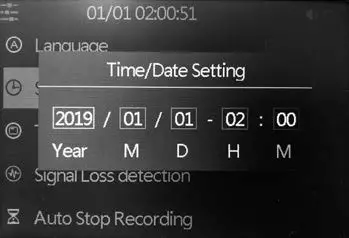
Note:
The time will be reset after the power supply has been removed – if you use the device again, you must set the time/date configuration again!
Time/Watermark: Selection whether the time stamp should be integrated in recordings or not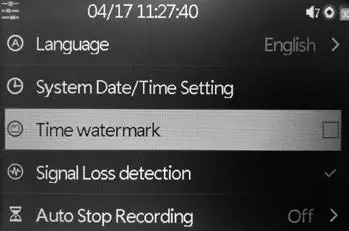
Auto-stop-function: Selection whether the recording should stop automatically after 60/90/120/150 min, Off: Recording will not stop automatically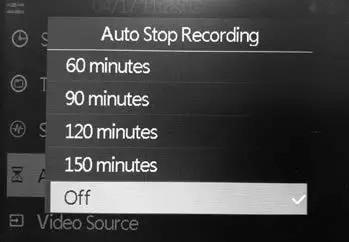
Video Source: Selection of video source, S-Video or AV (composite)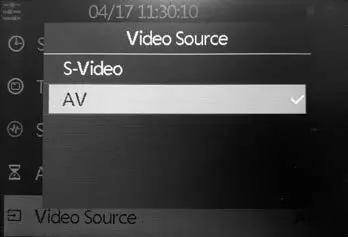
Note: Recording resolution (576p or 480p) will automatically be choosen due to it‘s original source.
Video Quality:
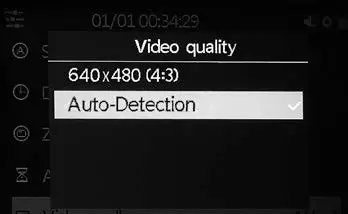
The optimal resolution is automatically selected by the Grabstar AV and the recording is saved in the format 720×576 or 720×480 („Auto-Detection“). It is not possible to influence the format during auto-detection mode.
Standard Memory: Selection of which external storage (SD card or USB storage) should be used as the standard storage. If one of the alternatives is not available, the system automatically switches to the available storage type.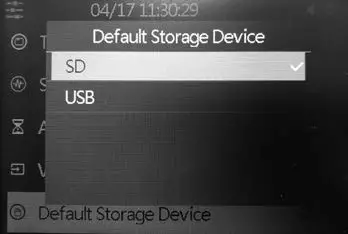
Reset to default: Reset the device to the delivery state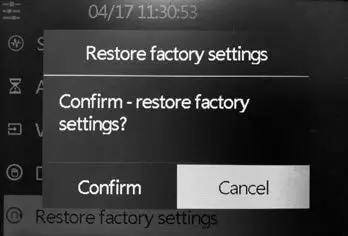
Formatting: Formatting the storage medium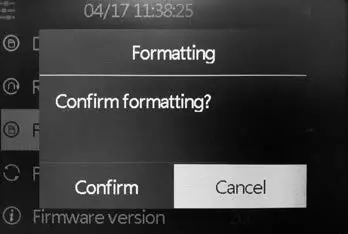
Firmware update: A new firmware version is going to be installed here (if available)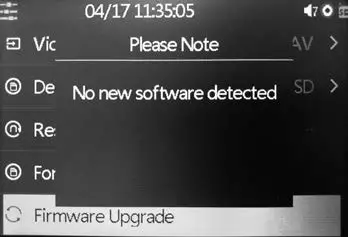
Software-version: The current firmware version is displayed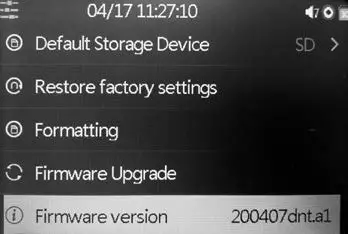 – After completing the settings, go back to the video preview with the „Menu“ button.
Signal Loss detection
The Grabstar AV is able to pause the recording in the event of missing/faulty source signals. The deactivation of this function means that the recording can only be stopped after the user has manually finished/stopped his recording and is therefore only recommended if the source medium is in poor/faulty condition/quality.
Recording function
- First check whether the video source and memory are connected (see „Connection and commissioning“).
- Start recording with the „Rec/Stop“ button on the device. The recording time is shown in the top on the left.
- Stop recording with the „Rec/Stop“ button on the device. Alternatively, you can use the „Auto stop function“ option. Then the recording stops automatically after the selected recording time.
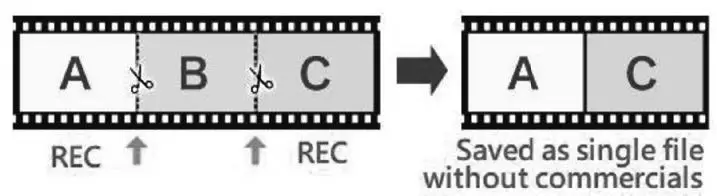
- You can cut out unwanted content from the original recording during recording process. To do this, briefly press the „OK“ button at the beginning of the part to be cut out, now the recording time display flashes.
At the end of the part to be cut out, briefly press the „OK“ button again, now the recording continues.
Playback function
- First check whether the previously used memory is connected (see „Connection and commissioning“).
- Playback can either take place via the device itself or on a monitor/television connected via HDMI. If a monitor is connected, the display of the Grabstar AV remains switched off during video output.
- First press the „Mode“ button twice to switch to playback mode. A blue triangle now appears as a label in the top on the left.
- Select the desired file from the list displayed and start playback with the „OK“ button.
- You can adjust the playback volume with the arrow keys q and p.
- With the arrow keys t and u you can accelerate the playback forwards and backwards („fast-forward/rewind“). Stop playback with „OK“.
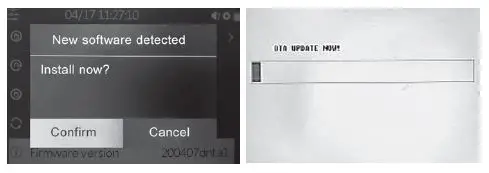
Firmware-Update
- Copy the update file into the basic directory of an SD memory card or USB memory, which you connect to the Grabstar AV.
- Switch on the device: If you have copied the firmware to an SD card, the update window appears automatically. For USB storage, manually select the firmware update option in the main menu and start the update from there.
- Start by choosing „Confirm“.
- Do not interrupt the power supply or the connection to the data storage device during the update process.
- After a successful update, the device automatically restarts.

Notes on Errors
No picture appears on on the display:
- Check the connection and output of the video source.
- The display remains switched off when a screen is connected to the HDMI output.
Device does not recognize storage device
– The storage device may not be formatted with FAT32, NTFS or exFAT, e.g. if it was previously used in a digital camera. Format such memory cards with a PC and a compatible file system. You can format a new memory card via the internal menu „format“.
For formatting high-capacity USB hard drives, we recommend using the freeware tool „Guiformat“ and formatting the hard drive in FAT32 format.
Mac OS users must note that the exFAT and NTFS format cannot be used.
Linux users are also affected by this, but can use various solutions and tools from the Internet. The formats mentioned here refer to a Windows client/computer.
Image freezes when recording („freeze“)
– Press the on/off button for 10 s and the device restarts.
No sound output
– Check whether the mute function is activated and a sufficient sound level is set.
– When recording, check whether the audio lines are connected to the audio inputs. This applies to CVBS as well as S-Video.
No files found while playing
– This can happen if files have been uploaded externally. Video files have to be in the folder „Video“.
External USB hard drive is not working
– Only operate USB hard drives if they are operated with their own power supply.
Care and Maintenance
Only clean the device with a soft, dry linen cloth. In case of heavy soiling, it may be slightly damp. Do not clean the device with cleaning agents containing solvents! The device has to be dried carefully with a cloth. Make sure that no humidity gets inside the device.
Technical data
Recording media:……………………………………….SD memory card/USB stick, max. 128 GB,
USB hard drive max. 4 TB (with its own power supply),
File-Systems FAT32/NTFS/exFAT (max. 4 GB/File)
Recording format:……………………………..MP4 (H.264), memory requirement up to 150 MB/min
Inputs:……………………………………….CVBS/Composite (A/V): PAL/NTSC; S-Video (Y/C), Audio L/R
Outputs:…………………………………………………………………………………………………HDMI, 1280 x 720p
Supported input resolutions:……..720 x 576i/50Hz (625 lines), 720 x 480i/60Hz (525 lines)
Recording resolutions:…………………………………………………720 x 576p, 720 x 480p, 640 x 480p
LC-Display:……………………………………………………………………………………………….8,9 cm (3,5″)
Power supply:………………………………………………………………………………………………5 VDC, 1 A
Dimensions (W x H x D):………………………………………………………………………….160 x 25 x 75 mm
Weight:……………………………………………………………………………………………………………………156 g
Power supply details
| Value and accuracy | Unit | |
| Manufacturer Name | SHENZEN QI XIN ELECTRONICS CO., LTD | – |
| Model Identifier | YNQX06G050100VU | – |
| Input Voltage | 115–230 | V |
| Input AC frequency | 50/60 | Hz |
| Output voltage | 5,0 | V |
| Output current | 1,0 | A |
| Output power | 5,0 | W |
| Average active efficiency | (230 V/50 Hz) 76.538 ; (115 V/60 Hz) 77.146 | % |
| Effieciency at low load (10 %) | (230 V/50 Hz) 70.014 ; (115 V/60 Hz) 75.606 | % |
| No-load power consumption | (230 V/50 Hz) 0.064 ; (115 V/60 Hz) 0.037 | W |
| Supported temperature range | 0–35 | °C |
Declaration of Conformity
dnt Innovation GmbH, Maiburger Straße 29, 26789 Leer, Germany, hereby declares that the device
„dnt Video Digitizer-Grabstar AV“
is in accordance with the essential requirements and other relevant provisions of Directive 2014/30/EU. The declaration of conformity can be found at the following link: www.dnt.de
Disposal
Do not dispose of through domestic waste!
Electronic devices have to be disposed of accordance with the directive of waste for electrical and electronic equipment via the local collection points for used electronic devices!
Technical support
Do you have any questions about the product? Our customer service will be happy to to provide you with comprehensive and qualified information: Email: [email protected]
2. Edition English 03/2021
Documentation © 2019 dnt Innovation GmbH
All rights reserved. No part of this operating manual may be reproduced in any form without the written permission of the publisher. It is possible that these operating instructions have some typographical defects or misprints. However, the information in this operating manual is beeing checked regularly and corrections will be done for the next edition. We don‘t have liability for technical or printing errors and their consequences. All trademarks and copyrights are acknowledged. Changings due to technical progress can be made without notice.
DNT000010-03/2021, Version 2.4, dtp


