
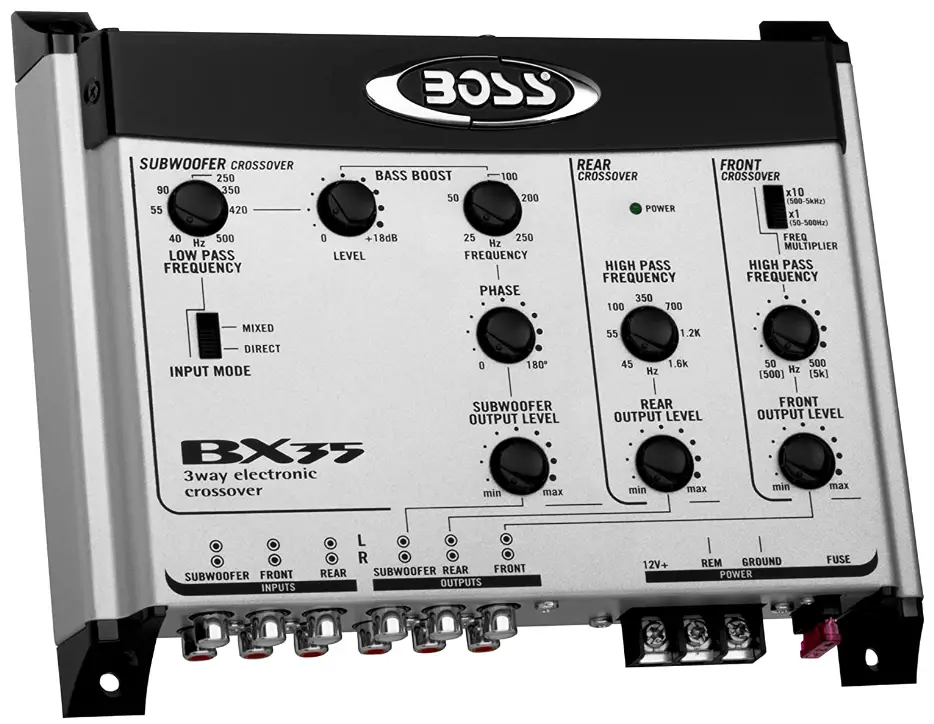
BOSS Audio Systems BX35 Electronic Car Crossover
INTRODUCTION
Congratulations on your purchase of a BOSS Audio Systems Electronic Crossover. This product has been designed and built to deliver excellent sound quality and long lasting high performance. We are sure you’ll enjoy listening to your favorite music with this BOSS component in your car audio system. For best results please consult a professional car stereo installer for application advice or troubleshooting. To guarantee top performance we recommend using The BOSS Link installation accessories such as RCA interconnects, power cable, and speaker wire. Thank you for choosing BOSS Audio Systems products for your autosound system. We can’t change the world, but we can make it sound better.
FEATURES
- Three Way Electronic Crossover
- Gold Pleated RCA and Power Connectors
- Remote On/ Off Power Control
- LED Power Indicator
- Switching Power Supply
- Low-Noise High Slew Rate Audio Grade Op Amps
- Fully Adjustable Low and High Pass Output Levels
- Phase Reverse Volume on Low Pass
- Infinitely Variable Low Pass Crossover
- Infinitely Variable High Pass Crossover
- Frequency Multiplier Switch on Front High Pass Crossover
- Low Pass Stereo Channel Selector for mixed or Direct Low Pass Inputs
- Bass Boost Volume with Variable Frequency Volume
SPECIFICATIONS
- Input Impedance Front & Rear: 39K-Ohm, Low Pass: 1 OK-Ohm
- Maximum Input Level 5V RMS
- Maximum Output Level 9VRMS
- High Pass Crossover, 12dB/octave Front: 50Hz-5KHz; Rear: 45Hz -1.6KHz
- Low Pass Crossover, 12d B/octave 40Hz-250Hz
- Low Boost 0 to +18dB
- Gain Structure Variable, o to +6dB
- Frequency Response, Low Pass 5Hz – 500Hz, -3dB
- Frequency Response, High Pass F: 50Hz-50KHz, -3dB; R: 45Hz-50KHz, -3dB
- Signal-to-Noise Ratio >95dB
- THD <0.01%
- Dimensions 8 3/4″(W) x 7 1/2″(L) x 1 1/4″(H)
Features and specifications subject to change without notice
TROUBLESHOOTING
Symptom Possible remedy:
- Signal Processor Check: does not turn on. *Remote Turn-On wire has(+) 12V *(+) 12V wire has(+) 12V *Ground wire is properly connected:
- Level of sound is Check: *Wiring is not loose or cables misconnected/disconnected *RCA cables are not faulty
- Background noise Check: is too high. *Wiring is not loose or cables misconnected/disconnected – ground is important *RCA cables are not faulty
PRECAUTIONS
Enjoy your system, but use it wisely and safely!
- Never drive with the volume raised so high you cannot hear what is occuring in traffic around you.
- Be ware that repeated exposure to excessive volume levels can permanently damage your hearing!
- Keep all electronics away from moisture, dust, extreme heat or extreme vibrations.
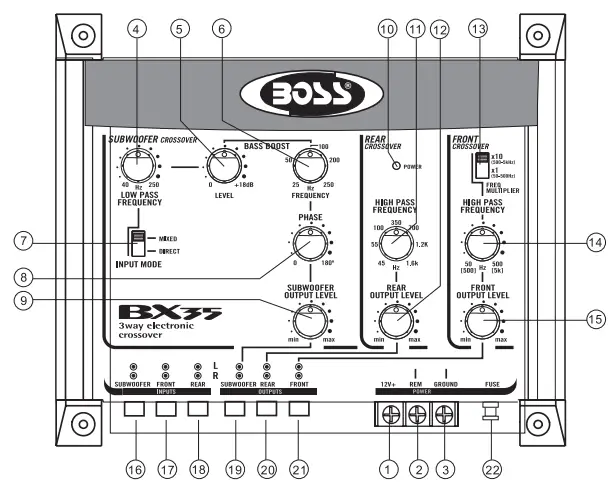
- Power Terminal (+12V).
- Remote Turn-On Terminal (REM).
- Ground Terminal (GND).
- Subwoofer Low Pass Frequency Control.
- Bass Boost Level Control (TO +18dB)
- Bass Boost Frequency Control
- Low Pass Mode Switch: Allows Low Pass Channel to receive signal from either the mix of Front and Rear inputs or from Low Pass Inputs directly (when head unit has appropriate 5th/ 6th outputs.
- Variable Phase Selector Control: Use this control to select output phase for the subwoofer channel to provide best time alignment and stereo imaging.
- Subwoofer (Low Pass) Output Level Control
- LED Power On Indicator
- Rear Channel High Pass Frequency Control
- Rear Channel Output Level Control
- Frequency Multiplier Switch, Front High Pass Crossover
- Front High Pass Frequency Control
- Front High Pass Output Level Control
- Subwoofer Low Pass Channel Inputs
- Front Channel Inputs
- Rear Channel Inputs
- Subwoofer Low Pass Channel Output Terminals.
- Rear Channel Output Terminals.
- Front Channel Output Terminals.
- Fuse
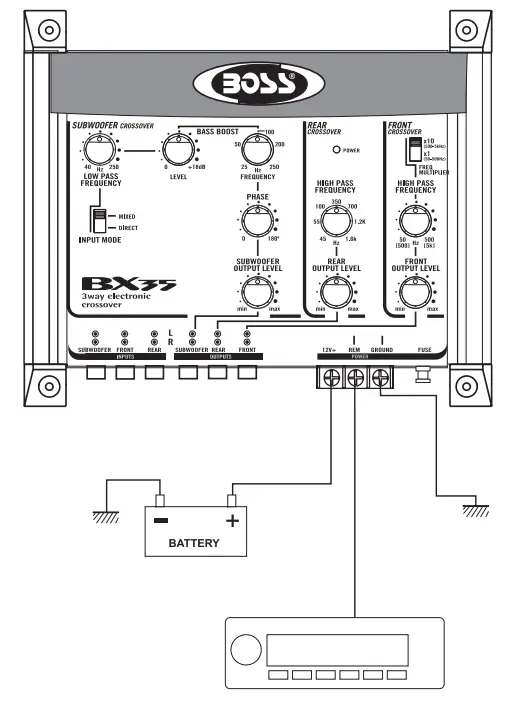
POWER CONNECTION
- 8 + (12V): Connect a red wire to the car battery or other power source.
- REMOTE: Connect an orange wire to remote activating (12V DC)wire of car stereo or equalizer.
- GND: Connect a black wire to the car chassis for ground connection.
Two Way (BIAMP) Operation
INSTALLATION
- Find a suitable location in the vehicle to mount the crossover.
- Bolt the crossover to the mounting surface.
- Using the screw terminals provided, connect minimum 16 gauge wire from the power, Ground and remote terminals. Connect the shortest possible wire to a chassis ground point. The(+) 12V connection should be made directly to the car battery, and the remote should be connected to the Remote Turn On Lead of your head unit. When connecting directly to the battery, install a 3A Fuse within 18 inches of the battery terminal.
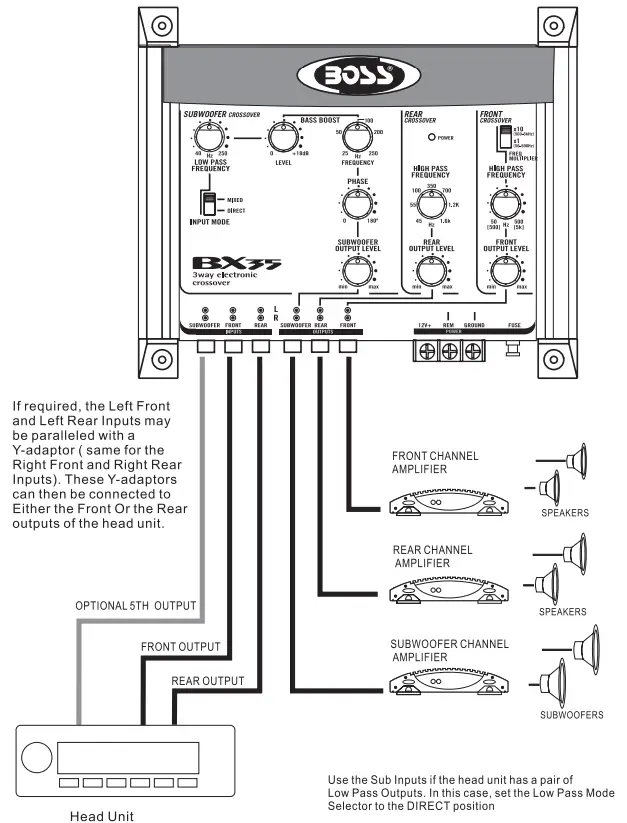
- Connect all line inputs and outputs using high-quality RCA cables.
- Recheck all connections before powering up.
- Set all level controls to their minimum positions and set all crossover controls, switches, etc. To the desired frequency or position.
- Once the system is powered up, set the volume control on the head unit to a moderate level where your normal speaking voice can be heard while the music is playing.
- Further fine tuning of the various controls may be necessary to obtain the desired results.
- When unsure about installation or system tuning, please consult an authorized BOSS AUDIO dealer.
CONTROLS AND OPERATION
FAQs
In order to create a 3-way crossover, low-pass, band-pass, and high-pass filters are combined (LPF, BPF and HPF respectively). The HPF and LPF sections are combined to form the BPF part.
The receiver and the amplifier are connected via an active or electronic crossover. Its solid-state circuitry handles low-level preamp signals to cleanly separate the signal and deliver each band of frequencies in the appropriate direction.
Compared to a preamp, crossover has a greater variety of settings and a wider frequency range, allowing for more and finer tweaking. Both can be employed in a system simultaneously. You can also utilise either one exclusively in a system.
The pre-amplifier in a home theatre system manages switching between various line-level sources and amplifies the signal before sending it to the amplifier. A weak electrical signal is amplified to allow for further processing, which reduces noise and produces cleaner output.
If you use low output dynamic microphones, such as ribbons, an external preamp may greatly enhance your sound quality. An external preamp is less important when using high output condenser microphones.
You will need to buy a preamp for your turntable if it doesn’t already come with one and if your amplifier or receiver doesn’t have a phono input (otherwise known as a phono preamp).
The preamp topology, or the way its circuit is built, is the most crucial. The preamp’s circuit structure and component quality determine how it sounds, including how smooth, harsh, thick, neutral, colourful, transparent, grainy, etc.
No, they’re extremely dissimilar. A preamp just modifies the signal’s dynamics to bring it down to standard line level.
Before a signal is amplified to be reproduced by a loudspeaker, a preamplifier makes a parallel output available. Pre-out is an analogue audio output with source selection and volume control. It allows the signal to flow through so that another power source can then amplify it.
The turntable would link to the preamp by one ground wire, and the preamp would connect via the other ground wire to the speakers or amplifier. Only if you hear “ground hum,” which is defined as a buzz or hum coming from the speakers when operating the turntable, is this necessary.
Weak mic-level signals are transformed into strong line-level signals via a pre-amplifier. A computer and a microphone are linked by an interface. An XLR cable is required to connect the preamp to the microphone, and a TRS cable is required to connect the preamp to the interface. The output from this connection is powerful and noise-free.
They aren’t all the same, no. The transient response, frequency response, and other more esoteric variables are typically different. Depending totally on the source, you may or may not be able to hear these differences.
A power amp amplifies the line level signal before it is sent to the speakers after being amplified by a preamp to bring it to line level. To put it another way, a preamp boosts signal intensity to a level that can be sent to the devices in your chain.
Preamps do really transform “weak” signals to line level. Simply put, a preamp amplifies the mic level, low-level signals coming from your source. After that, they upgrade them to stronger signals (line level) and transmit them farther into the loudspeaker power amplifier.
Turntables with and without built-in preamps can both use an external preamp. This enables you to connect to any existing audio system, including powered and passive speaker systems. Even many turntables with built-in preamps can be used with an external one.
The majority of powered speakers still need their own phono pre-amp. In any case, the lack of a receiver and distinct phono pre-amp is due to internal amplification and the built-in phono pre-amp.


