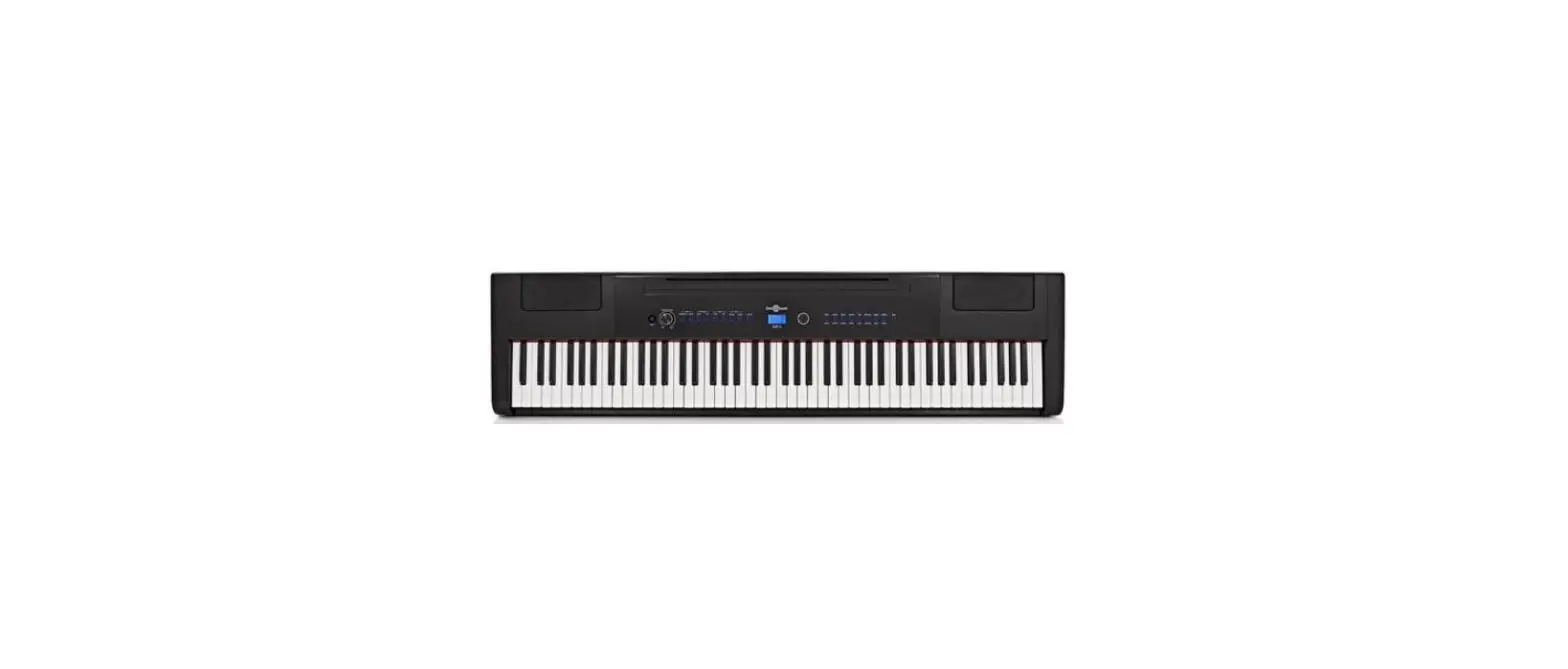
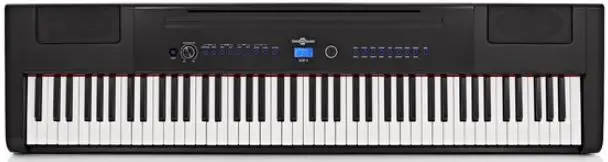
Gear4music SDP-3 Digital Stage Piano

INTRODUCTION
Thank you for purchasing the SDP-3 Digital Piano by Gear4music. To get the most out of your product, please read this manual carefully.
CONTENTS
- 1 x SDP-3 Digital Stage Piano
- 1 x Power supply unit (PSU)
- 1 x Sustain pedal
- 1 x Music rest
FEATURES
- Compact stage piano with 16 versatile voicings.
- Achieve maximum expression with 88 hammer action keys.
- Customise your sound with reverb, chorus and equalisation.
- Perfect for both stage and studio applications via lightweight design.
- Includes sustain, power supply and music rest.
FRONT PANEL
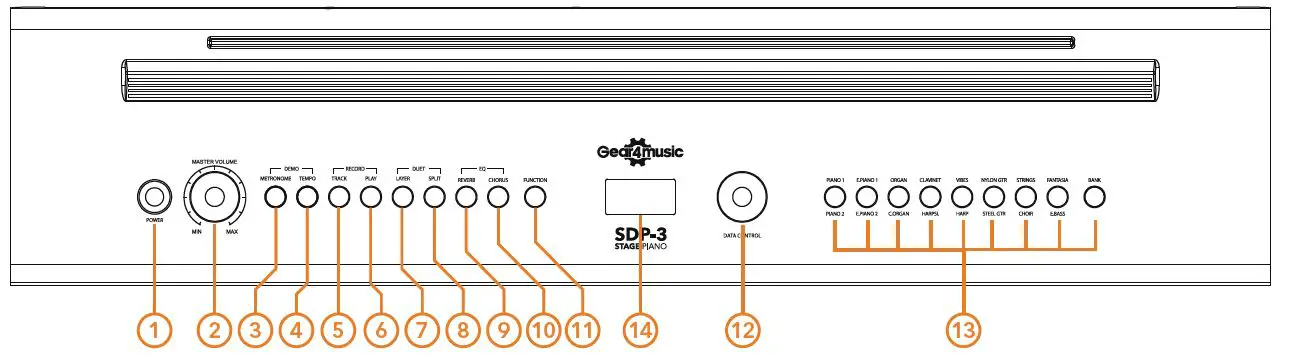
- POWER Use this sitch to power on the device when it is connected to the mains.
- MASTER VOLUME Use this control to adjust the global volume of the SDP-3.
- METRONOME Use this button to engage/disengage the metronome.
- TEMPO Use this button in conjunction with data control to adjust the SDP-3’s tempo.
- TRACK Use this button to select the track you wish to record on.
- RECORD Use this button to commence recording.
- LAYER Use this button to play two voices simultaneously.
- SPLIT Use this button to split the piano into two sections
- REVERB Use this button to engage/disengage the reverb effect.
- CHORUS Use this button to engage/disengage the chorus effect.
- FUNCTION Press this button to enter the function menu.
- DATA CONTROL Use this wheel to scroll through the various options
- VOICES SELECT Use these buttons to select your preferred voice.
- LCD DISPLAY Use this screen to display the voice you’re using.
REAR PANEL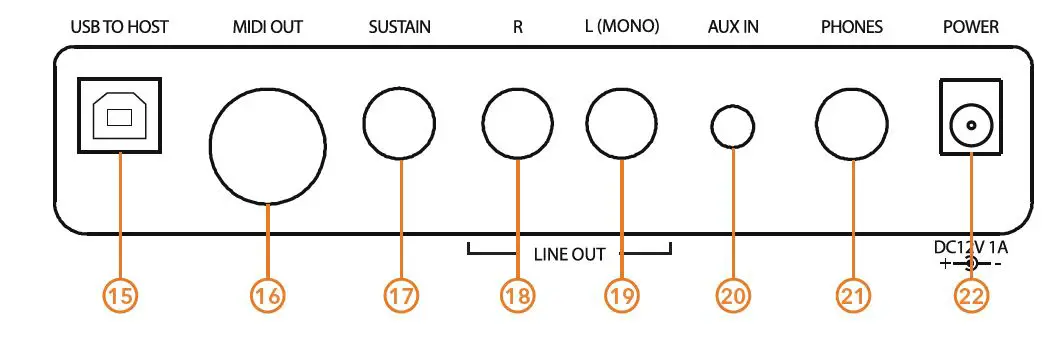
- USB TO HOST Use this to connect the SDP-3 to your computer.
- MIDI OUT Use this output to transfer MIDI data to an external device.
- SUSTAIN Use this input to connect a sustain pedal.
- LINE OUT (R) Use this output to send audio to a PA, interface or mixer.
- LINE OUT (L MONO) Use this output to send audio to a PA, interface or mixer. If you desire a summed mono output instead of stereo then use this output.
- AUX INPUT Use this input to playback audio from an external device through your speakers.
- HEADPHONES Use this input to connect your headphones for silent playback.
- DC POWER INPUT Use this input to connect the SDP-3 to a power source.
GETTING STARTED
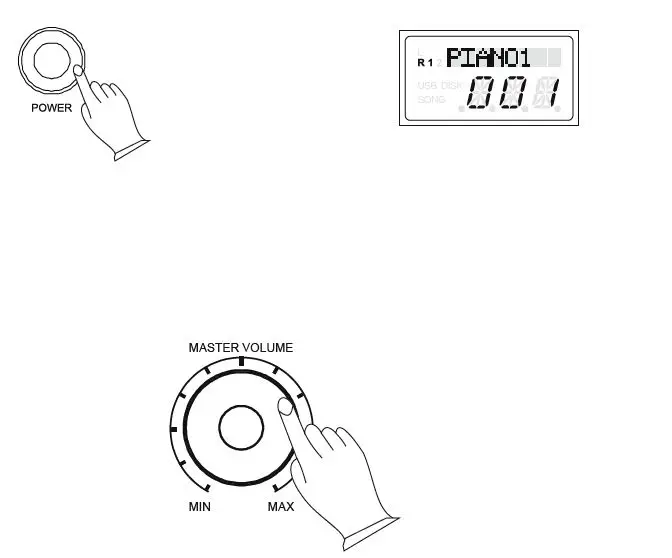
POWER
After safely connecting the supplied power supply firstly to the piano and then the mains, turn on the piano by pressing the POWER switch. The display will light up.
AUTO POWER OFF
The unit will Auto Power Off after 30 minutes of no operation, except when playing demo songs.
SETTING THE VOLUME
It is advised to set the [MASTER VOLUME] to “MIN” when powering on the piano, and then adjust the volume to your desired level when playing.
CONNECTIONS
USING HEADPHONES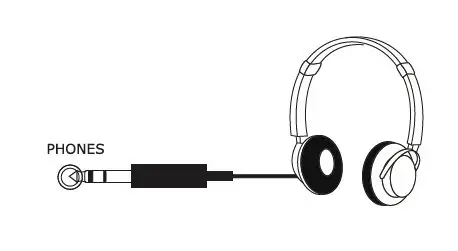
The SDP-3 has a 1/4” output jack (PHONES) for connecting standard stereo headphones. The output volume level is controlled using the main master volume wheel. The internal speaker system is automatically muted when a pair of headphones is plugged into the PHONES jack.
USING AN EXTERNAL SOUND SYSTEM
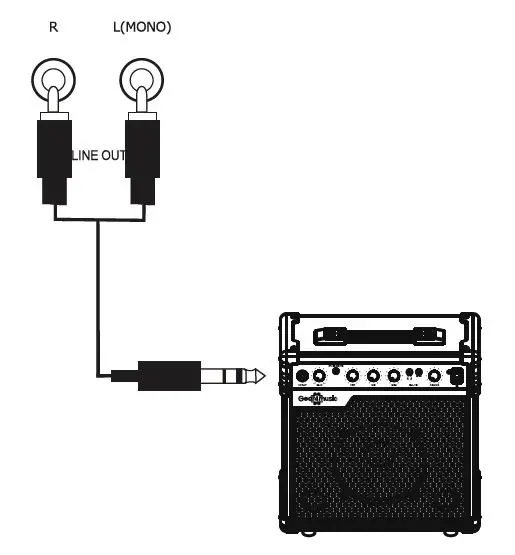
The LINE OUT (R) and (L)(MONO) phono sockets can be used to connect the piano to an external sound system, such as a keyboard amplifier, inter-face, or mixer. When using one cable (for mono output), insert your cable into the (L)(MONO) out-put. Connecting two cables sends separate left and right audio signals down each cable, giving you stereo output.
AUX INPUT
The Aux Input 3.5mm jack allows you to mix an external sound source (such as a smartphone or MP3 player) with the piano’s internal sounds, for playback through the piano’s in-built speakers or headphone output. The volume of the Aux Input is controlled by the external sound source.
MIDI OUTPUT
Use this output to transfer MIDI data, including note and touch velocity, via a 5-pin MIDI cable (not included).
USING USB MIDI
The SDP-3 allows the transfer of MIDI via USB from the piano to an audio interface or “host.” Use the audio interface to control the MIDI signal.
SUSTAIN PEDAL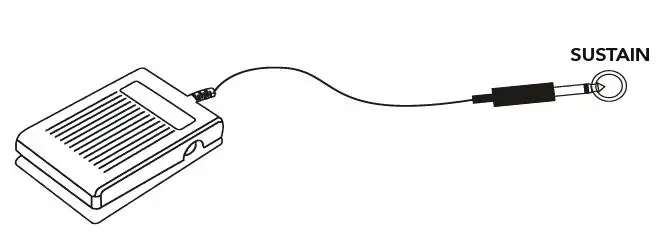
The foot pedal included with your digital piano can be connected to the SUSTAIN input and, when held down, allows the sound of the notes played to decay slowly, or “sustain.” A piano-style foot pedal may also be used. The sustain input will auto-detect the polarity of the sustain pedal used. Ensure the piano is turned off before connecting the pedal, otherwise it may not be recognised by the piano correctly. To change the polarity of the pedal, hold the foot pedal down during power up.
USING DC POWER INPUT
The power input is used to connect the piano to mains power. Only use the included power supply unit (PSU).
USING BATTERY POWER
Ensure all batteries are inserted correctly, as indi-cated by the +/- polarity markings. Replace all the batteries at the same time. Do not combine old and new batteries and do not mix battery types, as this can cause overheating, fire, or battery fluid leakage. Remove the batteries from the instrument if it is not to be used for a long period of time.
DEMO SONGS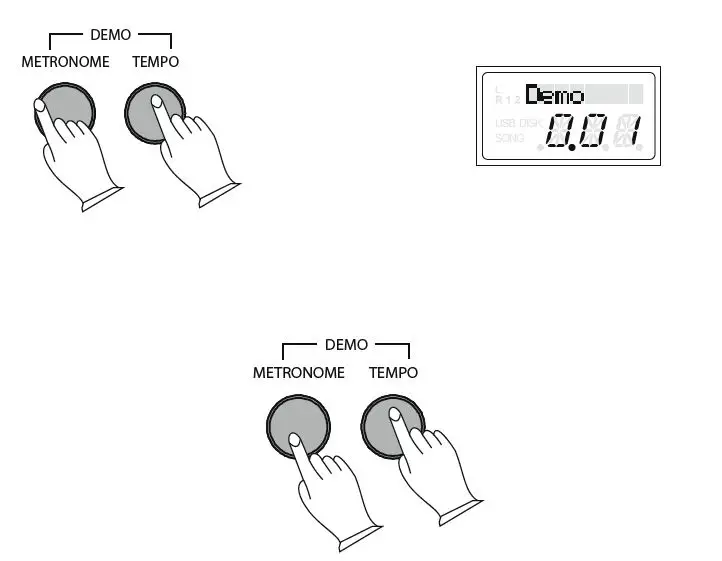
The SDP-3 features 16 demo songs, each demonstrating a different voice.To select a demo song, press the [METRONOME] and [TEMPO] buttons simultaneously. The first demo song will feature the Piano 1 voice. The metronome and tempo buttons will flash. During playback, another demo song may be chosen by pressing a different voice select button. Alternatively, use the data control wheel to select different demo songs.To stop the demo song. Press the [METRONOME] and [TEMPO] buttons together again. To replay the current song from the beginning, press the flashing voice select button.
SELECTING A VOICE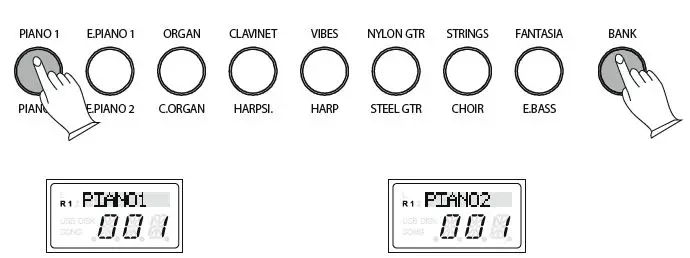
The piano has 16 different built-in voices. These digitally sampled musical instrument sounds may be selected one at a time or layered to produce two voices at once. To select a main voice, press the appropriate voice select button on the right side of the front panel. This will select the voice name above the button. Pressing the [BANK] button allows you to then select the second set of voice names below the voice buttons. The data control wheel can also be used to select the different voices
LAYER MODE
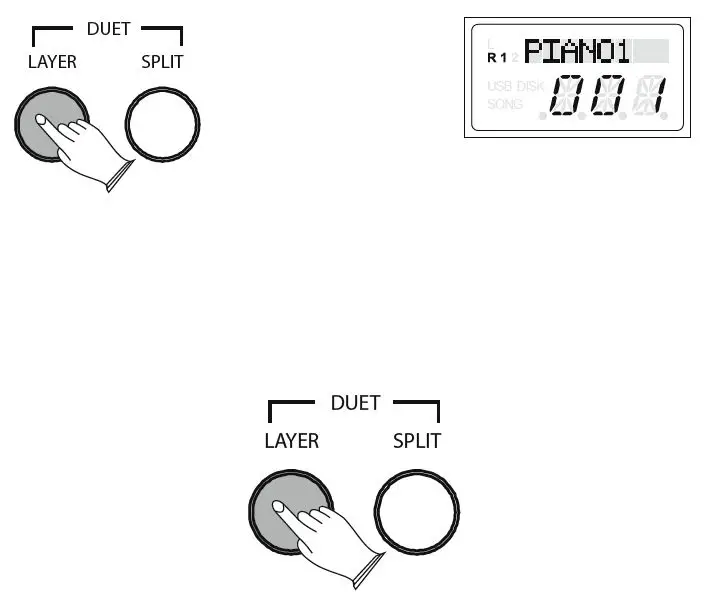
In layer mode, two voices may be played simultaneously, each at individually selected volumes. To add a second voice to the currently selected one, first press the [LAYER] button and then use the data control wheel to select the desired layer sound. Both the selected voice button lights will be on when the sounds are layered. Please refer to the Function Menu for how to adjust the volume, octave, and pan (how much sound source is sent to the left and right speakers) settings of both the main and layer voices.
To exit the layer mode, press the [LAYER] button again.
SPLIT MODE
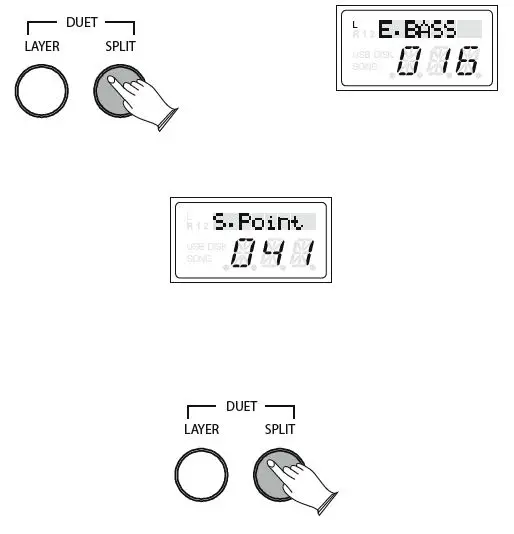
The piano keys can be “split” into two sections, allowing different voices to be played in the left and right hands. To add a second voice on the left-hand section of the piano to the voice currently selected, press the [SPLIT] button and use the data control wheel to select the desired left-hand voice. The point at which the piano is split can also be adjusted by holding down the [SPLIT] button for 2 seconds and then playing the desired split point key. Please refer to the Function Menu for how to adjust the volume, octave, and pan settings of the split voices. To exit the split mode, press the [SPLIT] button again.
REVERB & CHORUS
The in-built reverb and chorus effects can be added to selected voices and help add expression to your playing. The settings will be retained even when the power is turned off/on.
REVERB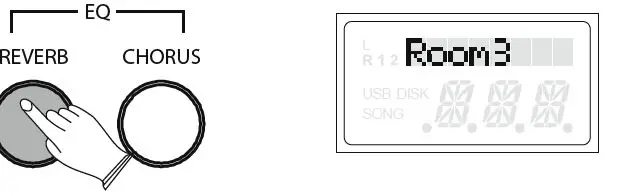
Press the [REVERB] button to add the effect to the current voice. Use the data control wheel to select between the 8 different in-built reverb types, as shown in the display below. Please refer to the Function Menu for how to adjust the reverb level. To turn off the reverb effect, press the [REVERB] button again.
CHORUS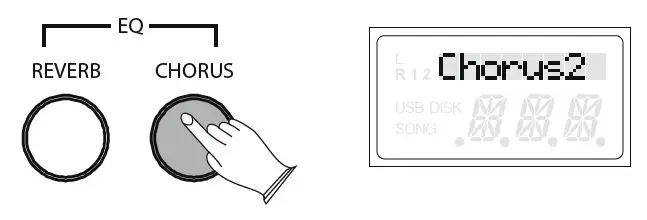
Press the [CHORUS] button to add the effect to the current voice. Use the data control wheel to select between the 13 different in-built chorus types, as shown in the display below Please refer to the Function Menu for how to adjust the chorus level. To turn off the chorus effect, press the [CHORUS] button again.
METRONOME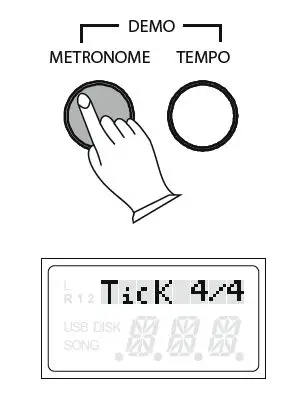
The SDP-3 has an in-built metronome, a great feature for practising and a solid rhythm guide when recording. Press the [METRONOME] button to turn the metronome on. The time signature of the metronome can be set using the data control wheel. The selected time signature will be shown on the display. The options are as follows: 2/2, 1/4, 2/4, 3/4, 4/4, 5/4, 6/4, 3/8, 6/8, 7/8, 9/8, 12/8. Please refer to the Function Menu for how to adjust the volume of the metronome.\
TEMPO
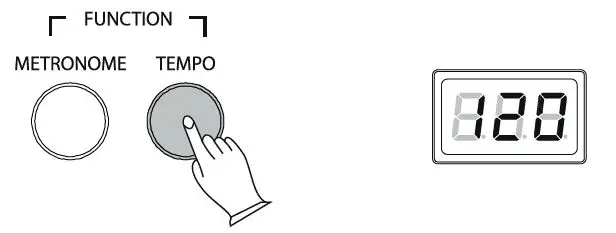
The tempo of the metronome ranges from 20 to 280 BPM The default tempo will be 120 BPM. To change the tempo, press the [TEMPO] button and use the data control wheel to adjust the speed as desired. The speed of the tempo will be shown on the display. To turn off the metronome, press the [METRONOME] button again.
TWIN MODE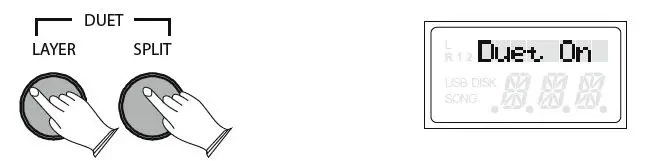
The SDP-3 can be divided into two sections that both play the same notes, voice, octave, and volume. This provides an ideal teaching function, allowing two people to play the same notes simultaneously. When using this mode, keys A1 to C3 make up the left-hand section and keys C#3 to C7 make up the right-hand section. To enter/exit the twin mode, press the [LAYER] and [SPLIT] buttons together. Using the twin mode will automatically exit the layer and split modes.
EQ ADJUSTMENT
The overall EQ of the piano’s sound can be shaped by adjusting the bass and treble settings.
TO CHANGE THE BASS LEVEL
Press the [REVERB] and [CHORUS] buttons together to enter the EQ mode. Turn the data control wheel until “EQ Bass” is shown on the display. Press the [REVERB] and the [CHORUS] buttons together again and their button lights will start to flash. Now the data control wheel can be used to set the bass level, from -12 to +12 as desired.
TO CHANGE THE TREBLE LEVEL
Press the [REVERB] and [CHORUS] buttons together to enter the EQ mode. Turn the data control wheel until “EQ Treble” is shown on the display. Press the [REVERB] and the [CHORUS] buttons together again and their button lights will start to flash. Now the data control wheel can be used to set the treble level, from -12 to +12 as desired.
FUNCTION MENU
The function menu can be used to edit settings for a wide range of SDP-3 features. Each option will have its own default value and adjustable range. To enter the function menu, press the [FUNCTION] button. The data control wheel can now be used to select the function you wish to edit. Once the desired option is shown on the display, press the [FUNCTION] button again. The function button will flash, and the data control wheel now allows you to edit the adjustable range as detailed in the following table:
| FUNCTION DISPLAY RANGE DEFAULT | |||
| TRANSPOSE | TRANSP | -012 to +012 | 000 |
| MASTER TUNING | Tune | -064 to +063 | 000 |
| MAIN VOICE OCTAVE | M.Oct | -002 to +002 | 000 |
| SPLIT VOICE OCTAVE | S.Oct | -002 to +002 | 000 |
| LAYER VOICE OCTAVE | L.Oct | -002 to +002 | 000 |
| MAIN VOICE PAN (L/R) | M.Pan | -064 to +063 | 000 |
| SPLIT VOICE PAN (L/R) | S.Pan | -064 to +063 | 000 |
| LAYER VOICE PAN (L/R) | L.Pan | -064 to +063 | 000 |
| LOCAL | Local | ON/OFF | ON |
| TOUCH | T Normal | High, Low, Normal | Normal |
| MAIN VOICE VOLUME | M.Vol | 000 to 127 | 127 |
| SPLIT VOICE VOLUME | S.Vol | 000 to 127 | 127 |
| LAYER VOICE VOLUME | L.Vol | 000 to 127 | 075 |
| METRONOME VOLUME | MetroVol | 000 to 127 | 100 |
| REVERB LEVEL | R Lvl | 000 to 127 | 036 |
| CHORUS LEVEL | C Lvl | 000 to 127 | 036 |
MIDI FUNCTIONS
MIDI CHANNELS
The SDP-3 MIDI OUT channel values range from 1 to 16. The default channel is 1. Please refer to the MIDI Implementation Chart appendix for further information.
LOCAL ON/OFF
To use the SDP-3 piano purely as a MIDI controller, turn the local on/off function to “off.” Other MIDI devices (or virtual instrument software running on a computer) can now be controlled by the SDP-3, without it playing the piano’s internal sounds. Please refer to the function menu for controlling local on/off.
RECORDING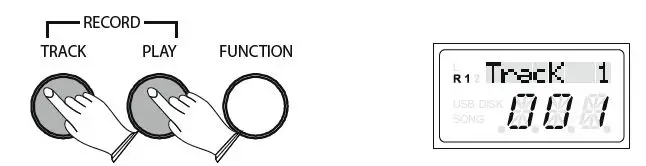
The SDP-3 piano features an in-built 2 track recorder, allowing you to record, playback and overdub one part on top of another, using the same or a different voice. Before recording, set the desired voice, tempo, reverb level and other functions (see Function Menu for further instructions). Select the track you want to record on by pressing the [TRACK] button repeatedly to select between track 1 or track 2. Once you are ready to record, press the [TRACK] and [PLAY] buttons together to enter the recording mode. The track button light will begin to flash. The metronome can be turned on by pressing the [METRONOME] button, if desired. The metronome sound acts as a guide and will not be recorded. Recording will begin as soon as you start to play. The selected track light will flash throughout. To stop recording, press the [TRACK] button. Recordings will be stored even when the piano is turned off/on.
PLAYBACK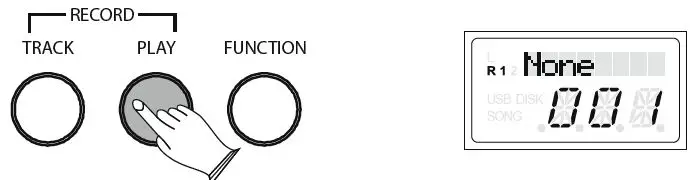
To listen to your recorded tracks, press the [PLAY] button. If there is nothing recorded on the track, the display will show “None.” To stop playback, press the [PLAY] button again. Playback will also stop automatically at the end of the recording. The tempo of your recorded track can be changed by pressing the [TEMPO] button and using the data control wheel to set the new tempo.
CLEARING RECORDED TRACKS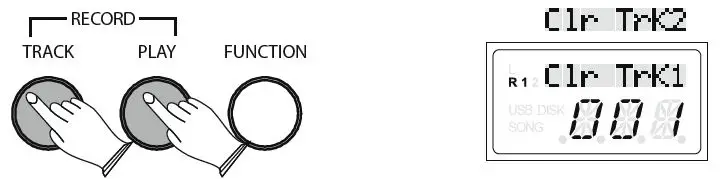
To erase the recorded tracks, select the track you want to clear and then hold down the [TRACK] button for 3 seconds to delete the recording. When recording a new track, any previous recording on that track will automatically be deleted.
FACTORY RESET
Performing a factory reset will clear all memory settings and restore all functions to their factory default settings. To perform a factory reset, firstly turn the piano power off. Then hold down both the [PIANO 1] and [E.PIANO 1] buttons whilst powering on the piano. The display will show “Reset”. When the [PIANO 1] and [E.PIANO 1] buttons are released, the piano will return to performance mode and function normally, as if powered on for the first time.
APPENDIX
MIDI IMPLEMENTATION CHART
| FUNCTION | TRANSMITTED | RECOGNISED | REMARKS | |
| Basic Channel | Default Changed | 1-16 1-16 | 1-16 1-16 | *Up to 3 channels simultaneously |
| Mode | Default Messages Altered | Mode 3 Yes ******** | Mode 3 No No | |
| Note Number | True Voice | 0≈127 ******** | 0≈127 | |
| Velocity Note | Note On Note Off | Yes Yes | Yes Yes | |
| After Touch | Key’s Channels | No No | No No | |
| Pitch Bend | No | No | ||
| Control Change | 0-127 | 0, 1, 5, 6, 7, 10, 11, 32, 64, 65, 66, 67, 80, 81, 91, 93, 100, 101, 121 | ||
| Program Change | True # | 0-127 ******** | 0-15 | 16 |
| System Exclusive | Yes* | Yes* | * The controller will recognise and respond to GM Device inquiries. Master Tune supported. Master Volume supported | |
| System Common | Song Position Pointer Song Select True Request | No No No | No No No | |
| System Real Time | Clock Commands | No No | No No | |
| Aux Messages | All Sounds Off* Reset All Controllers Local ON/OFF* ALL Notes OFF Active Sensing System Reset | Yes Yes Yes Yes No No | Yes Yes Yes Yes Yes Yes | * The controller will respond to GM, but not piano voices |
| MIDI CHANNEL MODES | ||
| POLY OFF | MONO ON | |
| OMNI ON | MODE1 | MODE3 |
| OMNI OFF | MODE2 | MODE4 |
SPECIFICATIONS
- Keys ……………88 Hammer Action
- Speakers ………..2 x 10W / 4Ω
- Display ………….9 Digit LED
- Connections …….. Headphone Output 1/4″ Jack Sustain Pedal Input 1/4″ Jack Aux Input 3.5mm Jack Stereo Phono Outputs MIDI Output USB to Host 12V DC Power
- Batteries …………6 x 1.5V D Cell (not included)
- Dimensions (W X H X D) ………1320 X 130 X 340mm
- Weight ………….13.55kg Polyphony ……….64 Notes
- DSP Effects ………Reverb, Chorus & EQ
- Included Accessories ……… PSU, Sustain Pedal, Music


