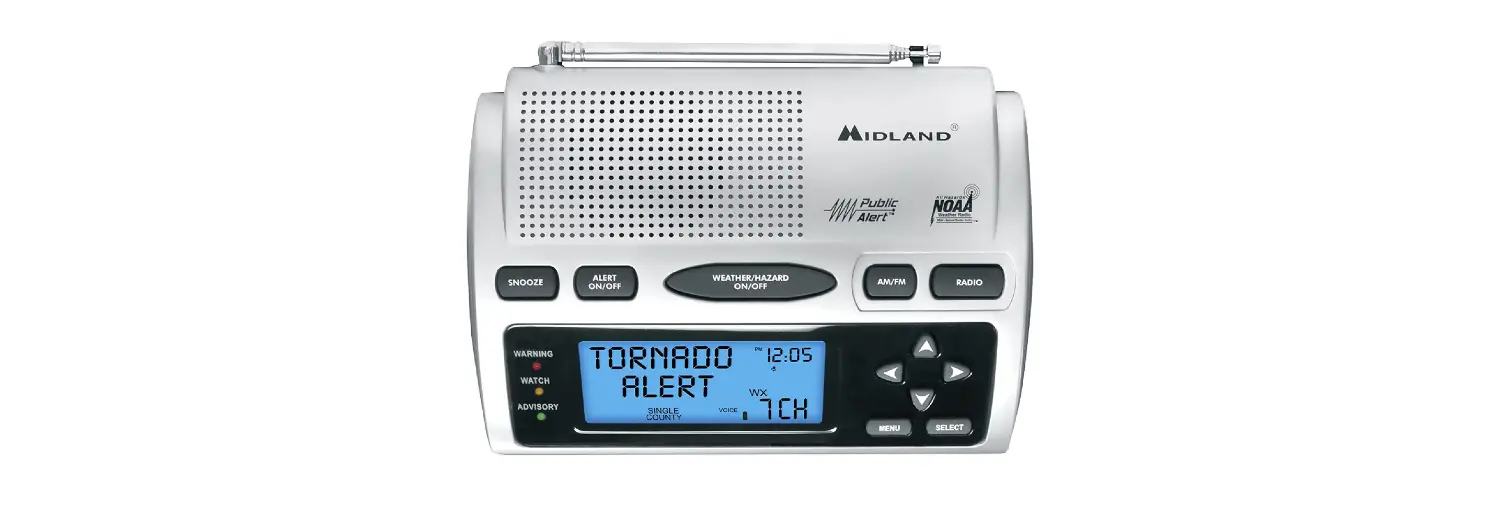
Midland – WR300, Deluxe NOAA Emergency Weather Alert Radio
Quick Start Instructions
Please see pg. 5 for important buttons and controls.
- Place 4 AA batteries (not supplied) into the compartment on the underside of the radio.
(Note: batteries are important because they provide emergency power for the radio in case of a power outage.) - Plug the AC adapter into a standard house outlet. Plug the other end of the adapter into the DC jack on the back of the radio.
- Pull out the antenna and extend it to its full length above the weather radio.
- Program the Weather Channel for Your Area-
- Turn the radio on with the power/volume wheel on side of the radio (Ensure the volume is up so you will be able to hear the broadcast).
- Press the “MENU” button.
- Press the “UP” (or “DOWN”) arrow until “WEATHER CHANNEL” is displayed on the LCD.
- Press the “SELECT” button.
- Press the “UP” arrow to manually scroll through the weather channels until you hear the weather broadcast.
- Press the “SELECT” button to save this channel.
- Press the “MENU” button to exit programming mode.
- Press the “WEATHER/HAZARD ON/OFF” button to listen to the weather radio. Then use the power/volume wheel to adjust the volume to a desired listening level.
You are now able to receive weather alerts for your area and surrounding areas. To narrow the alerts to just your county, see pg. 8 to program the S.A.M.E. code for your county into the radio.
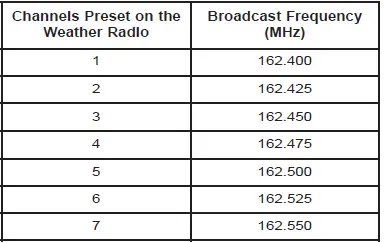
Weather Channel Frequencies
Product Information
Thank you for choosing Midland! Your new WR-300 weather radio is the latest in weather and hazard alert monitoring technology, providing you with the information needed to keep you safe. Your WR-300 weather radio has a special receiver that tunes to the 24/7 broadcast issued by the National Weather Service. The combined All Hazards/Weather Alert broadcast network is the single, most immediate source for comprehensive weather and emergency information avail-able to the public.
This WR-300 weather radio has an innovative automatic alert system. In the event of a special warning broadcast, the radio is automatically activated along with a loud tone, flashing LED indicator and an “alert” message on the LCD. Emergency weather bulletins include alerts about: tornadoes, hurricanes, floods, ice/snow storms and other severe weather. Other emergencies might include Amber alerts, hazardous explosions, fires, chemical spills and other civil emergencies.
In addition, this WR-300 weather radio has the “S.A.M.E. Digital Weather/Hazard Alert” feature, providing you with constant monitoring of your localized NWS broadcast. The S.A.M.E. decoding receiver allows you to hear only messages for the area(s) concerning you. You now have a choice as to what information will be brought to you.
We encourage you to read this owner’s manual thoroughly before operating this radio. This manual is a valuable part of your new weather radio. See the “Quick Start Instructions” section of this manual for the initial weather radio setup and programming. After your new weather radio is programmed and operating properly, store the manual in a safe place for future reference.
WR-300 Controls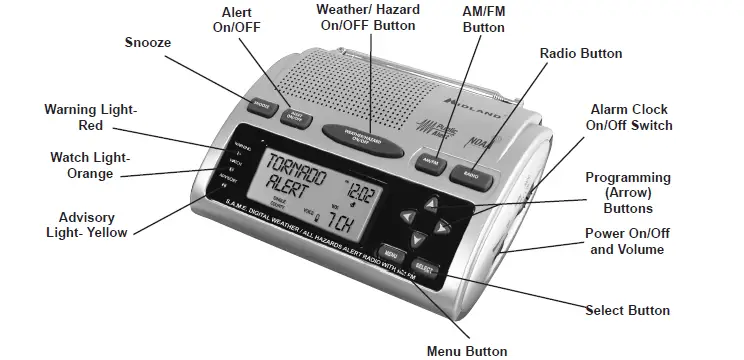
ICONS on the Display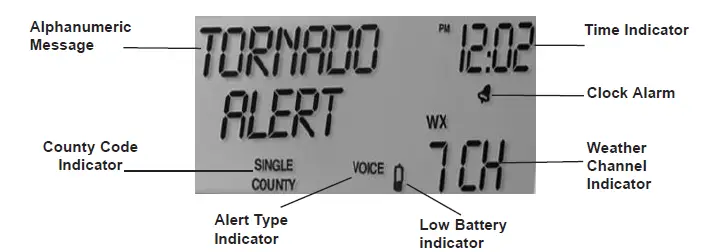
LCD Backlighting
Press and release any button to turn the backlight on for 5 seconds. For continuous backlight, press the “MENU” button, then the press the “DOWN” arrow until “LIGHT” displays on the screen. Then press the “SELECT” button. Then press the “UP” arrow to change the backlight setting from “NORMAL” to “CONTINUOUS”. Press the “SELECT” button to save your settings.
WR-300 Accessory Jacks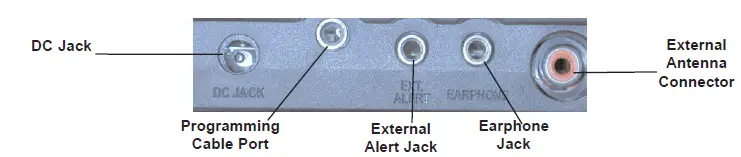
Setting the AM /FM Clock Radio Functions
Set the Time:
- Turn on the weather radio with the power/volume wheel on side of the radio.
- Press the “MENU” button.
- Press the “DOWN” arrow button until “SET UP TIME” is displayed.
- Press the “SELECT” button, hour setting will begin to flash.
- Press the “UP” button to adjust the hour setting. (Note: the am/ pm setting cannot be manually changed; it changes automatically as you scroll through the hours.)
- Press the “RIGHT” arrow to adjust minutes and save your hour setting.
- Press the “UP” button to adjust the minute setting.
- Press the “SELECT” button to store the time setting.
- Press the “MENU” button to return to the main menu.
Set the DATE
- Turn on the weather radio with the power/volume wheel on side of the radio.(B). Press the “MENU” button.
- Press the “DOWN” arrow until “SET UPDATE” is displayed.
- Press the “SELECT” button.
- Press the “UP” arrow to adjust the day.
- Press the “RIGHT” arrow to select the month.
- Press the “UP” arrow to adjust the month.
- Press the “RIGHT” arrow to select the year.
- Press the “UP” arrow to adjust the Year.
- Press the “SELECT” button to store DAY/MONTH/YEAR.
- Press the “MENU” button to return to the main menu.
Set the ALARM Time (for the AM/FM Clock Radio)
- Turn on the weather radio with power/volume wheel on side of the radio.
- Press the “MENU” button.
- Press the “DOWN” arrow until “SET UP ALARM” is displayed.
- Press the “SELECT” button. The alarm hour setting will begin to flash.
- Press the “UP” arrow to adjust the alarm hour setting. (Note: the AM/ PM setting cannot be manually changed; it changes automatically as you scroll through the hours.)
- Press the “RIGHT” arrow to choose setting alarm minutes.
- Press the “UP” arrow to adjust the alarm’s minute setting.
To Choose the Type of Alarm
- Press the “MENU” button.
- Use the “UP” arrow to choose radio or sound for the clock alarm. (The icons are located below the clock display.)
- Press the “SELECT” button to store the type of alarm setting.
- To activate the alarm, set the “ALARM OFF/ON” switch to the “ON” position.
- The clock face icon will appear.
- The “SNOOZE” button on the top of the WR-300 is for advancing the alarm time by 9 minutes each time the alarm sounds. The “SNZ” icon will be displayed.
- Turn the alarm off with the ”ALARM OFF/ON” switch on side of the radio.
- Press the “UP” arrow to adjust the alarm’s minute setting.
Getting your S.A.M.E. County Codes
First, determine the counties you are interested in. Then, do one of the following three steps to get the codes
- The National Weather Service Toll-Free Number provides S.A.M.E. County Codes at:1-888-NWS-S.A.M.E. (1-888-697-7263)
This is what to expect when you call the NWS number. When you call the NWS toll-free number, automated instructions will guide you to the S.A.M.E. County Code(s) you need. The number will be six digits long.- You will hear “Welcome to the National Weather Service. You have reached the Specific Area Message Encoding Program Service.”
- If you select “touch tone” to make your entries, you will be prompted to enter the name of your state using the telephone keypad.
- Next, you will be prompted to enter your county name.
- Then you will hear, “Your geographic code is XXXXXX”. (This is your S.A.M.E. County Code.
- The Internet Web Site of National Weather Service- www.nws.noaa.gov/nwr/indexnw.htm
When you pull up this URL, you will see a list of states.- Click on your state.
- Find your county, and record the S.A.M.E. number listed next to your county.
- Go to the Midland Radio Corporation website at www.midlandradio.com
- Click on the weather radio link at the top of the page.
- At the top of the weather, radio page will be a link to the NWS list of states and corresponding county codes. Click on this link.
- Click on your state and a list of counties and codes will be listed. Find your county and then find your code.
Programming S.A.M.E. County Codes into the WR-300
Helpful Tip: The S.A.M.E. code is created using the following method
- The first digit is the sub-county code-currently 0 in most areas.
- The second two digits represent the state code.
- The last three digits represent the county code.
“ALL” S.A.M.E. County Codes is the Factory Setting:
Your WR-300 weather radio is preprogrammed to receive NWS weather and hazard alert trans-missions for all S.A.M.E. county codes within range. If this is what you want, leave the radio set to “ALL”.
A Single S.A.M.E. County Code
- Press the “MENU” button to open menu options.
- Press the “UP” arrow to scroll through menu options until “County Code” is displayed.
- Press the “SELECT” button and then the “UP” arrow to scroll through ”SINGLE”, “MUL-TIPLE” or “ALL”.
- Display “SINGLE”, then press the “SELECT” button.
- “Code 01” will be displayed. Press the “SELECT” button to program this code. The first digit space will start blinking.
- Use the “UP” arrow to scroll through the digits 0-9. Input the first digit then press the “RIGHT” arrow to save that selection and move to the next digit.
- Continue programming all 6 digits in this way. When finished, press the “SELECT” button and your entered code will be saved.
Multiple S.A.M.E. County Codes
- Press the “MENU” button to open menu options.
- Press the “UP” arrow to scroll through menu options until “County Code” is displayed.
- Press the “SELECT” button and then the “UP” arrow to scroll through “SINGLE”, “MUL-TIPLE” or “ALL”.
- Display “MULTIPLE”, then press “SELECT”.
- Use the “UP” arrow to scroll through code locations 1-23. You are able to program up to 23 different county codes into your WR-300 weather radio.
- Display the location you want then press the “SELECT” button. The first digit space will start blinking.
- Use the “UP” arrow to scroll through the digits 0-9. Input the first digit then press the “RIGHT” arrow to save that selection and move to the next digit.
- Continue programming all 6 digits in this way. When finished, press the “SELECT” button and your entered code will be saved.
- To program your next code, press the “UP” arrow to go to the next code location.
- When you have entered all your desired codes, press the “MENU” button to store your settings.
Reviewing Stored S.A.M.E. CodesReviewing Stored S.A.M.E. Codes
To review your saved S.A.M.E. codes, do the following
- Press the “MENU” button.
- Press the “UP” arrow until “COUNTY CODE” is displayed on the screen.
- Press “SELECT”
- Use the “UP” arrow to scroll through the S.A.M.E. memory code locations.
- All empty memory locations will appear as “——”.
- Press the “MENU” button when finished reviewing the S.A.M.E. codes.
Choosing an Alert TAlert Type (Vype (Voice or Siren):once or Siren)
- Press the “MENU” button to open menu options.
- Press the “UP” arrow until Alert Mode is displayed on the screen. Press the “SELECT” button and “VOICE” will start blinking.
- If you want the voice alert, press the “SELECT” button.
- If “VOICE” is chosen, the alert would sound for 8 seconds followed by 5 minutes of weather broadcast.
- If you want the siren alert, press the “UP” arrow until “SIREN” is displayed, then press the “SELECT” button to save your setting.
- If “SIREN” is chosen, alert tones will sound for 5 minutes or until the “ALERT ON/OFF” button is pressed.
Alert ON and OFF
To turn the alert on and off, press and hold the “ALERT ON/OFF” button for 5 seconds until you see “ALERT ON” blinking. While still holding down the button, press the “UP” arrow to switch between “ALERT ON” and “ALERT OFF”. Press the “SELECT” button to save your selection.
Setting the Alert Volume:
- To set the alert volume, press the “MENU” button.
- Press the “UP” arrow until “SIREN LEVEL” is displayed.
- Press the “SELECT” button and “LEVEL HIGH” or “LEVEL LO” will start blinking.
- Then press the “UP” arrow to choose “LEVEL HI” or “LEVEL LO” volume.
- Press the “SELECT” button to save your setting.
Selectable Alert Option
You can program the WR-300 weather radio to only sound the voice or siren alert for certain weather emergency messages. Those messages unimportant to you can be programmed to only display a message, minimizing annoyance.
To program the emergency messages you want to silence, do the following
- Press the “MENU” button until “DEFEAT SIREN” is displayed. Press the “SELECT” button.
- Using the “UP” arrow, scroll through the different alerts you may want to silence.
- When you have selected one, press the “RIGHT” arrow to change the status of the event from “ALERT ENABLE” to “ALERT DISABLE”.
- Press the “MENU” button to save your selection and exit the programming option.
Testing the Alert
To test the alert function to ensure it is working, press the “MENU” button, then press the “UP” arrow until “SIREN TEST” is displayed. Press the “SELECT” button to sound the alert siren. Press the “SELECT” button again to silence the alarm.
Reviewing Alerts
The WR-300 weather radio can store 10 different alerts (with overlapping effective times) in its memory. If the radio receives a new alert while a previous alert is still in effect, it automati-cally displays the new alert description. To review past alerts that are still in effect, press the “DOWN” arrow to scroll through the last 10 alerts. If an alert is expired, it will be marked “EXP”.
Test Signals Broadcast by NWS
All National Weather Service stations periodically transmit test signals. You can find out when your local NWS station broadcasts test signals by calling the NOAA National Weather Service Forecast Office (listed under “Weather” in the Federal Government section of the telephone book.)
During the weekly test signal, the local NWS station will give a list of counties covered by their transmitter. The NWS test signal allows everyone with weather radio receivers to verify the operation of their equipment.
The following test signals may be sent by the NWS during testing: required weekly test, required monthly test, system demo, and national periodic test.
No Reception Warning
If no alerts are received for 10 days, the display will flash “CHECK RECEPTION” every 30 seconds. If this happens, check your channel settings and county codes for setting errors. If you receive a clear signal from the NWS, try using the “ALL” county code set to receive all alerts for all counties.
Note: If you have trouble finding reception, please move your radio closer to a window and away from fluorescent lighting.
AM/FM Radio
There is an AM/FM radio built into the WR-300 weather radio that you can listen to without interrupting the weather radio functions. If an alert is received, the radio automatically switches from the AM/FM radio to the weather radio alert.
Turning the AM/FM Radio On: Press the “RADIO” button to turn the AM/FM radio on and off.
Changing AM/FM Stations: Press the “RIGHT” arrow or the “LEFT” arrow to scan through the radio stations. When you find a station you like, stop pressing the arrow and the radio will stay on that station.
AM/FM Memory Channels: You can program 3 AM and 3 FM radio stations into the radio’s memory. To program a memory channel, do the following:
- Turn the AM/FM radio on and use the “LEFT” or “RIGHT” arrow to tune to the desired station.
- Press the “MENU” button. The “MEMORY” number will flash on the display.
- Use the “UP” or “DOWN” arrow to choose the desired memory channel you wish to program.
- Press the “SELECT” button to save your frequency selection to the chosen memory channel.
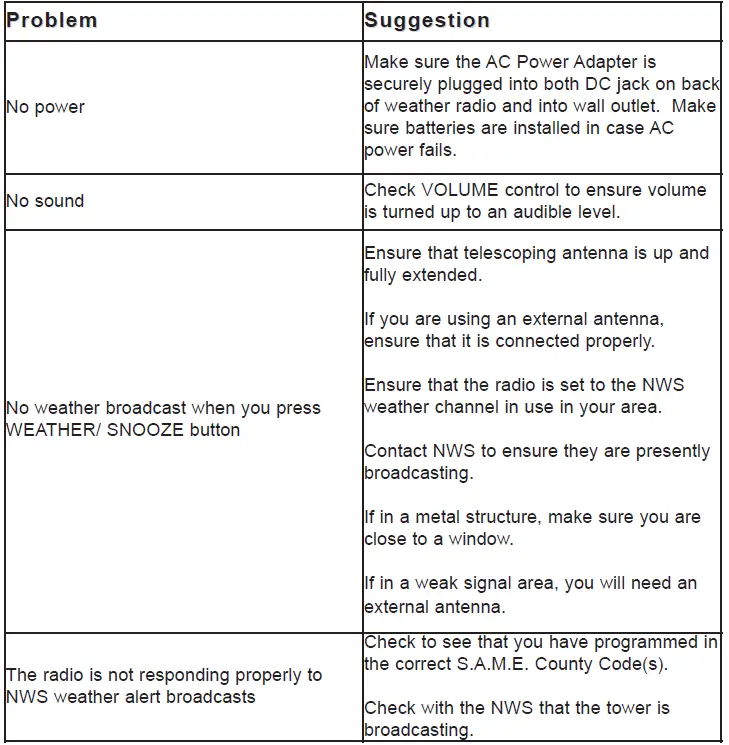
Troubleshooting
Reception
The National Weather Service operates a system of weather and hazard alert broadcasts covering a large area of the United States. Currently, only a few areas are not covered. Typical broadcasts are within reception distance of 25-50 miles of the weather station. Your WR-300 weather radio can receive broadcasts from up to 50 miles from the weather station, depending on your location and conditions of weather, terrain, etc. If you find reception is not good in your area, try different locations in your home or office to find a spot of improved reception. Placement near a window usually improves reception.
If a weather broadcast cannot be heard on any of the 7 channels, contact your local NWS office and verify the closest station is on air. Also, verify the channel frequencies the station is broadcasting. If your NWS is transmitting and you are not receiving the broadcasts, you may need an external antenna. Please visit our website at www.midlandradio.com to view our suggested antenna, the 18-259W VHF Through-Glass Antenna. This antenna improves reception when applied to a window.
Please note: Metal structures are more difficult to receive reception in, because metal interferes with the signal. If you live in a metal structure, you may need an external antenna.
About NOAA, NWS, & S.A.M.E. County Codes
In 1994, NOAA began broadcasting coded emergency signals that identify the specific geographic area (such as the county within a state) that is affected by an emergency. Until that time, such specific emergency weather information was not available directly to the public. NOAA transmits the coded emergency signals using a technique called Specific Area Message Encoding (S.A.M.E.) The WR-300 weather radio is designed to receive these
S.A.M.E. county code transmissions.
The National Weather service divides the United States by state and county (or parish) and assigns a six-digit code number called a FIPS (Federal Information Processing System) code, also known as a S.A.M.E. county code.
You can program the weather radio with up to 23 S.A.M.E. county codes. The weather radio allows you to receive broadcast alerts for either your own county or for up to 23 counties. This will eliminate any alerts that are not within your area of interest.
When you program your S.A.M.E. county code(s) into the WR-300 weather radio, you eliminate any alerts that are not within those counties. Warnings, watches and advisories of weather and other area emergencies, about 50 different types, will activate the weather radio for only your programmed specific area.
The S.A.M.E. message the NWS sends contains information pertaining to the period for which the alert is valid. NWS can set the active time of the alert from 15 minutes up to 6 hours. When the designated time has passed, the weather radio display message and light will automatically reset to their normal appearance.
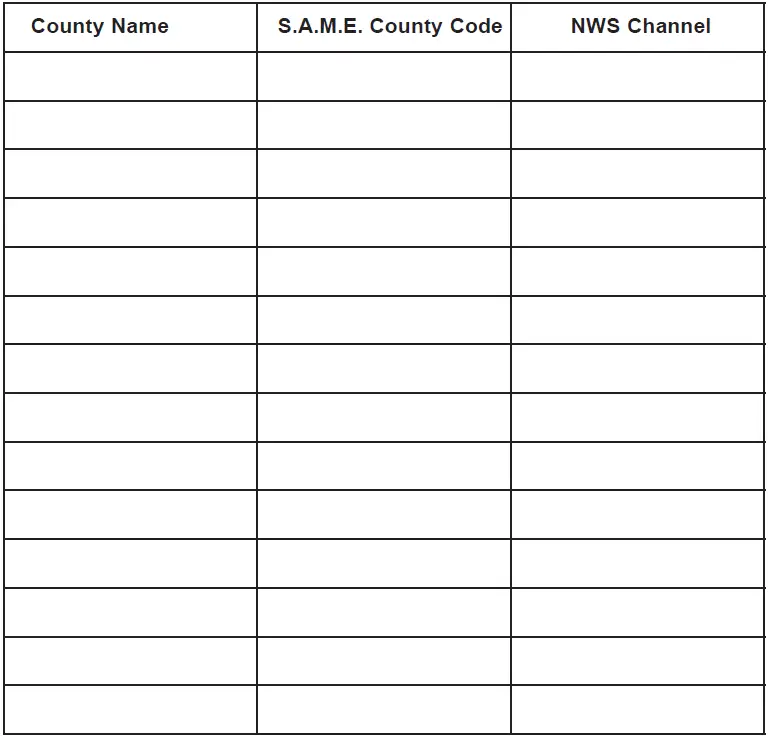
S.A.M.E. County Code Record
Specifications
Specifications are nominal and subject to change.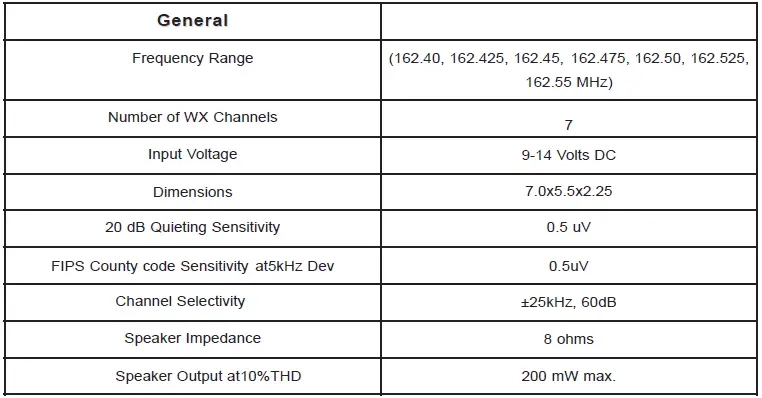
FCC Compliance Information
MIDLAND (NOAA) Weather Radio Model WR-300, “S.A.M.E. Digital Weather/Hazard Alert Radio”. This device complies with part 15 of the FCC Rules. Operation is subject to the fol-lowing two conditions: (1) This device may not cause harmful interference; (2) This device must accept any interference received including interference that may cause undesired oper-ation.
One Year Limited Warranty
MIDLAND Radio Corporation will repair or replace, at its option without charge, your WR-300 weather radio which fails due to a defect in material or workmanship within one year following the initial consumer purchase.
This warranty does not include any antennas, which may be a part of or included with the warranted product, or the cost of labor for removal or re-installation of the product in a vehicle or other mounting.
Performance of any obligation under this warranty may be obtained by returning the warrant-ed product, freight prepaid, along with a copy of the original sales receipt to Midland Radio Corporation at the address provided below.
This warranty gives you specific legal rights, and you may also have other rights, which vary, from state to state.
Note: The above warranty applies only to merchandise purchased in the United States of America or any of the territories or possessions thereof, or from a U.S. Military exchange. For warranty coverage on merchandise purchased elsewhere, ask your dealer.
Midland Radio Corporation Warranty Service Department
5900 Parretta Drive
Kansas City, Missouri 64120
Phone: (816) 241-8500
Fax: (816) 241-5713
E-mail: [email protected] Website:www.midlandradio.com
Service
If your MIDLAND Weather Radio fails to operate properly, check the “Troubleshooting” section in this manual before returning it for service. If necessary, return as follows:
- Pack the unit in its original box and packing. Then pack the original box in a suitable shipping carton. Caution: Improper packing may result in damage
during shipment. - Include the following:
- full description of any problems
- money order for $7.50 to cover shipping and handling (this may not be required in some states)
- daytime telephone number, name & address
- For warranty service include a photocopy of the bill of sale from an authorized dealer or other proof of purchase showing the date of sale.
- You do not need to return accessory items (AC/DC Adapter, batteries, Owners Guide) unless they might be directly related to the problem.
- A flat rate of $45.00 will apply to repairs not covered by warranty or units that are over one year old. Send only the cashier’s check, money order or Master Card or Visa card number.
Come see Our Other Midland Products at wwwCome see Our Other Midland Products at www.midlandradio.com.
FREQUENTLY ASKED QUESTIONS
Does it use batteries for backup
It has the ability to run off of batteries or the included A/C adapter. Without the A/C adapter the batteries will last about a month in the monitoring mode before becoming exhausted. It also had the ability to tune in regular radio stations in addition to the weather channels, which makes it useful in time of emergency when the power goes out (running on batteries).
Can the volume of the alarm be changed? Wall mountable?
The unit is ABSOLUTELY wall mountable. Two channels in the back to hang on mounted screws.
Do they have one where you can turn off specific warnings? I don’t need to be warned of a thunderstorm, just tornadoes.
Elvis42 is right. A Severe Thunderstorm Warning in my book is, to me, automatically a Tornado Watch. To all the idiots who gave Elvis42 thumbs down, look at the Plainfield, Illinois tornado in 1990.
Does it have an external antenna jack?
There is an RCA jack on the back for an external antenna. To use a BNC type of antenna you would need a BNC to RCA male adapter
I don’t need another digital or an alarm clock. Just need a Wx radio only. Can the clock display be disabled?
While there is not way to fully disable the clock, it is a smaller portion in the upper right corner of the display. It is also an option to turn the alarm clock off and not set for alerts.
When seting to multiple counties can you disable certain ones?Like if I travel somewhere for a weekend and then travel back home can I shut that county off
Re-enter the county code choices from the configuration menu and set the counties that you want. They are enabled by being added to the list and disabled by removing them.
Does this have dual alarms?
Yes. It is dual alarm. Can easily set two wake-up alarms
Is there a volume control for the alerts with this model?
Hello, Yes, to set the alert volume, press the “MENU” button. Then Press the “UP” arrow until “SIREN LEVEL” is displayed. Press the “SELECT” button and “LEVEL HIGH” or “LEVEL LO” will start blinking. Then press the “UP” arrow to choose “LEVEL HI” or “LEVEL LO” volume. Press the “SELECT” button to save your setting. There is also a volume control wheel on the side of the unit.
Other than reporting alerts, can the screen also show current conditions? (non-emergency, just everyday weather reports which noaa also provides)?
Negative again Mojo74, all of these radios are weather alert radios that alert you when the NWS sends out notifications.
How long will it last on batteries alone?
We haven’t tried this because we have ours plugged in while there are batteries in it. The batteries are in it just in case the power goes out. So it is a wonderful weather radio because it is easy to program and the display is easy to read. I hope this helps.


