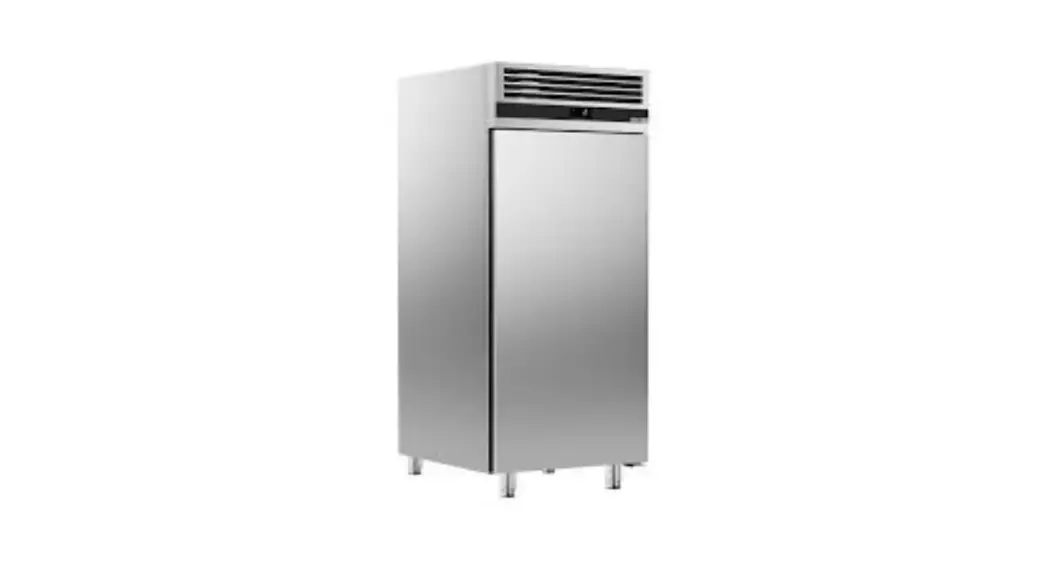
![]() Gastro GE500M Dishwasher 3.55 kW
Gastro GE500M Dishwasher 3.55 kW
User Manual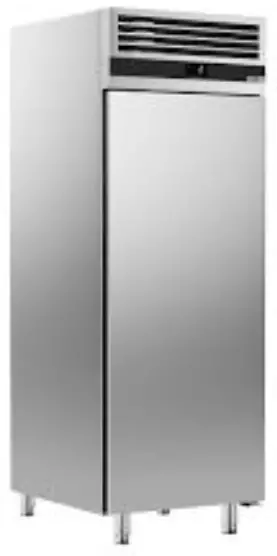
GENERAL INFORMATION
Before installing the appliance, read operation and maintenance instructions carefully.Wrong installation and part changing may damage the product or may cause injury on people.These are not in our company’s responsibility to damage the appliance intentionally,negligence,detriments because of disobeying instructions and regulations,wrong connections.Unauthorized intervention to appliance invalidates the warranty.
- This instruction manual should be kept in a safe place for future reference.
- Installation should be made in accordance with ordinances and security rules of that country by a qualified service personnel.
- This appliance has to be used by trained person.
- Please turn off the appliance immediately in the event of malfunction or failure.The appliance should be repaired only by authorized service personnel.Please demand original spare part.
A1 PRODUCT DESCRIPTION
*The Professional Undercounter Type Dishwasher ,that provides high efficiency has been designed to be used in industrial kitchens.
| Product Code | Dimensions (mm) | Weight (kg) | Packaging Dimensions (mm) |
| EMP.500 | 590x700x820 | 67 | 725x650x970 |
A2 TECHNICAL INFORMATION
| Product Code | EMP.500 |
| Capacity (Plate/ hour) | 500 |
| Water Consumption(Lt/Piece.) | 2,5 |
| Total Power (KW) | 3,6 |
| Motor Power (KW) | 0,55 |
| Operating Voltage (V) | 220 |
| Water Pressure ( bar ) | 4 |
| Washing Tank Power (KW) | 2,5 |
| Rinsing Tank Power (KW) | 3 |
| Cable (mm²) | 3×2,5 |
| Fuse (A) | 25 |
| Max.Plate Diameter (Ø) | 320 |
| Program Number (ºC) | 90 – 120 – 180 |
A3 TRANSPORTATION
*This appliance can not be moved by hand from area to area.It must be moved on pallet with forklift truck.
A4 UNPACKING
*Please unpack the package according to the security codes and ordinances of current country and get rid from the pack.Parts which contacts with food are produced by stainless steel.All plastic parts are marked by material’s symbol.
*Please check that all the parts of appliance had come completely and if they are damaged or not during the shippin.
INSTALLATION
*Please place the product to straight and sturdy ground,please take necessary steps against possibility of overturn.
*Technician who will serve for installation and service for the appliance must be professional on this subject and must have installation and service licenses by the company.
*Connection to Electric Power Supply must be done by authorized person.
*Please be sure that the voltage connected to appliance must be equal with the voltage which is on appliance’s label.![]() This appliance must be connected to an earthed outlet in accordance with safety rules and standards.
This appliance must be connected to an earthed outlet in accordance with safety rules and standards.
*Appliance’s earthing must be connected to earthing line on panel which is nearest to electric installation.
*Connection to the main fuse and leak current fuse must be done in accordance with the current regulations.
SAFETY INSTRUCTIONS
![]() *Do not use the appliance in insufficient lighted place.
*Do not use the appliance in insufficient lighted place.![]() *Do not touch the moving attachments while the appliance operates.
*Do not touch the moving attachments while the appliance operates.![]() *Do not install the appliance in the presence of flammable or explosive materials.
*Do not install the appliance in the presence of flammable or explosive materials.![]() *Do not operate the appliance when the machine is empty.
*Do not operate the appliance when the machine is empty.![]() *Do not load so less or more than appliance’s capacity.
*Do not load so less or more than appliance’s capacity.![]() *Do not attempt to use the appliance without suitable protective equipments.
*Do not attempt to use the appliance without suitable protective equipments.![]() *Because of any reason if there is a fire or flame flare where the appliance is used,turn off all gas valves and electric contactor switch quickly and use fire extinguisher. Never use water to extinguish the fire.
*Because of any reason if there is a fire or flame flare where the appliance is used,turn off all gas valves and electric contactor switch quickly and use fire extinguisher. Never use water to extinguish the fire.![]() *All the damages because of not having earthing connection will not be on warranty.
*All the damages because of not having earthing connection will not be on warranty.![]() *Do not wash the decorated dishes.Prevent silver wares to contact with the other metals.
*Do not wash the decorated dishes.Prevent silver wares to contact with the other metals.
OPERATION
*Control Panel;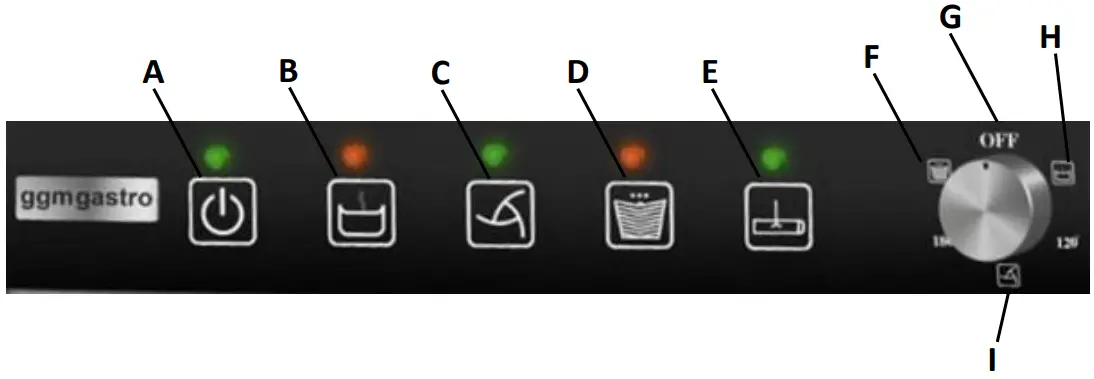 A : Appliance ON lamp
B : Water heated lamp
C : Washing lamp
D : Water getting /rinsing
E : Evacuation lamp
F : Evacuation position
G : Appliance OFF position
H : Water inlet
I : Washing program
*Operating;
- Change the water that is in water tank 3 times in a day.
- Before putting the dishes in to the appliance,make prewash with cold or warm water without using any detergent.
- Turn on the water source valve and plug in the appliance.
- In order to take off any residue that remain in storage or pipes,operate the appliance when it is empty.
- When the appliance is at OFF position,get ‘’water inlet’’ by switching to right.If ‘’water heated lamp’’ signals ,it indicates that the power is given to the dishwasher,water is
given and heated. - Open the appliance’s lid and put enough detergent into the storage.(If detergent pump is not connected ).
- Place the dirty dishes on baskets.
- Close the lid and choose the suitable washing program.Connected indicator lamp signals and washing starts.
- Washing process; for hot water and washing with detergent (minimum 55°C) ,for rinsing with hot water and polisher (minimum 75°C).
- After washing process,the appliance will start the automatic rinsing program.
- At the end of program,open the lid and take off washed basket.Place another basket to be washed.The machine will do washing and rinsing process at chosen program.
CLEANING & MAINTENANCE
CLEANING AND MAINTENANCE AFTER EVERY USE
- Always turn off the appliance and disconnect from the power supply before cleaning.
- Evacuate the water by taking off the stopple and switching to evacuation position after every use.
- Clean all surfaces of the appliance with hot soapy water after every use.Rinse and dry with a wet cloth.
- Clean the control panel with soft moisty cloth,if necessary use ineffective detergent.
- Do not use abrasive cleaning chemicals as these can leave harmful residues.
- Do not clean the appliance by spraying water directly,otherwise electric motor may get damaged.
PERIODIC CLEANING AND MAINTENANCE
- Maintenance should be done by qualified person.
- Clean the limes of the burner,inner surface of the washing tank and water pipes once or twice in a year.
- Clean the limes with using rinsing and washing nozzles once in a month by using vinegar or lime remover.
- Clean the filters in the appliance once in a week.After cleaning be sure that thumbscrew is compressed.
- Clean the appliance’s fountains once in 15 days by detaching it.
- Clean the appliance’s evacuation stopple and evacuation hoses once in 15 days.
TROUBLESHOOTING
| THE APPLIANCE DOESN’T WASH WELL | 1. Clean the absorbing filter if it is dirty. 2. Check the washing nozzles if they are accumulated with residues or not. 3. Check the amount of detergent. 4. If chosen washing program is too less,repeat the program. 5. Check if the plates are placed to the baskets correctly. |
| CUPS AND PLATES ARE NOT DRIED WELL | 1. If there is polisher or not,if not add some. 2. Check the amount of polisher. |
| MIST OVER ON CUPS | 1. After washing process ,take off the cups from baskets. |
| CORROSİON ON CUPS | 1. Only use products that are not foaming for the professional dishwashers. |
| MUCH FOAM AT STORAGE | 1. Check the amount of detergent . 2. If foaming detergent is used,pour it and rinse the storage till the foams are lost. |
| WASHING OR RINSING HANDLES ARE TURNING SLOWLY | 1. Take off washing handles and clean them. 2. Clean the washing pump absorbing filter. |
| VISCIDITY AND SPOTS ON CUPS | 1. Reduce the amount of polisher. |
- If dishwashing is not done at suitable quality
- If any function of security doesn’t work
- Do not use the appliance.
*If these problems are still going on,contact with our authorized services.
SPARE PART LIST-EXPLODING DRAWING
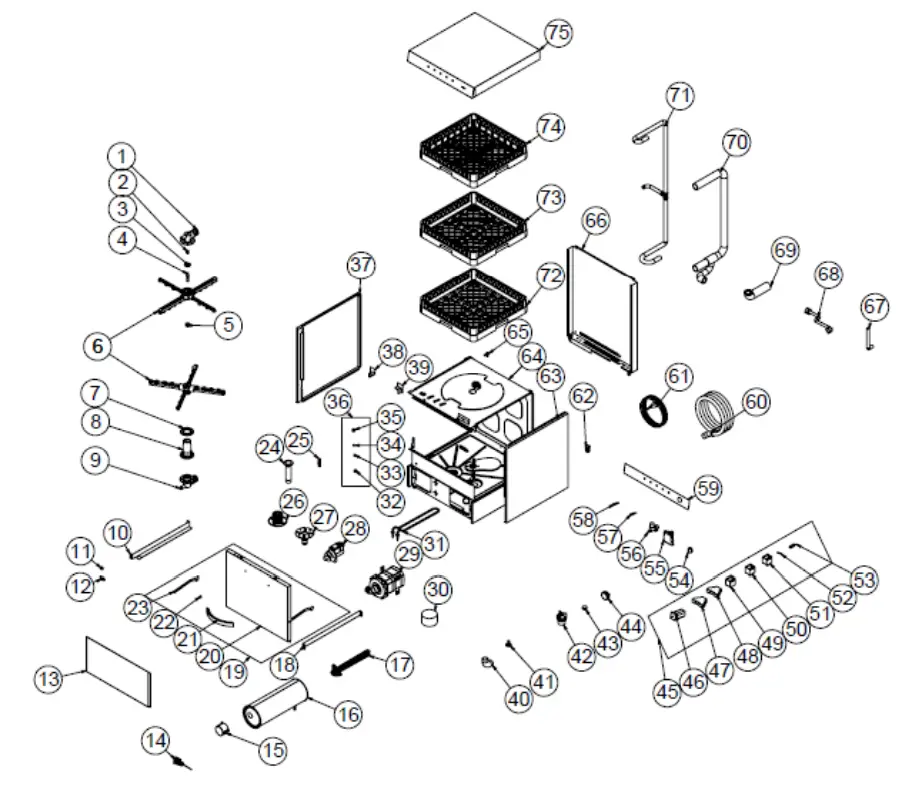
| PRODUCT CODE : EMP.500 | ||
| NO | PRODUCT NAME | P. CODE |
| 1 | HOSE INLET UPPER ELBOW (BUSHING) | M.ENJ-ERS-PLS-BYM-097 |
| 2 | FOUNTAIN BELLY SIGN | YTL-ERS.BYM-KS-0014 |
| 3 | PRESSURE PLASTIC | M.ENJ-ERS-PLS-BYM-059 |
| 4 | FOUNTAIN CORE SHAFT | YTL-ERS.BYM-KS-0001 |
| 5 | FOUNTAIN CORE SCREW | M.ENJ-ERS-PLS-BYM-070 |
| 6 | FOUNTAIN | M.ENJ-ERS-PLS-BYM-053 |
| 7 | BOTTOM TOP FOUNTAIN CORE GASKET (WITH ORING) | M.ENJ-ERS-LST-019 |
| 8 | LOWER FOUNTAIN CORE | M.ENJ-ERS-PLS-BYM-020 |
| 9 | HOSE INLET LOWER ELBOW (WITHOUT BUSHING) | M.ENJ-ERS-PLS-BYM-096 |
| 10 | RIGHT SLIP SHEET | YSC-ERS.BYM-LZ-0005 |
| 11 | DIAMETER 15*5 – MAGNET | M.MIK-ERS-001 |
| 12 | MICNATIS BED 15X5 | M.ENJ-ERS-PLS-BYM-001 |
| 13 | BOTTOM COVER SHEET | YSC-ERS.BYM-LZ-0452 |
| 14 | TERMOSTAT-0-90C (EGO-5517012040) | M.ELK-MEK-TRM1-008 |
| 15 | RESISTOR COVER | M.ENJ-ERS-PLS-BYM-025 |
| 16 | BOILER TANK | M.MEK-TES-BYM-BYL-001 |
| 17 | F2120-1P 121348 UPI-BOILER RESISTANCE 220V-5000W | M.ELK-RZS-BRU-BYM-030 |
| 18 | LEFT SLEEVE SHEET | YSC-ERS.BYM-LZ-0004 |
| 19 | COVER ASSEMBLY (SPARE PARTS) | ARA-ERS.BYM-0012 |
| 20 | COVER EXTERIOR SHEET | YSC-ERS.BYM-PN-0344 |
| 21 | LID HANDLE (21 CM) | M.AKS-KLP-INX-003 |
| 22 | COVER HANDLE TURNING PART | YTL-ERS.BYM-KS-0119 |
| 23 | TOP COVER HANDLE | YSC-ERS.BYM-LZ-0455 |
| 24 | SHORT WATER DRAIN WEDGE | M.ENJ-ERS-PLS-BYM-016 |
| 25 | COVER ARM WEDGE PLASTIC | M.ENJ-ERS-PLS-BYM-017 |
| 26 | FILTER COVER | M.ENJ-ERS-PLS-BYM-086 |
| 27 | WATER DRAIN WEDGE BEARING | M.ENJ-ERS-PLS-BYM-112 |
| 28 | DRAIN PUMP CL2100 | M.ELK-MTR-PMP-002 |
| 29 | DISHWASHING MOTOR | M.ELK-MTR-PMP-001 |
| 30 | STRAINER | M.ENJ-ERS-PLS-BYM-041 |
| 31 | 120541 UPI-TANK RESISTANCE 230V-2500W | M.ELK-RZS-BRU-BYM-028 |
| 32 | SPRING SEAT SET | YTL-ERS.BYM-KS-0073 |
| 33 | COVER SPRING | M.YAY-ERS-035 |
| 34 | 9,525 MM 316K STAINLESS STEEL GRAIN BALL (INOX) | M.MUH-021 |
| 35 | BODY SET | YTL-ERS.BYM-KS-0072 |
| 36 | ASSEMBLY (SPARE PARTS) | ARA-ERS.BYM-0013 |
| 37 | RIGHT SIDE SHEET | YSC-ERS.BYM -P N-0347 |
| 38 | CORNER PLASTIC RIGHT | M.ENJ-ERS-PLS-BYM-061 |
| 39 | CORNER PLASTIC LEFT | M.ENJ-ERS-PLS-BYM-062 |
| 40 | WASHING PUMP HOSE | M.MEK-TES-HRT-014 |
| 41 | FOOT TACROSIS | M.AKS-AYK-INX-004 |
| 42 | ROUND STRAINER BED | M.ENJ-ERS-PLS-BYM-018 |
| 43 | STRAINER NUT | M.ENJ-ERS-PLS-BYM-113 |
| 44 | P ROSESTAT SHA MAN DIRA | M.ELK-MUH-001 |
| 45 | READY ELECTRICAL PANEL GROUP | M.ELK-PNO-BYM-001 |
| 46 | SWITCH | M.ELK-SLT-PKO-011 |
| 47 | Z3-360S TIME ROLLER | M.ELK-KNT-ROL-007 |
| 48 | DWT-3E TIME ROLLER | M.ELK-KNT-ROL-020 |
| 49 | SCHNEIDER LC1K0901M7 MINI CONTACTOR | M. ELK -K NT-KNT-020 |
| 50 | SCHNEIDER LC1K0910M7 MINI CONTACTOR | M.ELK-KNT-KNT-021 |
| 51 | SCHNEIDER LC1K1210M7 MINI CONTACTOR | M.ELK-KNT-KNT-022 |
| 52 | GLASS INSURANCE 5A | M.ELK-SGR-011 |
| 53 | MAGNETIC SENSOR-HORIZONTAL | M.ELK-SWC-KTG-001 |
| 54 | CHARTEL BUTTON | M.AKS-DGM-MUH-001 |
| 55 | AIR TRAP | M.ENJ-ERS-PLS-BYM-019 |
| 56 | VENTILATION-SINGLE INLET (14 LT) | M.ELK-SLN-PLS-001 |
| 57 | WARNING LIGHT WITH PLUG-IN SOCKET-GREEN | M.ELK-LMB-SNY-001 |
| 58 | WARNING LIGHT WITH PLUG-IN SOCKET – YELLOW | M.ELK-LMB-SNY-003 |
| 59 | PANEL LABEL | M.AKS-ETK-LKS-ERS-BYM-014 |
| 60 | 244 CM ELBOW-FREE WASTE WATER HOSE | M.MEK-TES-HRT-033 |
| 61 | 3*2.50 MM TTR CABLE GRAY-BLACK | HEL-KB-TT-3*2,5-SYH |
| 62 | PG-16 GRAY CABLE GLAND WITH NUT (CENTER) | M.ELK-RKR-PLS-004 |
| 63 | LEFT SIDE SHEET | YSC-ERS.BYM -P N-0346 |
| 64 | CHASSIS | – |
| 65 | DETERGENT INLET PLASTIC | M.PLS-ERS-036 |
| 66 | BACK COVER SHEET | YSC-ERS.BYM -P N-0010 |
| 67 | VENTIL BOILER HOSE | M.MEK -TES-H RT-006 |
| 68 | MAINS HOSE (150 CM) | M.MEK-TES-HRT-011 |
| 69 | BOILER PUMP HOSE | M.MEK-TES-H RT-002 |
| 70 | WASHING WATER INLET HOSE | M.MEK-TES-HRT-001 |
| 71 | SPRINKLER DISTRIBUTION HOSE | M.MEK-TES-H RT-003 |
| 72 | PLATE BASKET | EMP.TB.01 |
| 73 | SPOON AND FORK BASKET | EMP.KC.01 |
| 74 | GLASS BASKET | EMP.BB.01 |
| 75 | TOP COVER SHEET | YSC-ERS.BYM-LZ-0448 |
ELECTRIC CIRCUIT SCHEMA
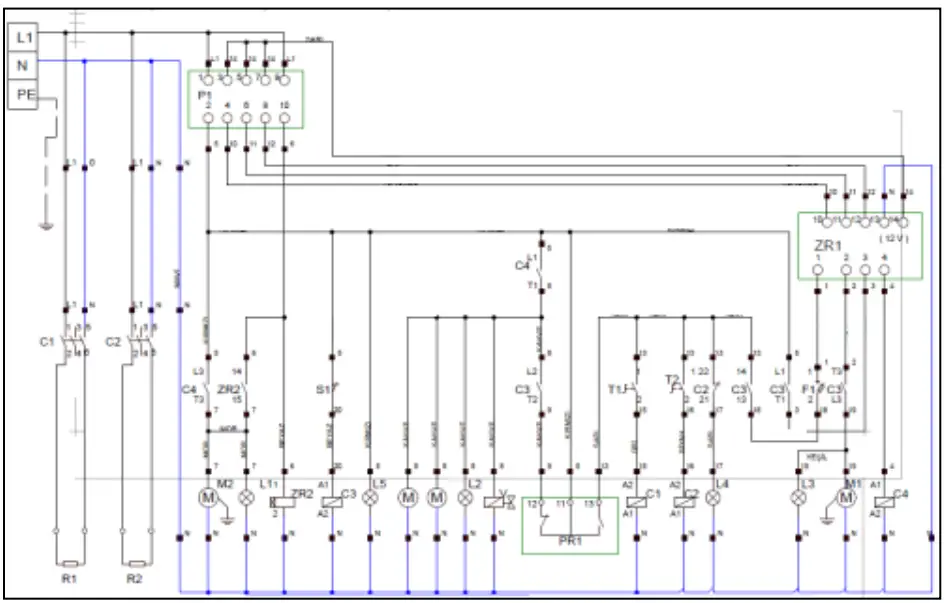 UNDERCOUNTER TYPE DISHWASHER
| Kasap Tip | Buzdolapları |
| P1 | 5 PROGRESSİVE COMMUTATOR |
| S1 | MAGNETİC DOOR SENSOR |
| C1 | BOİLER CONTACTOR 220V |
| C2 | WASHİNG CONTACTOR 220V |
| C3 | LİD CONTACTOR 220V |
| C4 | RİNSİNG CONTACTOR 220V |
| L1 | EVACUATİON LAMP |
| L2 | RİNSİNG LAMP |
| L3 | WASHİNG LAMP |
| L4 | WATER İS HEATED LAMP |
| L5 | START LAMP |
| T1 | BOİLER THERMOSTAT (30-90ºC) |
| T2 | WASHİNG THERMOSTAT (30-90ºC) |
| ZR1 | 5 CYCLE- CYCLE RELAY (İNTER RR-5TG) |
| ZR2 | 0-240 SEC. CYCLE RELAY |
| PR1 | PROSSESTAT |
| M | DETERGENT PUMPS |
| M1 | WASHİNG MOTOR 0,55 KW 230V |
| M2 | EVACUATİON MOTOR 0,44 W 230V |
| R1 | BOİLER RESİSTANCE 3000W |
| R2 | WASHİNG RESİSTANCE 2500W |
| F1 | LEAKAGE CURRENT SAFETY FUSE |
| F2 | ZR1 FUSE 500MA |
| V | SOLENOİD VALVE 220V |
| TR1 | WASHİNG MOTOR SAFETY RELAY |
| TR2 | EVACUATION HOSE SAFETY THERMIC |
![]()


