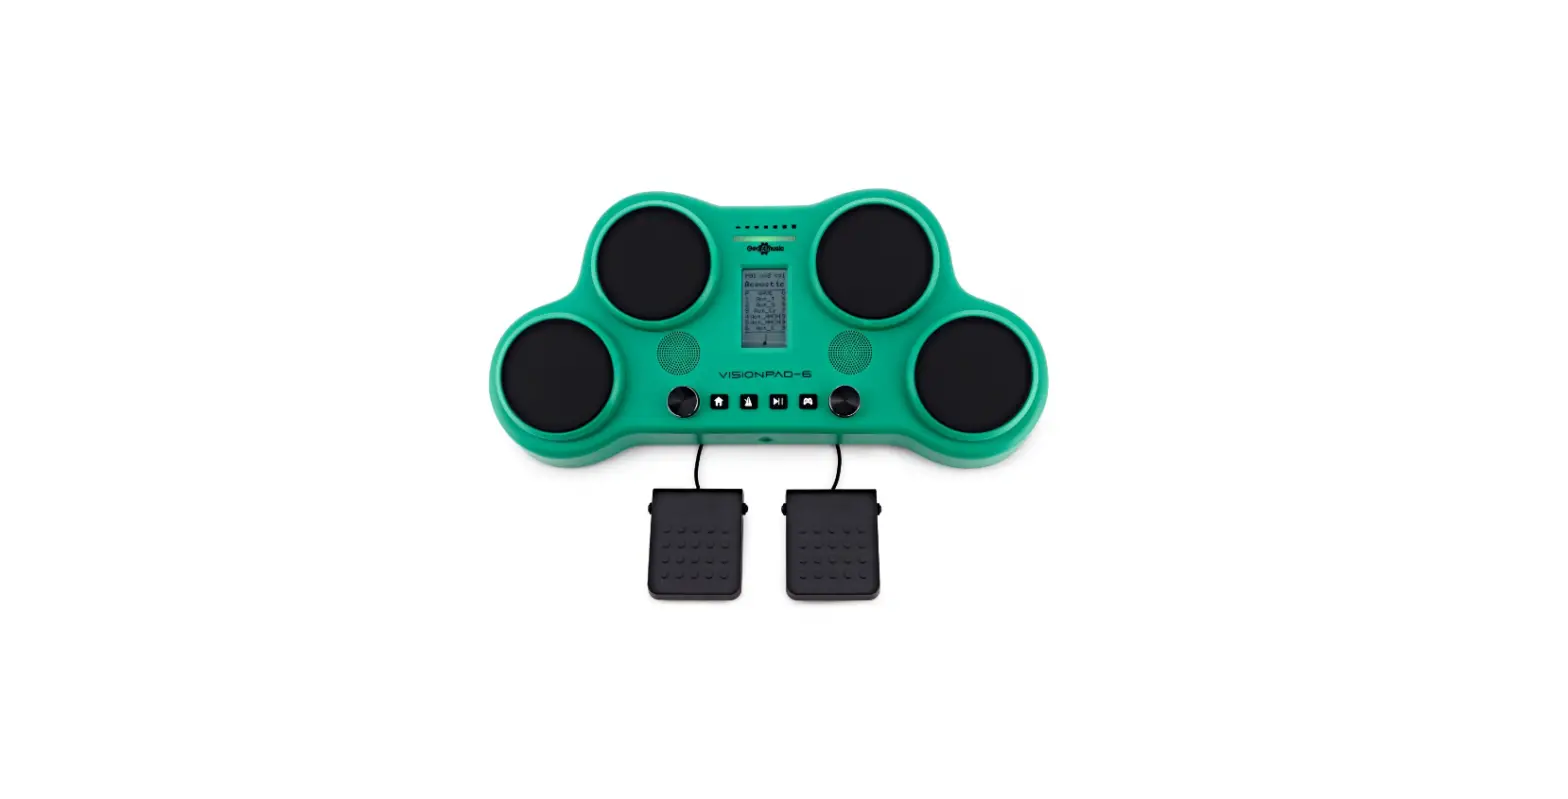
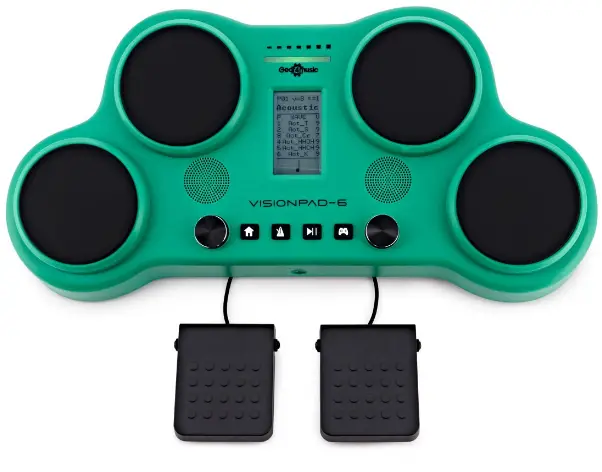
Gear4music VISIONPAD-6 Electronic Drum Pad
WARNING!
- Do not open cover. No user-serviceable parts inside. Refer servicing to qualified service personnel
- Do not place the product in a location near a heat source such as a radiator, or in an area subject to direct sunlight, excessive dust, mechanical vibration or shock
- The product must not be exposed to dripping or splashing and no objects filled with liquids, such as vases, shall be placed on the product No naked flame sources, such as lighted candles, should be placed on the product
- Allow adequate air circulation and avoid obstructing vents (if present) to prevent internal heat build-up. The ventillation must not be impeded by covering the appliance with items such as newspapers, table-cloths, curtains etc.
- The mains plug is used to disconnect the appliance from the mains supply. Ensure that the mains outlet is easily-accessible and remove the plug from the mains outlet if you notice any abnormality with the appliance.
INTRODUCTION
Thank you for purchasing the VISIONPAD-6 Electronic Drum Pad by Gear4music. To get the most out of your product, please read this manual carefully.
BOX CONTENTS
- 1 x VISIONPAD-6 Electronic Drum Pad by Gear4music
- 1 x Pair of drum sticks
- 1 x Power supply unit (PSU)
- 1 x User manual
- 2 x Pedals
FEATURES
- Tabletop electronic drumkit with four velocity sensitive pads provide realistic drumming experience.
- Includes kick and hi-hat pedals.
- Achieve great drum tones with 30 fully customisable kits and 163 sounds.
- Master the basics of rhythm and track your progress with 25 integrated games.
SPECIFICATIONS
- Number of Pads. . . . . . . . . . . . . . 4
- Numbers of External
- triggers. . . . . . . . . . . . . . . . . . . . . . 2
- Maximum Polyphony. . . . . . . . . . . . . . . . . . . 16
- Number of Kits. . . . . . . . . . . . . . . 30 (presets)
- Number of Sounds. . . . . . . . . . . . 163
- Number of Games. . . . . . . . . . . . 25
- Display. . . . . . . . . . . . . . . . . . . . . . LCD
- Stereo Output. . . . . . . . . . . . . . . . 3.5mm headphone output with volume control
- DC Input . . . . . . . . . . . . . . . . . . . . 9V/2A
- Built-In Speaker . . . . . . . . . . . . . . Yes
- Power. . . . . . . . . . . . . . . . . . . . . . . Adapter (included) or 6 x AA batteries (not included)
FUNCTIONS
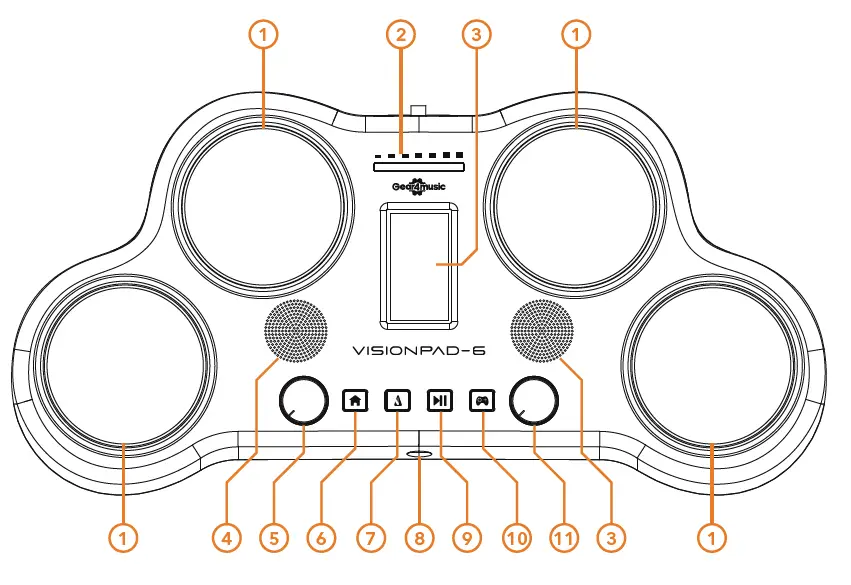
TOP PANEL
- PADS
Hit these velocity sensitive pads to trigger drum sounds. - LED
This LED indicator displays the velocity of each hit. - SCREEN
This screen provides all relevant information and settings. - SPEAKERS
If no headphones are connected then sound will be projected through the 1.5” speakers. - SELECT
Use this control wheel to adjust parameter values. - HOME
Short press this button to return to the home page. Long press to enter the drum kit settings. - METRONOME
Short press this button to activate the metronome. Long press to adjust the setting of the metronome. - HEADPHONE INPUT
Connect your 3.5mm headphones here. Please note, ensure that the volume is low before hitting the pads. Once your headphones are on hit the pads and gradually increase the volume until comfortable. - PLAY/PAUSE
Press this button to start/stop the game. - GAME
Press this button to activate game mode. - VOLUME
Use this control wheel to adjust the volume and some settings of the VISIONPAD-6.
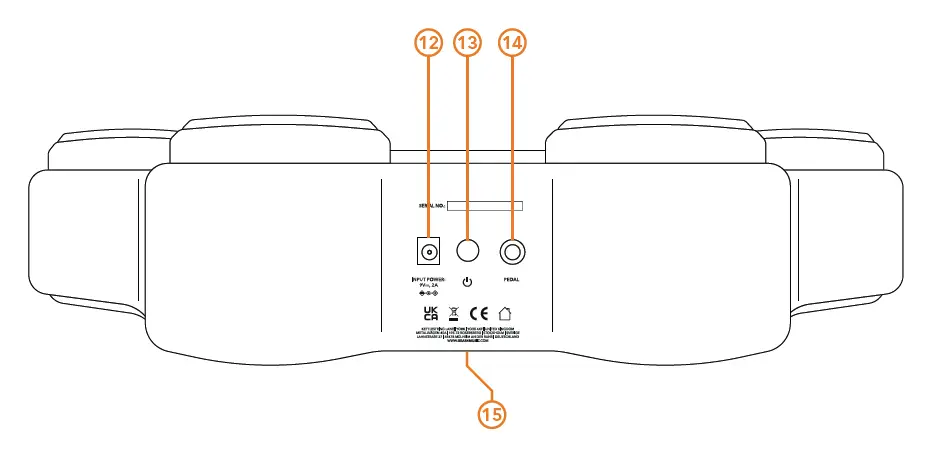
- DC INPUT
Connect the VISIONPAD-6 to a power source here. - POWER
Press this button to turn the VISIONPAD-6 on/off. - PEDAL
Connect the hi-hat and kick pedals here using the 6.3mm Jack. - BATTERY COMPARTMENT
Insert 6 x AA alkaline batteries (not included) here.
FUNCTIONS
LCD SCREEN
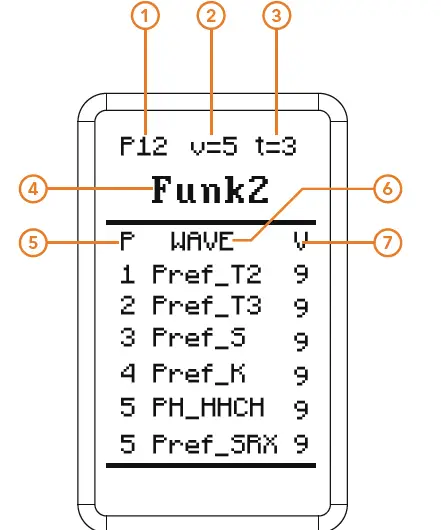
- P
This indicates the number of the current drum kit you’re on. - V
This indicates the global volume of the unit. - T
This indicates the current tempo rhythm/style. - FUNK2
This indicates the title of the current drum kit. - P
This indicates the pad which each sound is assigned to. - WAVE
This indicates the title of the sound assigned to each pad. - V
This indicates the volume of each individual pad.
METRONOME MODE
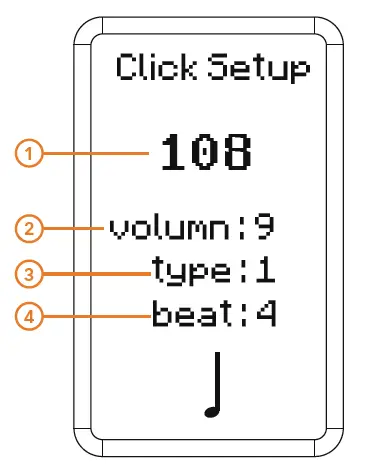
- This displays the current tempo. This can be adjusted between 20-240 BPM.
- This displays the current volume of the metronome. This can be adjusted within a value range of 0-9.
- This displays the current type of tempo rhythm. There are 7 types in total.
- This displays the beat of the metronome.This can be adjusted within a value range of 1-16.
GAME MODE
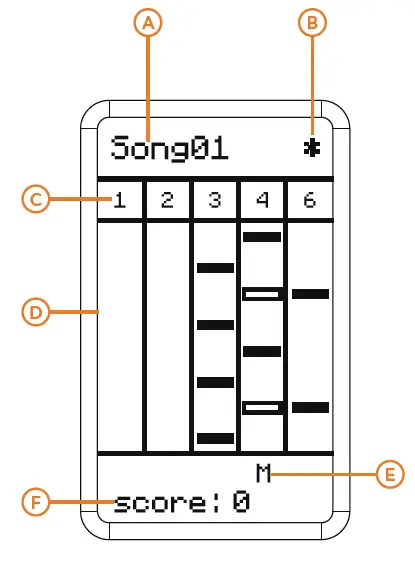
- This displays the current game song.
- This displays the difficulty of the song. The higher the *, the greater the difficulty.
- These numbers represent the pad that should be hit. Note that column 6 represents the kick pad. When the column 4 blocks have a hollow middle, this indicates represents the hi hat pedal should be pressed at the same time as pad 4.
- Notes will make their way down the lane. When they reach the bottom hit the corresponding pad.
- This displays the accuracy of the hit.
- Miss
- Good
- Perfect
- This displays the current score.
OPERATION
DRUM KIT OPERATION
- Short press HOME to switch to the home screen.
- Rotate the SELECT wheel to alternate between the drum kits available.
- Rotate the VOLUME wheel to adjust the volume of the current drum kit.
DRUM KIT SETTING
- Long press HOME, PAD1 will start flashing, indicating that you are now in “drum kit set mode”.
- Hit Pads 1-4 or tap the pedals 5-6 to access the sound you wish to modify. You’ll notice that the cursor will switch to the corresponding pad or pedal.
- Rotate the SELECT wheel to adjust between the parameters of the drum kit.
- Rotate the VOLUME wheel to modify the value of the corresponding setting parameter.
- When complete short press home to exit the drum set mode and instantly save the current set-up.
METRONOME
- Press METRONOME to start the metronome.
- Press METRONOME again to stop
- Hold down METRONOME to enter the settings page and make changes.
GAME
The VISIONPAD-6 comes complete with 25 songs that you can use to improve your technique and feel. Before the start of each song you’ll be provided with a bar count in, giving you plenty of time to prepare before the game begins. On the LCD screen you’ll see various blocks making their way downwards. When they reach the bottom of the screen you hit the corresponding pad to score points.
- Press GAME to enter game mode.
- Rotate the SELECT wheel to alternate between the different songs.
- Press START/STOP to begin the game.
- Rotate the VOLUME wheel to adjust the background volume of the game.
- During the game, press START/STOP to pause the song.
- Adjust the tempo by pressing click and then rotate the VOLUME wheel to increase/decrease the BPM.
- When the game is over if you have charted then the player’s name will appear. If not then only the score will be displayed. If no activity is detected after three seconds then you’ll automatically return to the game’s home screen.
SLEEP
If the electronic drum pad detects no activity after 8 minutes it will automatically enter sleep mode. During this time, the screen will display a sleep icon and the light belt will flash green. In order to wake up the electronic drum pad hit any pad or press any button. If you no activity is detected after five minutes in sleep mode then the device will power down.
RESET
In order to reset the electronic drum pad, press METRONOME + GAME together, and then press PLAY/PAUSE. After this, the product will be restored back to its initial factory state.
SOUNDS
| NUMBER | SOUND NAME |
| 001 | Act_K |
| 002 | DFk_K |
| 003 | DWCW_K |
| 004 | ED8_K |
| 005 | ED9_K |
| 006 | Hip_K |
| 007 | Jazz_K |
| 008 | Lud_K |
| 009 | PR_K |
| 010 | Pref_K |
| 011 | SD_K |
| 012 | Tama_K |
| 013 | Trig_K |
| 014 | TSc_K |
| 015 | Vint_K |
| 016 | Act_S |
| 017 | Bas_SRX |
| 018 | DFk_S |
| 019 | DW_S |
| 020 | DW_SRX |
| 021 | DWC_S |
| 022 | ED8_S |
| 023 | ED9_S |
| 024 | GHa_S |
| 025 | Jazz_S |
| 026 | PR_S |
| 027 | Pref_S |
| 028 | Pref_SRX |
| 029 | SD_S |
| 030 | Sslam_S |
| 031 | TSc_S |
| 032 | Vint_S |
| 033 | Act_T |
| 034 | Noise_T |
| 035 | PR_T |
| 036 | Pref_T2 |
| 037 | Pref_T3 |
| 038 | SD_T |
| 039 | Act_HHCH |
| 040 | Act_HHOH |
| 041 | Clave_HC |
| 042 | Clave_HF |
| 043 | DFk_HHCH |
| 044 | DFk_HHOH |
| 045 | ED8_HHCH |
| 046 | ED8_HHOH |
| 047 | ED9_HHCH |
| 048 | ED9_HHF |
| 049 | Hip_HHCH |
| 050 | Hip_HHFR |
| 051 | Jazz_HHF |
| 052 | Jazz_HHP |
| 053 | Pay_HHCH |
| 054 | Pay_HHF |
| 055 | PDC_HHCH |
| 056 | PDC_HHF |
| 057 | PH_HHCH |
| 058 | PH_HHF |
| 059 | SAS_HHCH |
| 060 | SAS_HHF |
| 061 | SH_HHCH |
| 062 | SH_HHF |
| 063 | ZNB_HHCH |
| 064 | ZNB_HHOH |
| 065 | Act_Cr |
| 066 | Cele_Cr |
| 067 | Jazz_Cr |
| 068 | PSDE_Cr |
| 069 | SHS_Cr |
| 070 | SHT_Cr |
| 071 | ZKD_Cr |
| 072 | Act_Rd |
| 073 | MBD_Rd |
| 074 | PR_RdB |
| 075 | SHG_RdB |
| 076 | 78Bongo |
| 077 | Alarm |
| 078 | Alarm1 |
| 079 | Amiga2 |
| 080 | Amiga3 |
| 081 | Amiga5 |
| 082 | Bells |
| 083 | BellTree |
| 084 | Bell |
| 085 | Bicycle |
| 086 | Blip4 |
| 087 | Burp |
| 088 | Bychan |
| 089 | CabasaM |
| 090 | Cajon |
| 091 | CajonBas |
| 092 | CajonSlp |
| 093 | CarSBig |
| 094 | CarSLo |
| 095 | CarSMid |
| 096 | Cat1 |
| 097 | Cat2 |
| 098 | Cat3 |
| 099 | Cat4 |
| 100 | FX 4 (Atmosphere) |
| NUMBER | SOUND NAME |
| 101 | Caxixi |
| 102 | Chime |
| 103 | Clap |
| 104 | Coin5 |
| 105 | Coke |
| 106 | Cork |
| 107 | Cowbell3 |
| 108 | Cowbell4 |
| 109 | CR78Tamb |
| 110 | Cricket |
| 111 | Crow1 |
| 112 | Crow2 |
| 113 | Crrect |
| 114 | Cutp |
| 115 | DjemBass |
| 116 | DjemTone |
| 117 | Dog |
| 118 | Door |
| 119 | DoorB |
| 120 | Down |
| 121 | Drink |
| 122 | Eat |
| 123 | ED8_Cowb |
| 124 | Fallin1 |
| 125 | Fallin2 |
| 126 | Gas |
| 127 | GuiroL |
| 128 | Jump |
| 129 | Jump1 |
| 130 | Jump2 |
| 131 | Jump3 |
| 132 | Lightn1 |
| 133 | Lightn2 |
| 134 | Marimba |
| 135 | MNoise |
| 136 | Motor1 |
| 137 | Nail |
| 138 | Nosie |
| 139 | Owl |
| 140 | Phone |
| 141 | Plate |
| 142 | Poyo |
| 143 | Rain |
| 144 | Rain1 |
| 145 | Select |
| 146 | Snaps |
| 147 | Snoring |
| 148 | Soda |
| 149 | Starwar |
| 150 | Steps |
| 151 | TablaTin |
| 152 | Tamb1 |
| 153 | Tamb3 |
| 154 | Tea |
| 155 | Thunder |
| 156 | TimbaleH |
| 157 | TimbaleP |
| 158 | TimbaleR |
| 159 | TinyGong |
| 160 | TreeChim |
| 161 | VibraSlp |
| 162 | Whistle |
| 163 | Wind |
| 164 | Zipper |
DRUM GROUP
| NUMBER | DRUM GROUP |
| 001 | Acoustic |
| 002 | Bossa |
| 003 | Child |
| 004 | ChaCha |
| 005 | Little |
| 006 | Classic1 |
| 007 | Classic2 |
| 008 | Dance |
| 009 | Disco |
| 010 | Electric |
| 011 | Funk1 |
| 012 | Funk2 |
| 013 | Fusion |
| 014 | Jazz |
| 015 | Classic3 |
| 016 | Pop1 |
| 017 | Pop2 |
| 018 | Comic |
| 019 | Handgod |
| 020 | Latin |
| 021 | Cat |
| 022 | Game |
| 023 | Fx1 |
| 024 | Animal |
| 025 | Natural |
| 026 | Fx2 |
| 027 | Fx3 |
| 028 | Fx4 |
| 029 | Fx5 |
| 030 | Fx6 |
| 031 | Guitar Harmonics |


