eurolite LED Mega Strobe 768 Bar
INTRODUCTION
Thank you for having chosen one of our products. If you follow the instructions given in this manual, we are sure that you will enjoy this device for a long period of time.
Every person involved with the installation, operation and maintenance of this device has to
- be qualified
- follow the instructions of this manual
- consider this manual to be part of the total product
- keep this manual for the entire service life of the product
- pass this manual on to every further owner or user of the product
- download the latest version of the user manual from the Internet
Product features
LED effect light bar with RGB color mixing and DMX
- 384 high-power 1 W SMD 3030 LEDs, CW
- 384 high-power 0,2W SMD 5050 LED, RGB
- Auto, master/slave and DMX mode
- 37 built-in automatic programs
- Stepless RGB color blend and color change, dimmer and strobe effect with variable speed
- Various dimmer curves adjustable
- Flash rate 1 – 30 Hz
- Electrically switchable frost filter
- Control panel with LCD for easy configuration
- DMX and power terminals intelligently designed for easy wiring
- Swivel mounting bracket
Intended use
- This device is an LED strobe bar for creating decorative lighting effects. This device is designed for professional use in the field of event technology, e.g. on stage. It is not suitable for household lighting.
- Only use the device according to the instructions given herein. Damages due to failure to follow these operating instructions will void the warranty! We do not assume any liability for any resulting damage.
- We do not assume any liability for material and personal damage caused by improper use or non-compliance with the safety instructions. In such cases, the warranty/guarantee will be null and void.
- Unauthorized rebuilds or modifications of the device are not permitted for reasons of safety and render the warranty invalid.
Danger due to electricity
- The device is suitable for indoor use only. Do not use it outdoors. Never expose it to rain or moisture. Do not store it in rooms exposed to moisture.
- To reduce the risk of electric shock, do not open any part of the device. There are no serviceable parts inside the device.
- Only connect the device to a properly installed mains outlet. The outlet must be protected by residual current breaker (RCD). The voltage and frequency must exactly be the same as stated on the device. If the mains cable is equipped with an earthing contact, then it must be connected to an outlet with a protective ground. Never defeat the protective ground of a mains cable. Failure to do so could result in damage to the device and possibly injure the user.
- The mains outlet must be easily accessible so that you can unplug the device quickly if need be.
- Never touch the mains plug with wet or damp hands. There is the risk of potentially fatal electric shock.
- The mains cable must not be bent or squeezed. Keep it away from hot surfaces or sharp edges.
- Never pull the mains cable to disconnect the mains plug from the mains outlet, always seize the plug.
- Unplug the device during lightning storms, when unused for long periods of time or before cleaning.
- Do not expose the device to any high temperatures, direct sunlight, dripping or splashing water, strong vibrations or heavy mechanical stress.
- Do not place any objects filled with liquids on the device.
- Do not place any open sources of fire, such as burning candles, on or directly next to the device.
- Make sure that objects cannot fall into the device, in particular metal parts.
- Only have repairs to the device or its mains cable carried out by qualified service personnel. Repairs are required when the device or the mains cable is visibly damaged, liquid has been spilled or objects have fallen into the device; when the device has been exposed to rain or moisture, has been dropped or malfunctions occur.
- Cleaning of the device is limited to the surface. Make sure that moisture does not come into contact with any areas of the terminal connections or mains voltage control parts. Only wipe off the product with a soft lint-free and moistened cloth. Never use solvents or aggressive detergents.
Danger to children and people with restricted abilities
- This product is not a toy. Keep it out of the reach of children and pets. Do not leave packaging material lying around carelessly. Never leave this device running unattended.
- This device may be used only by persons with sufficient physical, sensorial, and intellectual abilities and having corresponding knowledge and experience. Other persons may use this device only if they are supervised or instructed by a person who is responsible for their safety.
Warning – risk of burns and fire
- The admissible ambient temperature range (Ta) is -5 to +45°C. Do not operate the device outside of this temperature range.
- The housing temperature (Tc) can be up to 50°C during use. Avoid contact by persons and materials.
- Do not illuminate surfaces within 10 cm of the device. This value is indicated on the device by the symbol.
- Do not use the device near highly flammable materials. Always place the device at a location where sufficient air circulation is ensured
- Leave 50 cm of free space around the device. Never cover the air vents of the housing.
Warning – risk of injuries
- Do not look directly at the light source. Persons with light-sensitive epilepsy may suffer from epileptic seizures or fall unconscious.
- Make sure that the product is set up or installed safely and expertly and prevented from falling down. Comply with the standards and rules that apply in your country, in particular EN 60598-2-17.
- If you lack the qualification, do not attempt the installation yourself, but instead use a professional installer. Improper installation can result in bodily injury and or damage to property.
- The manufacturer cannot be made liable for damages caused by incorrect installations or insufficient safety precautions.
- For overhead use, always secure the device with a secondary safety attachment such as a safety bond or safety net.
- Make sure that the area below the installation place is blocked when rigging, derigging or servicing the device.
- For commercial use the country-specific accident prevention regulations of the government safety organization for electrical facilities must be complied with at all times.
Caution – material damage
- This device must not be connected to the mains voltage by means of a dimmer.
- Lighting effects are not designed for permanent operation. Consistent operation breaks will ensure that the device will serve you for a long time without defects.
- Never switch the device on and off at short intervals. This will considerably reduce the service life of the device.
- If the device has been exposed to drastic temperature fluctuation, do not switch it on immediately. The resulting condensation may destroy the device. Allow the device to reach room temperature before connecting it. Wait until the condensation has evaporated.
- Please use the original packaging to protect the device against vibration, dust and moisture during transportation or storage.
- If a serial number label is affixed to the device, do not remove the label as this would make the guarantee void.
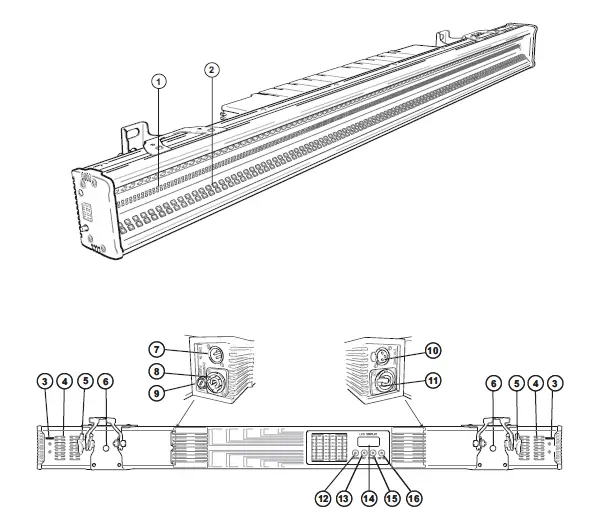
DESCRIPTION OF THE DEVICE
- LED 1W SMD 3030 CW
- LED 0,2W SMD 5050 RGB
- Safety eyelet
- Venting slots
- Fixation screw
- Mounting bracket
- DMX input
- Power input
- Fuse
- DMX output
- Power output
- MENU button
- UP button
- LCD
- DOWN button
- ENTER button

INSTALLATION
- The rigging structure must support at least 10 times the weight of all fixtures to be installed on it.
- Block access below the work area and work from a stable platform when installing the device.
- Use rigging hardware that is compatible with the structure and capable of bearing the weight of the device. Please refer to the “Accessories” section for a list of suitable rigging hardware.
- Secure the device with a safety bond or other secondary attachment. This secondary safety attachment must be sufficiently dimensioned in accordance with the latest industrial safety regulations and constructed in a way that no part of the installation can fall down if the main attachment fails. There are two appropriate eyelets mounted on the device for fixation of the safety bond. Fasten the safety bond in such a way that, in the event of a fall, the maximum drop distance of the device will not exceed 20 cm.
- To align the device, release the fixation screws at the mounting bracket, adjust the desired inclination angle and retighten the fixation screws.
- After installation, the device requires inspections periodically to prevent the possibility of rot, deformation and looseness.

CONNECTIONS
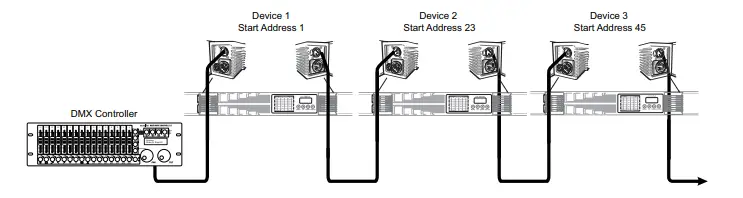
DMX512 control
- Connect the output of your DMX controller to the DMX input DMX IN of the device with a DMX cable.
- Connect the DMX output DMX OUT of the device to the DMX input of the next unit in the chain. Always connect one output to the input of the next unit until all units are connected.
- At the last unit, the DMX cable has to be terminated. Plug the terminator with a 120 Ω resistor between Signal (–) and Signal (+) in the DMX output of the last unit.
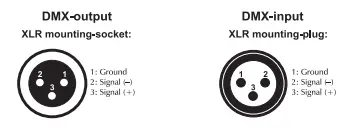
- If the cable length exceeds 300 m or the number of DMX devices is greater than 32, it is recommended to insert a DMX level amplifier to ensure proper data transmission. XLR connection:
XLR connection:
Power Supply
- The device uses an auto-range power supply that accepts input voltages between 100 und 240 volts.
- Connect the device via the mains cable to a grounded mains socket. Thus the unit is switched on.
- To switch off the unit, disconnect the power plug.
- Do not connect the unit to the mains voltage via a dimmer. For a more convenient operation, use a mains outlet which is switchable.
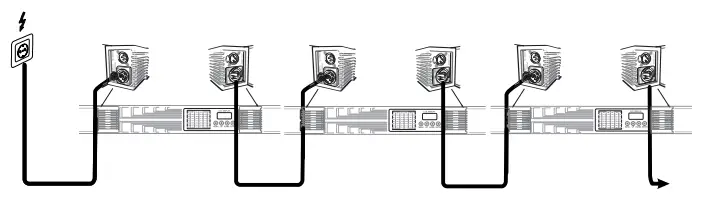
- The jack POWER OUT allows for power supply of further devices. To interconnect several devices, connect the jack POWER OUT to the input POWER IN of the next unit until all units are connected.
- Matching power cables with P-Con plugs are available as accessories. In this manner, up to 8 devices can be linked at 230/240 input voltage and up to 4 devices at 110/115 input voltage.

OPERATION
After connecting the device to the mains it is ready for operation. The display indicates the last operating mode. The operating modes can be selected by means of the display and the control buttons. All settings remain stored even if the device is disconnected from the mains. The device can be operated in stand-alone mode via the control board or in DMX-controlled mode via any commercial DMX controller.
Menu structure
| Display | Function | |||||
| DMX ADDR | 001-512 | DMX address setting | ||||
| Channel | 7, 18, 21, 22, 256, 269 | Setting DMX channel mode | ||||
|
DMX Monitor | CH:7 |
The DMX values for each channel can be read out via the monitor. | ||||
| CH:18 | ||||||
| CH:21 | ||||||
| CH:22 | ||||||
| CH:256 | ||||||
| CH:269 | ||||||
| Auto | Auto 00 ~ Auto 36 | 37 auto programs | ||||
| Speed | 000 – 255 | Auto program running speed slow > fast | ||||
| Effect on Auto | Dim RGB | 000 – 255 | Brightness dark > bright | |||
| Strobe | 000 – 255 | Strobe effect slow > fast | ||||
| Mas Mode | Yes | Select master or slave function on | ||||
| No | Master/slave function off | |||||
|
MANUAL | White | 000 – 255 | Intensity 0 – 100 % | |||
| Blue | 000 – 255 | Intensity 0 – 100 % | ||||
| Green | 000 – 255 | Intensity 0 – 100 % | ||||
| Red | 000 – 255 | Intensity 0 – 100 % | ||||
| Strobe | 000 – 255 | Strobe-Effect slow > fast | ||||
| Dimmer | 000 – 255 | Brightness dark > bright | ||||
| Frost | 000 – 100 | Clear front panel | ||||
| 101 – 255 | Frost effect | |||||
| Back Light (Display shutoff time) | On | Constantly on | ||||
| 60s | Off after 60 seconds | |||||
| 120s | Off after 120 seconds | |||||
| 300s | Off after 300 seconds | |||||
| Temp | Temp 1 | xxC° | Temperature of the LED panel | |||
| Temp 2 | xxC° | Inside temperature | ||||
| Info | Test 1 | Test mode without flash | ||||
| Test 2 | Test mode with flash | |||||
| Version | Current software version | |||||
| Dimmer curve | Curve 0 | Linear | Dimmer curves | |||
| Curve 1 | S-curve | |||||
| Curve 2 | Square | |||||
| Curve 3 | InvSquare | |||||
| Fade TIME | Speed 0 ~ Speed 7 | Fade fast > slow | ||||
Stand-alone mode
DMX Monitor
- Here you can read out the DMX values for each DMX channel.
- Press the MENU button so many times until DMX Monitor is indicated on the display. Confirm with the ENTER button.
- Use the buttons UP and DOWN to select the desired DMX channel mode and confirm with the ENTER button.
- You can now read out the desired DMX value for each channel in the selected DMX mode. Confirm with the ENTER button.
Automatic mode
In automatic mode, 37 various show programs are available that run at an adjustable speed. Additionally, a desired color can be set.
- Press the MENU button so many times until Auto is indicated in the display. Confirm with the ENTER button. Use the buttons UP and DOWN (Auto 00 – Auto 36) to select the desired show program. Confirm with the ENTER button.
- The display now indicates Speed. Confirm with the ENTER button. Use the buttons UP and DOWN to
adjust the running speed of the program from 000 (slow) to 255 (fast). Confirm with the ENTER button. With the MENU button you can return to the main menu.
Effect on Auto
In this mode, you can set the desired brightness and strobe speed of the programs in Automatic Mode.
- Press the MENU button so many times until Effect on Auto is indicated in the display. Confirm with the ENTER button.
- The display shows Dimmer. Confirm with the ENTER button
- Use the buttons UP and DOWN to select the desired brightness, from 000 (dark) to 255 (bright). Confirm with the ENTER button.
- The display now indicates Strobe. Confirm with the ENTER button.
- Use the buttons UP and DOWN to adjust the strobe speed from 000 (slow) to 255 (fast). Confirm with the ENTER button.
Mas Mode
- In this mode, you can set the Master and Slave devices.
- Several devices may be interconnected (max. 32). Then all slave units can be synchronized and controlled with the master unit without the need for a DMX controller. The devices must be set to the corresponding operating modes.
- Configure all slave units before connecting the master unit.
- Connect the DMX output of the master unit to the DMX input of the first slave unit. Then connect the DMX output of the first slave unit to the DMX input of the second slave unit, etc. until all units have been connected in a chain. Make sure the master unit is the first in the chain. Do not connect a DMX controller to the DMX input of the master unit.
- Press the MENU button so many times until Mas Mode is indicated in the display. Confirm with the ENTER button.
- Use the buttons UP and DOWN to select the desired setting, yes or no for Master or Slave, depending upon the device. Confirm with the ENTER button.
- Set the master unit to the desired operating mode. The interconnected devices will now operate synchronously.
MANUAL
- In this mode, you can manually set the desired brightness, strobe speed and frost effect, as well as the intensity of the colors Red, Green, Blue and White.
- Press the MENU button so many times until MANUAL is indicated in the display. Confirm with the ENTER button.
- The display shows Dimmer. Confirm with the ENTER button
- Use the buttons UP and DOWN to select the desired brightness, from 000 (dark) to 255 (bright). Confirm with the ENTER button.
- The display now indicates Strobe. Confirm with the ENTER button.
- Use the buttons UP and DOWN to adjust the strobe speed from 000 (slow) to 255 (fast). Confirm with the ENTER button.
- The display then shows Frost. Confirm with the ENTER button.
- Use the buttons UP and DOWN to adjust the frost effect from 000-100 clear front panel, 101-255 frost effekt. Confirm with the ENTER button.
- The display then shows Red. Confirm with the ENTER button
- Use the buttons UP and DOWN to select the desired intensity, from 000 (dark) to 255 (bright). Confirm with the ENTER button.
- Continue this procedure to set the desired intensity for the colors green, blue and white.
Back Light
With this function, you can adjust the display characteristics when the buttons are inactive:
- Press the MENU button so many times until Back Light is indicated in the display. Confirm with the ENTER button.
- Use the buttons UP and DOWN to select the desired setting and confirm with the ENTER button.
- On – Display always on
- 60s – Shuts off the display after 60 seconds
- 120s – Shuts off the display after 120 seconds
- 300s – Shuts off the display after 300 seconds
Temp
- With this function, device temperatures can be displayed.
- Press the MENU button so many times until Temp is indicated in the display. Confirm with the ENTER button.
- Use the buttons UP and DOWN to select the desired temperature reading and confirm with the ENTER button.
- Temp 1: Displays the temperature on the LEDs.
- Temp 2: Displays the inner temperature of the device.
Info
- In this mode, several settings can be read out or set.
- Press the MENU button so many times until Info is indicated in the display. Confirm with the ENTER button.
- Use the buttons UP and DOWN to select the desired setting and confirm with the ENTER button. The desired setting will be executed.
- Test 1: The device conducts a test. (without flash)
- Test 2: The device conducts a test. (with flash)
- Version: With this function, you can display the software version of the device.
Dimmer curve
- With this function, you can set various dimmer curves.
- Press the MENU button so many times until Dimmer curve is indicated in the display. Confirm with the ENTER button.
- Use the buttons UP and DOWN to select the desired Dimmer curve and confirm with the ENTER button.
- Curve 0 – LINEAR: The brightness increases linearly with the DMX value.
- Curve 1 – SQUARE LAW: The brightness increases exponentially with the DMX value.
- Curve 2 – INVERSE SQUARE LAW: The brightness increases reverse exponentially with the DMX value. Curve 3 – S-CURVE: The brightness increases S-shaped with the DMX value.
Fade TIME
- With this function, you can set the fade time.
- Press the MENU button so many times until Fade TIME is indicated in the display. Confirm with the ENTER button.
- Use the buttons UP and DOWN to select the desired fade TIME 00 (fast) to 07 (slow) and confirm with the ENTER button.
DMX operation
Setting the number of DMX channels and the DMX starting address
For operation with a controller with DMX512 protocol, the device is equipped with 269 control channels. However, it can also be switched to a mode with 7, 18, 21, 22, or 256 channels if different functions are required. To be able to operate the device with a DMX controller, the DMX starting address must be set. The starting address depends upon which DMX controller is being used. Please refer to the controller’s documentation.
- Press the MENU button so many times until DMX ADDR is indicated on the display. Confirm with the ENTER button.
- Set the address via the UP and DOWN buttons and press the MENU button to return to the main menu.
- Now press the MENU button so many times until Channel is indicated on the display.
Functions in DMX mode
7-channel mode
| Channel | Value | Function |
| 1 | 000 – 255 | Master dimmer |
| 000 – 005 | No function | |
| 2 | 006 – 250 | Strobe RGB with increasing speed 0-100% |
| 251 – 255 | No function | |
| 3 | 000 – 255 | Red 0-100% |
| 4 | 000 – 255 | Green 0-100% |
| 5 | 000 – 255 | Blue 0-100% |
| 6 | 000 – 255 | White 0-100% |
| 7 | 000 – 100 | No function |
| 101 – 255 | Frost |
18-channel mode
| Channel | Value | Function |
| 1 | 000 – 255 | Master dimmer |
| 2 | 000 – 255 | Yellow 0-100% |
| 3 | 000 – 255 | Red 0-100% |
| 4 | 000 – 255 | Green 0-100% |
| 5 | 000 – 255 | Blue 0-100% |
| 6 | 000 – 255 | White 0-100% |
| 7 | 000 – 255 | Strobe (white) intensity, from minimum to maximum |
| 8 | 000 – 004 005 – 255 | No function Strobe (white) |
| 9 | 000 – 255 | Strobe with increasing speed 0-100% |
| 000 – 005 | No function | |
| 10 | 006 – 250 | Strobe RGB with increasing speed 0-100% |
| 251 – 255 | No function | |
| 000 – 004 | No function | |
| 005 – 014 | Show 1 | |
| 015 – 024 | Show 2 | |
| 025 – 034 | Show 3 | |
| 035 – 044 | Show 4 | |
| 045 – 054 | Show 5 | |
| 055 – 059 | Show 6 | |
| 060 – 064 | Show 7 | |
| 065 – 069 | Show 8 | |
| 11 | 070 – 074 | Show 9 |
| Special effect | 075 – 079 | Show 10 |
| white | 080 – 084 | Show 11 |
| 085 – 089 | Show 12 | |
| 090 – 094 | Show 13 | |
| 155 – 159 | Show 26 | |
| 160 – 164 | Show 27 | |
| 165 – 169 | Show 28 | |
| 244 – 249 | Show 44 | |
| 250 – 254 | Show 45 | |
| 255 | Show 46 | |
| 12 | 000 – 255 | Speed special effect from channel 11, slow > fast |
|
13 Special effect RGB | 000 – 003 | No function |
| 004 – 007 | Show 1 | |
| 008 – 011 | Show 2 | |
| 012 – 015 | Show 3 | |
| 016 – 019 | Show 4 | |
| 020 – 023 | Show 5 | |
| 024 – 027 | Show 6 | |
| 028 – 031 | Show 7 | |
| 092 – 095 | Show 22 | |
| 096 – 099 | Show 23 | |
| 100 – 103 | Show 24 | |
| 200 – 203 | Show 49 | |
| 204 – 207 | Show 50 | |
| 208 – 211 | Show 51 | |
| 248 – 251 | Show 62 | |
| 252 – 255 | Show 63 | |
| 14 | 000 – 255 | Speed for special effect for channel 13, slow > fast |
| 15 Color change | 000 – 255 | Color macros |
| 16
17 | 000 – 255 000 – 127 | Different background color macros Direction from right to left |
| 128 – 255 | Direction from left to right | |
| 18 | 000 – 100 | No function |
| 101 – 255 | Frost |
21-channel mode
| Channel | Value | Function |
| 1 | 000 – 255 | Master dimmer |
| 2 | 000 – 255 | 16 Bit fine dimmer, 0-100% |
| 3 | 000 – 255 | Yellow 0-100% |
| 4 | 000 – 255 | Red 0-100% |
| 5 | 000 – 255 | Green 0-100% |
| 6 | 000 – 255 | Blue 0-100% |
| 000 – 005 | No function | |
| 7 | 006 – 250 | Strobe RGB with increasing speed 0-100% |
| 251 – 255 | No function | |
| 000 – 003 | No function | |
| 004 – 007 | Show 1 | |
| 008 – 011 | Show 2 | |
| 012 – 015 | Show 3 | |
| 016 – 019 | Show 4 | |
| 020 – 023 | Show 5 | |
| 8 Special effect | 024 – 027 028 – 031 | Show 6 Show 7 |
| RGB | ||
| 092 – 095 | Show 22 | |
| 096 – 099 | Show 23 | |
| 100 – 103 | Show 24 | |
| 200 – 203 | Show 49 | |
| 204 – 207 | Show 50 | |
| 208 – 211 | Show 51 |
| 248 – 251 | Show 62 | |
| 252 – 255 | Show 63 | |
| 9 | 000 – 255 | Speed for special effect for channel 8, slow > fast |
| 10 | 000 – 255 | Color change 8 |
| 11 | 000 – 255 | Color change 12 |
| 12 | 000 – 255 | Different background color macros |
| 13 | 000 – 127 | Direction from right to left |
| 128 – 255 | Direction from left to right | |
| 14 | 000 – 255 | White 0-100% |
| 15 | 000 – 255 | Strobe (white) intensity from minimum to maximum |
| 16 | 000 – 004 | No function |
| 005 – 255 | Strobe (white) | |
| 17 | 000 – 255 | Strobe effect |
|
18 Special effect white | 000 – 004 | No function |
| 005 – 014 | Show 1 | |
| 015 – 024 | Show 2 | |
| 025 – 034 | Show 3 | |
| 035 – 044 | Show 4 | |
| 045 – 054 | Show 5 | |
| 055 – 059 | Show 6 | |
| 060 – 064 | Show 7 | |
| 065 – 069 | Show 8 | |
| 070 – 074 | Show 9 | |
| 075 – 079 | Show 10 | |
| 080 – 084 | Show 11 | |
| 085 – 089 | Show 12 | |
| 090 – 094 | Show 13 | |
| 155 – 159 | Show 26 | |
| 160 – 164 | Show 27 | |
| 165 – 169 | Show 28 | |
| 244 – 249 | Show 44 | |
| 250 – 254 | Show 45 | |
| 255 | Show 46 | |
| 19 | 000 – 255 | Speed for special effect channel 18, slow > fast |
| 20 | 000 – 127 | Direction from right to left |
| 128 – 255 | Direction from left to right | |
| 21 | 000 – 100 | No function |
| 101 – 255 | Frost |
22-channel mode
| Channel | Value | Function | |
| 1 | 000 – 255 | Master dimmer | |
| 2 3 4 5 6 7
8
9 Special effect RGB
10 11 12 13
14 | 000 – 255 000 – 255 000 – 255 000 – 255 000 – 255 000 – 255 000 – 005 | Dimmer for RGB, 0-100% 16 Bit fine dimmer, 0-100% Yellow 0-100% Red 0-100% Green 0-100% Blue 0-100% No function | |
| 006 – 250 | Strobe RGB with increasing speed 0-100% | ||
| 251 – 255 000 – 003 004 – 007 008 – 011 012 – 015 016 – 019 020 – 023 024 – 027 028 – 031 092 – 095 096 – 099 100 – 103 200 – 203 204 – 207 208 – 211 | No function No function Show 1 Show 2 Show 3 Show 4 Show 5 Show 6 Show 7
Show 22 Show 23 Show 24
Show 49 Show 50 Show 51 | ||
| 248 – 251 252 – 255 000 – 255 000 – 255 000 – 255 000 – 255 000 – 127 | Show 62 Show 63 Speed for special effect channel 9, slow > fast Color change for channel 9 Different background color macros Dimmer for channel 12, 0-100% Direction from right to left | ||
| 128 – 255 | Direction from left to right | ||
| 15 16 | 000 – 255 000 – 255 | White 0-100% Strobe (white) intensity from minimum to maximum | |
| 17 | 000 – 004 | No function | |
| 005 – 255 000 – 255 000 – 004 005 – 014 015 – 024 025 – 034 | Strobe (white) Strobe effect No function Show 1 Show 2 Show 3 | ||
| 18
19 Special effect white |
| 035 – 044 045 – 054 055 – 059 060 – 064 065 – 069 070 – 074 075 – 079 080 – 084 085 – 089 090 – 094 155 – 159 160 – 164 165 – 169 244 – 249 250 – 254 | Show 4 Show 5 Show 6 Show 7 Show 8 Show 9 Show 10 Show 11 Show 12 Show 13
Show 26 Show 27 Show 28
Show 44 Show 45 | |
| 255 | Show 46 | |
| 20
21 | 000 – 255 000 – 127 | Speed special effect channel 19, slow > fast Direction from right to left |
| 128 – 255 | Direction from left to right | |
| 22 Frost | 000 – 100 | No function |
| 101 – 255 | Frost |
256-channel mode
| Channel | Value | Function |
| 1 | 000 – 255 | Red 1, 0-100% |
| 2 3 4 5 6 7 8 9 | 000 – 255 000 – 255 000 – 255 000 – 255 000 – 255 000 – 255 000 – 255 000 – 255 … | Green 1, 0-100% Blue 1, 0-100% Red 2, 0-100% Green 2, 0-100% Blue 2, 0-100% Red 3, 0-100% Green 3, 0-100% Blue 3, 0-100% |
| 190 | 000 – 255 | Red 64, 0-100% |
| 191 | 000 – 255 | Green 64, 0-100% |
| 192 | 000 – 255 | Blue 64, 0-100% |
| 193 | 000 – 255 | White 1, 0-100% |
| 194 | 000 – 255 | White 2, 0-100% |
| 195 | 000 – 255 | White 3, 0-100% |
| 255 | 000 – 255 | White 63, 0-100% |
| 256 | 000 – 255 | White 64, 0-100% |
269-channel mode
| Channel | Value | Function |
| 1 | 000 – 255 | Master dimmer |
| 2 | 000 – 255 | Strobe (white) intensity from minimum to maximum |
| 3 | 000 – 004 005 – 255 | No function Strobe (white) |
| 4 | 000 – 255 | Stobe effect |
| 000 – 005 | No function | |
| 5 | 006 – 250 | Strobe RGB with increasing speed 0-100% |
| 251 – 255 | No function | |
| 000 – 004 | No function | |
| 005 – 014 | Show 1 | |
| 015 – 024 | Show 2 | |
| 025 – 034 | Show 3 | |
| 035 – 044 | Show 4 | |
| 045 – 054 | Show 5 | |
| 055 – 059 | Show 6 | |
| 060 – 064 | Show 7 | |
| 065 – 069 | Show 8 | |
| 070 – 074 | Show 9 | |
| 6 Special effect white | 075 – 079 080 – 084 085 – 089 | Show 10 Show 11 Show 12 |
| 090 – 094 | Show 13 | |
| 155 – 159 | Show 26 | |
| 160 – 164 | Show 27 | |
| 165 – 169 | Show 28 | |
| 244 – 249 | Show 44 | |
| 250 – 254 | Show 45 | |
| 255 | Show 46 | |
| 7 | 000 – 255 | Speed for special effect for channel 6, slow > fast |
| 000 – 003 | No function | |
| 004 – 007 | Show 1 | |
| 008 – 011 | Show 2 | |
| 012 – 015 | Show 3 | |
| 016 – 019 | Show 4 | |
| 020 – 023 | Show 5 | |
| 8 Special effect RGB | 024 – 027 028 – 031
| Show 6 Show 7 |
| 092 – 095 | Show 22 | |
| 096 – 099 | Show 23 | |
| 100 – 103 | Show 24 | |
| 200 – 203 | Show 49 |
| 204 – 207 | Show 50 | |
| 208 – 211 | Show 51 | |
| 248 – 251 | Show 62 | |
| 252 – 255 | Show 63 | |
| 9 | 000 – 255 | Speed for special effect channel 8, slow > fast |
| 10 | 000 – 255 | Color change for channel 8 |
| 11 | 000 – 255 | Different background color macros |
| 12 | 000 – 127 | Direction from right to left |
| 128 – 255 | Direction from left to right | |
| 13 | 000 – 100 | No function |
| 101 – 255 | Frost | |
| 14 | 000 – 255 | Red 1, 0-100% |
| 15 | 000 – 255 | Green 1, 0-100% |
| 16 | 000 – 255 | Blue 1, 0-100% |
| 17 | 000 – 255 | Red 2, 0-100% |
| 18 | 000 – 255 | Green 2, 0-100% |
| 19 | 000 – 255 | Blue 2, 0-100% |
| 20 | 000 – 255 | Red 3, 0-100% |
| 21 | 000 – 255 | Green 3, 0-100% |
| 22 | 000 – 255 | Blue 3, 0-100% |
| … | ||
| 203 | 000 – 255 | Red 64, 0-100% |
| 204 | 000 – 255 | Green 64, 0-100% |
| 205 | 000 – 255 | Blue 64, 0-100% |
| 206 | 000 – 255 | White 1, 0-100% |
| 207 | 000 – 255 | White 2, 0-100% |
| 208 | 000 – 255 | White 3, 0-100% |
| 268 | 000 – 255 | White 63, 0-100% |
| 269 | 000 – 255 | White 64, 0-100% |
CLEANING AND MAINTENANCE
- The outside of the device should be cleaned periodically to remove contaminants such as dust etc.
- The lenses, in particular, should be clean to ensure that light will be emitted at maximum brightness.
- Disconnect the device from power and allow it to cool before cleaning.
- Clean the surface with a soft lint-free and moistened cloth.
- Never use alcohol or solvents as these may damage the surface. Make sure that no liquids can enter the device.
- The device must be dry before reapplying power.
- There are no serviceable parts inside.
- Do not open the housing.
- Do not try to repair the device by yourself as this may result in damage.
- Maintenance and service operations are only to be carried out by authorized dealers.
- Should you need any spare parts, please use genuine parts. Should you have further questions, please contact your dealer.
Replacing the fuse
- If the fine-wire fuse of the device fuses, only replace the fuse by a fuse of same type and rating.
- Disconnect the device from power and allow it to cool.
- Open the fuse holder of the mains connection with a fitting screwdriver.
- Remove the old fuse from the fuse holder and replace it with a new fuse.
- Carefully push the fuse holder back into its position before reapplying power.
TECHNICAL SPECIFICATIONS
| Power supply: | 100-240 V AC, 50/60 Hz |
| Power consumption: | 350 W |
| IP classification: | IP20 |
| Protection class: | Class I |
| Fuse: | T 4 A Fuse replaceable |
| LED: | 384 x 1 W SMD 3030 LED, cold white (CW) |
| 384 x 0,2 W SMD 5050 LED, 3in1 TCL, RGB (homogenous color mix) | |
| DMX channels: | 7; 18; 21; 22; 256; 269 |
| DMX input: | 3-pin XLR (M) mounting version |
| DMX output: | 3-pin XLR (F) mounting version |
| Cooling: | Temperature-controlled fan |
| Control: | DMX; stand-alone, Master/slave function; Light´J; Light Captain |
| Beam angle (1/2 peak): | Strobe effect 65° |
| Ambient light 50° | |
| Display type: | LCD |
| Dimensions: | Length: 1 m |
| Depth: 13.5 cm | |
| Height: 8.5 cm | |
| Weight: | 6 kg |
Accessories
| EUROLITE TPC-10 Coupler, silver | No. 59006856 |
| EUROLITE Safety Bond UNV-5 3x600mm up to 5kg silver | No. 58010372 |
| EUROLITE DMX cable XLR 3pin 3m black | No. 3022785H |
| PSSO DMX cable XLR 3pin 3m black Neutrik | No. 30227810 |
| PSSO PowerCon Connection Cable 3×1.5 3m | No. 3023503R |
Eurolite
Eurolite is a brand of Steinigke Showtechnic GmbH Andreas-Bauer-Str. 5 97297 Waldbüttelbrunn Germany D00121741 Version 1.0 Publ. 18/08/2022


