![]() B246DW Label Printer
B246DW Label Printer
User Guide
![]() iOS Android
iOS Android
works with Munbyn Print
Product Introduction
1.1 What’ s in the package?
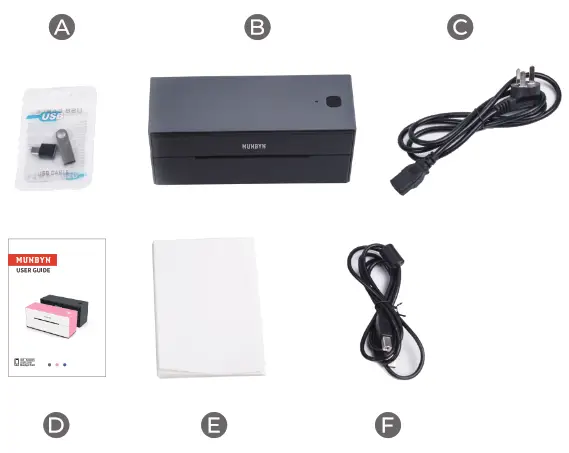
A. USB Flash Drive
B. Printer
C. Power Cord
D. User Manual
E. Labels
F. USB Cable
• If contents are missing or damaged, please contact us
1.2 Specifications
| Method | Direct Thermal |
| Resolution | 203 dpi |
| Max Printing Speed | 150 mm/s |
| Paper Width | 25.4-117 mm |
| Paper Thickness | 0.06-0.25 mm |
| Power Adapter | 24V / 2.5A |
| Printing Life | TPH 50 KM |
| Operating Environment | Temperature: 5 to 50 °C Humidity: 20-85% (non-condensing) |
| Storage Environment | Temperature: -20 to 60 °C Humidity: 5-95% (non-condensing) |
| Connection | USB/Bluetooth |
| Weight | 1.591b /0.74kg |
| Dimensions | 213 x 80 x95 mm(L*W*H) |
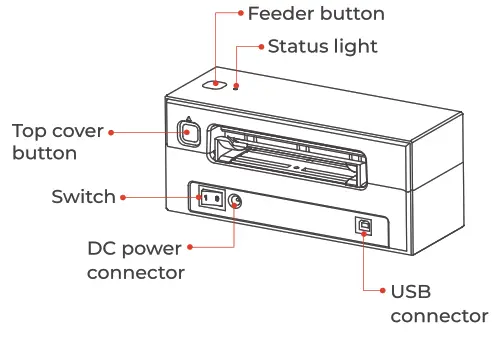
1.3 Printer features
Set Up The Printer
Recommended:
Watch the short setup video at: www.munbyn.biz/129unboxing
2.1 Quick printer connection
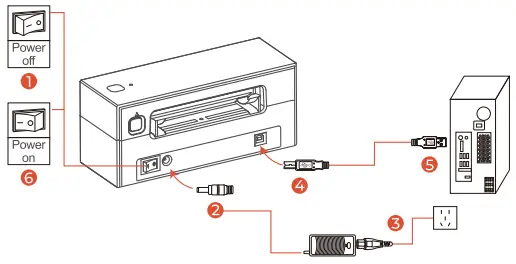
- Please follow the sequence of the above picture to operate
2.2 Label setup
Automatic label identification:
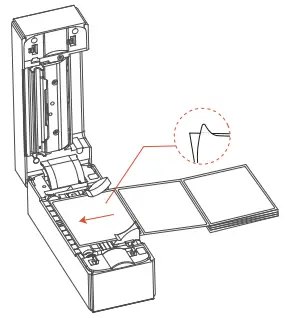
- Load no less than 6 consecutive labels of paper into the printer.
- After the paper is stable, press and hold FEED until the blue light flashes 2 times.
- Then, the printer will run automatically label identification.
2.3. Wi-Fi connection
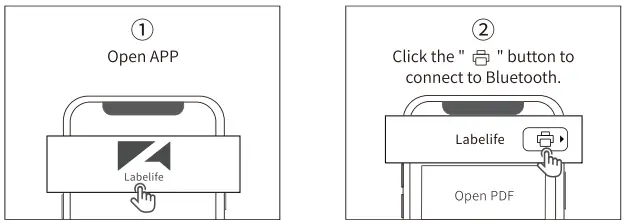
2.3.1 Connect to App
- Search “Labelife” on App Store or Google Play to get the app.

- Open the “Labelife”, connect the printer in two steps.

Note:
- Due to the mobile phone system requirements , App needs access to location, you need to enable GPS and confirm authorization (Android only).
- Make sure to select 4″ x 6″ file to print.
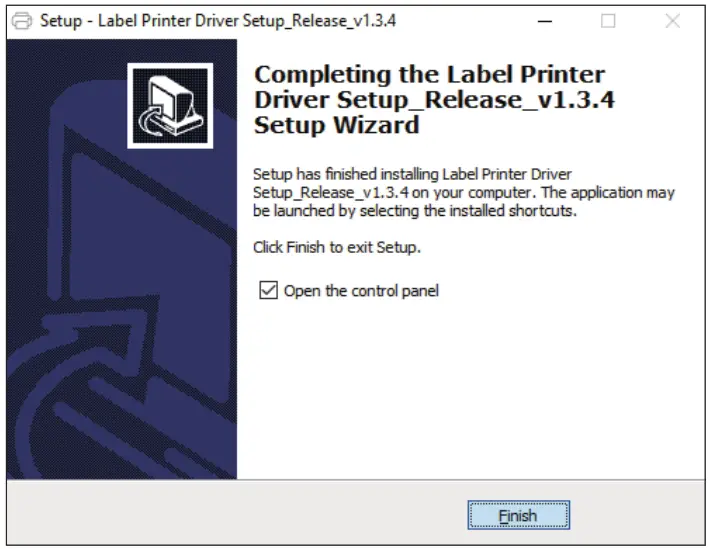
2.4 Driver installation
For the latest driver, please visit, www.munbyn.biz/129d
Before running the PC driver, please complete the printer network connecting on your mobile device with “Labelife app”
- Please run the downloaded software from the web address indicated above and follow the prompts to complete installation.
2.4.1 Windows Driver Installation
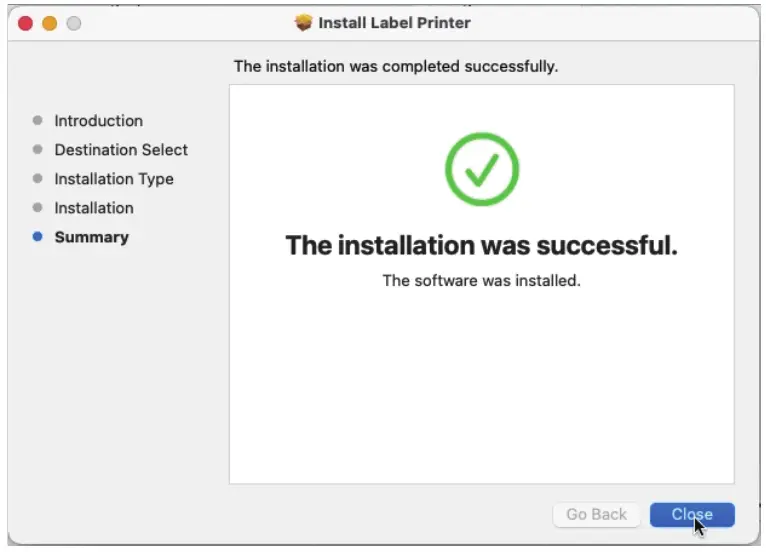
2.4.2 Mac Driver Installation
Pro Tips
- Anytime you change your label, run the automatic label identification.
- Press the circle feeder button on the printer to skip a blank label.
- To run a self-test, press and hold the feeder button until the blue light flash once.
- Avoid poor quality labels as they can damage the printer.
- Regularly clean the printer head.
- if the paper is jammed and the blue flashing slowly, run Automatic label identification.
- Insert Munbyn into the same USB port on your computer every time. This will avoid creating duplicate copies of the printer in your operating system.
FAQ
FAQ file, please visit www.munbyn.biz/129faq
LED Status
| Light | Printer Status |
| Solid blue | Standby |
| Blue flashing slowly | Label jams or label detection error |
| Blue flashing quickly | Wrong media tracking |
| Solid red | Printer head is over-heated |
| Red flashing slowly | Paper shortage |
| Red flashing quickly | Cover is not closed |
| Solid purple | Printing |
| Purple flashing quickly | Pause printing |
| Desired Action | Execution |
| Skip a label | When the printer is standby(not in the middle of printing), press the Feed Button once. |
| Restore factory setting | Insert the label, ensure it is straight and smooth. When the printer is standby and ready, press and hold the Feed Button for about 10 seconds while the blue light flashes 4 times, then release the Feed Button. |
| Run the automatic label identification (for labels with black marks) | Insert the label, ensure it is straight and smooth. When the printer is standby and ready, press and hold the Feed Button for about 8 seconds while the blue light flashes 3 times, then release the Feed Button. |
| Run the automatic label identification (for labels with gaps) | Insert the label, ensure it is straight and smooth. When the printer is standby and ready, press and hold the Feed Button for about 6 seconds while the blue light flashes 2 times, then release the Feed Button. |
| Print test page | Insert the label, ensure it is straight and smooth. When the printer is standby and ready, press and hold the Feed Button for about 4 seconds while the blue light flashes once, then release the Feed Button. |
| Pause printing | When the printer is printing, press the Feed Button once. |
| Resume printing | When the printer pauses printing, press the Feed Button once to resume printing. |
| Clear printing data | When the printer pauses printing, press the Feed Button twice to clear the printing data. |
Safety Notices
- The printer head can become very hot after printing labels. Do not touch the printer head.
- Do not bend the power cord excessively or place objects on the cord.
- Do not use the printer if you find any irregularities as these could result in fire or electrocution.
- Keep the printer out of reach of children.
- Use only approved accessories and do not try to disassemble, repair the unit by yourself.
- Keep the printer away from water and other objects that could penetrate the components.
- Please unplug the printer when it is not in use for long periods.
Tech Support
 |  |
| https://wa.me/qr/5R2RRPLNUBYNH1 | https://www.facebook.com/munbyn/ |
E-mail: [email protected]
Whatsapp: +86 1 781 788 1067
Phone: +1 403 477 1911
Skype: munbyn
Support time: Monday to Friday 24 hours
MUNBYN provides 18 months warranty and lifetime free service.
If you encounter any issues with the product, please contact the MUNBYN team to promptly receive troubleshooting tips or a replacement.
Website: www.munbyn.com (how-to videos, warranty details)
Warning statement
This device complies with part 15 of the FCC Rules. Operation is subject to the following two conditions:
- This device may not cause harmful interference, and
- This device must accept any interference received, including interference that may cause undesired operation.
Any Changes or modifications not expressly approved by the party responsible for compliance could void the user’s authority to operate the equipment
Note: This equipment has been tested and found to comply with the limits for a Class B digital device, pursuant to part 15 of the FCC Rules. These limits are designed to provide reasonable protection against harmful interference in a residential installation. This equipment generates uses and can radiate radio frequency energy and, if not installed and used in accordance with the instructions, may cause harmful interference to radio communications. However, there is no guarantee that interference will not occur in a particular installation. If this equipment does cause harmful interference to radio or television reception, which can be determined by turning the equipment off and on, the user is encouraged to try to correct the interference by one or more of the following measures:
- Reorient or relocate the receiving antenna.
- Increase the separation between the equipment and receiver.
- Connect the equipment into an outlet on a circuit different from that to which the receiver is connected.
- Consult the dealer or an experienced radio/TV technician for help.
FCC RF exposure statement:
The equipment complies with FCC radiation exposure limits set forth for an uncontrolled environment. This equipment should be installed and operated with minimum distance between 20 cm the radiator your body.
![]() More Choice
More Choice
For Your Growing Business
Whats App +86178178131067
FB message Munbynotticial


