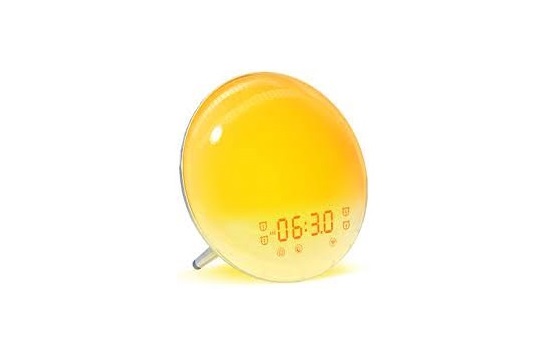
DEKALA ACA-003-B Sunstone Sunrise Alarm Clock Instructions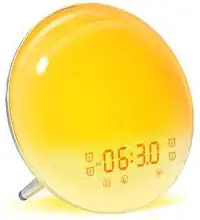
WHAT’S INCLUDED

GET STARTED
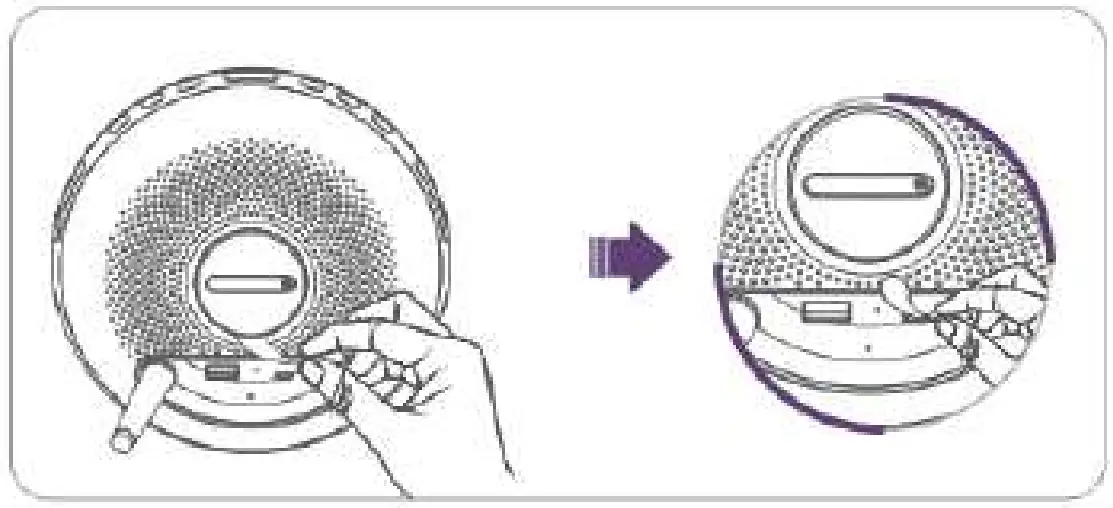
- Remove the Insulation Film from the Button Cell Compartment at the bottom.

- Connect the Dekala Sunstone to power with the USB Cable and Adapter provided. Important: This product has no power on/off button, and it will be on once you plug the power adapter into the socket. To disconnect power, unplug the power adapter.

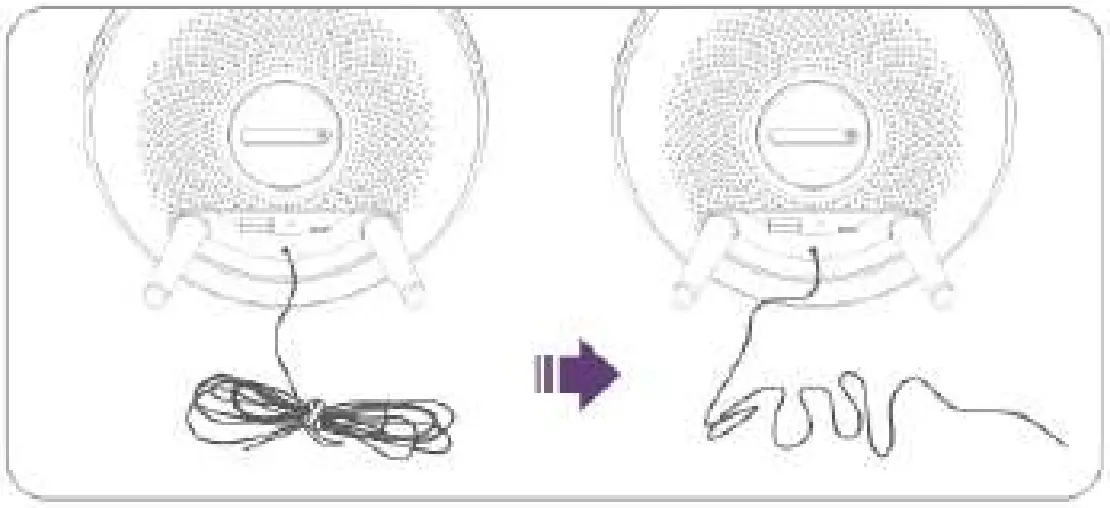
- Loosen the tie that wraps the FM Radio Antenna, then unroll the wire for receiving strong signals when turning on the FM Radio.


PRODUCT OVERVIEW
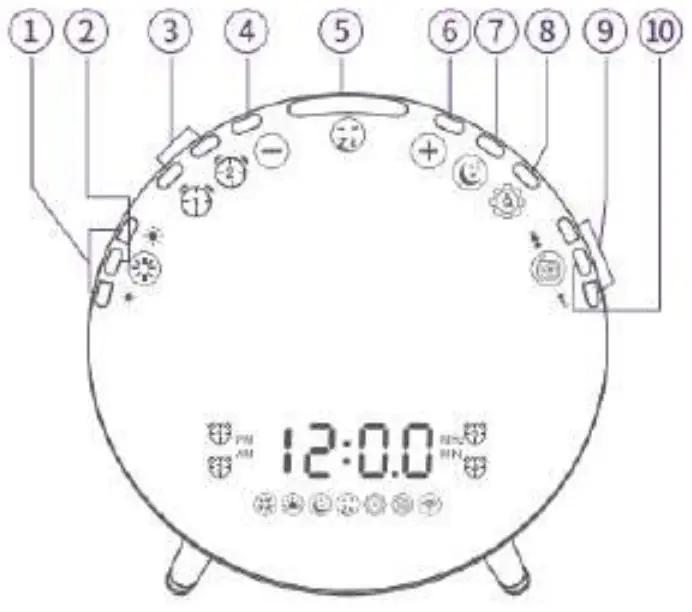
- Light Brightness Adjustment
- Light Switch
- Alarm 1/Alarm 2
- Setting “-“,Volume “-“
- Snooze; Night Light Switch
- Setting “+”Nolu me “+”
- Sleep-aid
- Display Brightness/Time Setting
- FM Radio Tuning
- FM Radio Switch
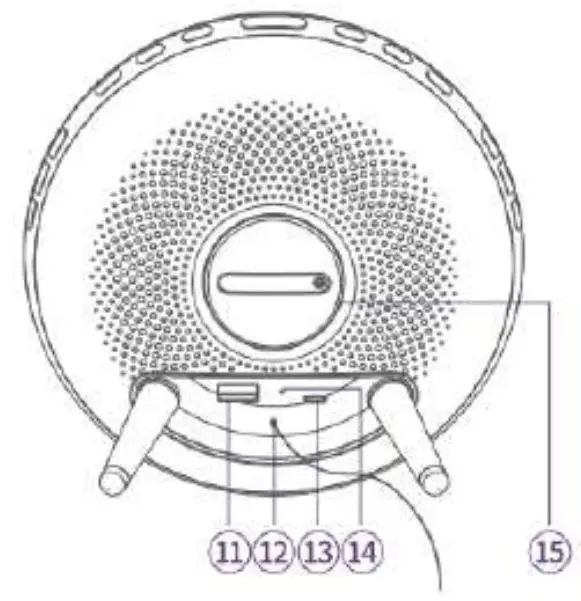
- USB Output
- FM Radio Antenna
- Micro USB Input
- Reset
- Button Battery
OPERATING GUIDE
Note:
The Sunrise Alarm Clock will automatically save the current setting and exit from setting mode if the operation is not resumed within 15s.
Ti me —Buttons will be used (![]() Time Setupr/
Time Setupr/![]() /
/![]() )
)
Before the first use, please set the time.
Step 1:
Press and hold Setting/![]() for 2 seconds until the Hour starts to flash on the LED display.
for 2 seconds until the Hour starts to flash on the LED display.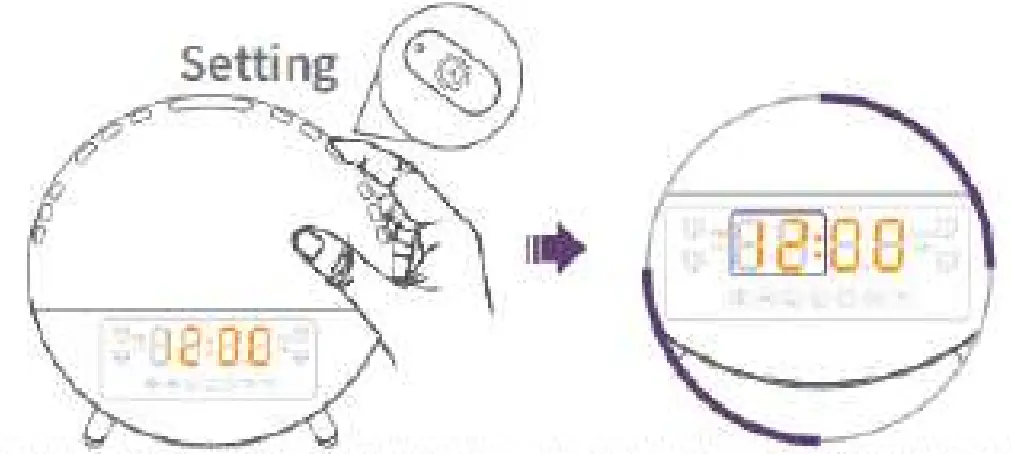
Step 2:
Press ( ![]() /
/![]() ) to change the Hour, then press Setting/
) to change the Hour, then press Setting/![]() to confirm and set Minute.
to confirm and set Minute.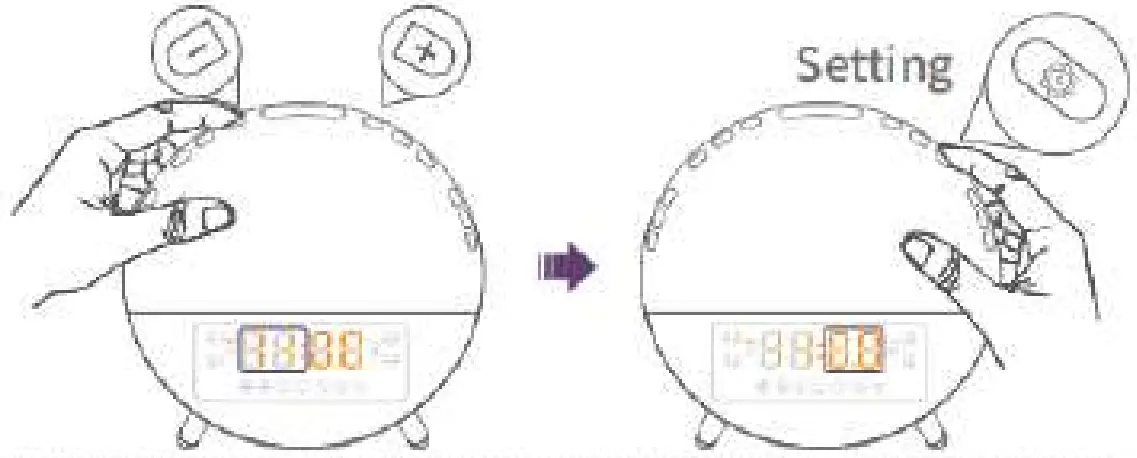
Step 3:
Press ![]() /
/![]() to change the Minute, then press Setting/
to change the Minute, then press Setting/![]() to confirm and start to set the Clock Format.
to confirm and start to set the Clock Format.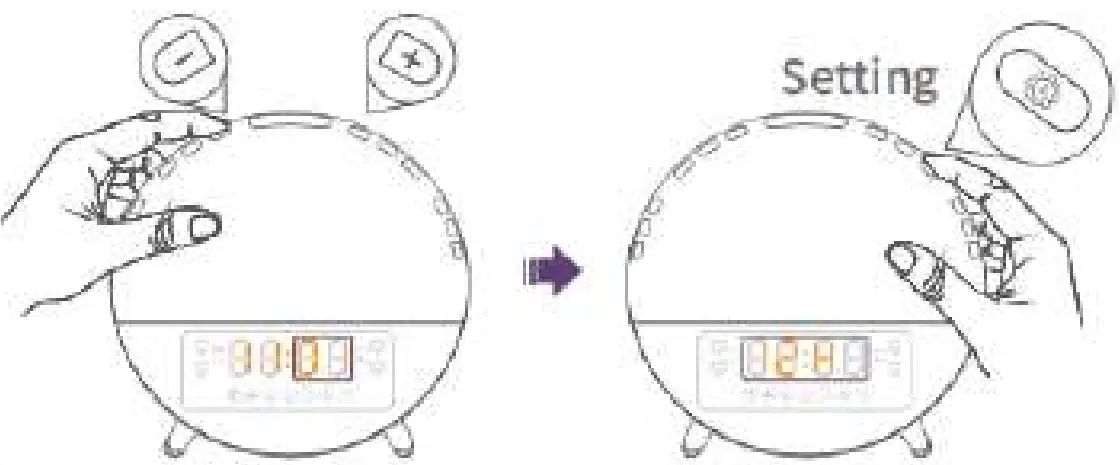
Step 4:
Press (![]() /
/![]() )to select the clock format form 24-hour clock and 12-hour clock, then press Setting/
)to select the clock format form 24-hour clock and 12-hour clock, then press Setting/![]() to confirm and complete the setting.
to confirm and complete the setting.
![]() Tip:
Tip:
If the 12-hour clock format is selected, PM or AM will be displayed accordingly.
Brightness of the LED Display —Buttons will be used (![]() Time Setup)
Time Setup)
Press setting/![]() to toggle the brightness of the LED Display among Day Mode, Auto Mode and OFF.
to toggle the brightness of the LED Display among Day Mode, Auto Mode and OFF.
Day Mode indicates the brightness level of the LED Display will be always the brightest even at night.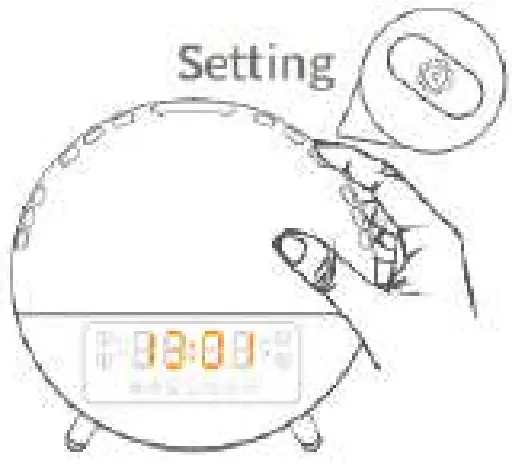
Auto Mode indicates the brightness level of the LED Display will automatically adjust according to the surrounding light.
OFF means turning off the LED display. Special for light sensitive user at night.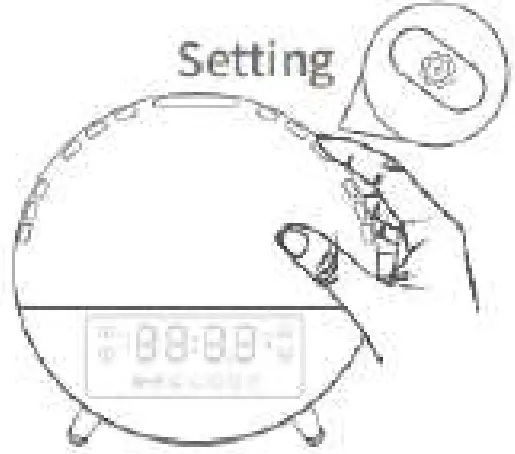
Alarms —Buttons will be used (![]() Alarm 1/
Alarm 1/![]() /
/![]() )
)
You could set Alarm 1 and Alarm 2 with the wake-up light. We will take setting Alarm 1 as an example to guide you how to set an alarm.
Step 1:
Press and hold Alarm 1/![]() for 2 seconds until the icon
for 2 seconds until the icon ![]() and the Hour starts to flash on the LED display.
and the Hour starts to flash on the LED display.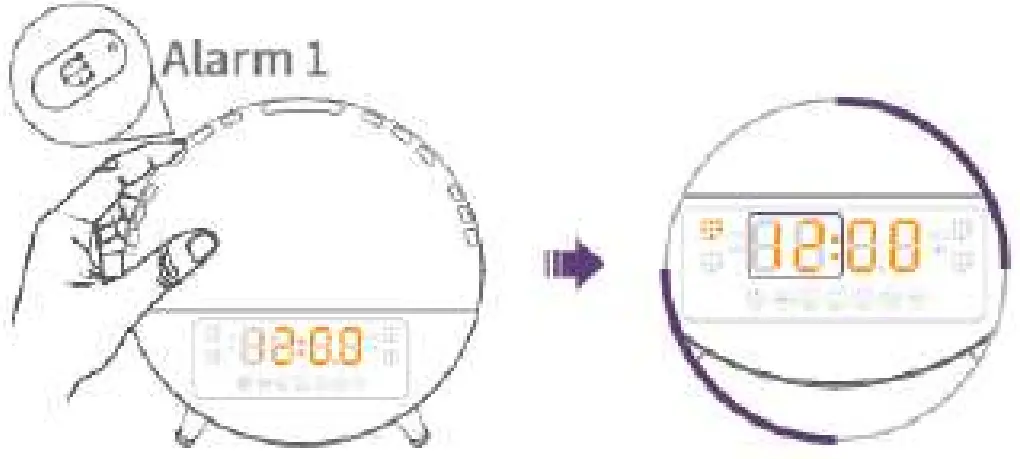
Step 2:
Press ![]() /
/![]() to change the Hour, then press Alarm 1/
to change the Hour, then press Alarm 1/![]() to confirm and switch to Minute.
to confirm and switch to Minute.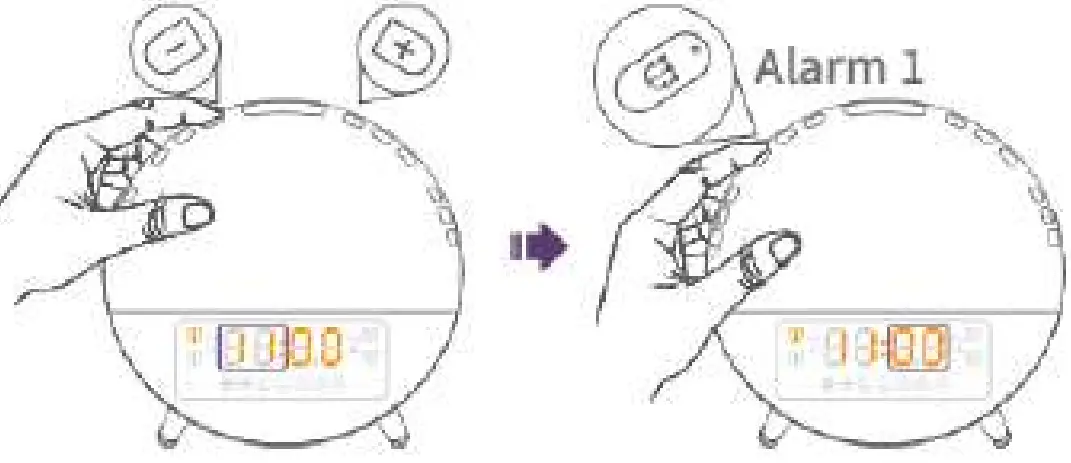
Step 3:
Press ![]() /
/![]() Into change the Minute, then press Alarm 1/
Into change the Minute, then press Alarm 1/![]() to confirm and start the Ringtone Setting.
to confirm and start the Ringtone Setting.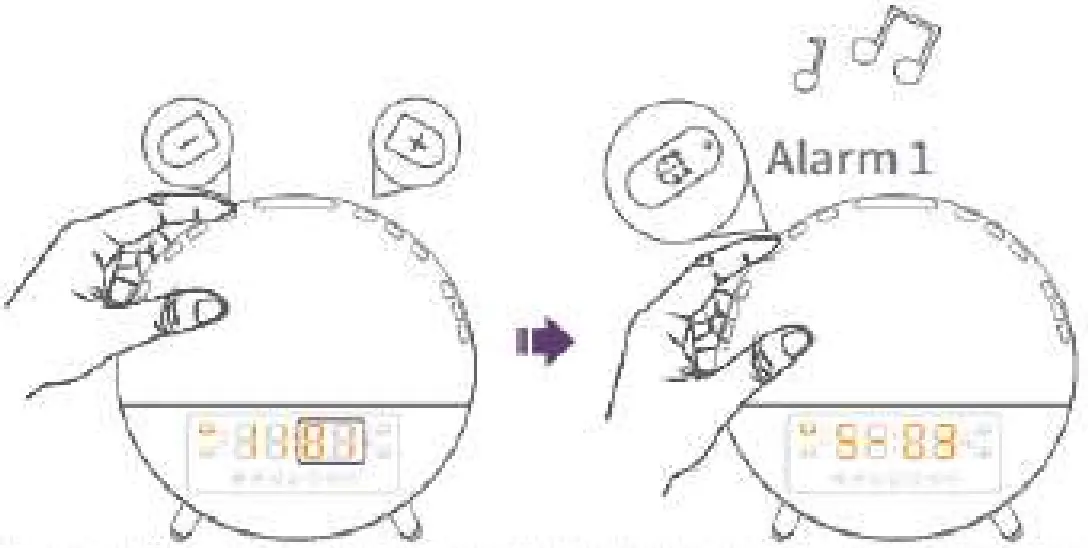
Step 4:
Press ![]() /
/![]() to select your favorite ringtone for Alarm 1/
to select your favorite ringtone for Alarm 1/![]() , then press Alarm 1/ tri ) to confirm and start the Volume Setting.
, then press Alarm 1/ tri ) to confirm and start the Volume Setting.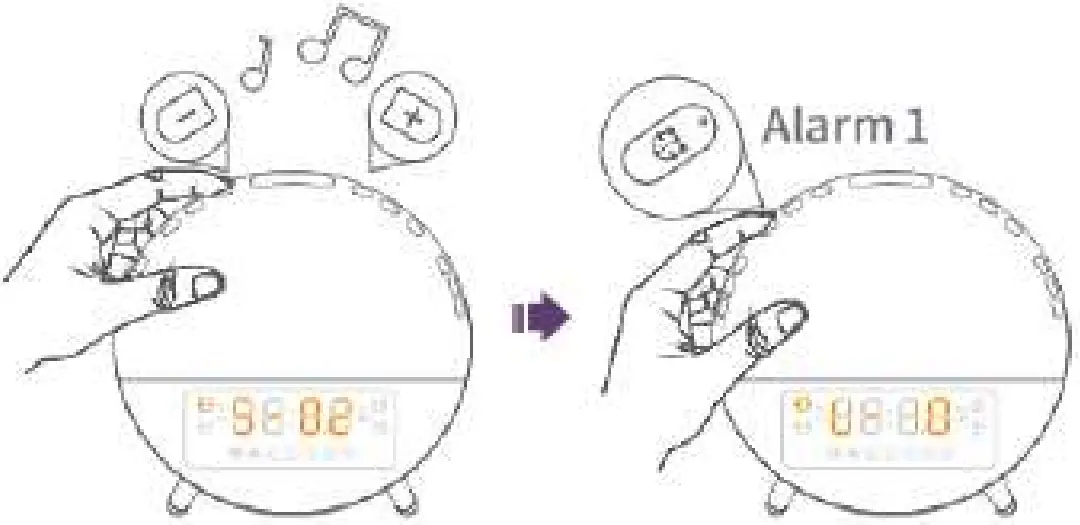
![]() Tip:
Tip:
S-00: No Sound
S-01 to S-07: Nature sounds
F-08: The last FM station you were tuned to before turning off the radio.
if you prefer another station, please turn on the FM radio to search and select the one you like, then set the alarm again.
Step 5:
Press ![]() /
/![]() to adjust the ringtone volume, then press Alarm 1/
to adjust the ringtone volume, then press Alarm 1/![]() to confirm and start the Sunrise Light Setting.
to confirm and start the Sunrise Light Setting.
![]() Tip:
Tip:
U-01 to U-16: Volume levels
Step 6:
Press ![]() /
/![]() to adjust the brightness level for the light, then press Alarm 1/
to adjust the brightness level for the light, then press Alarm 1/![]() to confirm and start setting the sunrise time interval to turn on before the alarm rings.
to confirm and start setting the sunrise time interval to turn on before the alarm rings.
![]() Tip:
Tip:
L-00: Light off L-01 to L-20: Brightness levels If you select L-00, there will be no sunrise light (but only ringtone) when Alarm 1 rings.
Step 7:
Press ![]() /
/![]() to select the sunrise time from 10, 20, 30,40, 50 and 60 MIN, then press Alarm 1/
to select the sunrise time from 10, 20, 30,40, 50 and 60 MIN, then press Alarm 1/![]() to confirm and complete all the settings for Alarm 1. Alarm 1 is on after setup.
to confirm and complete all the settings for Alarm 1. Alarm 1 is on after setup.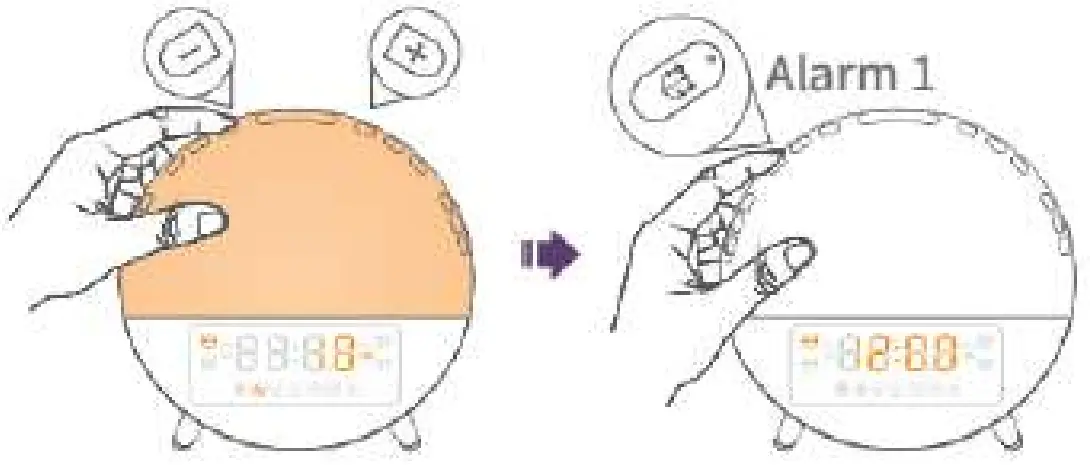
![]() Tip:
Tip:
If you select 10 MIN and the alarm time is 7:00 AM, the light will be on at 6:50 AM and gradually become brighter. When the alarm rings at 7:00 AM, the brightness level of the light will reach the level you set at Step 6.
Note:
To stop Alarm 1, just press the button ![]() when it’s the alarm time; To turn on/off the alarm 1, just press the button
when it’s the alarm time; To turn on/off the alarm 1, just press the button ![]() when it’s not the alarm time; ‘When Alarm 1 is turned on, the icon will display, When Alarm 1 is turned off, the icon will disappear.
when it’s not the alarm time; ‘When Alarm 1 is turned on, the icon will display, When Alarm 1 is turned off, the icon will disappear.
Snooze — Buttons will be used (![]() )Snooze/
)Snooze/![]()
![]() )
)
When the alarm rings, press Snooze/![]() to activate Snooze Mode to delay the alarm for 9 minutes.
to activate Snooze Mode to delay the alarm for 9 minutes.
Note:
- You can snooze up to 5 times.
- Press the corresponding Alarm Button
 / to manually stop the alarm.
 - If you don’t respond to it within 30 minutes after the alarm rings, the alarm will automatically stop.
FM Radio —Buttons will be used (![]() FM Radio/CE /
FM Radio/CE /
Double press FM Radio![]() 1 and to automatically search FM stations.
1 and to automatically search FM stations.
*It broadcasts the first station after the search is complete.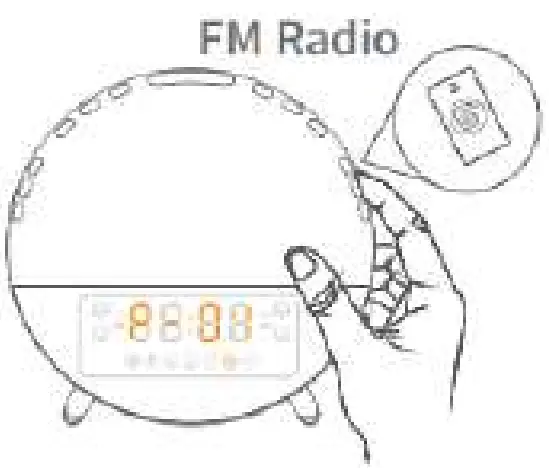
Step 1:
Press FM Radio/![]() to turn on/off FM radio.
to turn on/off FM radio.
Step 2:
Press and hold FM Radio/![]() to go to Next Station.
to go to Next Station.
Press ![]() /
/![]() , to adjust the frequency (0.1 MHz).
, to adjust the frequency (0.1 MHz).
Step 3:
Press ![]() /
/![]() to adjust the volume.
to adjust the volume.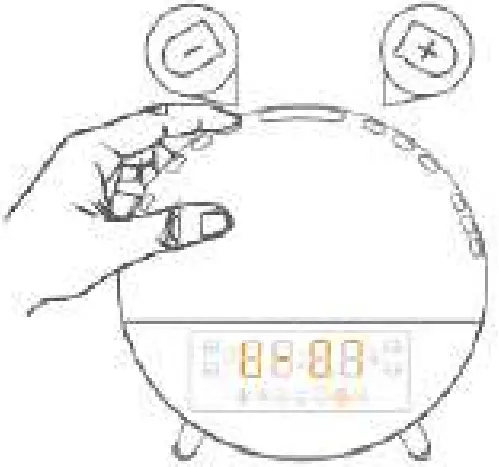
![]() Tip:
Tip:
U-01 to U-16: Volume levels
Note:
Please fully unwind the antenna and move it around until you receive the best reception.
Steep Aid —Buttons will be used ( ![]() Sleep Aid/
Sleep Aid/![]() /
/![]() )
)
Sleep Aid simulates the process of sunset, aiming to help you fall asleep easily. After it’s enabled, the sunset light will gradually dim, and the volume of sleep sounds will decrease with time.
Step 1:
Press and hold Sleep-aid/![]() for 2 seconds, then press
for 2 seconds, then press ![]() /
/![]() to select sleep-aid timer from 10 MIN to 120 MIN.
to select sleep-aid timer from 10 MIN to 120 MIN.
Step 2:
Press Sleep-aid/![]() to confirm your selection, then press
to confirm your selection, then press ![]() /
/![]() to adjust the brightness level of the light.
to adjust the brightness level of the light.
![]() Tip:
Tip:
L-00: Light off
L-01 to L-20: Brightness levels
Step 3:
Press Sleep-aid/![]() cite confirm your selection, then press
cite confirm your selection, then press ![]() /
/![]() n to select your sleep-aid sound to help you sleep.
n to select your sleep-aid sound to help you sleep.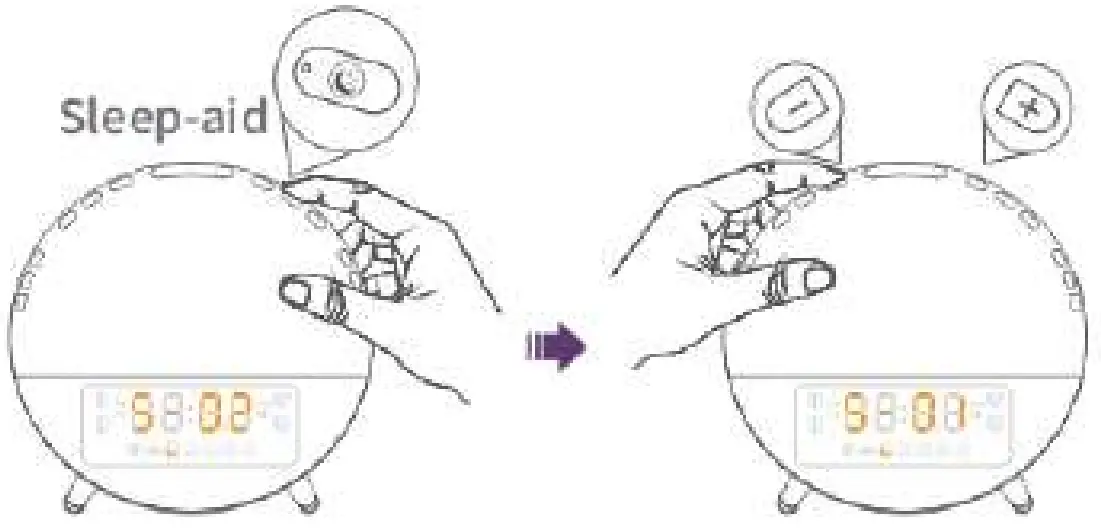
![]() Tip:
Tip:
S-00: Sound off S-01 to
S-03:Nature sounds
F-04: The last FM station you were tuned to before turning off the radio.
If you prefer another station, please turn on the FM radio to search and select the one you like, then set again.
Step 4:
Press Sleep-aid/![]() to confirm your selection, then press
to confirm your selection, then press ![]() /
/![]() to adjust the volume of the sound.
to adjust the volume of the sound.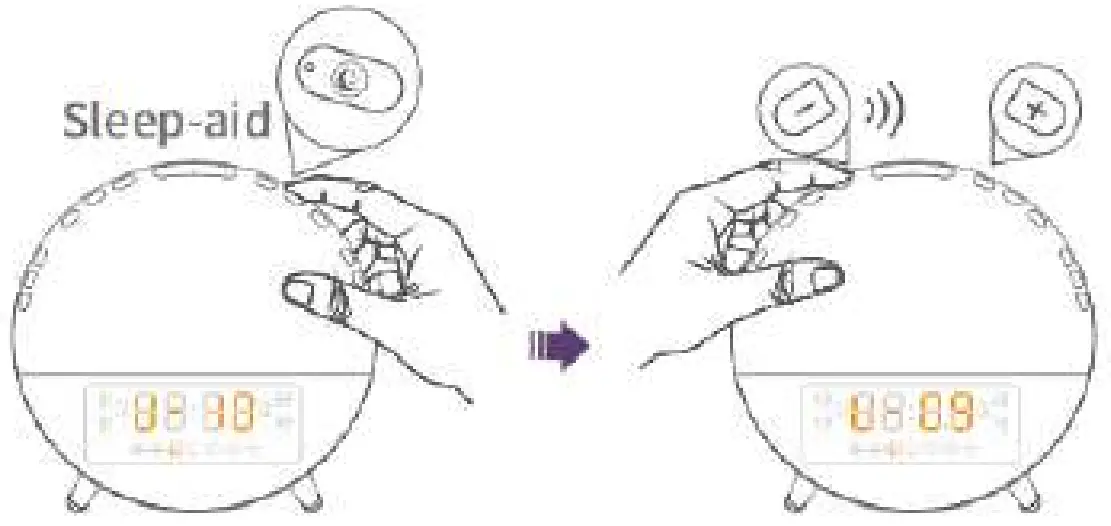
Step 5:
Press Sleep-aid/![]() to turn on/off Sleep Aid mode.
to turn on/off Sleep Aid mode.
![]() Tip:
Tip:
Press ![]() to turn on/off Sleep Aid mode.
to turn on/off Sleep Aid mode.
Light —Buttons will be used (![]() LED Light/
LED Light/![]() /
/![]() )
)
Sunrise Light
Step 1:
Press Light/![]() to turn on/off the Sunrise Light.
to turn on/off the Sunrise Light.
Step 2:
Press ![]() /
/![]() to adjust the brightness level.
to adjust the brightness level.
Atmosphere Light
Double press Light/![]() to turn on the Atmosphere Light, and the color of the light will change automatically.
to turn on the Atmosphere Light, and the color of the light will change automatically.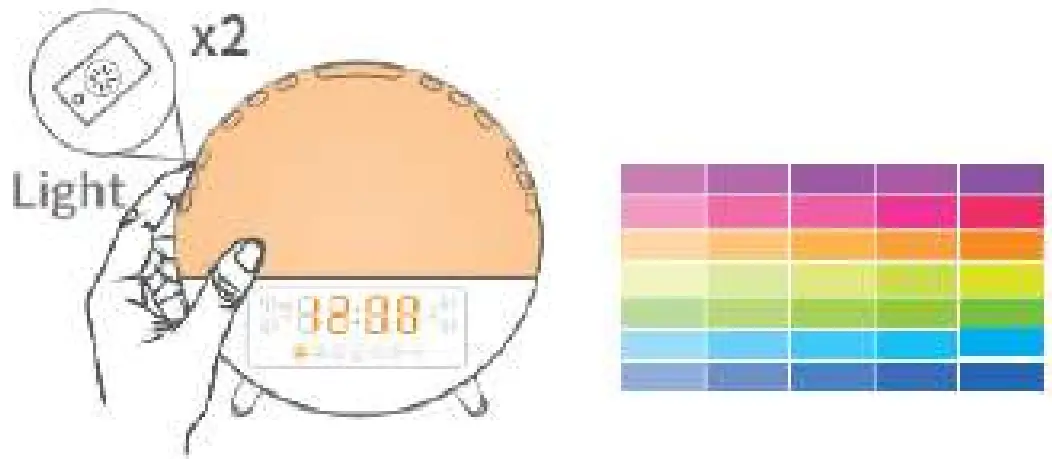
Press: ![]() /
/![]() choose one solid color (7 colors are available).
choose one solid color (7 colors are available).
Then long press ![]() or
or![]() to switch to automatic color changing mode. (If you need)
to switch to automatic color changing mode. (If you need)
Press Light/![]() again to turn off the Atmosphere Light.
again to turn off the Atmosphere Light.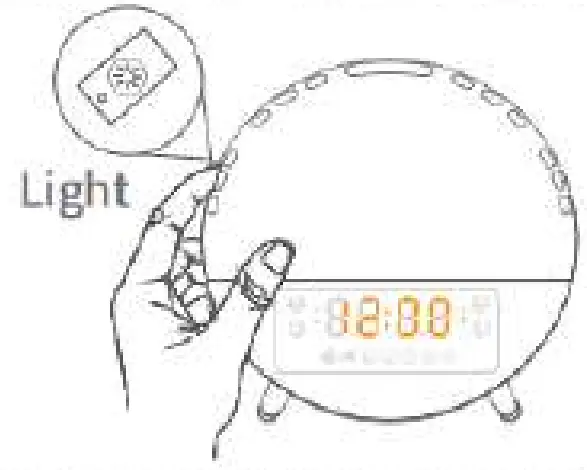
Night Light
Press snooze/![]() to tun on/off the night light.
to tun on/off the night light.
Note: Night light brighten is L-02 and can not be adjusted; it is recommended to use at night.
Note:
If alarm is not working, press Snooze/![]() to turn on/off night light; If alarm is working, press Snooze/
to turn on/off night light; If alarm is working, press Snooze/![]() to snooze.
to snooze.
SPECIFICATION
| Model | ACA-003-B |
| Size | 165x 160 x 60mm |
| Weight | 412g |
| Material | ABS, PC. Electronic components |
| FM radio frequency | 87.5-108M Hz |
| Control mode | Button control |
| Adaptor | 5V-2A/100-240V |
| Certification |  |
CAUTIONS
- Please use the product correctly according to the instructions. Disassembling and collision are strictly prohibited.
- Please place the product on a stable, horizontal, and non-smooth surface.
- Do not use it in high temperature, humidity and corrosive environment to avoid electric leakage due to circuit damage.
- Please keep it in a proper place and out of reach of children to avoid accidents.
- This product is not fireproof, do not throw it into the fire, and do not place it close to any fire source.
- This product is not waterproof, do not put it into the water to avoid damage.
STORAGE
- Please wipe the product with a soft cloth.
- Do not scrub the product with abrasive cleaner, rough chemical, alcohol or acetone detergent to avoid damage to the surface of the product.
- Store the product in a safe, dry place where it will not be crushed, bruised or damaged.
- Do not wrap the power cord around the appliance during storage.
Feel free to contact us if you need further assistance, our troubleshooting team will get back to you ASAP. Official
Website : www.dekalastore.com
Email : [email protected]