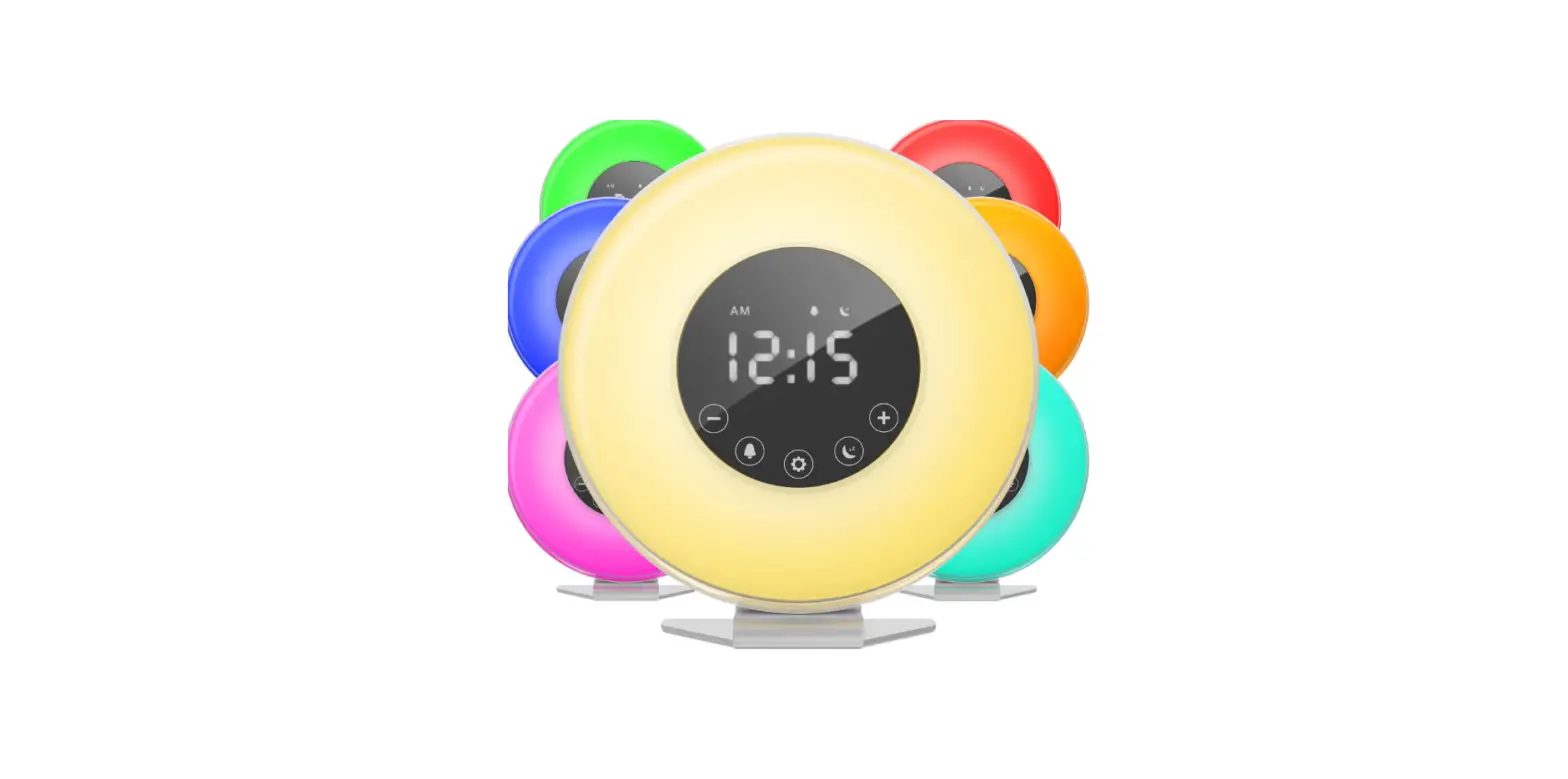
home HME040187N SUNRISE ALARM CLOCK

Important Safety Instructions
When using your hOme™ Sunrise Alarm Clock (appliance), basic safety precautions should always be followed to reduce the risk of fire, electrical shock, and/or injury to persons. Incorrect operation due to ignoring instructions may cause harm or damage
- These safety messages detail potential hazards, injuries, and dire consequences in minute detail. FOLLOW EM!
- Read these before you even think about touching your alarm clock.
- If the cord is damaged, continue not touching this alarm clock. Contact us at 1.800.898.3002.
- For your own sanity, plug this clock in somewhere easily accessible.
- More tips for a successful plug-in: ensure you are using a properly polarized outlet and also that the clock is, in fact, plugged in.
- Avoid ruining the cord. Don’t submerge it into liquids, step all over it, lay it over heat insulators, or cover/smother it.
- We don’t recommend using an extension cord, because we are in favor of avoiding fire risks at all costs.
- To clean your clock, unplug it first and don’t use flammable liquids. Explosions are only cool in the movies.
- Exercise reasonable caution and supervision if your kid is using this clock. Who knows what’s going on inside their little heads’.
- This clock is not a sundial. Keep it indoors and out of direct sunlight. For extra safety, put at least 4 inches between it and any wall or obstacle.
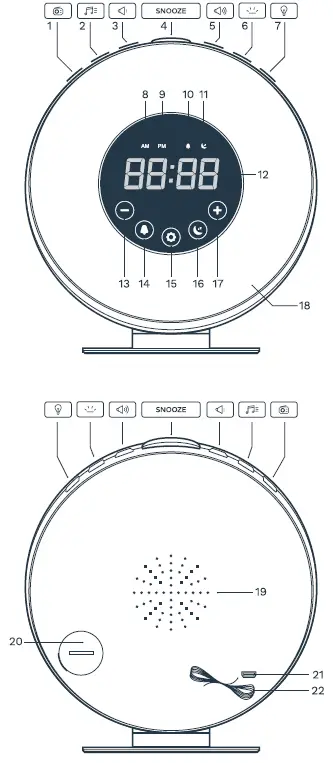
Getting To Know Your Sunrise Alarm Clock
- Radio
- Alarm Tone
- Lower Volume
- Snooze Button
- Raise Volume
- Digital Display Brightness
- LED Lights
- AM Icon
- PM Icon
- Alarm Icon
- Sleep Timer Icon
- Digital Display
- Decrease LED Brightness
- Alarm Option
- Current Time
- 12h / 24h Toggle
- Sleep Timer
- Increase LED Brightness
- LED Sunrise Light
- Speaker
- Battery
- USB (5V)
- Antenna

Glossary
 Radio – Press this button to play the radio. Hold for 3 seconds to scan available FM channels.
 Alarm Tone – Press this button to choose an alarm tone, using (+) and (-) to adjust. Press again to confirm.
 Lower Volume – Press to decrease volume.
- Snooze – Press to momentarily stop alarm sound. The default snooze time is 5 minutes. Press to change it to 10/15/20 minutes. After that time, the alarm tone will resume playing.
 Raise Volume – Press to increase volume.
 Display Brightness – Press this button to choose between three different LED display intensities: low, high, and off. Note: The clock will automatically display the brightest intensity during programming but will resume to the chosen option after 5 seconds.
 LED Light – Press once to turn on the light, then press and hold (+) and (-) to adjust among 10 levels of brightness. Press a second time to switch on light colors, using (+) and (-) to choose between 8 colors: warm white, cycling color, red, green, orange, pink, blue, and light green. Press and hold to switch off.
 Digital Display – This screen displays the time and modes you have selected.
- AM Icon – This indicates AM time when displayed.
- PM Icon – This indicates PM time when displayed.
 Alarm Icon – This indicates you have programmed an alarm when displayed.
 Sleep Timer Icon – This indicates you have set a sleep timer when displayed.
 Select down – Touch down to maneuver among sound, light, or radio options.
 Select up – Touch down to maneuver among sound, light, or radio options.
 Alarm Option – Touch to turn on alarm mode. The existing alarm time will display for 2 seconds. To adjust the alarm time, hold for 3 seconds then use (+) and (-) to adjust the hour. Press again to adjust the minute, and one last time to confirm. To dismiss alarm, touch to stop alarm tone completely.
 Current Time – This button is used to set the time. Press it to switch between a 12-hour and 24-hour clock, or hold for 3 seconds until the hour time begins to blink. Then use the (+) and (-) to adjust the hour. Press the button again to confirm the hour. Move to the minutes and choose in the same way. Press one final time to set the time.
 Sleep Timer – Touch this button to initiate sleep timer. Touch the Sleep Timer button once to set at 15 minutes and each press will add 15 minutes to the timer. Light will gradually dim until it turns off over the course of set time. Press twice for 30 minutes, three times for 60 minutes, and four times to turn off. Leave for 5 seconds to confirm.
 Select down – Touch down to maneuver among sound, light, or radio options.
 Select up – Touch down to maneuver among sound, light, or radio options.
 Alarm Option – Touch to turn on alarm mode. The existing alarm time will display for 2 seconds. To adjust the alarm time, hold for 3 seconds then use (+) and (-) to adjust the hour. Press again to adjust the minute, and one last time to confirm. To dismiss alarm, touch to stop alarm tone completely.
 Sleep Timer – Touch this button to initiate sleep timer. Touch the Sleep Timer button once to set at 15 minutes and each press will add 15 minutes to the timer. Light will gradually dim until it turns off over the course of set time. Press twice for 30 minutes, three times for 60 minutes, and four times to turn off. Leave for 5 seconds to confirm.
Using Your Alarm Clock
Set Up Your Clock
- Insert one CR2032 battery into the back of clock. Note that the battery is for backup power only.
- Connect to DC 5V power.
Set the Time
- Hold the Current Time button for 3 seconds until the hour time begins to blink.
- Use (+) and (-) to adjust the hour.
- Touch the Current Time button to confirm the hour time and move on to minutes.
- Use (+) and (-) to adjust the minutes.
- Touch the Current Time button once more to confirm.
Program Your Sunrise Alarm![]()
- Hold for 2 seconds to enter Alarm setting mode
- Use (+) and (-) to adjust the time. Tap Alarm Option button to confirm.
- Use (+) and (-) to set up alarm light rising time: 10/20/30/40/50/60 min/ OFF. Tap Alarm Option button to confirm.
- Use (+) and (-) to select the alarm light color. Tap Alarm Option button to confirm.
Set Your Alarm Tone![]()
- Press the Alarm Tone button to choose a tone.
- Use (+) and (-) to select between 7 sounds. Tone 1-6 consist of nature sounds, while tone 7 plays FM radio. “Program the Radio”.
- Wait for clock to return to standby mode, then press
 to adjust the volume. You must not be in “Tone”, “Light”, “Radio”, or any other mode.
 - Press the Alarm Tone button to confirm your tone. NOTE: Alarm volume and radio volume are adjusted separately.
Adjust Sleep Timer![]()
- Touch the Sleep Timer button to initiate sunset simulation.
- Touch the Sleep Timer button once to set at 15 minutes. Light will gradually dim until it turns off over the course of 15 minutes.
- Touch the Sleep Timer button a second time for sunset simulation over 30 minutes.
- Touch the Sleep Timer button three times for 60 minutes.
- Touch the Sleep Timer button four times to turn off.
- Leave for 5 seconds to confirm selected option.
Adjust Light![]()
- Press the LED Light button once to turn on the light.
- Use (+) and (-) to adjust between 10 levels of brightness.
- Press the LED Light button a second time to switch on light colors.
- Use (+) and (-) to choose between 8 colors: warm white, cycling color, red, green, orange, pink, blue, and light green.
Adjust Display Brightness![]()
- Press the Display Brightness button to choose between three different LED display intensities: low, high, and off.
- The clock will automatically display the brightest intensity during programming but will resume to the chosen option after 5 seconds.
Adjust Volume![]()

- Select the Lower Volume button to lower the volume.
- Select Raise Volume button to raise the volume.
Program the Radio![]()
- Hold the Radio button for 3 seconds to scan available FM channels. These will be automatically saved.
- Press Radio button once to play radio.
- Press (+) and (-) briefly to select FM station manually.
- Press (+) and (-) and hold for 3 seconds to select FM station automatically.
WARNING
To avoid the appliance falling or tipping over, always place on a flat, sturdy surface. Damage may occur if the appliance falls.
FAQs
Where should I place my alarm clock?
Place the alarm 16 to 20 inches from your head, such as on a bedside table.
How long does the snooze button last?
The Snooze button momentarily stops the alarm for 5/10/15/20 minutes by your Snooze setting. Alarm ring will resume after this time.
Why does the clock need a battery?
The battery serves as a backup power source if a power failure were to occur. To ensure that the battery is functioning, please change regularly.
Can I use a colored light during sunrise or sleep timer?
Colored light can be used in sunrise alarm, but not during sleep timer. To use the colored light options, press the light button twice and use (+) and (-) to select your color.
No sound for alarm clock even though the radio works fine?
In standby mode, increase the alarm clock volume with the raise volume button (You must not be in “Tone”, “Light”, “Radio”, or any other mode.)
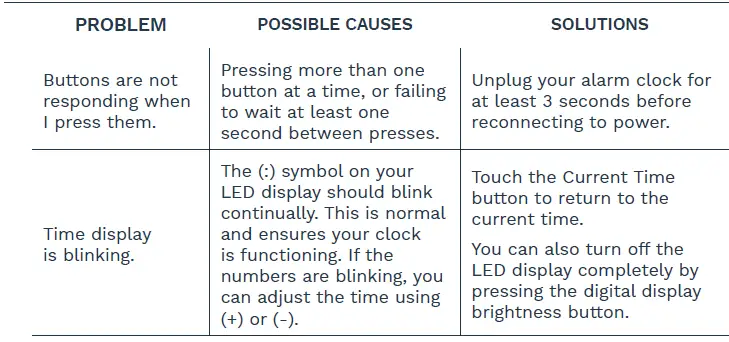
Troubleshooting
Warranty
hOme™ offers a limited two-year period on all of our products purchased new and unused from hOme Technologies, LLC or an authorized reseller, with an original proof of purchase and where a defect has arisen, wholly or substantially, as a result of faulty manufacture, parts, or workmanship during the warranty period. The warranty does not apply where damage is caused by other factors, including but without limitation:
- normal wear and tear;
- abuse, mishandling, accident, or failure to follow operating instructions;
- exposure to liquid or infiltration of foreign particles;
- servicing or modifications of the product other than by hOme™;
- commercial or non-household use.
The hOme™ warranty covers all costs related to restoring the proven defective product through repair or replacement of any defective part and necessary labor so that it conforms to its original specifications. A replacement product may be provided instead of repairing a defective product. HOme™’s exclusive obligation under this warranty is limited to such repair or replacement. A receipt indicating the purchase date is required for any claim, so please keep all receipts in a safe place. We recommend that you register your product on our website, homelabs.com/reg. Although greatly appreciated, the product registration is not required to activate any warranty and product registration does not eliminate the need for the original proof of purchase. The warranty becomes void if attempts at repair are made by non-authorized third parties and/or if spare parts, other than those provided by hOme™, are used. You may also arrange for service after the warranty expires at an additional cost. These are our general terms for warranty service, but we always urge our customers to reach out to us with any issue, regardless of warranty terms. If you have an issue with a hOme™ product, please contact us at 1-800-898-3002, and we will do our best to resolve it for you. This warranty gives you specific legal rights, and you may have other legal rights which vary from state to state, country to country or province to province. The customer may assert any such rights at their sole discretion.
Warning
Keep all plastic bags away from children. Manufacturer, distributor, importer and seller are not liable for ANY damage caused by improper use, storage, care or failure to follow warnings associated with this product.
Manufacturing Info
This manual is to be used with all items with the model number
- SKU# : HME040187N
- PART#: HME040187MNL
- RATING: 5V 1A
Contact Us
- homelabs.com/chat
- Mon–Fri 10AM–5PM EST
- 1-(800)-898-3002
- Mon–Fri 10AM–5PM EST
- [email protected]
- Respond within twelve hours
FCC
NOTE: This equipment has been tested and found to comply with the limits for a Class B digital device, pursuant to part 15 of the FCC Rules. These limits are designed to provide reasonable protection against harmful interference in a residential installation. This equipment generates, uses and can radiate radio frequency energy and, if not installed and used in accordance with the instructions, may cause harmful interference to radio communications. However, there is no guarantee that interference will not occur in a particular installation. If this equipment does cause harmful interference to radio or television reception, which can be determined by turning the equipment off and on, the user is encouraged to try to correct the interference by one or more of the following measures:
- Reorient or relocate the receiving antenna.
- Increase the separation between the equipment and receiver.
- Connect the equipment into an outlet on a circuit different from that to which the receiver is connected.
- Consult the dealer or an experienced radio/TV technician for help.”


