
 VocoPro UHF-3205 Rechargeable Wireless Microphone System
 VocoPro UHF-3205 Rechargeable Wireless Microphone System
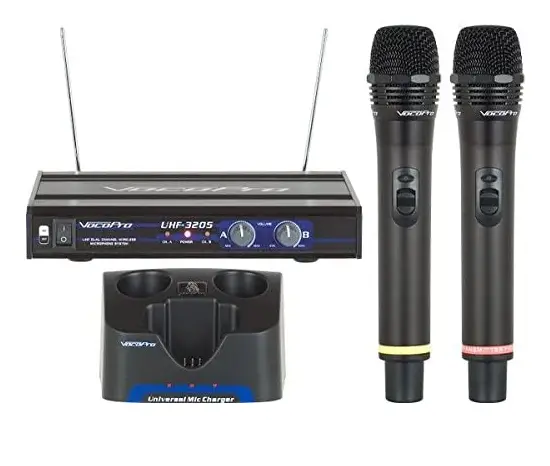
Save money on batteries with the VocoPro UHF3205 Rechargeable Wireless Handheld Microphone System—ideal for DJs or karaoke! This mic system uses the same feature set as the UHF3200, but adds a dual mic charging unit that can power two microphones at once or be used to rotate your microphone throughout the night for longer, all-night gigs! Battery-free operation is always a plus! Because UHF is a less busy frequency band, the UHF3205 gives a considerably clearer, interference-free signal and performs at a high level. With distinct 1/4 inch outputs and separate volume controllers to attach each microphone to a different mixer channel You can utilize both microphones on a single channel on your mixer or plug if you have an additional 1/4 inch mixed output.
SPECIFICATIONS
TRANSMITTER (MICROPHONES)
- CARRIER FREQUENCY: UHF 614~694 MHz
- STABILITY: 0.002%
- POWER OUTPUT: 30mv
- CURRENT LOSS: 55mA
- MAXIMUM DISTANCE: 197’ (Approx.)
- BATTERY:5V (AA) x2
- DIMENSIONS:4” (W) x 9.5” (H)
RECEIVER
- SENSITIVITY: 2uV @ sinad=12dB
- SPURIOUS REJECTION: 75dB
- IMAGE REJECTION: 85dB
- S/N RATIO: >105dB
- OUTPUT: MIX: 0~200mV, Separate: 0~400mV
- POWER: DC12 – 15V
- POWER CONSUMPTION: 3W
- DIMENSIONS:5” (W) x 5.5” (D) x 1.7” (H)
FEATURES
- 2 wireless rechargeable handheld mics included
- Included microphone charger charges both microphones at the same time
- 2 unbalanced mic outputs (1/4”) and 1 mixed output (1/4”)
- UHF Band (600 MHz)
- Rugged mic grills protect the microphone cartridge and prevent the mic from rolling
- Individual Volume controls for precise vocal balancing
- Low battery indicator (LED) on mics
- Dual antennas provide clear signal reception
- Rugged 1 RU metal receiver chassis
GETTING STARTED
Before starting any installation procedures, it is recommend that you completely unpack all of the package contents. The original packaging should be kept in the event that re-shipping is needed. Upon unpacking the UHF-3205, you should have received the following items:
| UHF-3205 receiver (1) | AC power adapter (1) | |
| Handheld Rechargeable microphones (2) | 3 ft. male/male ¼” cable (1) | 1.5 V AA batteries (4) |
| Removable Antennas (2) | Dual Microphone Charger (1) |
SETTING UP THE UHF-3205
Set up the UHF-3205’s receiver in a spot where there are no barriers above the antennas or between the receiver and the microphones.
NOTE: Do not place the UHF-3205 in a space where there is something above the antennas such as a rackspace or an entertainment center.
SETTING UP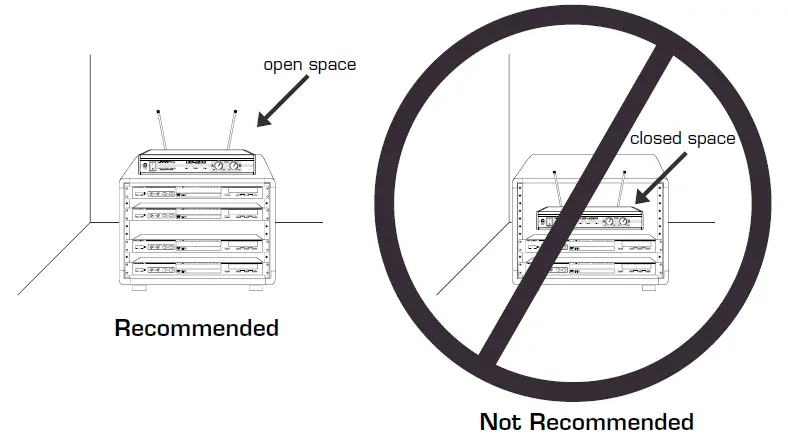
- Connect the AC POWER ADAPTER to the UHF-3205 receiver’s POWER INPUT connector, then plug the ADAPTER into a compatible AC electrical outlet.
- Attach the antennas by screwing in until secure. Be sure the antennas are pointing as straight up as possible.
- Connect the UHF-3205’s receiver to a sound system, mixer or amplifier’s microphone input(s) with ¼” output jacks.
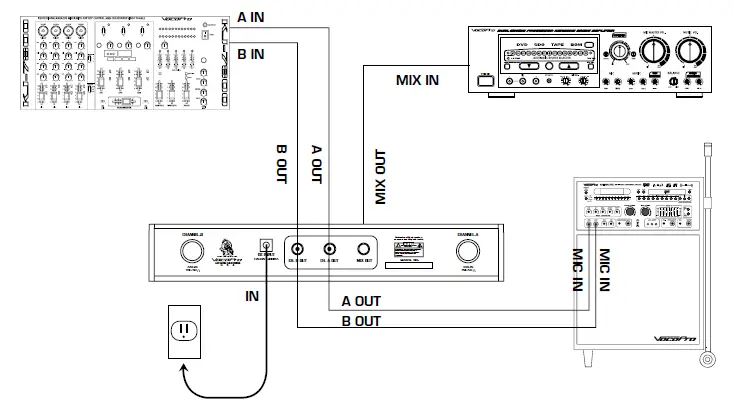
NOTE: There are two options when connecting the UHF-3205 to a mixer or amplifier.
- INDEPENDENT MIC CHANNELS
- Connect each mic channel independently to separate input channels on a mixer or amp. Do this by connecting a 1/4” cable from each mic channel (CH. A OUT and CH. B OUT) to individual inputs on your mixer or amp.
- MIXED MIC CHANNELS
- Use the mixed output to connect both microphone channels to a single mixer or amp channel. Do this by connecting a 1/4” cable from the MIX OUT jack to an input jack on your mixer or amp.
CONNECTING
CHARGING THE MICROPHONES
The UHF-3205 comes with a dual charger that lets you charge both microphones at the same time.
CHARGING THE MICROPHONES
If the LED light on the microphone(s) does not light up when the microphone is turned on, this indicates that the microphone needs to be charged
TO CHARGE:
- Place the microphone in the charger slot, the LED on the charger will be lit while the microphone is charging.
- When the LED on the charger turns off, the microphone is charged and can be removed. NOTE: For longest battery length, be sure to turn the microphones off when not in use.
READING THE LED INDICATORS
The LEDs on the charger indicate the charging status. There are three states: blinking, on, and off.
- BLINKING – The power is connected to the charger but there are no microphones being charged
- ON – The microphone is being charged
- OFF – The microphone is completely charged and can be removed.
CHARGER DESCRIPTIONS AND FUNCTIONS (PIC. NUMBERED PIC OF THE CHARGER)
- Microphone slots – Insert the microphones in these slots to charge
- Bodypack charger – Insert the optional rechargeable body pack in this slot to charge
- Microphone charge LED indicators – Indicate the charging status of the microphones
- Bodypack charge LED indicator – Indicates the charging status of the bodypack
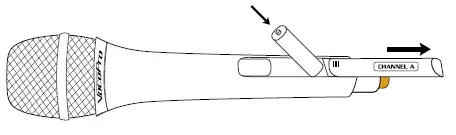
MICROPHONE DESCRIPTIONS
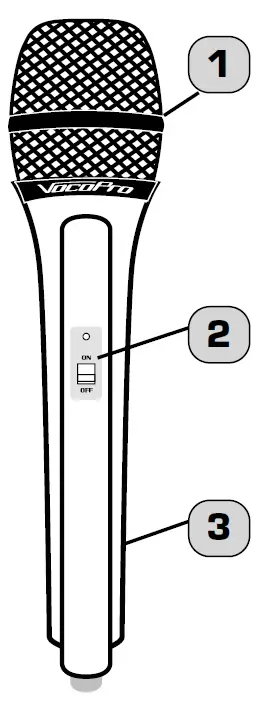
- GRILL – Protects the microphone cartridge and helps reduce “breathy” and wind noise pick-up.
- POWER SWITCH – Used to turn the microphone power ON and OFF. The mic power is ON when the switch is in the ON position and the power is OFF when the switch is in the OFF position.
MAINTENANCE PROCEDURES
CHARGING THE MICROPHONES
- Place one or both of the microphones in the microphone charger.
- Insert 2 fresh 1.5-volt AA alkaline batteries. Make sure the batteries are inserted in the right direction according to polarity (+/-).
- Close the BATTERY COMPARTMENT lid.
FRONT AND REAR PANEL DESCRIPTIONS
FRONT PANEL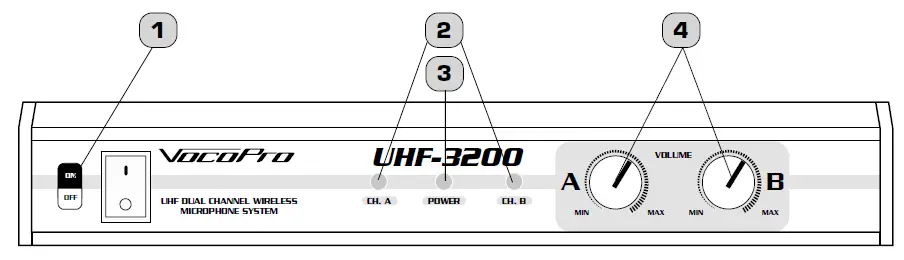
- POWER BUTTON – Turns the UHF-3205 On and Off.
- SIGNAL INDICATOR LEDS – These will light up when signals are received from the microphone channels.
- POWER (LED) – Indicates whether the UHF-3205 is ON or OFF. When it is lit, the power is ON.
- VOLUME CONTROLS – Adjusts the individual VOLUME of the receiver’s 2 microphone channels.
REAR PANEL
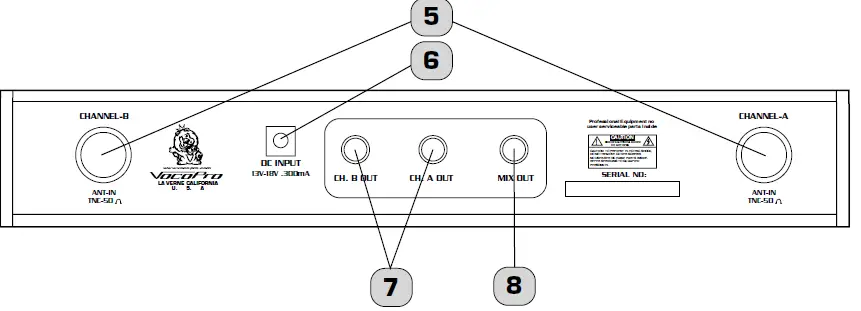
- ANTENNAS – Provide the RF signal.
- AC POWER connection – Main power jack for connection to an AC electrical outlet or power strip/surge protector.
- MIC CHANNEL OUTPUTS – These ¼” outputs are for connection to amplifiers, effects devices or mixers. OUT A corresponds to CHANNEL 1 and OUT B corresponds to CHANNEL 2.
- MIXED OUTPUT – Output mic channels A and B simultaneously from this output using a ¼” cable.
MICROPHONE BASICS
MICROPHONE POSITION
The UHF-3205 is ideal for close-up vocals and can be held in the hand or mounted on a mic stand. The most common applications and placement techniques are listed below. Keep in mind that microphone technique is largely a matter of personal taste, and there is no one “correct” microphone position.
PROXIMITY EFFECT
When the sound source is less than ¼” from the microphone, the microphone boosts bass frequencies (by 6 to 10 dB at 100 Hz), creating a warmer and richer bass sound than when farther away. This effect, known as proximity effect, happens only in unidirectional dynamic microphones like the UHF-3205.
FEEDBACK
- Feedback occurs when the amplified sound from any loudspeaker reenters the sound system through any open microphone and is repeatedly amplified. Most commonly, feedback is caused by the following conditions: placing loudspeakers too close to microphones, having too many open active microphones, boosting tone controls indiscriminately (mainly treble) and performing in areas with high ratios of room surfaces that have hard and reflective surfaces such as glass, marble and wood. What to do if feedback occurs before the sound system is loud enough?
- Request that the talker speak louder into the microphone.
- Reduce the distance from the talker to the microphone. Each time this distance is halved, the sound system output will increase by 6dB.
- Reduce the number of open microphones.
- Move the loudspeaker farther away from the microphone. Each time this distance is doubled, the sound system output can be increased by 6dB.
- Move the loudspeaker closer to the listener.
- Use an equalizer/feedback reducer to cut the frequency bands in which the feedback occurs.
MICROPHONE PLACEMENT & TONE QUALITY
LEAD & BACKUP VOCALS
Lips should be less than 3” from or even touching the windscreen on an axis to the microphone. Doing this creates a robust sound, emphasizes bass and provides maximum isolation from other sources.
SPEECH
When giving a speech or simply speaking, place the microphone 4” to 10” away from the mouth, just above nose height for a natural sound with reduced bass. You can also place the microphone 8” to 16” away from the mouth, slightly off to one side, for a more “distant” sound with highly reduced bass and minimal “s” sounds.
OPERATIONS
If you will be using the UHF-3205 with stage monitors and/or P.A. system, try the following:
- Place the stage monitor directly behind the microphone.
- Locate the P.A. loudspeakers so that they point away from the rear of the microphone. (With the speakers located in these positions, the possibility of feedback is greatly reduced).
- Always check the stage setup before a performance to ensure optimum placement of microphone and monitors.
IMPORTANT: Every wireless microphone installation is a unique situation, and can present a variety of problems. Never attempt a live performance without first conducting a “walkthrough” test of the system in the performing area. If major changes (additional wireless systems or intercoms, relocation of scenery, etc.) have been made since the last walk-through test, check the wireless system again, as close to performance time as possible.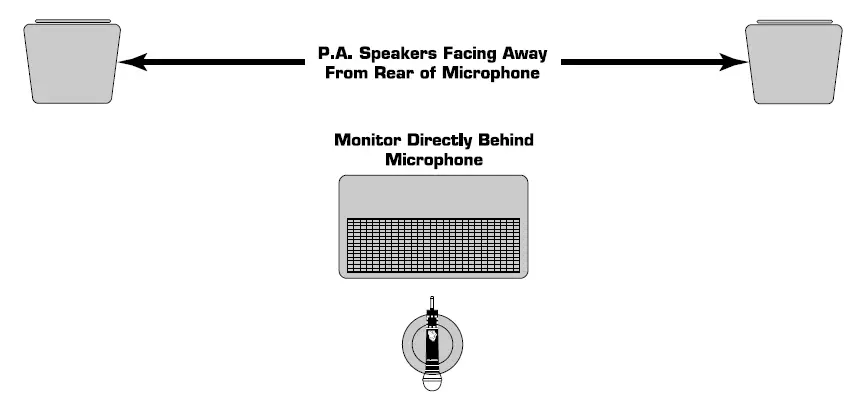
OPERATIONS
- Press the POWER button on the UHF-3205 receiver’s front panel. The power LED on the receiver will be RED.
- Adjust the receiver’s VOLUME controls to approximately 50%.
- Switch the microphone’s POWER BUTTONS to the ON positions.
- Talk or sing into the microphones. During normal operation, the Signal Indicator LED’s will light YELLOW when a microphone is being used.
- Adjust the receiver’s VOLUME controls until the output levels are balanced with each other and other possible source output i.e. CD+G tracks.
TROUBLESHOOTING
| PROBLEMS | SOLUTIONS |
| No sound; receiver RF light(s) and mic(s) not lit. | Make sure POWER switches on transmitters and receiver are set to ON positions.
Check microphone batteries to ensure they are providing power.
Recharge the microphones
Check receiver’s AC power connection.
Make sure antennas are in the microphones’ line of sight.
If necessary, reduce the distance between the microphones and receiver. |
| No receiver sound but the RF lights are glowing. | Turn up the receiver’s VOLUME level controls.
Check for proper connection between receiver and external amplifier/mixer.
Talk into the mic and observe the receiver’s RF signal LEDs. If they glow, the problem is elsewhere in the sound system. |
| Received signal is noisy or contains interference with transmitter on. | Check microphone power and charge if power is low.
Remove local sources of RF interference, such as lighting equipment. Two transmitters may be operating at the same frequencies or frequencies which are too close in proximity. Turn one off or exchange for one with a different frequency. Signal may be too weak. If so, reposition antenna (If possible, move them close to the transmitter). |
| Noise coming from the receiver with the mics turned OFF. | Remove local sources of RF interference, such as lighting equipment.
Reposition the receiver or antennae. |
| Momentary loss of sound as transmitter is moved around performing area. | Reposition receiver and perform a “walkthrough” test and observe the signal strengths. If audio dropouts persist, mark these “dead spots” in the performing areas and avoid them during the performance. |
FAQs
Do they include charger?
yes they do, but do not leave them on the charger. It is nice to be able to have them charged and ready but don’t leave them on the charger as a place to store them. I was told by a techy dude it can reduce the life of your battery by half if it is constantly charging. So, I bought a $5 plug in timer and set it for 2 hours before I use them and then they are ready to go.
I already have one set uhf3205 on freq chan p and o. how do I order another dual set on different freq channels?
I don’t know that.
My chord broke just after I purchased these. What chargers and plug do I get for replacements?
12 v. 1a or 1OOO mAh would work, but it is best to get original replacements from VocoPro directly.
My one mic is fading in volume sound can it be replaced? Or battery or anything to make it work again?
Mic sound fading can be many different issues. Battery could be getting old and cannot get a full charge. If low battery signal comes on frequently, that could be the problem. You might need to contact Vocopro to get that battery replaced. If battery is not the problem, it could be the receiver not picking up the signal as strong as before.
How can I get the recharger base
Contact Vocopro directly. I had to order new antennas and cords and they were extremely helpful and fast.
I have a set of these that I have had since 2014. I’d like to buy another set; how do I make sure that the two sets do not interfere with each other?
I have two set the one I got do not interfere I used these in a small church.
How many hours is usage time ?
I used for 5 or six hours and then I put to charge.
Does it work with vocopro wireless microphone uhfbp1m?
Yes.
How/where do I get replacement batteries?
You don’t need battery, cause is rechargeable.
where was this voco pro 3250 made?
China, I don’t remember – if I made comments about the unit after we purchased it or not but we bought two different units- a two mic system then a 4 mic. the two mics worked well for almost a year before one gave out– the 4 mic set had two mics that started with issues the day after we began using them. warranty didn’t happen because we got them but didn’t use them for 60 days waiting for our sound system to be completed. I would buy them again. we still use them but ended up buying two new receivers.
what kinds of the battery is ?
I bought them for the church and moved away so – what I remember is that they have a rechargeable- battery pack specific for that microphone. I think they are like $10 to replace them. I was there for three years and never had to replace them. I was told by a battery expert, not to leave them on the charger all the time. I think it takes about eight hours for them to get fully charged. We put the charger on a timer that turned on eight hours before church started. He said doing that would give them 5 times more life. We did have some quality issues at first, we actually have this set plus a set of four. It took a while but they did replace the three that were giving us problems.
Can wireless mics be used very far?
To prevent unwanted interference outside of the realistic range of a wireless microphone system, the government controls the radio signal strength from a wireless microphone transmitter. Depending on the situation, a transmitter’s effective range is normally between 100 and 1,000 feet.
Can many wireless mics be used simultaneously?
No, it won’t work like that. One active microphone transmitter at a time can only have its signal demodulated by a wireless receiver. However, as long as only one transmitter is turned on at any given time, you are free to utilize either one.
The way a UHF microphone functions
It is sometimes referred to as a radio microphone because it contains a tiny, battery-operated radio transmitter that uses radio waves to broadcast the audio signal from the microphone to a receiver device that is close by and recovers the audio. The receiver device is cabled to the additional audio gear.
How durable are wireless microphones?
Most wireless lavalier mics run 5 to 10 hours on a single charge when using an AA battery. Some have an integrated battery whose capacity determines how long it will last. However, they can typically endure at least five hours.


