
 Monoprice 600059 UHF Dual Handheld Wireless Microphones System
 Monoprice 600059
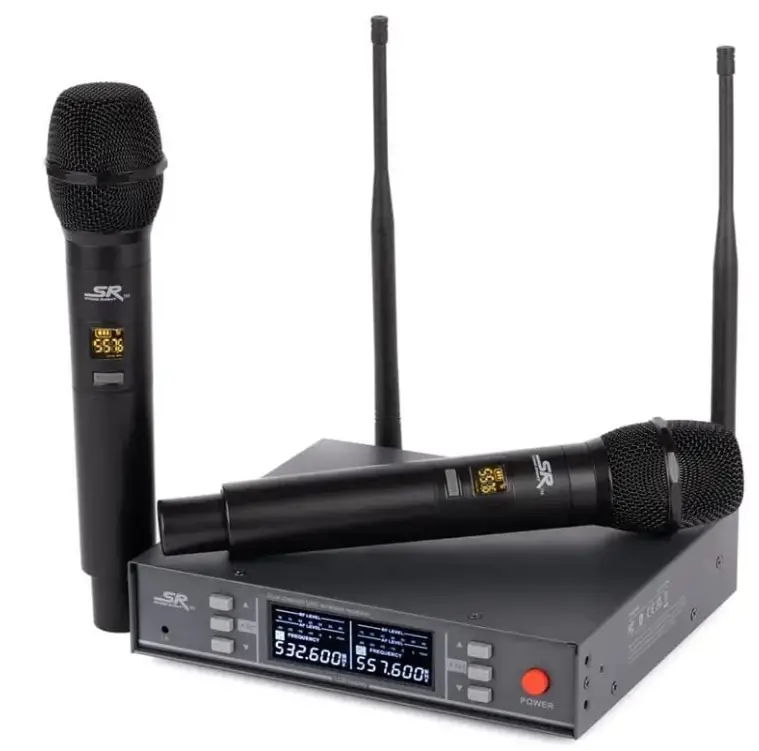
Introduction
Two portable wireless microphones with independent XLR outputs and reception channels are part of the system. Duets have never been so simple. Compared to cardioid patterns, the hypercardioid polar pattern has a smaller lobe of rear sensitivity and a tighter area of front sensitivity. With this pattern, the directivity factor is maximized and unwanted noise and feedback are rejected more effectively. You can locate open frequencies that are free of UHF source interference thanks to the 200 UHF channels. Thanks to the UHF bandwidth and the twin-channel receiver, you get more than 260 feet of range. operation stability without external interference in busy indoor spaces and at long distances.
PACKAGE CONTENTS
Please take an inventory of the package contents to ensure you have all the items listed below. If anything is missing or damaged, please contact Monoprice Customer Service for a replacement.
- 1x Receiver
- 2x Receiver Antennas
- 2x Handheld Microphones (600059 only)
- 2x Bodypack Transmitters (600060 and 600061 only) 2x Headset Microphones (600060 only)
- 2x Lavalier Microphones (600061 only) 1x AC Power Adapter
- 1x User’s Manual
PRODUCT OVERVIEW
RECEIVER FRONT PANEL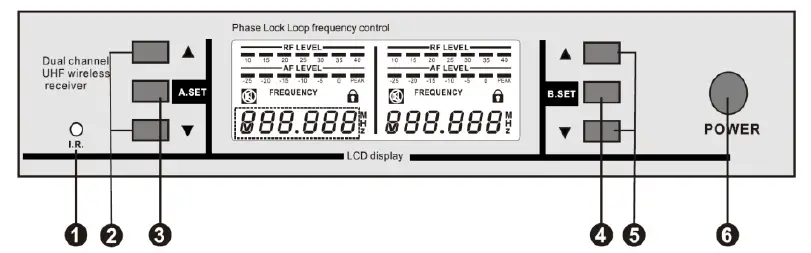
- R.: IR receiver.
- A▲/▼: Up and Down buttons for Channel A. Momentarily press either button to increase or decrease the volume level. Press the SET A button and the A▲ button at the same time to lock or unlock the front panel controls for Channel A.
- A SET: SET button for Channel A. Press the button one time to initiate IR synchronization. Press the button two times to scan for available frequencies. Press the button three time to manually set the frequency. Press the SET A button and the A▲ button at the same time to lock or unlock the front panel controls for Channel A.
- B SET: SET button for Channel B. Press the button one time to initiate IR synchronization. Press the button two times to scan for available frequencies. Press the button three time to manually set the frequency. Press the SET B button and the B▲ button at the same time to lock or unlock the front panel controls for Channel B.
- B▲/▼: Up and Down buttons for Channel B. Momentarily press either button to increase or decrease the volume level. Press the SET B button and the B▲ button at the same time to lock or unlock the front panel controls for Channel B.
- POWER: Momentarily press the POWER button to turn the Receiver on. Press and hold the POWER button for 2 seconds to turn the Receiver off.
RECEIVER REAR PANEL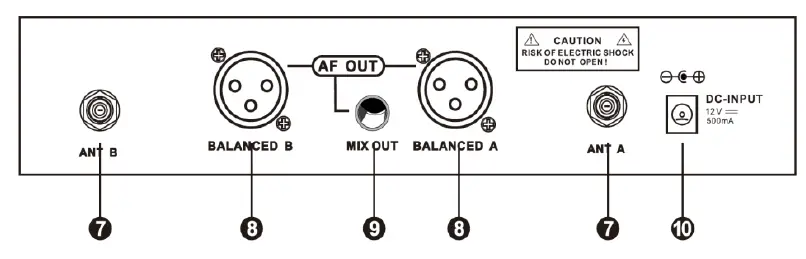
- ANT B/ANT A: Antenna BNC connector for Channel B and Channel A.
- BALANCED B/BALANCED A: The XLR jacks output a balanced signal for Channel B and Channel A.
- MIX OUT: The 1/4″ TRS jack outputs an unbalanced signal with a mix of Channel A and Channel B.
- DC INPUT: DC barrel connector for connecting the included AC power adapter.
RECEIVER DISPLAY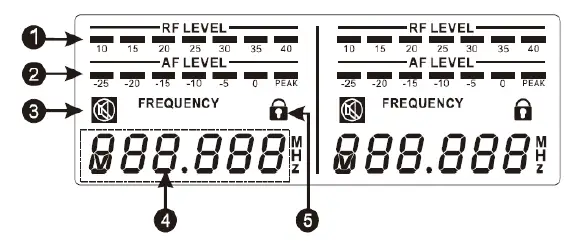
- RF LEVEL: The meter displays the strength of the RF signal from the Handheld Microphone (600059 only) or the Bodypack Transmitter (600060 and 600061 only).
- AF LEVEL: The meter displays the audio signal level in decibels (dB). The loudest signals should hit the 0 element. If the PEAK element illuminates, the signal is being distorted and the volume level should be reduced using the ▲/▼ buttons on the Receiver.
- MUTE: The output of the Handheld Microphone (600059 only) or the Bodypack Transmitter (600060 and 600061 only) is muted when the icon is displayed.
- FREQUENCY: Displays the frequency being used to communicate with the Handheld Microphone (600059 only) or the Bodypack Transmitter (600060 and 600061 only).
- LOCK: All settings are locked when the icon is displayed.
HANDHELD MICROPHONE (600059 ONLY)
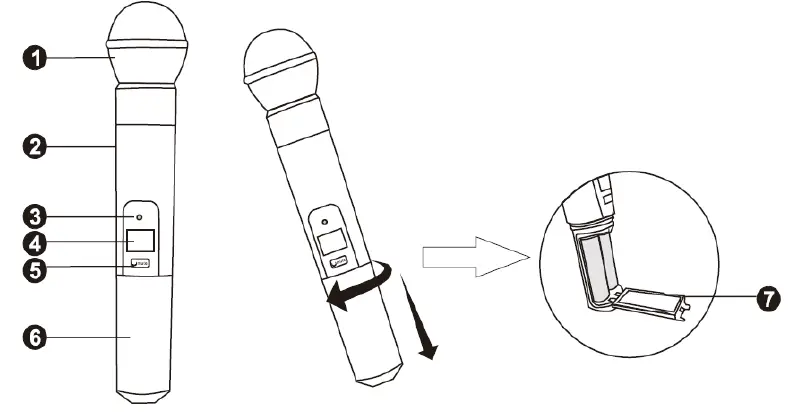
- Microphone Head
- Microphone Body
- IR: IR interface.
- Display
- Power/Mute Button: Momentarily press the button to turn the Handheld Microphone on or off. Press and hold the button for several seconds to turn MUTE on or off.
- Battery Cover: Unscrew the cover and remove it to access the battery compartment.
- Battery Compartment Cover: Open the cover to access the Battery Compartment.
HANDHELD MICROPHONE DISPLAY (600059 ONLY)
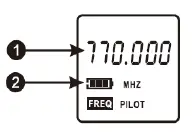
- FREQUENCY: Displays the frequency being used to connect to the Receiver.
- BATTERY: Displays the battery charge level.
SETUP AND OPERATION
RECEIVER
- Place receiver in a location close to where the performance will take place. Ensure that it is at least 5 feet (1.5 meters) from any large metal objects or wall/ceiling structure to ensure a strong RF signal.
- Connect the two antennas to the ANT A and ANT B connectors on the rear panel.
- Plug one end of the included AC Power Adapter into the DC INPUT jack on the rear panel, then plug the other end into a nearby AC power outlet.
- Momentarily press the POWER button to turn the Receiver on.
HANDHELD MICROPHONES
Perform the following steps for each Handheld Microphone to prepare it for use.
- Turn the Battery Cover counterclockwise to unscrew it, then pull it off the Microphone Body.
- Press the latch on the Battery Compartment Cover to open it to reveal the Battery Compartment.
- Install two AA batteries (available separately) into the Battery Compartment. Take care to match the polarity on the batteries with the polarity markings in the Battery Compartment.
- Close the Battery Compartment Cover.
- Slide the Battery Cover onto the Microphone Body, then turn it clockwise to screw it into place.
- Momentarily press the POWER/MUTE Button to turn the Handheld Microphone on.
MANUALLY SETTING THE RECEIVER FREQUENCY
You can manually set the frequency used to communicate with the Handheld Microphone or Bodypack Transmitter, or you can automatically scan for an available frequency. The latter is useful when using multiple Receivers. Perform the following steps to manually set the frequency.
- If the Receiver is not already powered on, momentarily press the POWER button to turn it on.
- Press the SET button three times. The FREQUENCY display will start flashing.
- Use the ▲/▼ buttons to change the displayed FREQUENCY.
- When the desired FREQUENCY is displayed, press the SET button to save the displayed FREQUENCY. The FREQUENCY display will stop flashing.
AUTOMATICALLY SETTING THE RECEIVER FREQUENCY
You can manually set the frequency used to communicate with the Handheld Microphone or Bodypack Transmitter, or you can automatically scan for an available frequency. The latter is useful when using multiple Receivers. Perform the following steps to automatically set the frequency.
- If the Receiver is not already powered on, momentarily press the POWER button to turn it on.
- Press the SET button two times. The FREQUENCY display will change to show SC.An.
- Press the ▲ button start scanning for an available frequency.
- When an available frequency is found, the display will change to show the FREQUENCY flashing. Either press the SET button to save the displayed FREQUENCY or press the ▲ button again to continue scanning. When the FREQUENCY is saved, the FREQUENCY display will stop flashing.
SYNCHRONIZING THE HANDHELD MICROPHONE WITH THE RECEIVER
Rather than manually setting the frequency used to communicate with the Receiver, you can synchronize the Handheld Microphone with the Receiver’s frequency using the I.R. interface.
- If you have not already set the frequency on the Receiver, perform the steps in the Manually Setting the Receiver Frequency or Automatically Setting the Receiver Frequency section above before synchronizing the frequency.
- If it is not already powered on, momentarily press the Power/Mute Button on the Handheld Microphone to turn it on.
- Press the SET button on the Receiver. The FREQUENCY display will show IR.–.
- Position the I.R. interface on the Handheld Microphone in front of the I.R. interface on the Receiver to begin synchronization.
- When synchronization is complete, the FREQUENCY display on the Receiver will change to display the FREQUENCY in use.
CONTROL LOCK
- Press the SET A Button and the A▲ button on the Receiver at the same time to lock or unlock the front panel controls for Channel A. The LOCK icon will show on the A Display when the controls for Channel A are locked
- Press the SET B button and the B▲ button on the Receiver at the same time to lock or unlock the front panel controls for Channel B. The LOCK icon will show on the B Display when the controls for Channel B are locked.
SPECIFICATIONS
RECEIVER
| Frequency Range | 590 ~ 890 MHz |
| Channel Number | 100 frequencies |
| Bandwidth | 30MHz |
| Oscillation Mode | PLL frequency synthesis |
| Frequency Stability | ±10ppm |
| RF Sensitivity | -95 ~ -60 dBm |
| Audio Frequency Response | 60Hz ~ 15kHz |
| Total Harmonic Distortion | ≤ 0.5% |
| Signal-to-Noise Ratio | ≥ 150dBA |
| Audio Outputs | 2x XLR (balanced), 1x TRS (unbalanced) |
| Receiving Distance | about 262 feet (80 meters) |
| Input Power | 12 ~ 24 VDC, 1A |
| AC Adapter Input Power | 100 ~ 240 VAC, 50/60 Hz |
| Maximum Power Consumption | ≤ 8 watts |
HANDHELD MICROPHONE/BODYPACK TRANSMITTER
| Frequency Range | 590 ~ 890 MHz |
| Receiving Frequencies | 200 frequencies |
| Frequency Stability | ±100ppm |
| Modulation | Wideband FM |
| Radio Frequency Power | ≤ 10 milliwatts |
| Audio Frequency Response | 60Hz ~ 15kHz |
| Total Harmonic Distortion | ≤ 0.5% |
| Input Power | 2x AA batteries (available separately) |
FAQs
Can many wireless mics be used simultaneously?
One active microphone transmitter at a time can only have its signal demodulated by a wireless receiver. However, as long as only one transmitter is turned on at any given time, you are free to utilize either one.
The way a UHF wireless microphone functions
The linked transmitter receives an audio signal from the wireless microphone. This audio signal is wirelessly sent by the transmitter using radio waves. These audio signals and radio waves are tuned to the receiver. An XLR cable is used by the receiver to output the balanced audio stream.
A wireless microphone can broadcast how far?
The usual range for systems of the kind detailed here (10–50 mW, VHF or UHF) can range from 100–1000 feet.
Can two wireless mics be used simultaneously?
No. When setting up wireless microphone systems, a specific receiver is required for each microphone that will be used.
Can any receiver be used with a wireless microphone?
No, as wireless microphones may employ incompatible frequencies, exclusive noise reduction circuits, and safe 128- or 256-bit encryption, they will NOT function with any receiver.
How much energy is consumed by a wireless microphone?
In contrast to wireless microphone systems, which typically have an output power of only 50 mW (fifty one thousandths of one watt! ), television transmitters can operate at power levels up to one million watts.
What benefit does UHF offer?
Since their wavelengths are shorter and can better pass through steel and concrete, UHF radios are often preferable for indoor use. The frequency range of UHF radios is 300 MHz to 3 GHz. Compared to UHF signals indoors, VHF radio signals deteriorate more frequently.
How much range does UHF have?
Since UHF transmission is constrained to distances of 30–40 miles (48–64 km) by the optical horizon and typically to shorter ones by local geography, it enables other users in nearby geographic regions to reuse the same frequency channels.
What uses does UHF have?
UHF radios operate at a higher frequency, making them perfect for wireless communications that must pass through obstructions like concrete, masonry, or other impediments.
The ideal frequency for a wireless microphone is
The 470 to 548Mhz bands offer the optimum compromise between long transmission distance and clear frequencies. Numerous wireless microphone setups are available that use the 2.4GHz frequency range.
What happens if you combine two microphones?
Two microphones operating simultaneously on the same frequency will interfere with one another because the receiver is unable to discern between the various signals or break them up into individual signals.
Why are there two microphones used?
It could be challenging to hear a singer’s voice while they are performing in front of a boisterous audience. Even poor singers can sound worse due to audience noise.
Does a wireless microphone require a speaker to function?
A microphone can be used without any speakers, headphones, or other playback devices.
Do wireless microphones require speakers?
Systems with wireless microphones are silent on their own. They need to be wired into a sound system.
How long do wireless microphone batteries last?
Most wireless lavalier mics run 5 to 10 hours on a single charge when using an AA battery. Some have an integrated battery whose capacity determines how long it will last. However, they can typically endure at least five hours.


