FSi DM Series Automatic Volumetric Calibration Instructions
Introduction
Automatic Volumetric Calibration provides a simple, fast, and accurate way to calibrate your FSI monitor. This automatic calibration routine is currently compatible with the Colorimetry Research CR100, the Klein Instruments K10A, and the Minolta CA310.
Before plugging your probe into your monitor you will want to ensure that the following prerequisites are met:
- Verify your monitor is running firmware version 2.0.00-2288 or later.
- Ensure that your colorimeter has the correct matrix or matrices stored on it for the display or displays you wish to measure. The name of the colorimeter matrix must match the model name of the monitor you wish to calibrate. Valid matrix names are DM170, DM240, and DM250.
- If possible, disconnect all signal cables from the monitor.
Automatic Calibration Steps
Step 1: With the monitor powered on plug the probe into the monitor’s USB Type A Port.
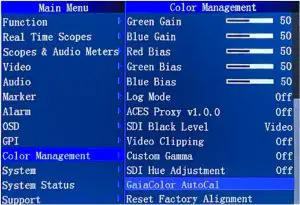
Step 2: From the Monitor’s Color Management Menu select GaiaColor AutoCalibration, confirm that you want to start alignment, then select the probe you will use from the list of available options.
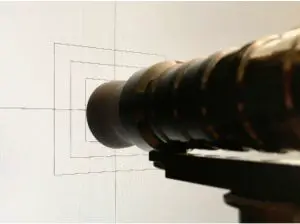
Step 3: Use the on-screen guides to position your probe correctly in the center of the screen.
Step 4: If your monitor is already warmed up you can Press Enter on the monitor at any time to start the automatic calibration routine. If your monitor was not previously warmed up you can simply leave the probe plugged into the monitor and the calibration routine will start automatically after one hour.
Step 5: The calibration will take approximately 7 to 12 minutes to complete depending on the probe / monitor combination in use. Calibration data is calculated and automatically saved to the monitor as part of the calibration routine. When prompted power cycle the monitor to complete the process.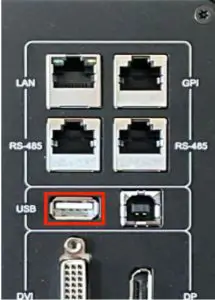
Tips and Troubleshooting
Issue / Topic | Solution / Tip |
| Calibration will not start and monitor shows “Please connect Meter to the monitor!” | This message can occur if the probe you are connecting does not match the probe you selected from the monitor’s menu when starting Automatic Calibration. This message can also appear if you do not have a correctly named matrix loaded to the probe. For example, if connecting to a DM170 a matrix named DM170 must be stored on the probe. If the problem continues disconnect the probe, power cycle the monitor, and try again. |
| Is disconnecting all signal cables before starting automatic calibration required? | No, but disconnecting cables allows the monitor to generate its own screen sync whereas leaving a signal connected forces the monitor to sync to the connected signal’s frame rate. If a signal is left connected and that signal format changes, drops, or is unstable it can cause the automatic calibration to fail or produce a poor calibration result. If this happens simply restart calibration. For the DM240 and DM170 disconnecting cables if possible is a best practice, for the DM250 please see the optimizing calibration for RGB Top Emission OLEDs topic for further considerations. |
| Optimizing calibration for RGB Top Emission OLEDs | The DM250 and other RGB Top Emission OLEDs are susceptible to a minor amount of calibration shift based on the frame rate and resulting refresh rate of the OLED panel. If no signal is connected during Automatic Calibration the monitor will be optimized for 30P and 60P signals. We would therefore suggest QC’ing at these same frame rates. If you would like to optimize for 24P or 25P instead simply connect a stable 24P or 25P signal during Automatic Calibration. Calibration results will remain very good for all frame rates regardless of the sync used during AutoCal, but if you operate primarily in one frame rate this is an easy way to optimize results for your primary use case. |
| The monitor or probe was unplugged before calibration completed | Previous calibration data is not deleted until the new calibration completes successfully so a mid-calibration power interruption to monitor or probe is not generally a problem. Simply unplug the probe from the monitor, power cycle the display, then reconnect the probe and start again. |
| Can I start my calibration right away or is warm-up necessary? | Best results will be obtained by calibrating a monitor that has had time to warm-up and stabilize. If the monitor was already in use before you begin calibration then you can typically start your calibration immediately. If your monitor was just recently turned on and you have the time available the monitor has an automatic 1 hour warm-up countdown timer built-in to autostart your calibration after warm-up. The DM170, DM240, and DM250 all stabilize fairly quickly so if you are pressed for time starting calibration without extensive warm-up will still yield good results, but the best practice when time is available is to allow for 30 to 60 minutes of warm-up. Keeping your probe plugged into the monitor during the warm-up period is also a good practice to allow the probe to warm-up and stabilize as well. |
| Poor results or calibration failure when using CR100 | When using the CR100 please ensure that Exposure Multiplier is set to 1, Sync is set to Auto, and Max Flicker Frequency Search is not set higher than 150Hz. Incorrect probe settings can cause problems during AutoCal. |
Customer Support
Flanders Scientific, Inc.
6215 Shiloh Crossing
Suite G
Alpharetta, GA 30005
Phone: +1.678.835.4934
Fax: +1.678.804.1882
E-Mail: [email protected]
www.FlandersScientific.com