BS SPORTS DC-01 Exercise Bike
IMPORTANT SAFETY INFORMATION
Thank you for choosing our product. To ensure your safety and health, please use this equipment correctly. It is important to read this entire manual before assembling and using the equipment. Safe and effective use can only be achieved if the equipment is assembled, maintained and used properly. It is your responsibility to ensure that all users of the equipment are informed of all warnings and precautions.
- Before starting any exercise program, you should consult your physician to determine if you have any medical or physical conditions that could put your health and safety at risk, or prevent you from using the equipment properly.
- Be aware of your body’s signals. Incorrect or excessive exercise can damage your health. Stop exercising if you experience any of the following symptoms: pain, tightness in your chest, irregular heartbeat, shortness of breath, lightheadedness, dizziness or feelings of nausea. If you do experience any of these conditions, you should consult your physician before continuing with your exercise program.
- Keep children and pets away from the equipment. The equipment is designed for adult use only.
- Use the equipment on a solid, flat level surface with a protective cover for your floor or carpet. To ensure safety, the equipment should have at least 4 feet (1.2 M) of free space all around it.
- Ensure that all nuts and bolts are securely tightened before using the equipment. The safety of the equipment can only be maintained if it is regularly examined for damage and/or wear and tear.
- Before each use, examine this machine for loose parts or signs of wear. Do not use if found in this condition. Monitor the Seat, Pedals and Crank Arms closely.
- If you find any defective components while assembling or checking the equipment, or if you hear any unusual noises coming from the equipment during exercise, discontinue Using of the equipment immediately and do not use until the problem has been rectified.
- If replacement parts are necessary use only genuine replacement parts and hardware supplied by DABANG SPORTS. Failure to use genuine replacement parts can cause a risk to users, Make machine operate correctly to avoid the warranty.
- Your product is intended for use in cool, dry conditions. You should avoid storing in extreme cold, hot or damp areas as this may lead to corrosion and other related problems.
- Do all assembly steps in the sequence given. Incorrect assembly can lead to injury or incorrect function.
- Do not place fingers or objects into the moving parts of the equipment.
- Wear suitable clothing while using the equipment. Avoid wearing loose clothing that may become entangled in the equipment.
- Maximum user weight limit: 264.55 lbs (120 kg). Do not use if you are over this weight.
- This equipment is designed for indoor and home use only, it is not intended for commercial use!
- Do not over exert yourself during exercise. Operate the machine in the manner described in this manual.
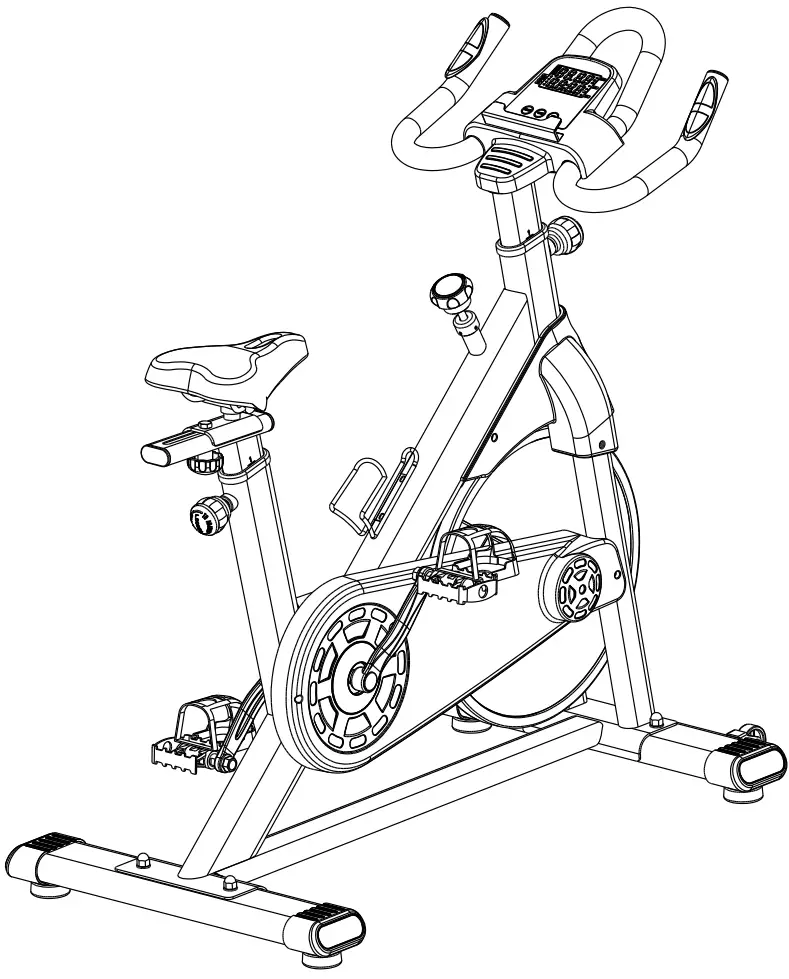
PARTS
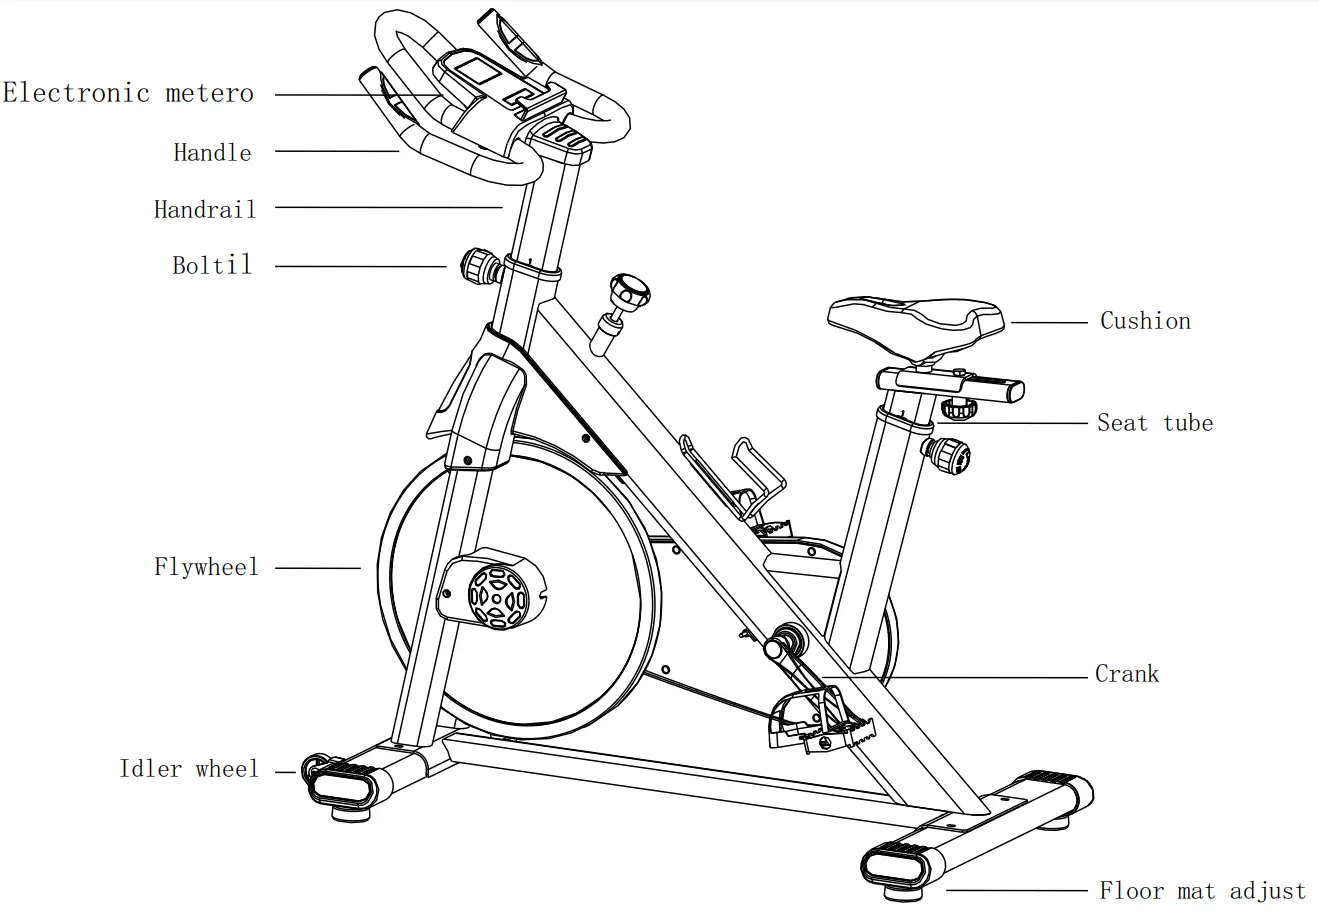
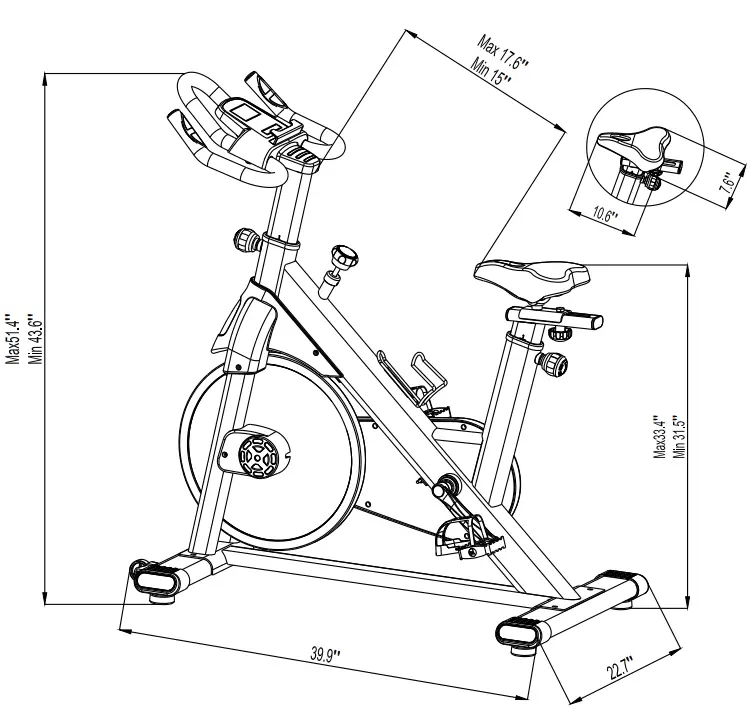
Suitable For Most Body Sizes
Parts List
| Part No. | Description | Diagram | Qty |
| 1 | Main frame |  | 1 |
| 2 | Front stabilizer |  | 1 |
| 3 | Rear stabilizer | 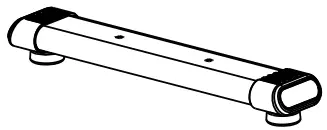 | 1 |
| 4 | Handle bar unit | 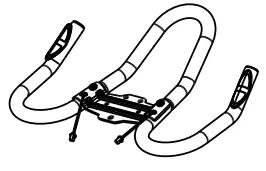 | 1 |
| 5 | Saddle sup port rack | 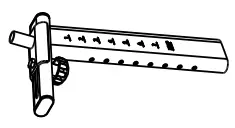 | 1 |
| 6 | H a n d l e b a r support rack | 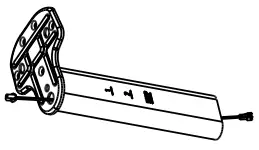 | 1 |
| 7 | Saddle | 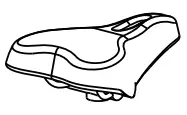 | 1 |
| 8 | Meter | 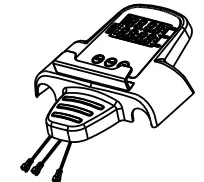 | 1 |
| 9 | Pedal(Left) |  | 1 |
| 10 | Pedal(Right) |  | 1 |
Detailed list of screw package

| Part No. | Description | Specification | Qty. |
| 1 | Carriage bolt | M8*55 | 4 |
| 2 | High cover nut | M8 | 4 |
| 3 | Flat wasr | φ8 | 4 |
| 4 | Spring washer | φ8 | 3 |
| 5 | Screws | M8*15 | 3 |
| 6 | Combination wrench A | 13mm 17mm 19mm | 1 |
| 7 | Combination wrench B | 13mm 15mm | 1 |
| 8 | Allen wrench | 5mm | 1 |
Installation Instructions
Step 1:
- Take out the spin bike from box , put on the flat ground.
- Using combination wrench B to install the main frame (78)onto the rear stabilizer(79) with the bolt (39),washer(32) and tighten with screw (31).

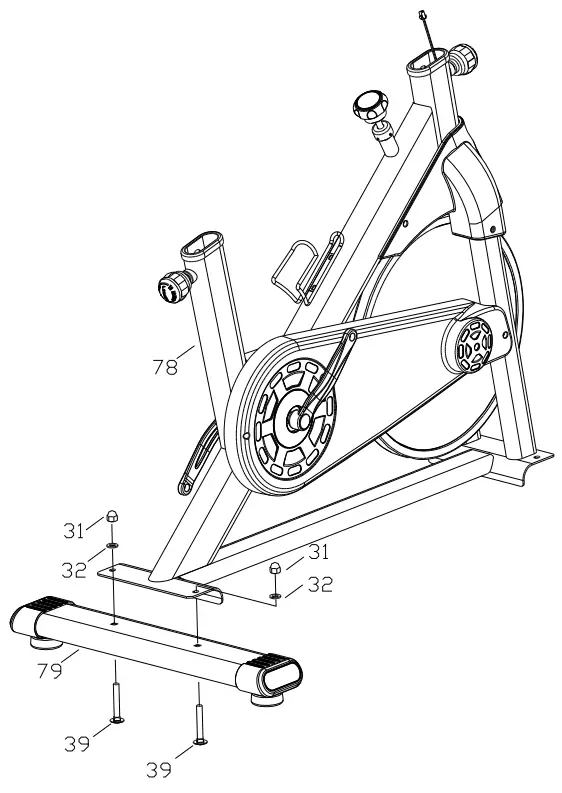
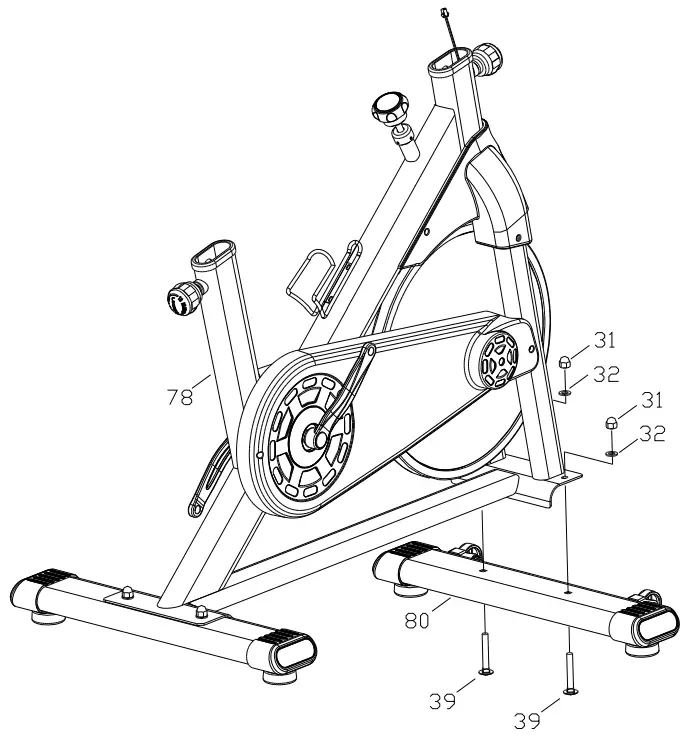
Step 2:
- Using combination wrench B to install the main frame (78)onto the front stabilizer with the bolt (39),washer(32) and tighten with screw (31).

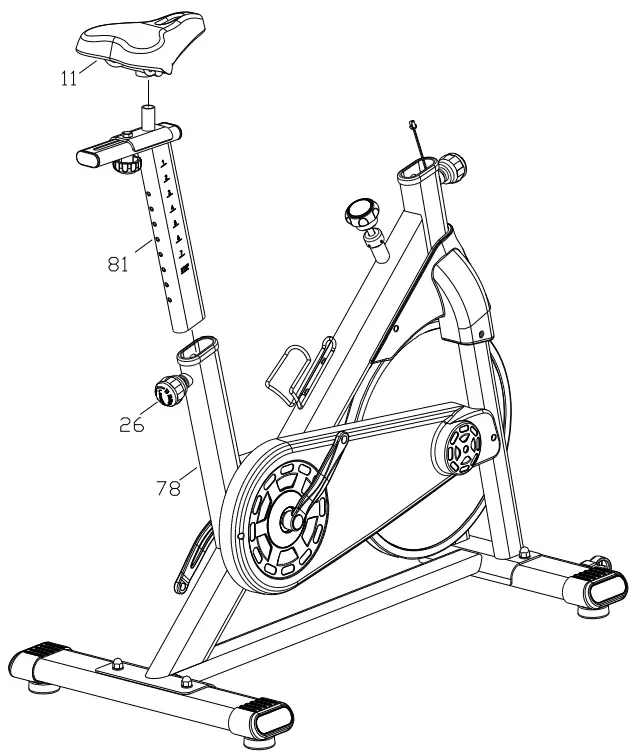
Step 3 :
- Pull back the Spring pin(26),insert the adjustable saddle support rack(81) into the main frame and lock with the spring pin.
- Use combination wrench B to Install the saddle(11) onto saddle support rack(81) ,then lock with nut for both sides.

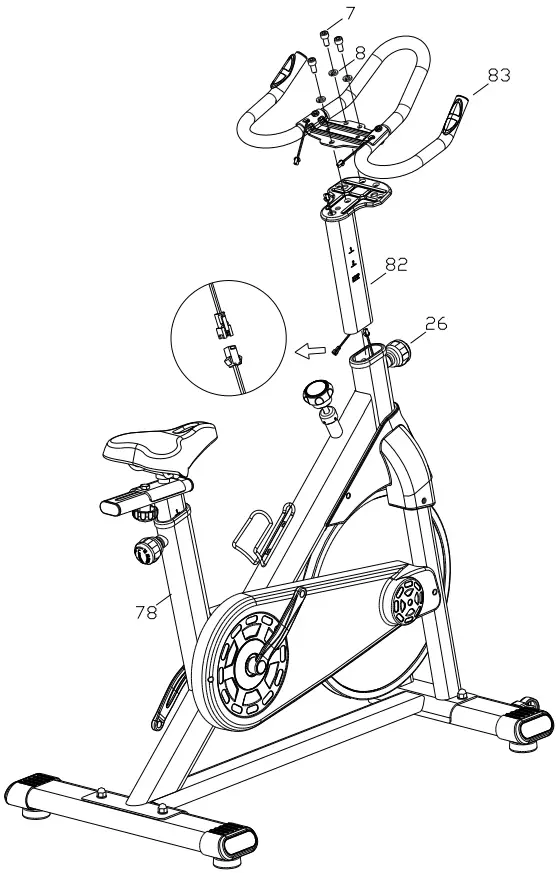
Step 4 :
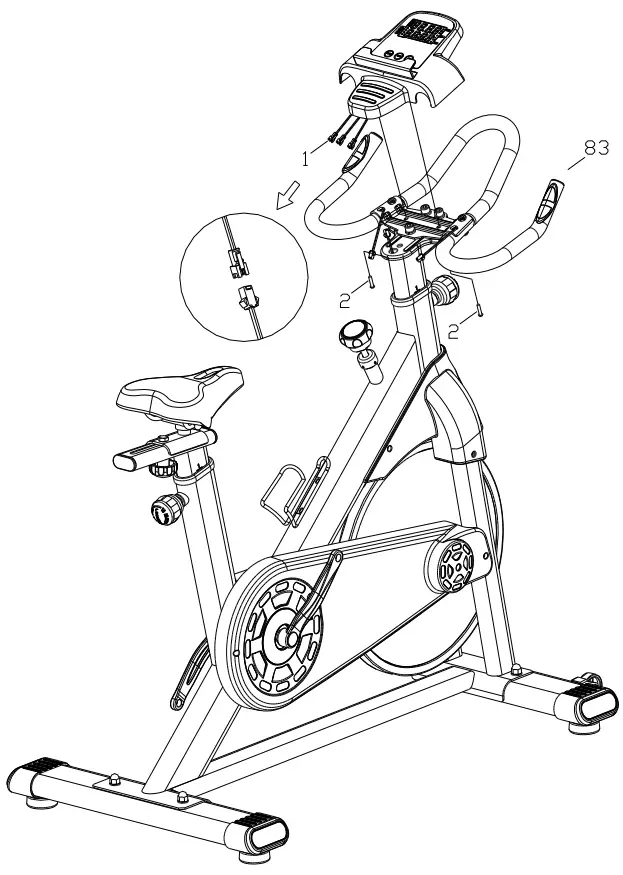
- Connect the wire between the handle bar support rack (82) with main frame ,pull back the spring pin(26),insert the adjustable handle bar support rack(82) into main frame with suitable height and lock it.(refer below pic)
- Install the handle bar (83) onto the handle bar support rack(82) with flat washer (8),screws(7) and tighten it.

Step 5 :
- Use combination wrench A to remove the pre installed screws from meter .
- Connect the meter wire with wire out of handle bar support rack.
- Install the meter(1) onto handle bar unit(83) with screws.

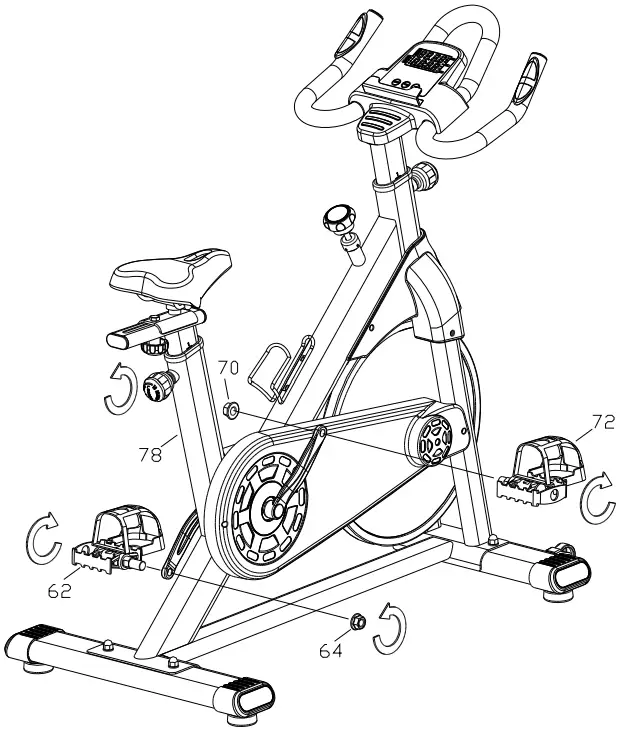
Step 6 :
- Use combination wrench B to remove the pre installed nuts from pedals on both sides .
- Use combination wrench B to lock the pedal(62) and crank on left side with nut (64) .
- Use combination wrench B to lock the pedal(72) and crank on right side with nut (70) .

NOTE: Please confirm that all screws are locked uniformly according to the requirements after installation, and check no part is left out before using.
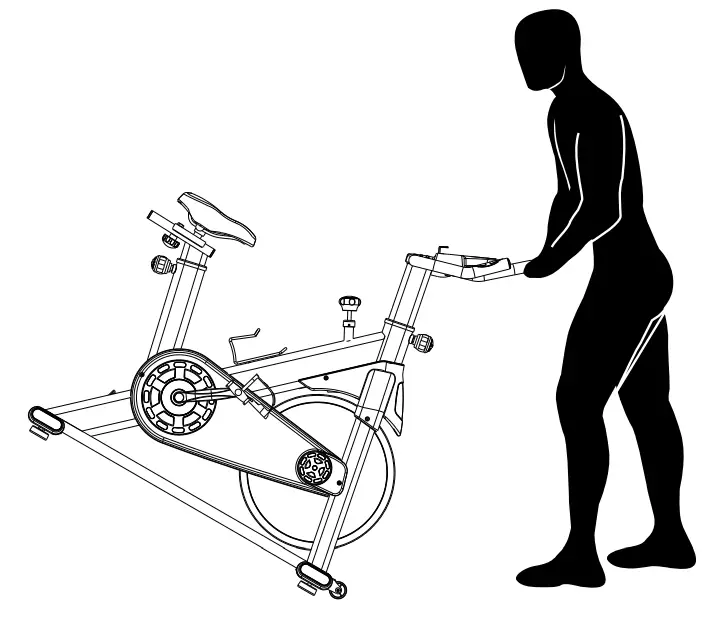
![]() For safe storage of the machine, remove the batteries.
For safe storage of the machine, remove the batteries.
Place the machine in a secure location away from children and pets.
Explosion View
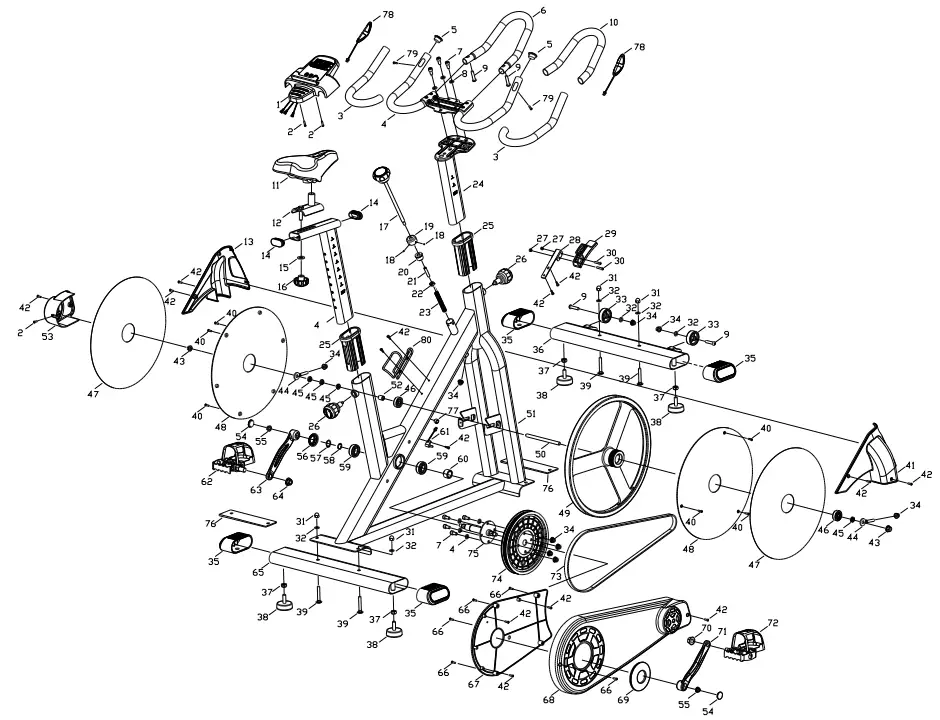
Explosion List
| Part No. | Description | Spec | Q’ty | Part No. | Descrip tion | Spec | Q’ty |
| 1 | Meter | 1 | 42 | Bolt | ST4.2*16 | 11 | |
| 2 | Bolt | M 5*15 | 3 | 43 | Nut | M 10*P1.0 | 2 |
| 3 | Handle bar foam | φ24*t3.0*410 | 2 | 44 | Regulator | M 8*45 | 2 |
| 4 | Handle unit | 1 | 45 | Nut | M 10*P1.0(t5) | 4 | |
| 5 | Plug | φ25(t1.5) | 2 | 46 | Bearing | 6300 | 2 |
| 6 | Handle bar | φ25*t1.5*566 | 1 | 47 | Flywheel sticker | φ63*φ387 | 2 |
| 7 | Bolt | M 8*15 | 7 | 48 | Protect cover | φ388*8.5 | 2 |
| 8 | Spring washer | φ8 | 7 | 49 | Flywheel | φ420*62.7 | 1 |
| 9 | Bolt | M 8*35*15 | 4 | 50 | Axle bearing | φ12*150*M 10*P1. | 0 1 |
| 10 | Handle bar foam | φ24*t3.0*470 | 1 | 51 | Main frame | 1 | |
| 11 | Saddle | 1 | 52 | Bushing | φ10.2*φ14*16.5 | 1 | |
| 12 | Saddlefixing plate | 1 | 53 | Protect cover | 148*104*64 | 1 | |
| 13 | Flywheel protect cover L | 308*186*87.3 | 1 | 54 | Plug | φ25*5 | 2 |
| 14 | Plug | 47.5*25*17 | 2 | 55 | Nut | M 10*P1.25 | 2 |
| 15 | Flat washer | φ10 | 1 | 56 | Bushing | φ23*φ44*10 | 1 |
| 16 | Knob | φ49*37*M 10 | 1 | 57 | Washer | φ20 | 1 |
| 17 | Brak unit | φ 60*255.5*M 10*215.5 | 1 | 58 | Arc washer | φ20 | 1 |
| 18 | Bolt | M 5*5 | 2 | 59 | Bearing | 6004 | 2 |
| 19 | Bushing | φ32*φ12*19 | 1 | 60 | Bushing | φ20.2*φ22*9 | 1 |
| 20 | Bushing | φ10.5*φ25.5*17.5 | 1 | 61 | Sensor | 800 | 1 |
| 21 | Bushing | φ11*φ14*75.5 | 1 | 62 | Pedal L | 9/16 | 1 |
| 22 | Bushing | 14*14*5.5*M10 | 1 | 63 | Crank L | 165 | 1 |
| 23 | Spring | φ11*φ13*86 | 1 | 64 | Nut L | 1 | |
| 24 | Handle support frame | 1 | 65 | Real stabilizer | 1 | ||
| 25 | Bushing | 85*45*130 | 2 | 66 | Bolt | ST4.2*16 | 5 |
| 26 | Spring pin | φ49*80.5*M16*P1.5 | 2 | 67 | Protect cover inner | 409*262*21 | 1 |
| 27 | Nut | M5 | 2 | 68 | Protect cover outer | 657*270*74 | 1 |
| 28 | Brake fixing plate | t1.5*115*51.5 | 1 | 69 | Protect cover | φ44*φ100*12 | 1 |
| 29 | Brake | 108*30*35 | 1 | 70 | Nut R | 9/16 | 1 |
| 30 | Bolt | M5*30 | 2 | 71 | Crank R | 165 | 1 |
| 31 | Nut | M8 | 4 | 72 | Pedal R | 9/16 | 1 |
| 32 | Flat washer | φ8 | 6 | 73 | Belt | PK1290 | 1 |
| 33 | Moving wheel | φ8.2*φ48*19 | 2 | 74 | Belt wheel | φ220*21.2 | 1 |
| 34 | Nut | M8 | 9 | 75 | Crank connection part | φ20*164.5 | 1 |
| 35 | Plug | 108*656*48 | 4 | 76 | EVA | 208*103*t2.0 | 2 |
| 36 | Front stabilizer | 1 | 77 | Wire buckle | φ14*11.5 | 1 | |
| 37 | Nut | M10 | 4 | 78 | Handle pulse | 2 | |
| 38 | Ajustable foot pad | φ53*49*M10*30.5 | 4 | 79 | Bolt | ST4.2*25 | 2 |
| 39 | Bolt | M8*55*20 | 4 | 80 | Water bottle holder | 1 | |
| 40 | Bolt | ST3.5*10 | 6 | ||||
| 41 | Flywheel protect cover R | 308*198*85 | 1 |
EXERCISE COMPUTER
SPECIFICATIONS:
TIME……………………………………………….. 00.00-99.59
SPEED…………………………………….. 0.0-99.9kM/H or ML/H
DISTANCE……………………………………. 0.00-999.9KM or ML
ODOMETER*(IF HAVE)…………………………….. 0-9999KM or ML
PULSE*(IF HAVE)……………………………………… 40-240BPM
CALORIES…………………………………………. 0.0-9999KCAL
KEY FUNCTIONS:
MODE. :This key lets you to select and lock on to a particular function you want.
OPERATION PROCEDURES:
- AUTO ON/OFF:
The system turns on when any key is pressed or when it receives an signal input from the speed sensor.
The system turns offautomatically when the sensor has no signal input or no key are pressed for approximately 4 minutes. - RESET:
The unit can be reset by either changing battery or pressing the mode key for 3 seconds. - MODE:
To choose SCAN or LOCK if you do not want the scan mode, press the MODE key when the pointer on the function you want which begins blinking. - FUNCTIONS:
TIME
Press the MODE key until the pointer advance.
SPEED
to TIME.The total working time will be shown.Press the MODE Key until the pointer advance to SPEED.The total working time will be shown.
DISTANCE
Press the MODE key until the pointer advances to DISTANCE. The distance of each workout will be displayed.
EXERCISE COMPUTER
ODOMETER
*(IF HAVE)
Press the MODE key until the pointer advances to ODOMETER
The total accumulated distance will be shown.
PULSE
*(IF HAVE)
Press the MODE key until the pointer advance to PULSE. User’s current heart rate wil be displayed in beats per minute.
CALORIES
Place the palms of your hands on both of the Contact pads(or put ear-clip to ear), and wait for 30 seeonds for the most accurate reading Press the MODE key until the pointer advance to CALORIES. The calories burned will be displayed.
SCAN
Automatic display of the following functions in the order show:
TIME-SPEED一DISTANCE-PULSE (ifhave) 一 CALORIES (repeat).
BATTERY
This monitor uses one or two (if have PULEE function) batteries. if improper display on monitor, please reinstall the batteries to have a good resuil.
www.bs-sports.cn
[email protected]![]()