

YOWHICK GDP1B Native 1080P 5G WiFi Bluetooth Projector

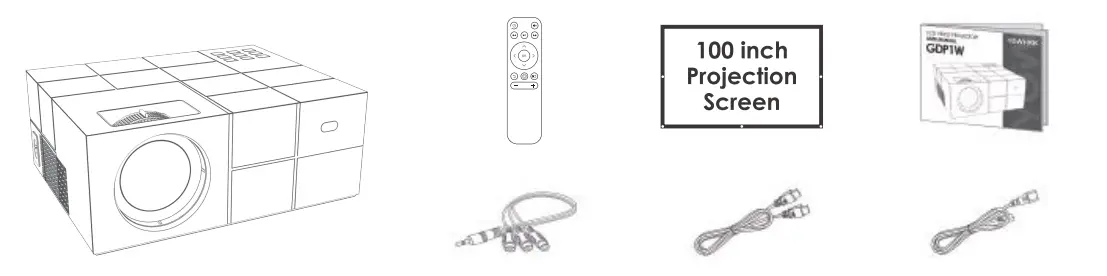
PACKING LIST
SAFETY PRECAUTIONS
- Please read the user manual carefully before using the projector.
- Only use the power cord supplied with this product with an electrical socket that is earthed properly.
- Please use the same power voltage as marked on the projector.
- Please do not disassemble the projector by yourself, otherwise, it will void your warranty.
- Please do not look into the lens directly while the projector is turned on, it may cause damage to your eyes.
- DO NOT block the air vents during use.
- Please keep the projector away from water or any other liquid as it is not waterproof.
- Please do not put the projector in wet or moist conditions to prevent electric shock.
- Please switch off and unplug the appliance when it is not in use for a long time.
- Please use the original packaging foam or other anti-shock material when relocating the projector.
- Please contact the YOWHICK customer support team if you encounter any problem with the projector.
- This projector is covered by the YOWHICK 24-month warranty.
Please contact us if you want to know more about the warranty. (The user manual and packaging are not covered by the warranty)
REMOTE CONTROL
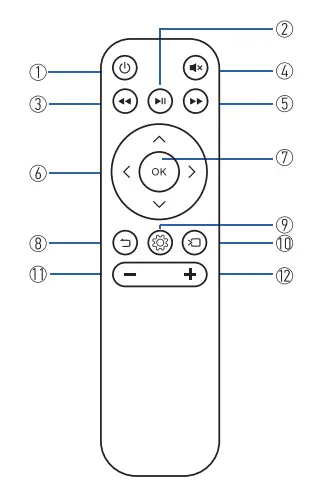
- Power On/Off
- Rewind
- Pause/Play
- Mute
- Left/Right/Up/Down 8. Return
- Signal
- Volume+
- Confirm
- Fast Forward
- Menu
- Volume-
Tip: ln screen projection mode, press and hold ” @ “for 1.5 seconds and release the button then can return to the main menu.
Caution
- Do not submerge the remote control in the water.
- Do not expose the remote control to the outdoors, liquid, moisture, excessive heat, or fire.
- Do not use old and new batteries together in the remote control,
- Please take the batteries out if not using the remote control for a long time to avoid battery Leakage.
- The remote control must be held perpendicular to the projector’s IR remote sensor to function correctly,
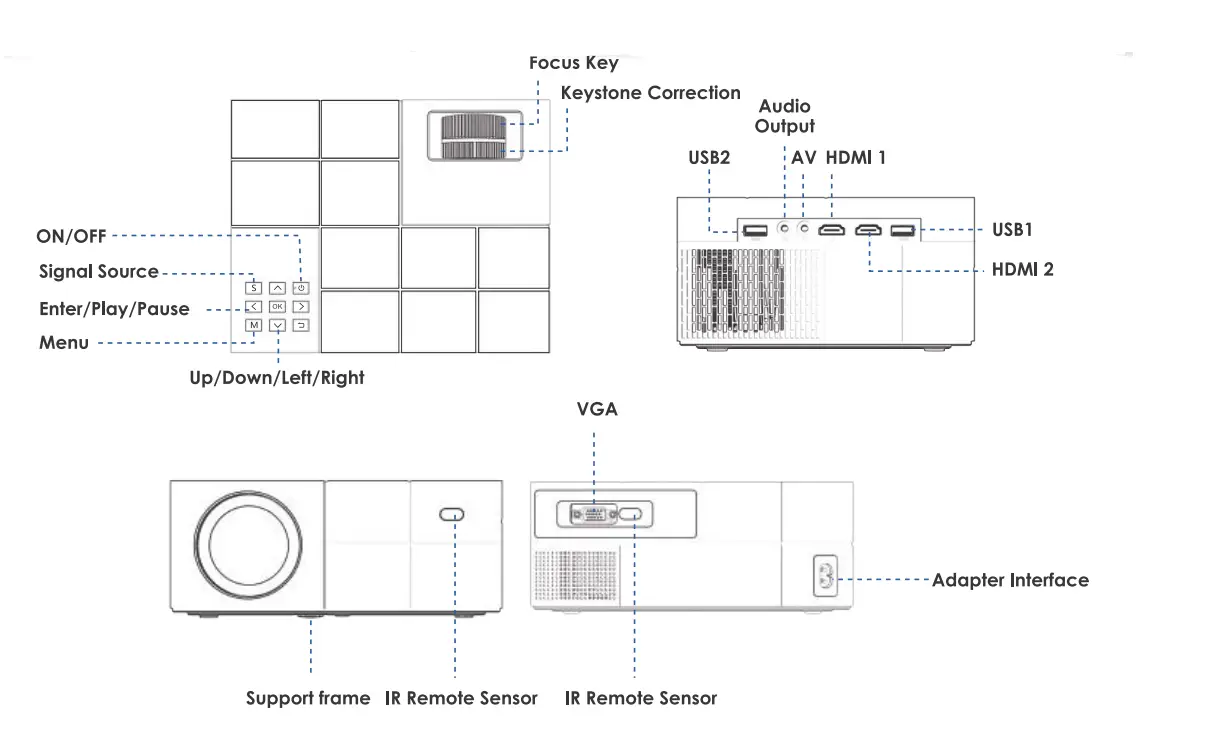
PROJECTOR OVERVIEW
- Connecting the projector to power
- Plug the power cord into the projector.
- The power indicator on the projector lights up after the power cord has been connected.
- Power ON/OFF
Press the” (!) “button on the projector or on the remote control to power it on.
- Multimedia boot screen
The multimedia screen will be displayed in 10-20 seconds after you press the power button.
- Focus & Keystone correction
- If the image is displayed as a trapezoid shape, turn the keystone correction knob on the upper surface of the projector until the projected image becomes rectangular to correct the keystone issue.
- Make sure the projector is horizontal to the projector screen and rotate the focus ring to sharpen the projected image.

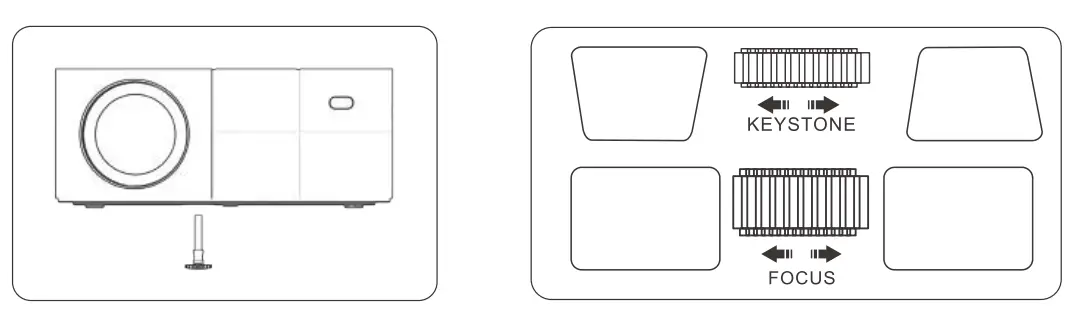
OPTICAL ADJUSTMENTS
The projector corrects the image deformation by the optical keystone correction. See the example below: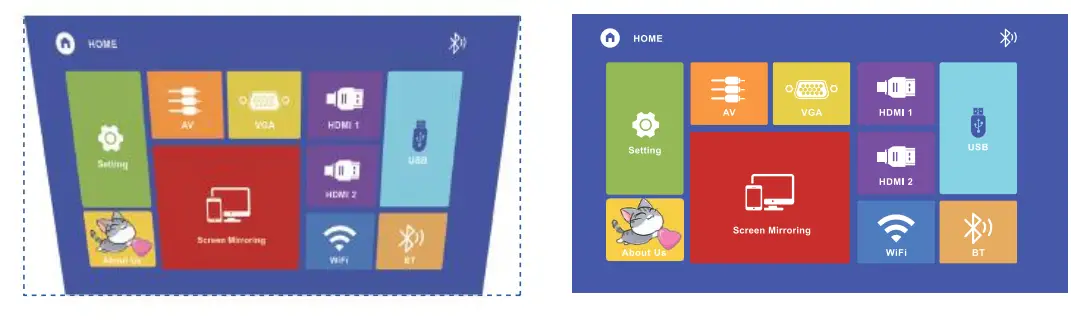
However, this projector does not hove a horizontal keystone correction function. The projector must be placed horizontally on the projection screen.
If you encounter the problem as shown above, it is probably because the projector has not been placed horizontally to the projection screen, or the projection screen is not vertically positioned.
Solution: Adjust the projector’s position so that it is horizontal to the projector screen.
CONNECTIONS
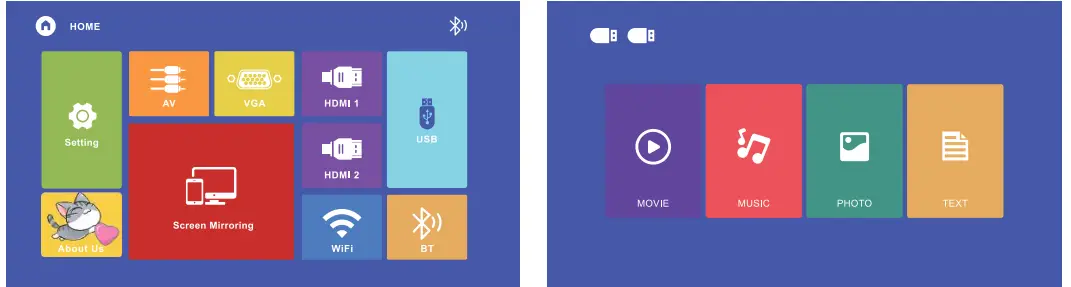
- Playing media files from a USB Drive
- Insert a USB storage device into a USB port.

- Pick USB at the Signal Sources menu.

Supported multimedia file formats and typesMultimedia
Audio file MP3/WMA/OGG/ AAC/MM/FLAC/ APE/WAV Picture file JPEG/BMP/PNG Video file
MPEG, MPEG2, FLV, MPEG, RM, AVI/RMVB, MOV, MKV, DIVX, FVOB M-JPEG (only unsupported 640*480) Text file TXT - Click the USB icon to select the contents of the memory stick to be displayed:

- D. Choose the file you want to play. Press the” ►I I “key to play or to pause.
- Insert a USB storage device into a USB port.
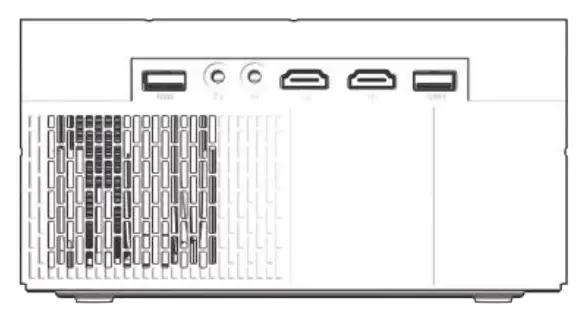
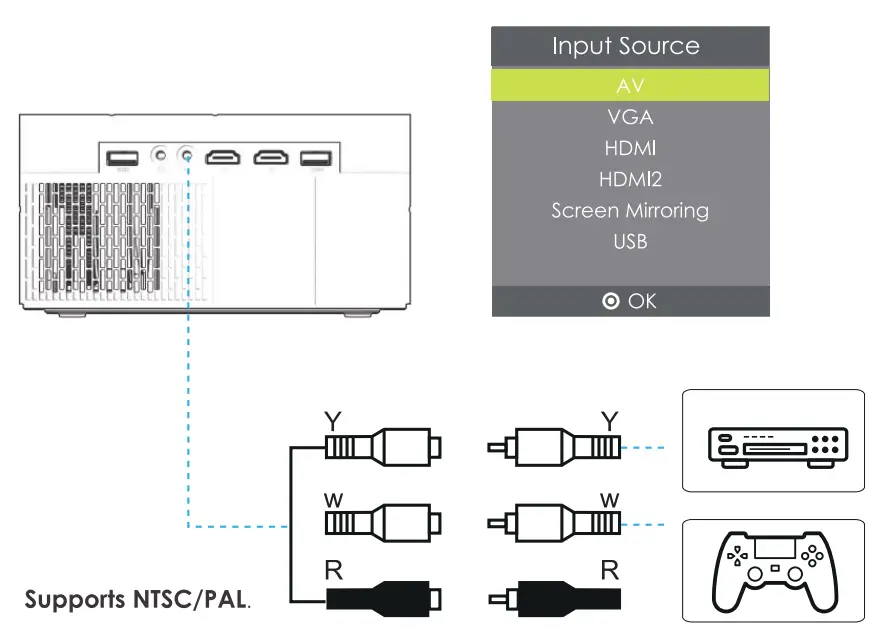
- AV video connection
Use a 3-in-l AV cable to connect to the projector as shown below. Once connected, pick AV at the Signal Sources menu.
- HDMI connection
Use the HDMI slot to connect computers and HDMI-compatible devices. Once connected, pick HDMll ot the Signal Sources menu.
Supported resolutions:
576P, 680P, 720P, 1080P, 640×480, 800×600, 102Ax768, 1280xl024, 1280×720, 1440×900, 1366×768, 1920xl080, 1280×800, 1440×960, 680xl050 - 3.5mm audio connection
Use a 3.5mm audio jack to connect headphones/speakers.
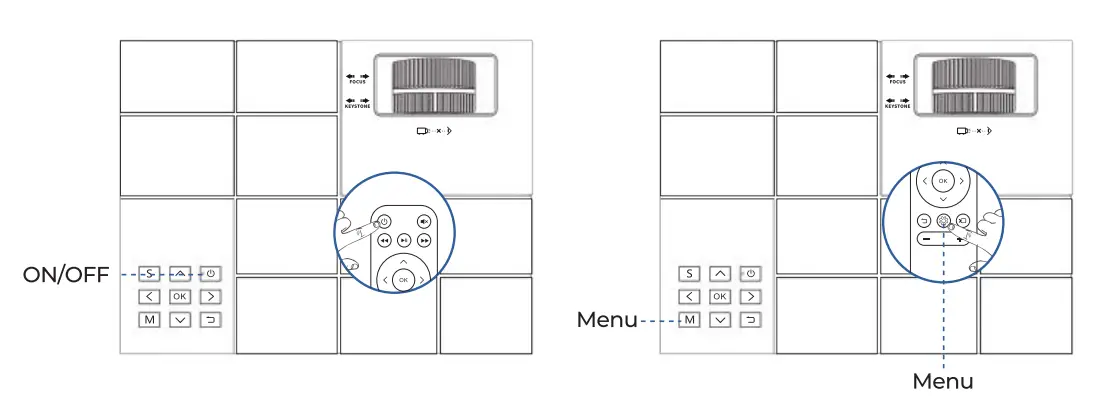
- Remote control user guide
Press the” ” key to enter the main menu, then press the ◄/► key to enter each sub-menu.
Press the”◄/►” key to select the sub-menu, then adjust the parameters as required, and press the “OK” key to confirm. - Using the Sub-menu
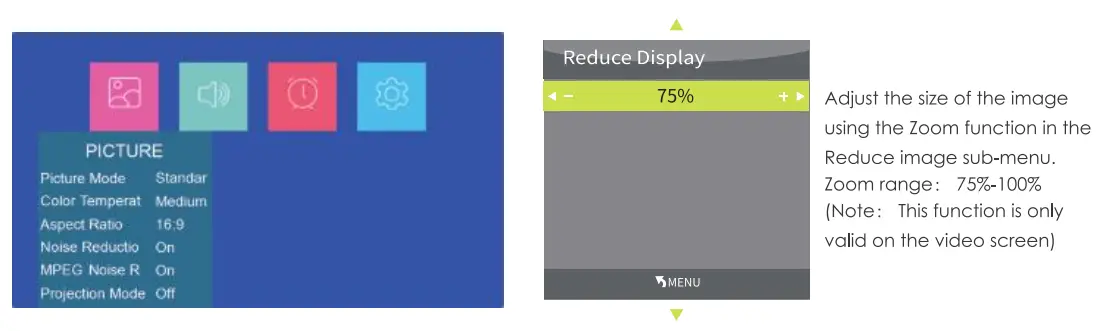
The Sub-menu picture provided below is for reference only and may differ from the actual design.- Picture sub-menu: Picture Mode/Color Temperature/Aspect Ratio/Noise Reduction/Screen/Projection Direct/HDMI Mode/Reduce Display.

- Sound sub-menu:
Available adjustments: Sound Mode/ Balance/ Auto Volume/ Bluetooth
Turn on/off Bluetooth
When the Bluetooth is turned on, search for nearby Bluetooth speakers or earphones to pair the device. Press the “OK” button to pair the device.
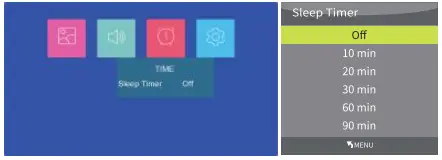
When the device is connected, press the “OK” button again to disconnect the device. - Time Sub-menu:
Timer: The projector enters standby mode automatically when the set duration of the timer elapses.
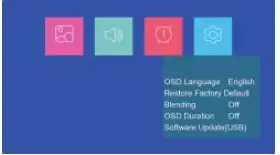
- Settings sub-menu:

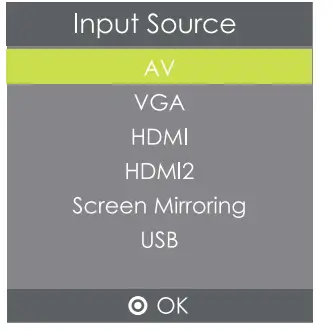
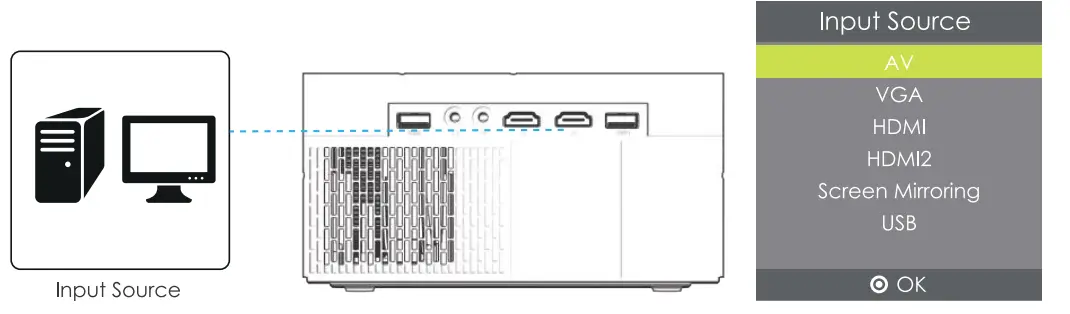
Available adjustments: OSD Language/Reset to Factory Settings/Blending/OSD Duration/Software Update - Input Source sub-menu:
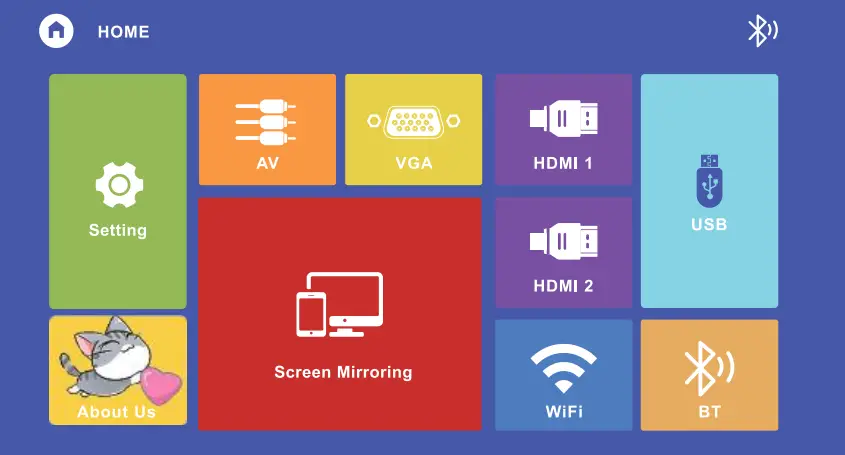
Available adjustments: AV/HDMll/HDMI 2/Screen Mirroring/VGA/USB
- Picture sub-menu: Picture Mode/Color Temperature/Aspect Ratio/Noise Reduction/Screen/Projection Direct/HDMI Mode/Reduce Display.

SCREEN MIRRORING
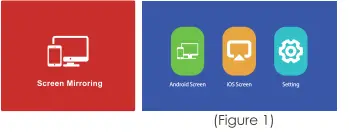
- Select Screen Mirroring in the Input Source list.
- Press the OK key to enter the interface.
- Pick the appropriate variant (Figure 1)
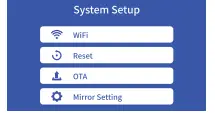
Connect Projector to Wi-Fi Router There are two methods to connect the projector to the Wi-Fi router. Method 1: Connect to the WiFi router through the system menu.
- Select Setting function

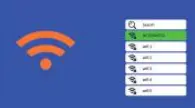
- Select WiFi from the System Setup menu, Then the projector will scan for nearby Wi-Fi.

- Select the Wi-Fi you want from the search result list and enter the password to connect.
Streaming with your Wi-Fi router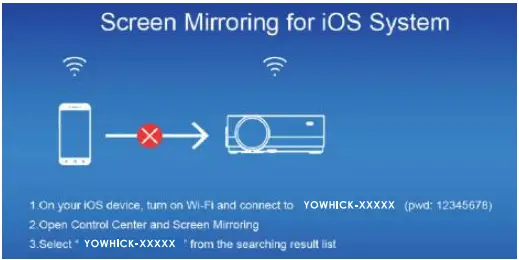
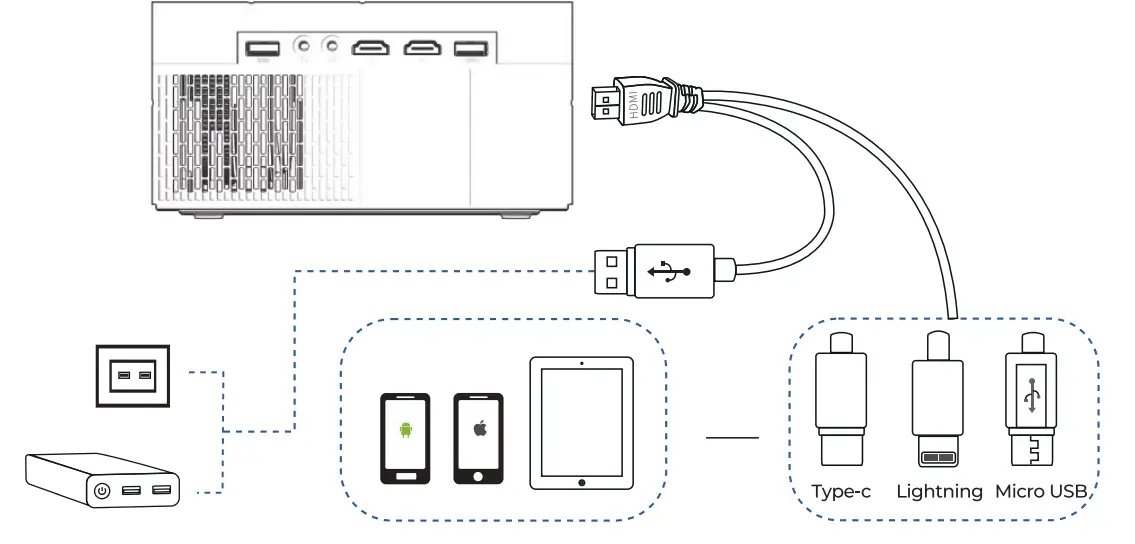
- Turn on the projector, select Screen Mirroring as the input source to enter the Screen Mirroring interface for iOS;
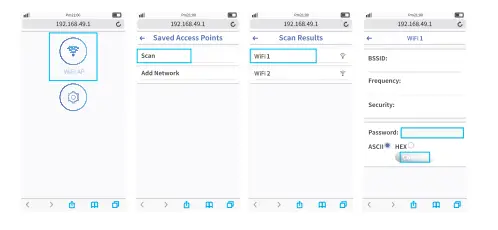
- Open the ‘Settings’, connect your iOS device to the “YOWHICK-124626,” Wi-Fi {PWD: 12345678);
- Open the HTTP: //192.168.49.1 webpage with the browser on your mobile phone.

Tap Wi-Fi AP >Scan, select your router’s Wi-Fi, and enter the appropriate password.
Tap ‘Connect’ to continue; - Then your projector will connect to the Wi-Fi router.
Android OS
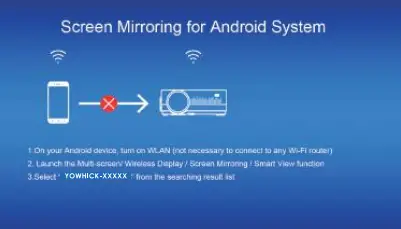
Android Screen has two connection methods Method 1: Wireless connection (Recommended)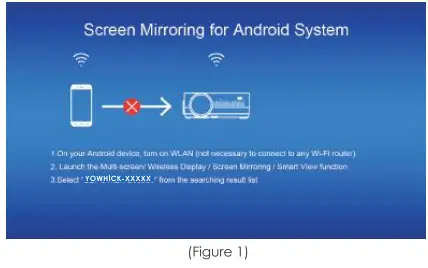
- Select Android Screen function
- Turn on the WLAN on the Android device.
- Launch the Multi-Screen / Wireless Display / Screen Mirroring / Smart View / Cast Function (Figure 2)

- Select “YOWHICK-XXXX” (Figure 3)
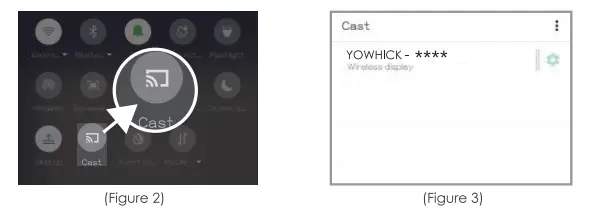
This projector supports the Miracast co-screen protocol; if you use Chromecast or other co-screen protocol devices, such as Google/Motorola mobile devices, you will be unable to wirelessly cast your screen.
Method 2. Wired connection
- Select the Android Screen function.
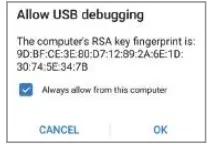
- On your Android device, find Developer options and turn on USB debugging.
- Connect your Android device to the projector 0UT5V port via the ORIGINAL USB cable.
- For the first time, when the “Allow USB Debugging” window appears, select Always allow from this computer and tap “OK”, to start screen mirroring.

Both USB 1 and USB2 can support data playback in the USB stick, but only USB2 can be used for wired-to-screen mirroring and USB 1 cannot support it.
Tips
USB debugging steps may vary due to different devices’ Android OS differences. Search for How to open the USB debugging mode on “Your device” in Google. Actual prompts are based on Samsung Galaxy S9+ OS.
- Open the ‘Settings’, tap About->Software information->Build number;
- Tap “Build number’ seven times until it shows Developer mode is turned on;
- Go back to settings, scrod down, and select ‘Developer options;
- Find the “Debugging” section;
- Tap the toggle next to “USB Debugging”.
- Some Android devices may not support screen mirroring due to compatibility. Such as some models of Google/Motorola/Sony
- Some Android devices may only transfer the display without audio due to protocol restrictions.
B, iOS
iOS has 3 connection methods:
Method 1: Wireless connection with Wi-Fi router (Recommended)
- Connect the projector to a Wi-Fi router;
- Select iOS Screen Mirroring function;
- Connect your iOS device to the same Wi-Fi router.
- Turn on Screen Mirroring on your iOS device, find the projector for pairing.

Method 2: Wireless connection without a Wi-Fi router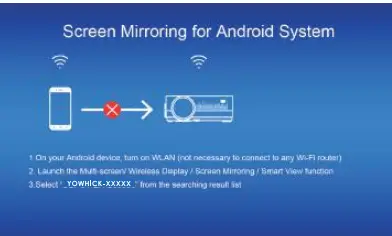
- You don’t need to connect the projector to a Wi-Fi router;
- Select the iOS Screen Mirroring function;
- Tum on Wi-Fi on your iOS device and search for the network name of the projector (for example YOWHICK-124626);
- Pick it ond enter the password: 12345678. Your iOS device will connect to the projector automatically.
- Turn on Screen Mirroring on your iOS device, find the projector for pairing.
Method 3: Wired connection 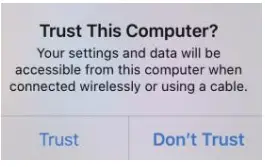
- Select iOS Screen Mirroring function;
- Connect your iOS device to the projector 0UTSV port via the original USB cable.
- Confirm the screen mirroring: when the ‘Trust this Compute appears, tap ‘Trust” to start screen mirroring.
- Tap on ‘Trust’ to start Screen Mirroring.
Tips
If you’d like to connect to another Wi-Fi router, please repeat the above procedures.
Settings
Description
WiFi: Connect to Wi-Fi router
Reset: Restore the Screen Mirroring function to its original system state
OTA: Online update
Mirror Setting: Mirror mode/ Airplay mode
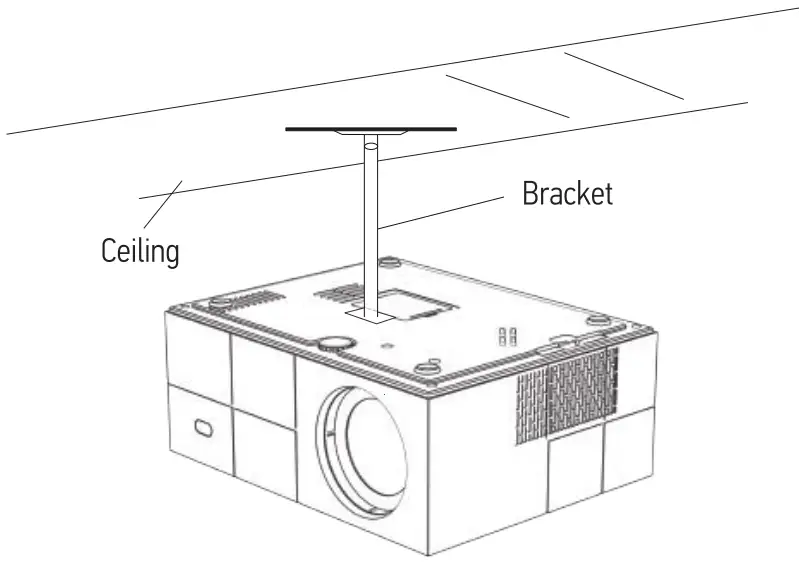
PROJECTOR INSTALLATION
Installation Method
The projector can be hung on the ceiling with a special hanger frame, and placed on the table desk to project the image according to the operating environment and requirements. Check the below images to decide on the best location for the screen: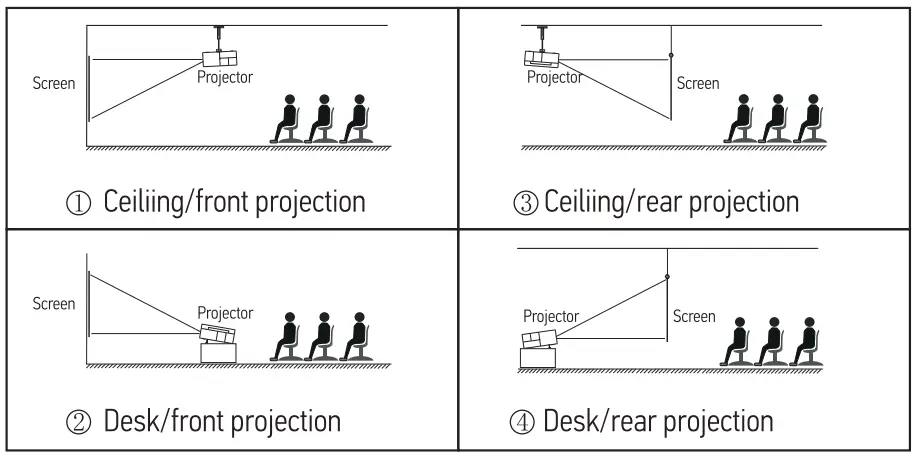
Projection screen mode setting
- The projector supports front projection/back/ceiling projection.
- Enter the settings interface>Picture Settings>Projection Direct Front.
- Choose the way you want the projector.
Install on the ceiling
- Contact a professional installer for the projector ceiling mounting;
- Please ensure that the screws used for ceiling mounting are of high qualify and the length is enough to prevent the projector from falling;
- Please purchase a universal projector ceiling mount;
- Remove the rubber pads on the bottom of the projector plate. When using a third-party ceiling mount kit, make sure the screws used to attach the projector to the mount are M4*10mm.

WARNING
- If the projector is mounted inappropriately on a ceiling or on a surface, it may be damaged beyond repair.
- The recommended ambient temperature range is 41 °f – 95 °f. The incorrect temperature may Lead to the device malfunctioning.
- Please do not place the projector in wet, moist, or dusty conditions to prevent electric shock or malfunction.
- Poor ventilation can be a significant cause of overheating. It could cause a projector to be damaged.
- Please use coarse-threaded screws with a diameter of M4*10mm.
Throw distance and screen size
For reference only. Throw distance and screen size may vary due to different configurations.

TECHNICAL SPECIFICATIONS
| Imaging Technology | LTPS LCD | Color Reproduction | 16.7m |
| Resolution | 1920’1080 | Keystone | Manuot Correction± 15° |
| Highest Resolution | 1920’1080 | Power Voltage | 100V-240V 50/60HZ |
| Light | LED | Integrated Watt | 90W(Mox) |
| Life Span | 50,000 Hrs | Input | AV/VGA/USB’2/HDMl’2 |
| Lens | Multichip Coated | Output | 3.5mm Jock(5V-500MA) |
|
Operation Mode | Lens (F=135)
Manual Operation | Speaker | 5O3W |
| System Support | Support Multi-Media | ||
| Language | 23 Screen Languages | ||
| Throw Distance | 1.7-6,9m/5,5-23ft | Unit Size | 229’180’89mm |
| Screen Size | 60-270 Inches | Projector Ratio | 1:4 |
| Aspect Ratio | 4: 3/16: 9 | System | Multimedia + One Screen |
Learn more about YOWHICK, please visit us at:
Support online chat
[email protected]
1-866-606-9133
GDP1B www.yowhickhome.com
www.yowhickhome.com
FAQS
Will this work with atmosfx digital decorations on usb drive? Can it loop on one or more files?
It has a USB and 2 HDMI.
What ceiling mount can I use with this projector?
The projector has a screw mount in the bottom using a – per manual – coarse thread M4*10mm rod or screw. I used a old camera/video recorder tripod with a quick-release plate but I am not mounting it, just using for outside/portable uses.
Can this projector work with PowerPoint?
this YOWHICK GDP1 projector can work with PowerPoint, but please pull some curtains and use it in a slightly dark environment to achieve better results.
Is the light source led or lcd?
LED is the light source and LCD is the image source. You have a lamp, LED, or laser – check “Lamp vs LED vs Laser Projectors
Can I switch the display to my ceiling instead of the wall? Like, modify the lens?
You can (as long as properly vented) point it at any direction you want just be aware there is no left-right keystone so the screen must always be directly in front of the projector. Your question about lens modification is unclear. If you wanted to project on the ceiling via a mirror or similar the need to invert the image is supported as “rear projection” mode. As to actually modifying the projector, I cannot speak to that as it is not in normal usage.
is this compatible with apple tv?
Yes
Does this projector support dolby digital audio?
No, so if you want “Dolby” level audio you would want to provide an alternative sound setup. If you are feeding the projector via HDMI the audio would need to be in front of the input to the projector.
Can this projector flip the image for “rear projection”?
Yes, this Projector. Certainly can be mounted, on the ceiling, upside-down, and projected inverted…
Is the picture good during dark scenes? Other projectors I’ve used are extremely hard to see when the scenes are dark in the movie
the projector only supports 180° rotation for hanging from the ceiling, not supports 90° vertical rotation.
Any further assistance fee free to contact us via: [email protected].
Can this be used for rear projection?
Yes.
Does this projector have screw holes on the bottom for a standard ceiling mount bracket?
Yes, one. It works with a micro projector mount. I got 2 for $12. On Amazon!
Can I connect a surround sound to this? I don’t see an optical connection.
You are correct there is no port for optical connection. We used the Bluetooth sound bar and that worked just fine.


