![]() master Easy
master Easy
KT-8122 MasterEASY Dual in Kupfer
masterEASY Dual in Kupfer
Art Nr KT – 8122
www.kvm-tec.com
Instruction Manual
V102022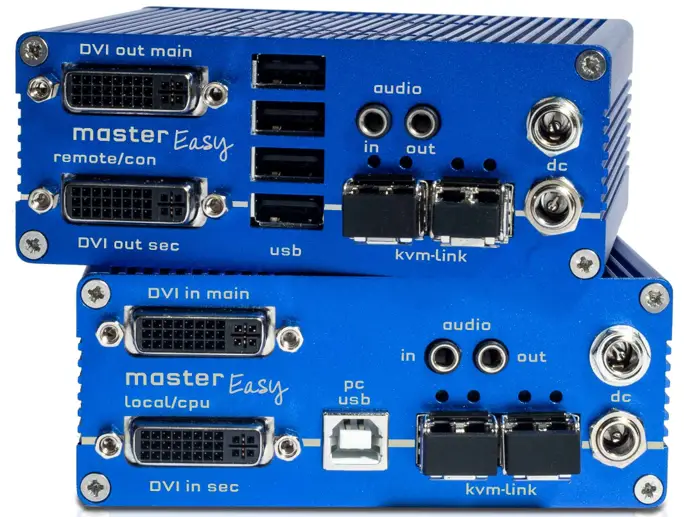
KT-8122 MasterEASY Dual in Kupfer
Check out our Installation Channel: www.kvm-tec.com
Lieferumfang
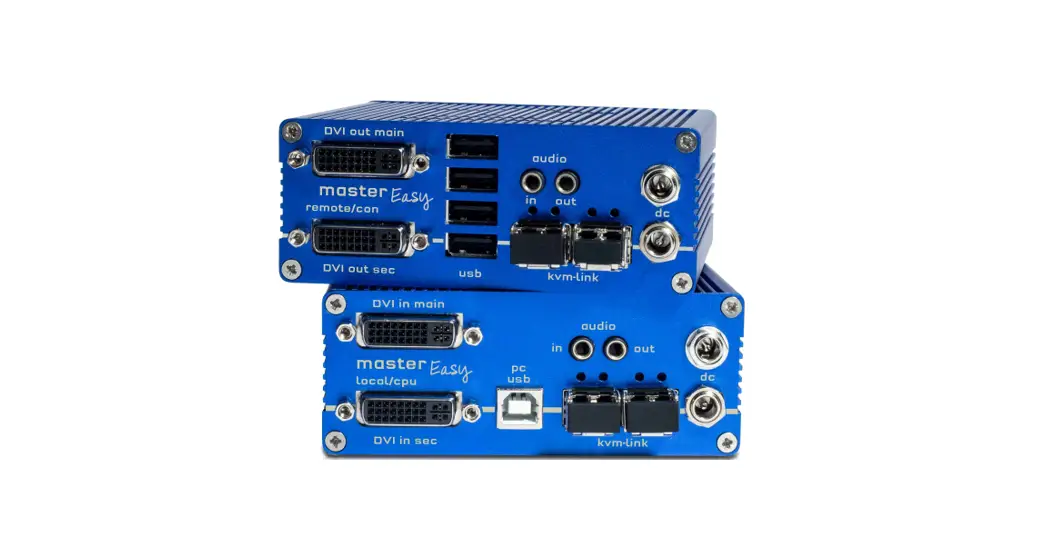
LOCAL/CPU Unit
1 x ME2 local (CPU)
1 x Steckernetzteil 12V 1A (EU-plug)
2 x DVI – DVIKabel 1,8m
1 x USB Kabel 1,8m
2 x VGA-DVi Kabel (opt)
2 x Audio Kable 1,8m(opt)
2 x SFP Modul Multimode bis 500m
4 x GeratefuRe
REMOTE/CON Unit
1 x ME2 remote (CON)
1 x Steckernetzteil 12V 1A (EU-plug)
4 x GeratefORe
Open OSD main menu
The OSD main menu is displayed with the default
Standard shortcut opened: 5 x ALT Gr
(Attention: the first 20 seconds works 5 times
Always scroll if the shortcut
oned 5 x scroll always if the shortcut was forgotten.
Switching List : CTRL+ALT+PRINT
Changing the shortcuts in the OSD menu
Call up the remote settings and then
navigate to Keyboard Shortcut.
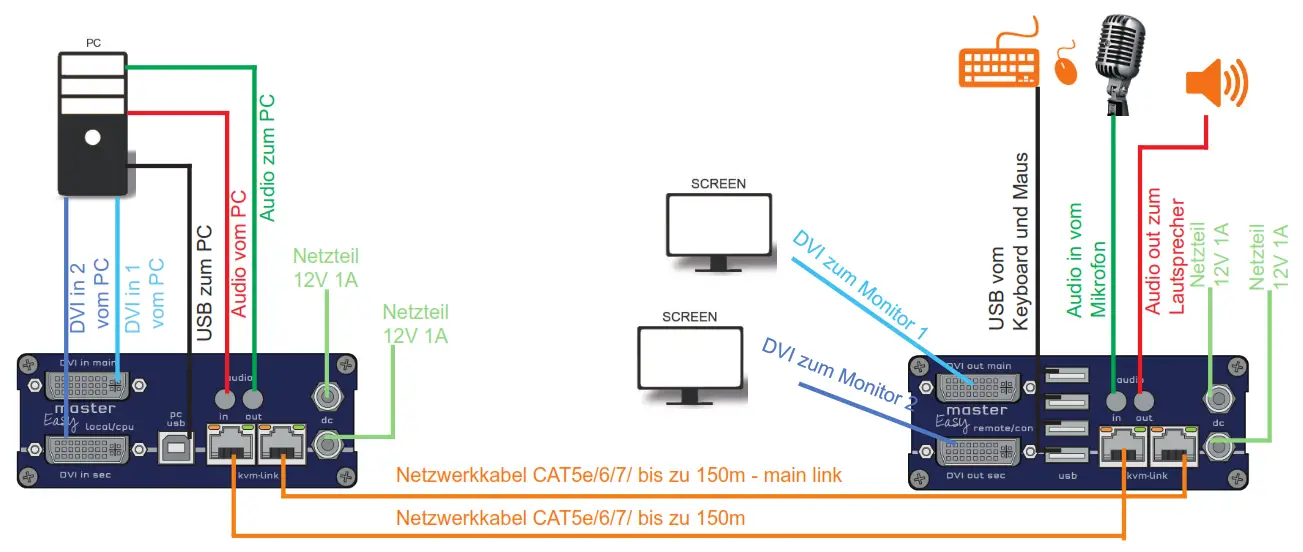
Quick Installation masterEASY CATx Dual local / CPU – remote / CON
- Connect the CON / Remote and the CPU / Local Unit to the supplied 12V 1A power supply.
- Now connect the USB cable to a USB socket on your PC and connect the other end of the USB cable to the CPU / local unit. Connect the keyboard and mouse to the CON / Remote Unit.
- Connect the CPU / Local and the CON / Remote Unit with the network cable.
- Now connect the DVI cable to the DVI socket on the PC and the other end to the DVI socket on the CPU / local unit (PC in 1).
- Connect the DVI cable to the DVI socket of the PC and the other end to the DVI socket of the CPU / local unit (PC-in 2). Then connect the monitor with the DVI cable to the CON / Remote Unit.
- OPT: Then connect PC Audio/out to Local Audio/in with audio cable. Then connect via the audio cable the remote audio/out
- Almost there! OPT: Now use the audio cable to connect Local Audio/out to PC Audio/in and Remote Audio/out to the audio cable to the microphone
- Use a switch: Connect all endpoints to the switch. Make sure all connections are one bandwidth of 1Gbit/sec. For video sharing you need a switch that supports IGMP snooping. (Layer3)
HAVE FUN – your kvm-tec extender will now be in use for you for many years (MTBF approx. 10 years).
Use the monitor and keyboard to access the main menu
Access to the main menu:
- Make sure the extenders, monitors, and computers are turned on are.
- Quickly press the Scroll Lock button five times. The main menu (main menu) as well an overview of the submenus is displayed.
- To enter a submenu, press the corresponding button.
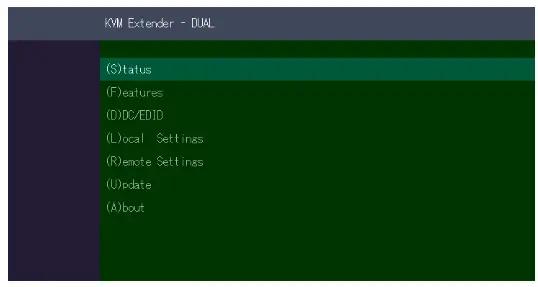
Main Menu
Hauptmenü Short Cuts :
| S Status Overview | Status menu / current status |
| U Update Flash FW | Update firmware |
| F Features Overview | Settings of the features |
| D DDC Option | DDC Option Fixed setting |
| L Local Settings | Local settings |
| R Remote Settings | Settings Remote |
| A About Overview | Overview of extenders |
| Taste „Esc“ | End |
DISPLAY THE FIRMWARE VERSION
Make sure the main menu is open. Under “A” – About will the currently installed firmware version of the remote (CON) and local (CPU) extender displayed
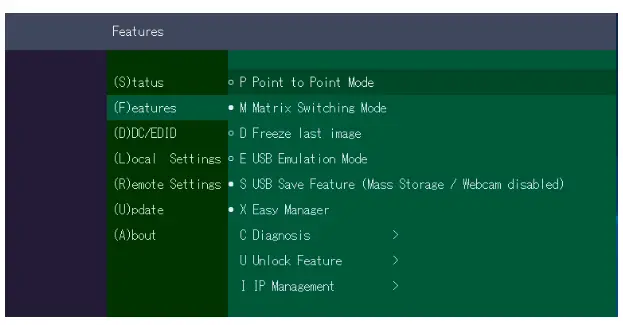
FEATURES
Pressing the F key takes you to the Features menu.
Switching mode is set by default
FRONT BRIDGING
HARDWARE: 2 SINGLE LOCAL + 1 X DUAL REMOTE
The current status of the extender connection is displayed in the “Status Menu”. The menu shows the information about the connection, the resolution of the video channel and the USB status.
The link status indicates whether a connection is possible. Connected indicates whether the kvm files can currently be transferred.
Video and USB indicate whether data is currently being transferred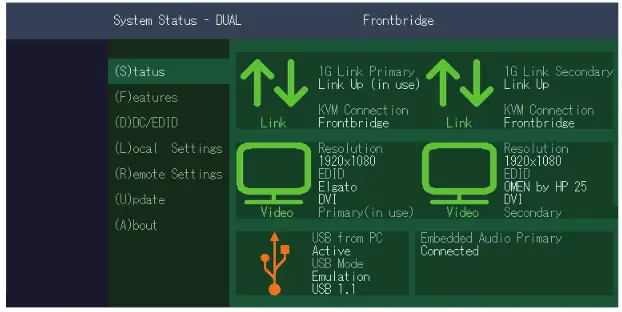
BACKBRIDGE
HARDWARE: 1 X DUAL LOCAL + 2 X SINGLE REMOTE
The current status of the extender connection is displayed in the “Status Menu”. The menu shows the information about the connection, the resolution of the video channel and the USB status.
The link status indicates whether a connection is possible. Connected indicates whether the kvm data can currently be transferred.
Video and USB indicate whether data is currently being transferred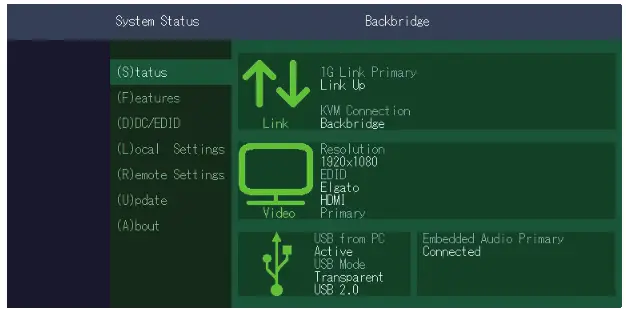
| KVM-TEC Gewerbepark Mitterfeld 1 A 2523 Tattendorf Austria www.kvm-tec.com | KVM-TEC ASIA p +9173573 20204 [email protected] KVM-TEC CHINA P + 86 1360 122 8145 [email protected] www.kvm-tec.com | IHSE GmbH Benzstr.1 88094 Oberteuringen Germany www.ihse.com |
| IHSE USA LLC 1 Corp.Dr.Suite Cranburry NJ 08512 USA www.ihseusa.com | IHSE GMBH Asia 158Kallang Way,#07-13A 349245 Singapore www.ihse.com | IHSE China Co.,Ltd Room 814 Building 3, Kezhu Road Guangzhou PRC www.ihse.com.cn |
Misprints, errors and technical changes reserved
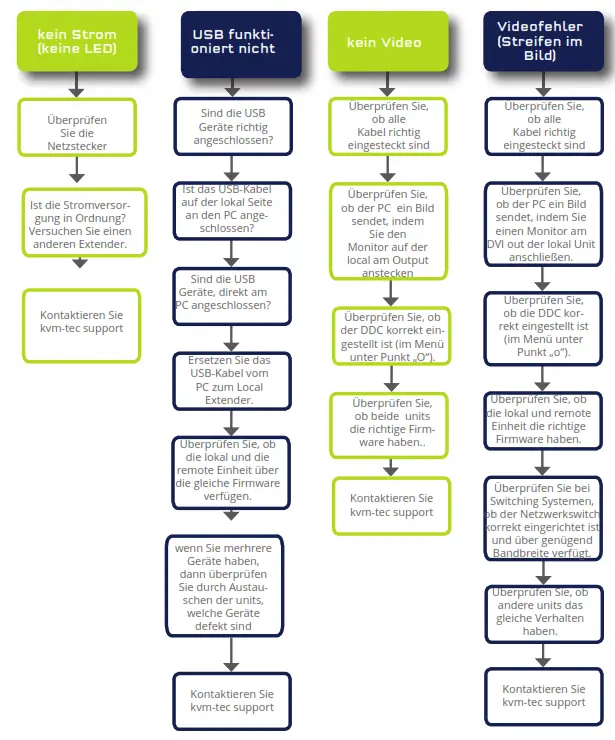
kvm-tec Support
[email protected]
Phone: +43 2253 81912 – 30
Gerne sind wir für Ihre Fragen
zu Ihrer Installation da?
Manual download www.kvm-tec.com
oder![]()
kvm-tec Installationchannel auf unserer Homepage
persönlich +43 2253 81912