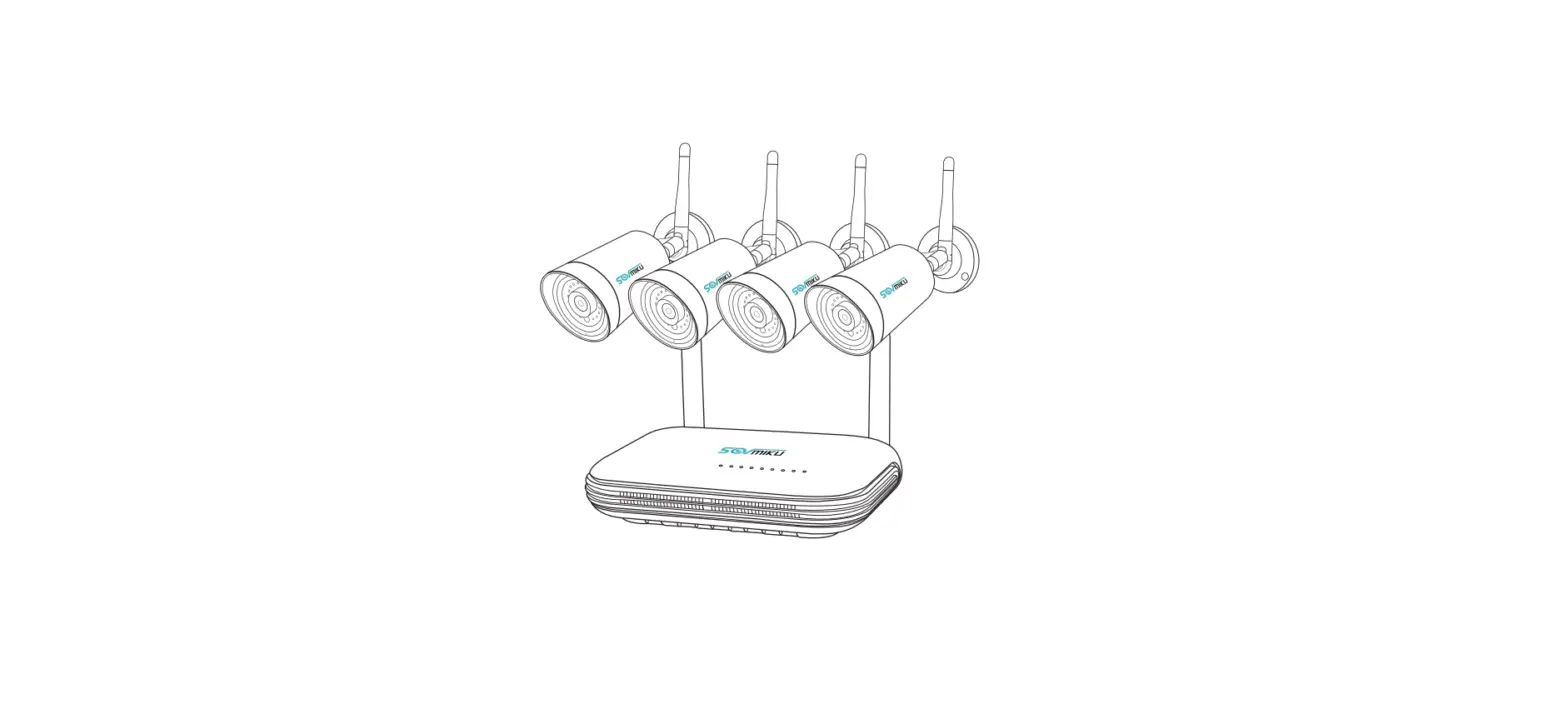
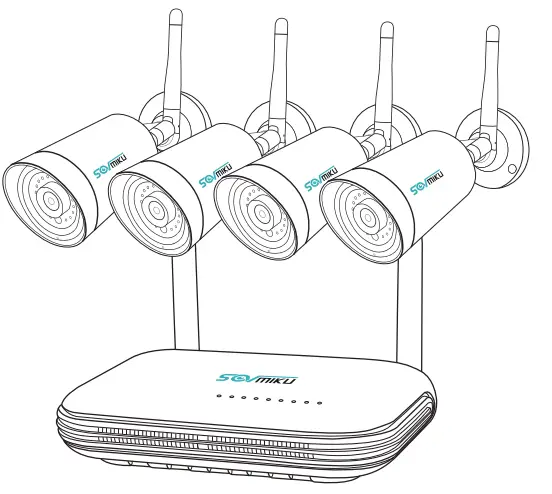
Sovmiku SFWK-10V-4HB913-1T Wireless Security Camera
Statement
Thank you for purchasing SOVMIKU product! This quick user guide will talk about main usages of the product. More information can be found on our website (www.sovmiku.net). This user guide may contain inaccurate content due to hardware and software upgrade. It is subject to change without previous notice.
Safety Caution
- Please do not put any fluid container on the product.
- Please use the product in ventilated environment and prevent blocking the vents.
- Please use included power supply with the product to prevent damage to the product.
- Please use the product under its standard working temperature and humidity. (advised in this manual or distributor’s website)
- Dust on PCB may cause short circuit. It is suggested to clean the dust on PCB timely to make the product work properly.
- Please obey the regulation and policy in your country and area during the installation of this.
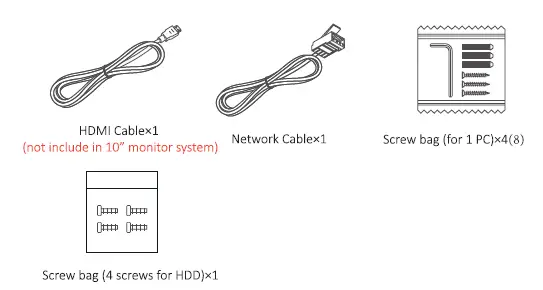
Out of Box Audit
After receiving the product, please check all products and accessording to distributor’s Package Includes information. If any is missed or damaged, please contact the distributor.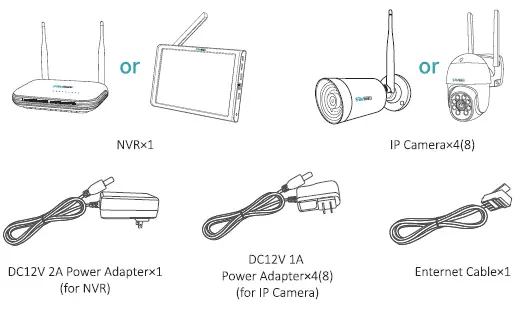
All Products & Parts
This product may require cabling, we suggest to test all products & parts before installation and cabling.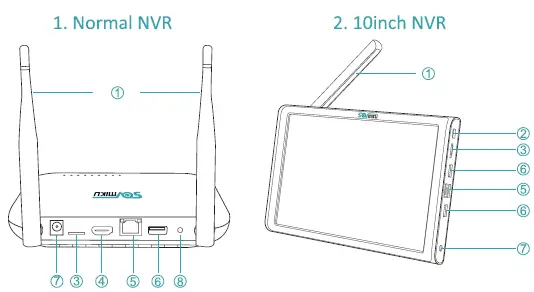
- WiFi Antenna
- Power Button: Turn On or Off the Screen
- TF Card Port
- HDMI Port: Connect to a Monitor
- WAN Port: Connect your NVR to Internet or data transmission with cameras
- USB Port: For mouse and data backup
- Power Input
- Reset Button: Start or Stop pairing cameras

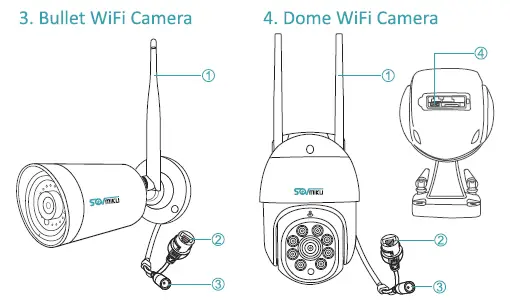
- WiFi Antenna: WiFi connection with NVR.
- RJ45 Port: for pair the camera with NVR, or connect the camera by wired connection.
- DC Port: input power 12V 1A.
- Reset Button: press reset button for 10 seconds to restore factory setting and enter into matching-code mode.
Anyway, there is range limitation for the wireless signal from NVR. When cameras are out of this range, they can’t be connected to NVR wirelessly. Then users can use network cable to connect cameras and NVR.
Installation Instruction of Wireless NVR KIT
Note: Wireless NVR can’t be connected to Wireless router wirelessly at present. They can be only connected by network cable.
- Install antennas for cameras;
- Connect a screen to the NVR via its HDMI (10″ monitor system doesn’t support to connect a larger monitor)
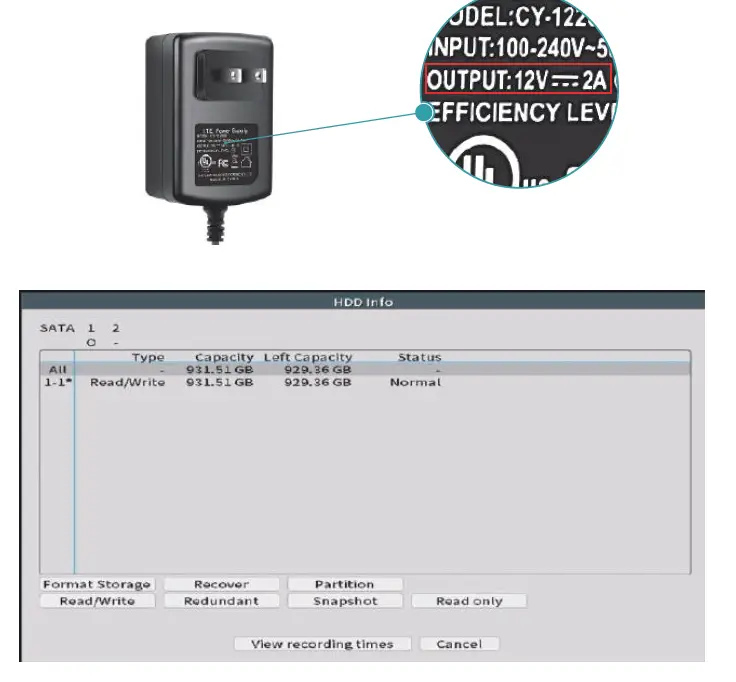
- Plug the NVR to power (use bigger 12V 2A power adapter);
- Plug cameras to power (use smaller 12V 1A power adapters);
- Within seconds, you should see cameras’ images on the screen;
- Plug the mouse(included) to an USB port on NVR. Then you can login in the system. (There is no password by default. Just leave password empty and click on OK to Log in)
In the OS you can find fullest functionalities including live view, record, playback video backup and all settings.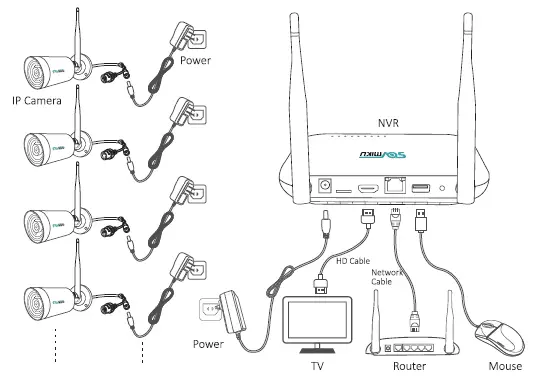
Setup the System
This system is standalone with embedded Linux Operating System in the NVR. Just like a desktop PC, need to hook a screen to the NVR to enter the OS. Any TV, monitor with VGA or HD input should work for it. If you connect the NVR with monitor shows SOVMIKU logo or shows black, normally it is your monitor resolution is lower than the NVR. please hold right click of your mouse for 15 seconds or change a monitor, thanks. {10″ monitor system doesn’t support to connect a larger monitor) When you turn on the NVR box, the monitor will get below interface: Setup Wizard ➔ Next➔ Time-Language Configuration ➔ Next➔ Install Mobile app ➔ Next➔ Wireless Camera Setup ➔ Next➔ Finish Setup ➔ OK.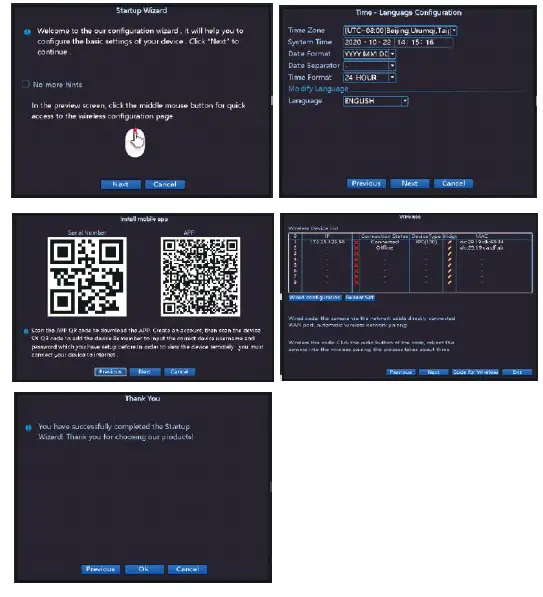
Hard Drive Information
Note: The Hard Drive is pre-installed in the NVR box. The new hard drive have to be formatted before recording. Format should be FAT32.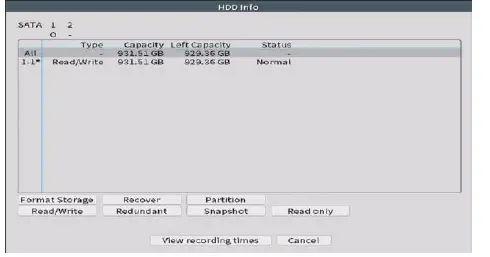
Please right click the mouse➔Main Menu ➔Advanced ➔HDD Info, to check your HDD information here, for your first time use pis click Format Storage to format it. For the record, it will automatically delete the old files and make new record, if not, please go to Main Menu➔ General➔ Storage Full➔ Select Overwrite.
Hard Drive Install
- The system may not include hard disk depending on the kit you selected. The NVR works with most 2.5″ SATA HOD.
- Note: New HOD have to be formatted before recording. Format should be FAT32.
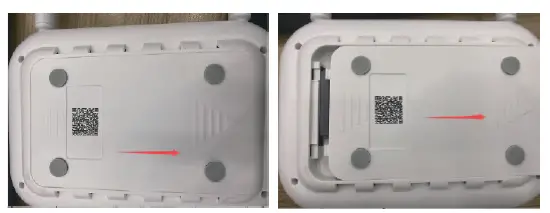
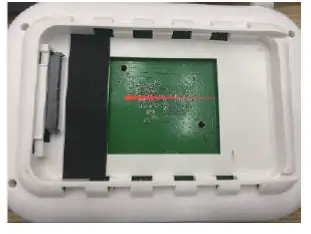
- If you have the white NVR system, please follow these instructions:
- Unplug the power of NVR, push the cover to the same direction as in the picture.

- Insert your hard drive to the same direction as in the picture, then cover it back.

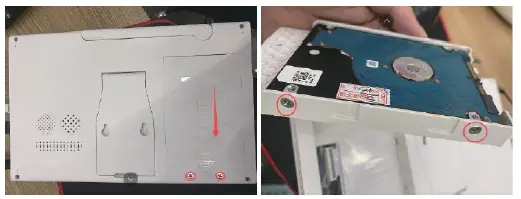
- If you have the 10″ monitor NVR system, please follow these instructions:
- Unplug the power of NVR, unscrew two screws, push the cover to the same direction as in the picture

- Unscrew four screws on two sides, replace by new hard drive, screw back four screws.
- Push the cover back to the same direction as in the picture .


Change NVR System Login Password
This system is standalone with embedded Linux Operating System in the NVR. Just like a desktop PC, need to hook a screen to the NVR to enter the OS. Any TV, monitor with HDMI input should work for it
Right click the mouse➔ Main Menu ➔System➔Account➔ Modifiy PWD to set password.
How to Check The NVR Connect with Network Successfully?
Note: The NVR can’t be connected to WiFi wirelessly at present. It can be only connected by network cable.
Two ways to check the network status:
- Right Click the mouse➔ NetDetect➔ Remote Net Detect➔ Diagnosis
- Result. If it shows Test Success, the net work is connected.
- Go to Main Menu➔ Advanced➔ Version, check Nat Status is Connected which means your NVR is connected with the network
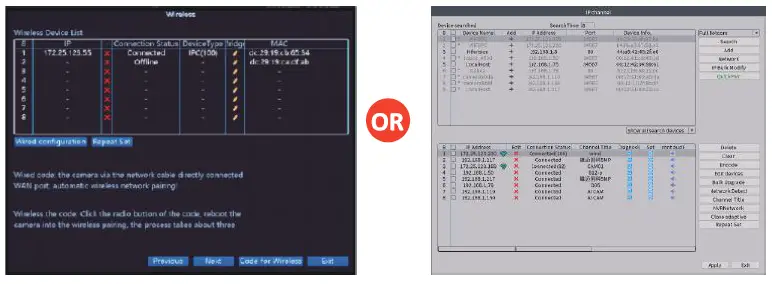
Wireless Configuration/Channel Set
- Wireless NVR supports wired and wireless two ways to access the camera (supported by some models). The two modes are set as follows:
- Wireless configuratuon: right click mouse➔Wireless / Channel Set, Delete the Offline Cameras first, then click on the Wireless Code to Pair/ QuickPair, then the image will automatically show after pairing successully.
- Wired configuration: Connecting NVR to the camera with an Ethernet cable will automatically obtain network settings for automatic internet access. After the Ethernet cable is plugged in, NVR will give priority to wired access, and the cameras will show on the screen automatically.
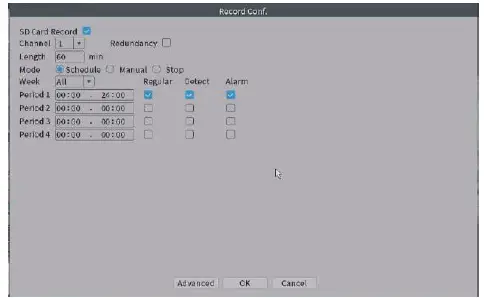
How to Setup the Record Video Plan?
- The factory setting defaults to full-day recording. If you need to customize the recording type, you can refer to the following setings:
- Right click the mouse➔ Main Menu➔ Record Conf.
- Regular recording: all-day recording, including detection recording and alarm recording.
- Detection recording: Only when a moving object or human form is detected, then the recording will be performed. Check the detection option to enable.
- Alarm recording: Only when an alarm is triggered, the video will be recorded. Check the alarm option to enable

Video Playback
Steps: right click on the mouse➔ Video playback➔ choose record mode, date, channel➔ Search➔ then you can view playback file.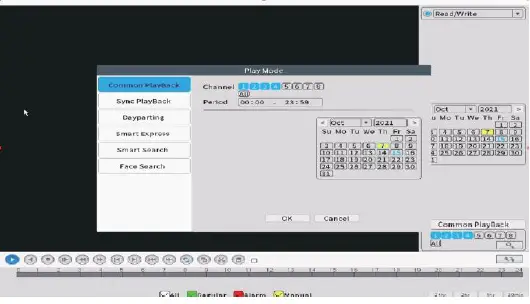
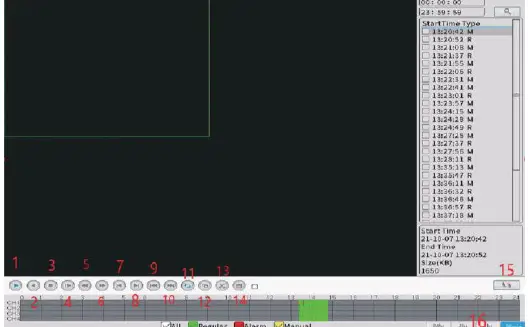
Icons
- Start/Puase Playback
- Play Backward
- Stop Playing
- Slow Playback
- Reverse Fast X2/X4/X6/X8
- Fast Playback X2/X4/X6/X8
- Previous Frame
- Next Frame
- Prvious File
- New File
- Repeat Playback
- Full Screeen
- Start Editing
- Backup
- Time Files/Day Files
- Change timeline to every 24hr/2hr/lhr/30min
Warm prompt
- You can double left click your mouse on the timeline to start playing at the specific point your want.
- When it is playing the video, you need to click on “Stop Playing” to change the date.
- Video backup: Choose the recording file in file list as the second picture shows. Insert the U flash disk, click ”Video Backup” to backup the file.
- To quit video playback, Right click your mouse anywhere➔ left clcik on window.
Video Backup
Use U disk to copy video, so easy and convenient I Main Menu➔ System➔ Record backup➔ insert U disk➔ detect➔ after detecting U disk➔ select “backup”➔ select “typea➔ “channel”➔ start time ➔ “end time” and “backup format”, then you can start to backup.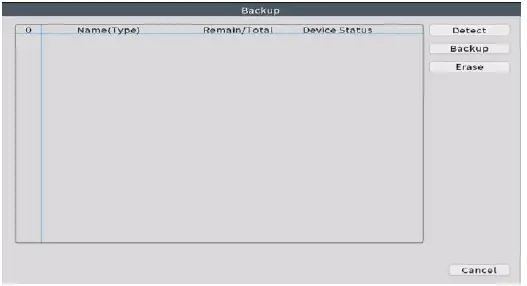
TlPS: when you backup failed, please check if your U disk is FAT32 format, NVR only support FAT32 formate U disk. If the viedeo file you backup is the .AVI format file, please use VLC player to play the video, download link: http://download.dvr163.com/tool/Video-player%20.zip
Human Detect and Face Detection Setup
- Right click your NVR mouse choose Main Menu➔ Alarm ➔ Intelligent Alert, select the channels and check the Enable. {The PTZ camera system doesn’t support face detect function}.
- Select Human DetecVFace detection, uncheck the Human Detect, you will get Motion Detect.
- If you want to get them to record, enable Reran:!.
- If you want to get notification on phone app, enable Mobile reported.
- If you want to get sound on your monitor, enable Alarm Sound.

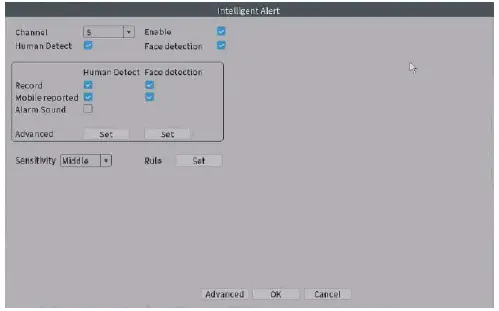
The device supports WIFI IPC with face detection function. Right click the mouse➔ Left click on Face Detection, then you can view the detection results on the real-time preview interface.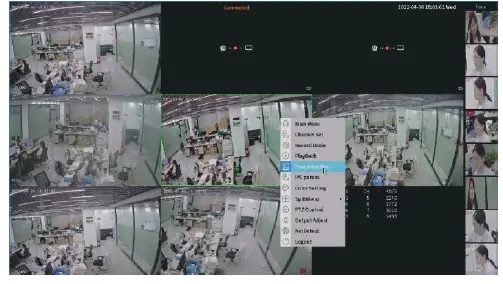
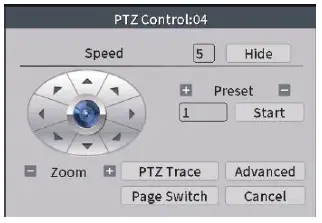
PTZ Function for PTZ Cameras Only
- PlZ Function on your monitor
- Move your mouse to the channel you want to do P1Z function, then right-click on the mouse➔ Left click on PTZ Control, then you can rotate it to eight directions.

- Move your mouse to the channel you want to do P1Z function, then right-click on the mouse➔ Left click on PTZ Control, then you can rotate it to eight directions.
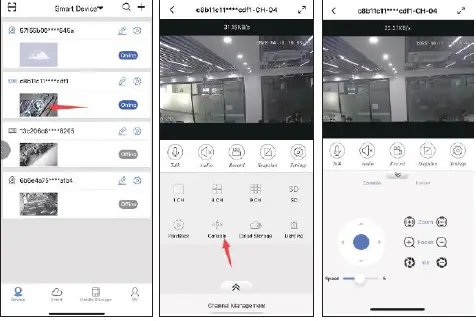
- PlZ Function in your APP
- If you have add your system to your app, you will be able to use the PlZ function in your APP. Open you APP, click on live video, click on Console, then you can rotate it to four directions.

- If you have add your system to your app, you will be able to use the PlZ function in your APP. Open you APP, click on live video, click on Console, then you can rotate it to four directions.
View on Mobile
- Android users can access Google play or Android application markets, iphone users can access Appstore, then search “XMeye Pro” to download the app, or scan the QR code below to download it.

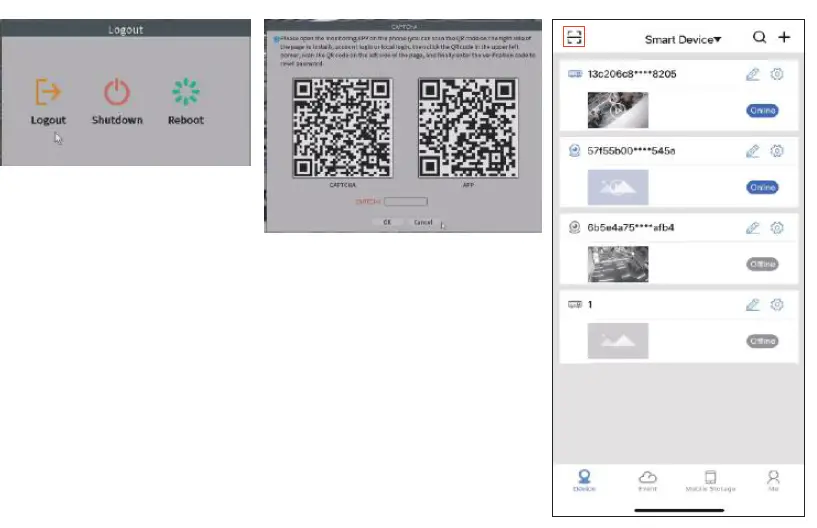
- Add the NVR system to your APP device list Run “XMeye Pro” app, Register an account with phone number or Email, then log in your account ➔ click to add device ➔ sea n the QR code of your device. (To get device’s QR code On the NVR monitor, move the mouse to the middle top of the real-time preview interface.) ➔ device description (my device name), user name (default username is admin) and password (there is no password by default).

Tips: If you’ve set a password on your NVR system, please update your password on APP to view.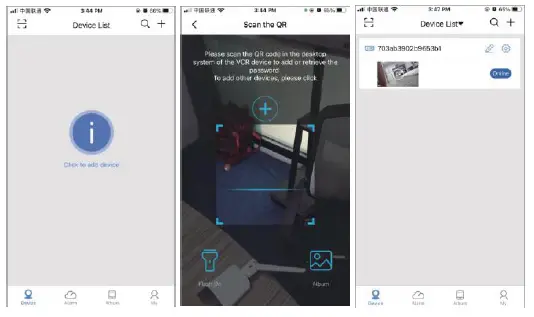
View On PC Via IE (Internet Explorer) and VMS
Tips: before you remotely check it on phone app and VMS, you need make sure Net Status is Connected.
To view on browser by NVR IP address, you have to connect the NVR and your computer to the same Network. Enter the IP address of NVR on the browser’s address bar. (We recommend using IE or Micorosoft Edge) Right click the mouse➔Main Menu ➔NetDetect ➔Network ➔IP address (Start with 192.168 … ) You can change language on the right top corner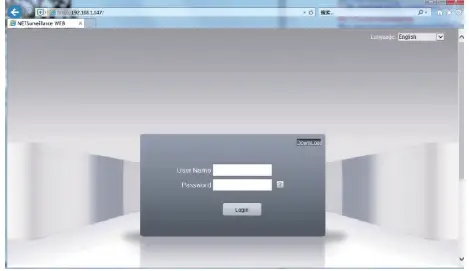
To view on browser by NVR Sera ii number, open website: www.xmeye.net (We recommend using IE or Micorosoft Edge) Right click the mouse➔ Main Menu➔ Advanced➔ Version➔ Serial Number. Click By Device to add the system, Serial NO .. Input serial number, ad min and password is your NVR login user name and password 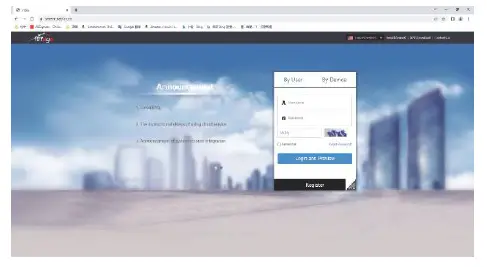
To view on VMS on PC
- Windows VMS download link: https://download.xm030.cn/d/MDAwMDA2NDE=
- MAC VMS download link: https://download.xm030.en/d/MDAwMDA2NDA=

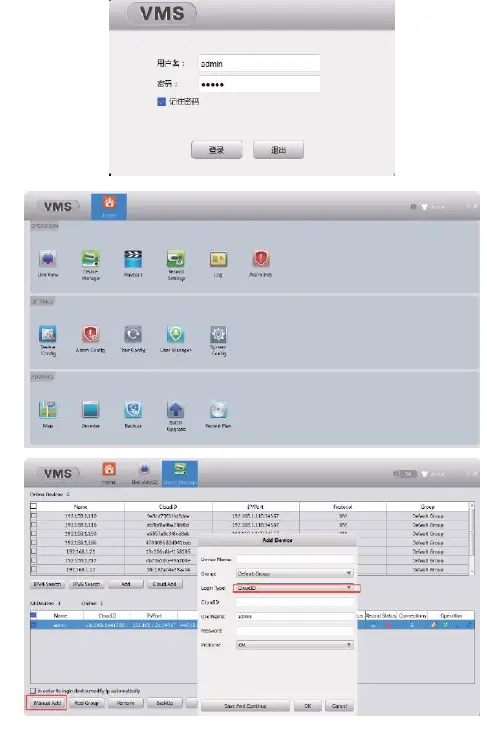
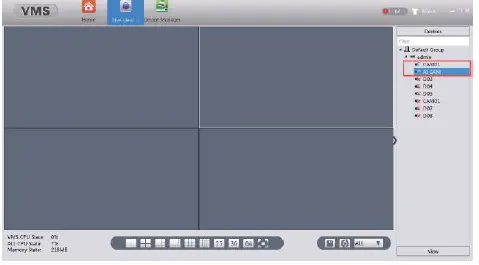
- Login in VMS, user name is ad min, no password
- Select “Device Manager”
- Select “Manual ADD”
- Device Name: name the system
- Login Type: CloudlD
- Cloud ID: system serial number (Right click the mouse➔ Main Menu➔ Advanced➔ Version➔ Serial Number)
- User Name: admin
- Password: NVR login in Password
- After you connect it the device will show Online, then click Home➔Live
- View➔Double left click on the cameras to check camera preview. * If you check on same network want to add by IP address, change the Login Type to IP.
Right click the mouse, you will enter the main menu; Rright click the mouse again you will exit the current menu or return.(Applicable to all interfaces)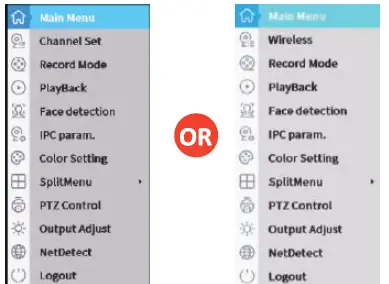
- Main Menu: click the main menu to enter the specific menu interface and configure the function parameters.
- Wireless/Channel Set: fast wireless code pairing.
- Record mode: record mode selection.
- Playback: playback the recorded video.
- Face detection: quickly open and close the face detection display frame.
- IPC param: View specific IPC parameters.
- Color setting: image brightness, contrast saturation, and other color adjustments.
- Split Menu: Split your screen into several views or LockScreen
- PTZ control: Zoom, focus, preset, tour(only applied to the PTZ cameras).
- Output Adjust: adjust the image style, output volume, and margin.
- NetDetect: network settings
- Logout: shut down, log out, reboot.
Expand Wireless Coverage
Wireless connection is easy and convenient, but it’s not universal application. Because of the character of WIFI, the WIFI signal will decrease when going through some obstacles. Some methods can be applied to bypass obstacles and extend WIFI range.
Note:
- The wireless repeater cannot enhance the signal strength of the wireless NVR kit, but can extend the distance of the signal relay or turn;
- Only when the repeaterd cameras are properly placed can the purpose of increasing the wireless transmission distance be achieved;
- Manual repeater settings need to ensure that the wireless connection is unblocked. In order to ensure the success of the setup, it is recommended to determine the repeater solution according to the actual use scenario, and place the camera near the NVR and set the repeater before installing the camera.
Reasonably adjust the antenna and optimize the signal radiation direction
As can be seen from the bar antenna gain chart as shown on the below, the signal coverage of the antenna is similar to an apple. The antenna is located in the center of the apple,and the signal around the antenna is strong. The upper and lower ends of the antenna are recessed, and the signal is weak.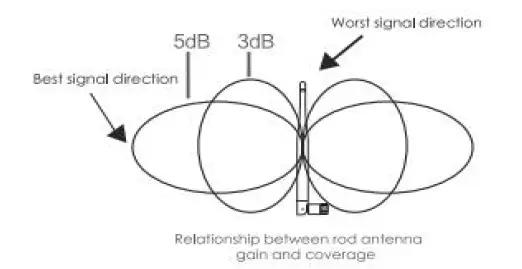
According to the signal transmission characteristics of the antenna, in order to ensure the optimal image transmission effect of the wireless NVR K, it is required:
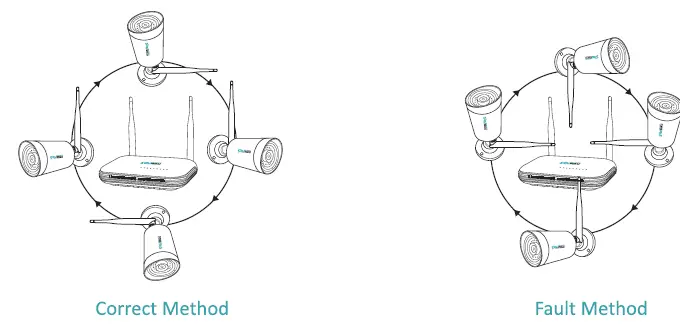
- The antennas of the NVR and IPC should be placed in a high and open place, and not near the wall, metal, glass and other obstacles, which will affect the signal’s outward divergence.
- The antenna of the IPC should be placed In para II with the NVR antenna as much as possible so that the respective maximum radiation direction angles are opposite to form the maximum signal coverage, as shown in the figure below.

Repeat Setting interface description
Right click the mouse➔ Wireless/Channel Set➔ Repeat Set. There are three Repeat Modes: AutoRepeat, OpenRepeat, CloseRepeat. Under normal circumstances, It ls recommended to set to Auto Repeat mode. Repeat Modes can be set in the pop-up option box when clicking the corresponding IPC Cameras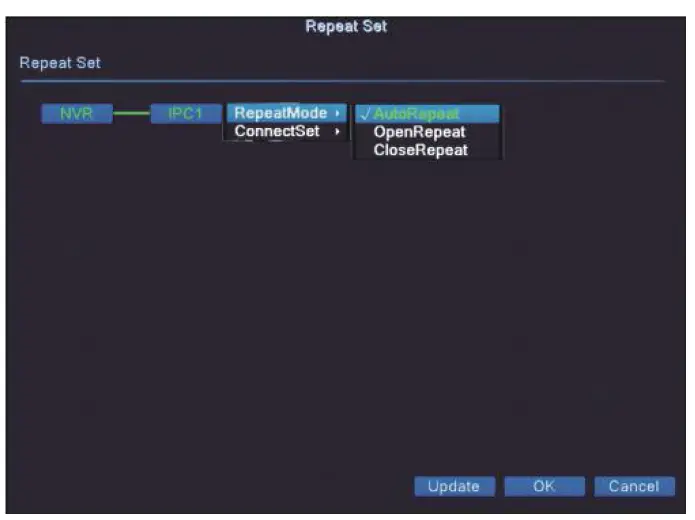
AutoRepeat: In AutoRepeat mode, at most two levels of repeat can be realized, NVR➔IPC1 ➔IPC2. The IPC devices connected to the NVR will automatically turn on the repeat function. If the repeat function is turned on, the corresponding IPC font is green(IPC1), and the device connected to I PC will not enable the repeat function. If the repeat function is not turned on, the corresponding IPC font is white (IPC2, that is, the device cannot be repeated after I PC2).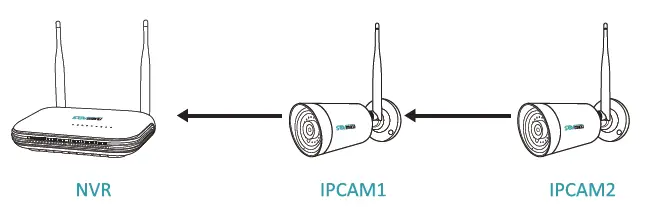
Open Repeat: This mode will forcibly open the repeat mode (restart is still maintained). This mode is used for three-level or above repeat. It is not recommended to turn on this mode because the transmission load of the WIFI module during the three-level or above repeat is big.
Close Repeat: This mode will forcibly close the repeat mode (restart remains), this mode is used when there is a complex environment, IPC may be repeated to an undesirable IPC, at this time you can turn off the repeated Equipment to prevent wrong repeat (or use forced connection function).
Warning
Device will not in the warranty if caused by below reasons:
- A. Accident; negligence; disaster; misoperation.
- B. Do not conform to the environment and conditions, such as power improper, working temperature is too high or too low, and lightning stroke
- C. Ever be maintained by another center which not belong to the real factory.
- D. Goods already sold for more than 12 months.
Frequently Asked Questions
How can I troubleshoot camera issues?
First check to see if the power adapter is working by testing with another power adapter. If the power adapter is functioning, move the camera close to NVR box to check whether you have video or not. If there is no video, cover the photocell with your finger as shown in the figure below. If the IR-CUT light turns red, the camera is working. If it does not turn red, this indicates that the camera has experienced a malfunction. If it does not turn red, this indicates that the camera has experienced a malfunction. In this case, please contact us for after sale service.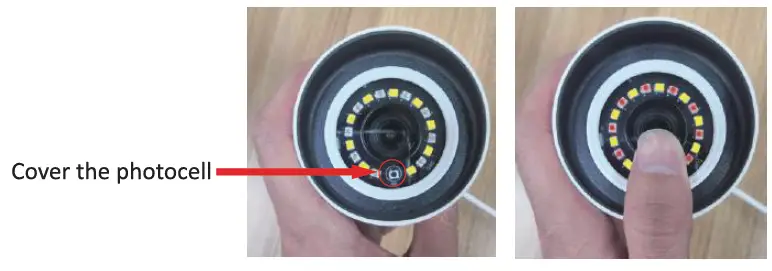
How do I add a new camera? What should I do when there is no camera display on the screen?
A: In some situations, you may need to add a new camera to your NVR. For example, you may need to replace a broken camera, or if you have an expandable NVR, you can add extra cameras
- Pis use an Ethernet cable connect the camera to your NVR first.
- Right Click the mouse➔ Wireless/Channel Set➔ Code for Wireless/QuickPair➔wait for the new camera IP address show up, then Exit.
- After that you can unplug the Ethernet cable

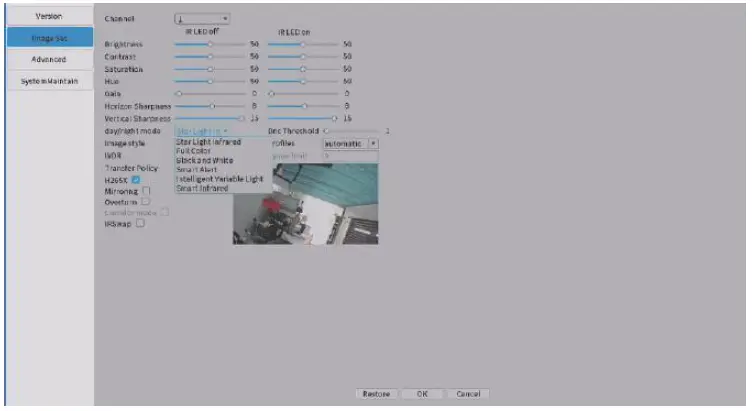
How to change the night vision modes of the camera?
A: The default night vision mode is Smart Infrared.
- Right click the mosue➔ IPC param➔ Image Set➔ day/night mode, select the mode you want and then click on OK. You need to change the night vision mode for each camera.

How can I get Human/Face/Motion Detect notifications on my phone?
A: (The dome camera system doesn’t support face/human detect function) First check the Net status is Connected
Second, from the home screen of your monitor, right click the mouse, choose Main Menu➔ Alarm➔ Intelligent Alert. Select Human Detect/Face detection. Uncheck the Human Detect, you will get Motion Detect. Enable for Mobile reported. Select the Sensitivity. Click OK.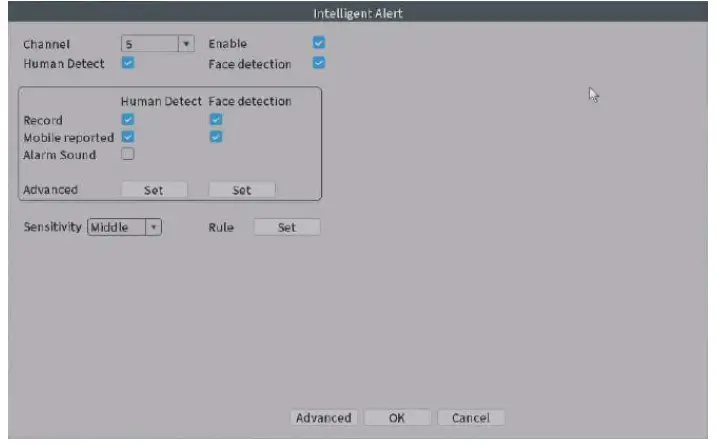
When people passed by, you will get motion detection signal and notification as shown. Login in your app : click Alarms➔ Message, then you will check the motion detection.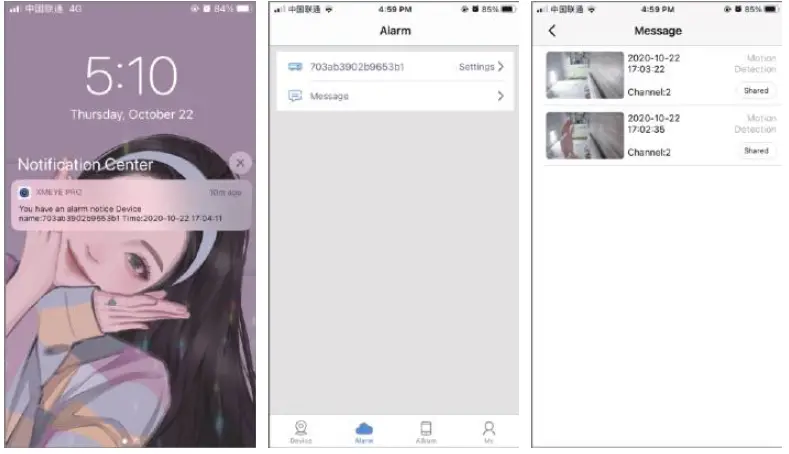
How can I receive e-mail notifications for Human/Face/Motion detection?
A: First, ensure you follow the steps outlined in the previous question How can I get motion notifications on my Smartphone? To receive notifications, you need a Email account (Such as Hotmail, Gmail, Yahoo, etc.) Next, log into the web version of your Email account. In the upper right-hand corner, click on the Settings button, then select Forwarding and POP/IMAP➔ POP and IMAP Select Enable and save it.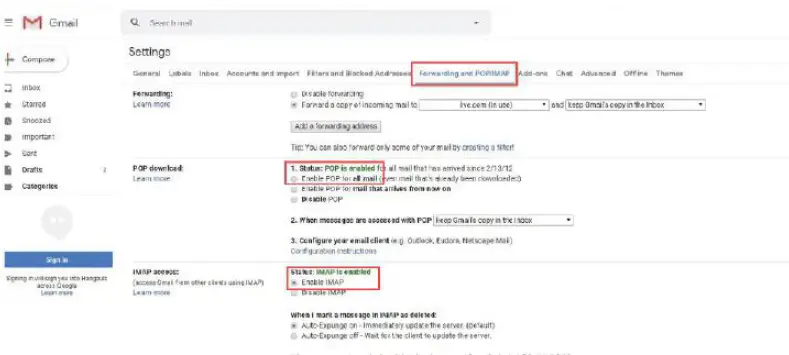
On the home screen of your monitor, Right click your mouse➔ NetDetect➔ Network➔ NetSevice➔ Double left click on Email from the left menu bar➔ click Enable, enter the information in the fields as shown in the figure below, please be sure to use the correct key on the keyboard next to the forward slash as shown in this figure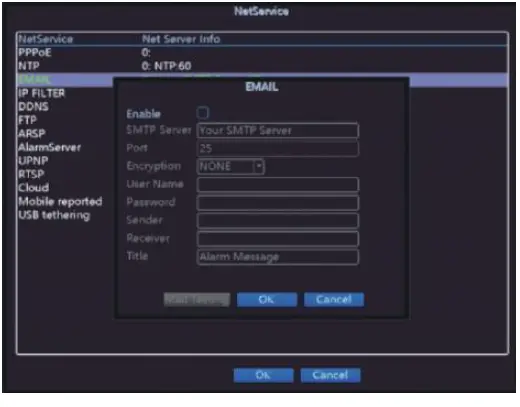
Complete the fields on the screen as follows{take gmail account as an example)
- SMTP Server: smtp.gmail.com
- Port: 465 or 587(for email port you can check
- Username: Sender e-mail address (click shift on the virtual keyboard for “@” symbol) to send alarm
- Password: Sender E-mail login password
- Encryption Type: SSL
- Sender: Sender e-mail address to send alarm
- Receiver: Receiver e-mail address to receive alarm (it must be different with sender, you can use another Hotmail/Gmail/Yahoo Email address)
- If you use other email account as sender, such as hotmail, yahoo, etc, you need to find out their own SMTP server and port, or you can contact our service person.
- After you have entered all of your information, click Test until the Test success message appears on the screen. Please allow a few minutes for the testing cycle to complete.
- If the test failed, Check the information again or try another Email account.Click Ok. Whether or not your test was successful, be sure to click Ok to save your settings.
- To test your alarm, walk past your camera. You will receive an Email notification within 2 to 3 minutes as shown in the sample figure below.


Q6: What is best temperature for the cameras to operate at their optimum level?
Select a location for the camera that has an ambient temperature ranging from-SO degrees Fahrenheit to 122 degrees Fahrenheit
Q7: How to restore my unit to the Factory Settings?
Right click the mouse from the home screen of your monitor, navigate to Main Menu➔ Advanced➔ Restore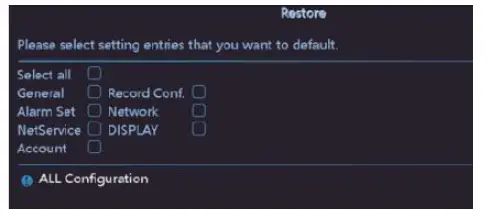
Q8:How to reset the NVR login password if I forget?
- Please Log out the system first, Right click on the mouse➔ click on Log out ➔ click on Log out again,
- Please Click Forget Password, If you remember the Safety questions, please enter your answers to reset the password. If you don’t remember the Safety questions, please click on Forget Answer. You will get the “CAPTCHA” QR code. Open the mobile APP “XMeye Pro”, click on Scan Icon on the left top corner
- Scan the QR code, you will get a super passcode.
 Enter the super passcoe in the “CAPTCHA”, click on OK, then you can set up your new password. {If device asks for old password, let it blank)
 Enter the super passcoe in the “CAPTCHA”, click on OK, then you can set up your new password. {If device asks for old password, let it blank)
Q9:How to find my NVR’s serial number/Cloud ID?
A: Please right-dick mouse navigates to Main Menu➔ Advanced➔ Version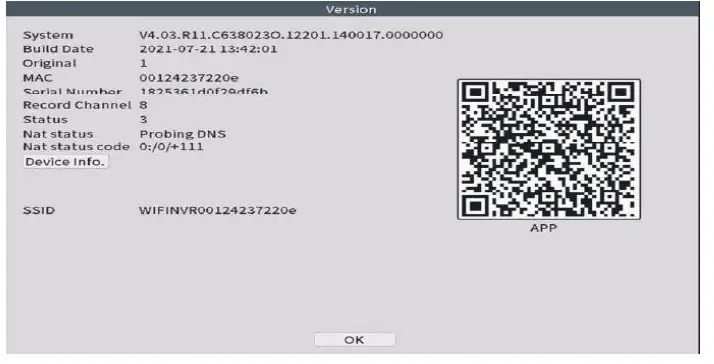
Q10:How to troubleshoot Hard Drive not found/No Recording?
A: Please make sure your system comes with a hard drive first I Some systems doesn’t include a hard drive.
- Check the output information of the power adapter that connected to the NVR box. The NVR box uses 12V 2A or 2.5A power supply. If you use the 12V lA power supply to the NVR, the NVR box will not have enough power to drive the hard drive.
- Check Hard Drive Information on NVR box and Format it. Please right click the mouse➔ Main Menu➔Advanced➔HDD Info, to check your HDD information here.
- Click Format Storage to format it. If the formatting is unsuccessful, please contact us.
- Please open the NVR box, check if the two cables connecting to the ha rd drive are loose.
- ake the hard disk out and install it on your computer. Check if the computer can recognize the hard disk.

Customer Support
- Email: [email protected]
- Tel: +1518-631-5872
- (Available from 5:30 pm. to 3:30 am. at California time)
- Website: www.sovmiku.net
FAQS
Yes! It includes 4X IP cameras, 1X NVR with a 10 inches LCD monitor, 1X 1 TB preinstalled HHD, 1X mouse, 1X Extension Antenna, adapters and cables.
The screen does scan through the cameras. You can set the amount of time spent on each scan and you can set the amount of scans per view.
There is no delay in monitor reaction
No, it can’t. But you can download an app VMS in your computer to watch it. About downloading the app, please email: [email protected]
It can expand 8 cameras very excellent security cameras.
Yes. You don’t need internet for recording. You need internet when you wanna connect it to your phone app
Yes. You need to set up in your app
Yes, you can. The system has a smart playback function according to the faces detected.
You can connect to your phone if you choose as well
Yes , after you set up the alert function in your App, the App will send you a message once the motion detected, providing a higher level of security.
The preinstalled 1 TB hard drive can be use to 45 days of 7/24 continuous recording. And it will overwrite the oldest video when it is full.
Please make sure the cameras are not too far away from the Monitor. And please right click the mouse, go to NetDetecte, and check the network status is online or not.
We are sorry, but the maximum number of channels is 8. And there are only 4 cameras for this kit.
Very easy it’s plug and play just set up cameras were you want them and it’s as easy as that
It depends on how cold it is. The cameras work well in the temperature among -25°C to 50°C(-13°F to 122°F)


