
![]() 1760 Video Door Phone 2Voice Hands-Free WiFi
1760 Video Door Phone 2Voice Hands-Free WiFi
Installation Guide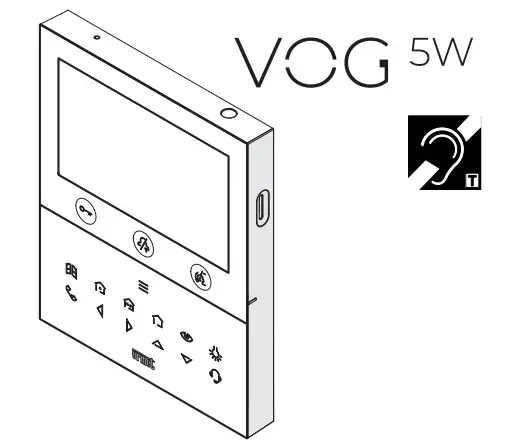
DESCRIPTION
The video door phones Ref. 1760/18 and Ref. 1760/19 are dedicated to using in 2Voice video door phone systems.
The main features are:
- 5’’ (Wide Angle) TFT-LCD color screen; backlit soft-touch buttons (*);
- possibility of activating video door phone functions using gesture commands on the IR sensor (disabled by default);
- possibility of adjusting the audio/video (speaker volume, brightness, contrast and color)in the OSD menu;
- possibility of adjusting the ring tone volume;
- call forwarding function to smartphones and tablets;
- video door phone answering machine function (up to 32 video messages);
- users book for intercom calls (up to 32 users);
- “Clean screen” function;
- “MUTE” function;
- hands-free or push-to-talk mode:
– Hands-free: press the audio button once to start the conversation and once again to end it;
– Push-to-talk: press the audio button to speak to the door unit, and release the button to listen.
(*) When a key is pressed an acoustic signal (beep) is provided. This signal is disabled when the “MUTE” function is activated.
DESCRIPTION OF COMPONENTS AND FEATURES
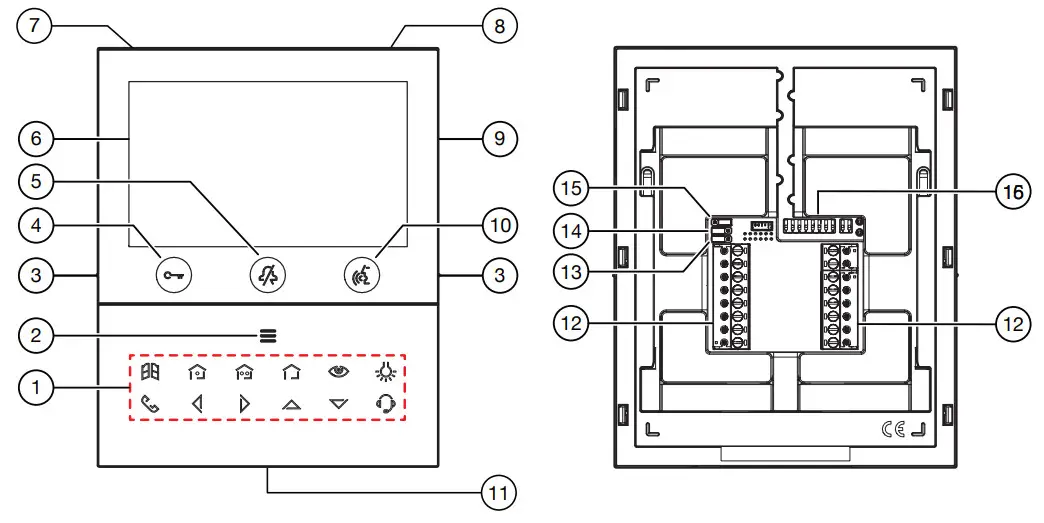
- Function keys:
 : driveway gate door opener key
 : closing the contact between terminals X1 and X2 (max 50 mA @ 24 V )
 : closing the contact between terminals Y1 and Y2 (max 50 mA @ 24 V )
 : no function
 : auto-on / video switching key
 : special function key
 : intercom call key
 : left scrolling arrow key
 : right scrolling arrow key
 : upwards scrolling arrow key
 : downwards scrolling arrow key
 : switchboard call key
 - Key for activation of secondary functions/display turning on
 (with green backlighting LED)
 - Raised notches for vision-impaired
- Pedestrian door opener button
 (with green/red backlighting LED)
 - Function button
 (with red backlighting LED)
 - 5” display
- Microphone
- IR sensor for gesture commands
- Micro SD slot
- Audio on/of a button
 (with green backlighting LED)
 - Speaker
- Terminals for connecting to the system
- Jumper for adjustment of power supply type: System BUS or local power supply unit (JP1)
- Jumper for adjustment of device consumption mode (JP2)
- Jumper for adjustment of Z line termination (JP3)
- (SW1 / SW2):
– no.1 of SW1, defines the operating mode on the WiFi on the video door phone;
– 2-8 of SW1, to define the apartment number in the column;
– 1-2 of SW2, to define the station number in the apartment.
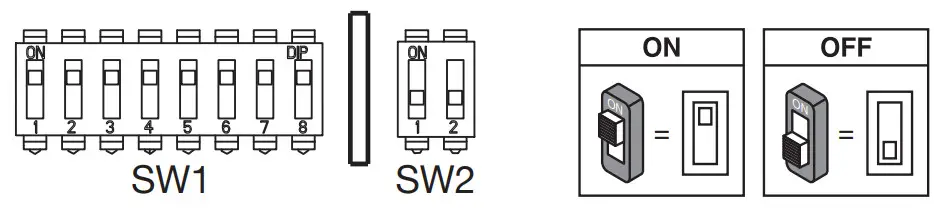
![]() Refer to the system booklet for how to set the dip switches.
Refer to the system booklet for how to set the dip switches.![]() The VOG
The VOG5w The video door phone is provided with a built-in hearing aid device, which only works during video calls. Furthermore, the video door phone is equipped with two raised notches, positioned on the sides next to the buttons![]() and
and ![]() to help vision-impaired users locate the position of the two buttons by touch.
to help vision-impaired users locate the position of the two buttons by touch.
INSTALLATION
ATTENTION! For proper operation of the Gesture commands, do not install the device in places where it may be exposed to direct sunlight, as the IR detector is sensitive to light.
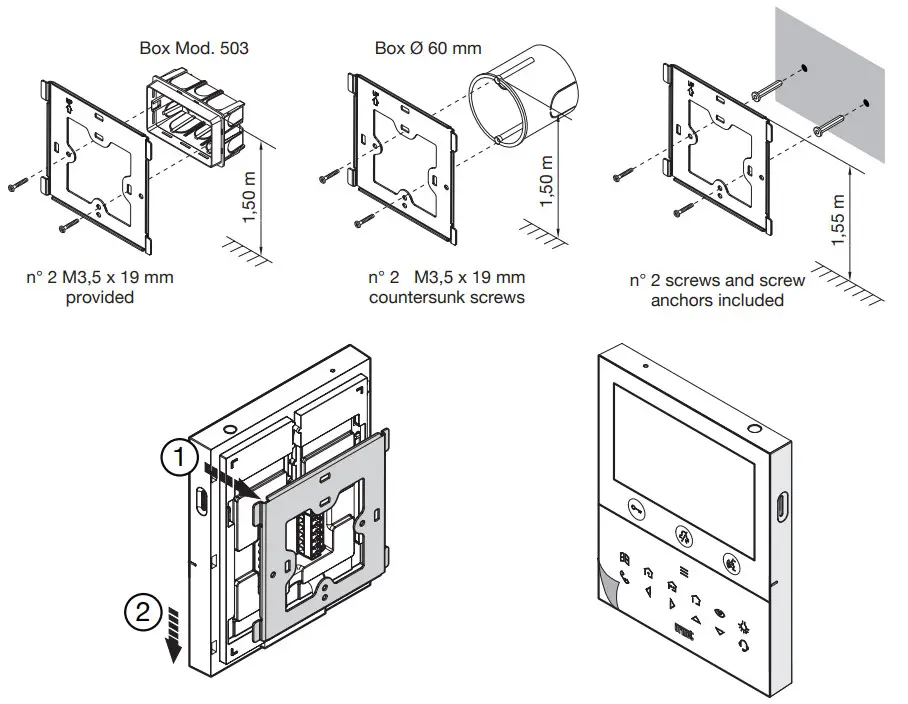
- Install the flush-mounting box Mod. 503 or the flush-mounting box 0 60 at the height indicated in the following drawing.
 The flush-mounting box Mod. 503 can be horizontally or vertically installed.
 - Fix the bracket to the mounting box as indicated.
- Program the dip switches and connect the system wires to the terminal boards.
- Fix the door phone to the bracket.
- Remove the protective film from the display.
- Power on the system.
ATTENTION! Based on the column address configured on the video door phones, there may be a delay in switching on.
TERMINAL DESCRIPTION
Left terminal board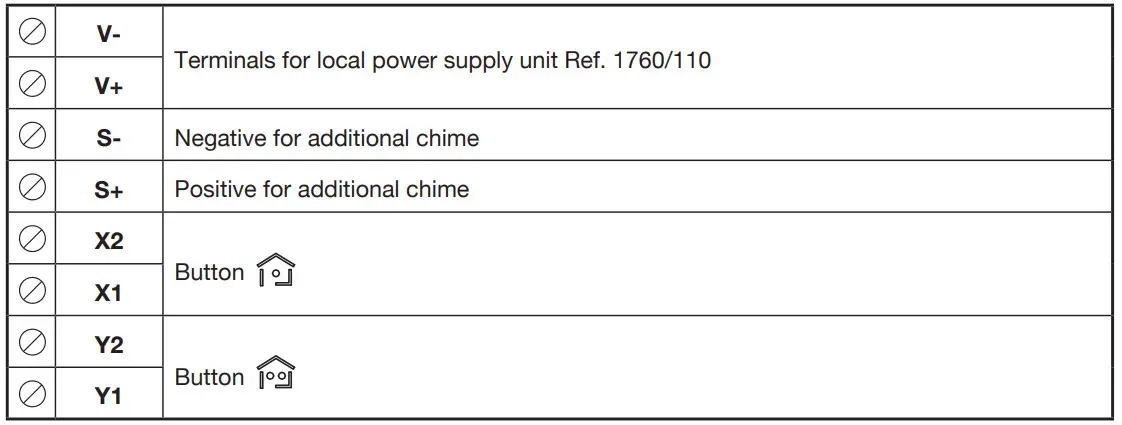
Right terminal board

JUMPER AND DIP-SWITCH SW1 NO.1 (DEFAULT)
JUMPER (JP3)
The following Jumper allows adjusting the line termination (Z) in case of in-out video door phone connection.
The line termination must be inserted into the last video door phone.
 For the position of jumpers JP1 and JP2 and dip-switch SW1, no.1 refer to the next chapter of the following handbook.
VIDEO DOOR PHONE PERFORMANCE ACCORDING TO CONFIGURATION METHOD
The video door phone can be configurated with 3 different methods. Depending on the selected method, limitations will be present in the following performance.
| Installation type (*) | |||
| Performance | Low rise block (Default) (Power supply from system BUS with WiFi always active) | High rise block (Power supply from system BUS with WiFi active after call forwarding) | Local power (Power supply from local power supply unit Ref. 1760/110) |
| Jumpers and DIP-switches | 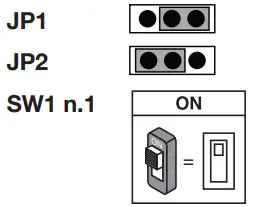 | 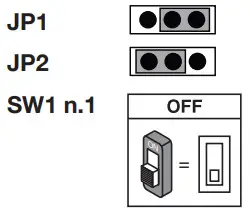 | 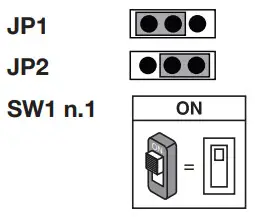 |
| Delay time on the reception of call forwarding to the CallMe app | No delay | 10 seconds | No delay |
| CallMe app auto-on | Available | Not available | Available |
| Panic alarm signaling to CaMe App | Available | Not available | Available |
| Automatic door opener timing | Not available | Available | Available |
| Screen displaying during intercom and switchboard calls | Not available | Not available | Available |
| Number of video door phones in the riser | Reduction of video door phone number (1 | Reduction of video door phone number (*) | 127 |
| Display turning on | 1 video door phone at a time in riser | 1 video door phone at a time in the riser | Unlimited |
| Display turning on the duration | 5 minutes | 5 minutes | Unlimited |
| Display timeout time for inactivity | 30 seconds | 30 seconds | 60 seconds |
(*) For the limits of the number of video door entry phones in the riser column, refer to the chapter “Video door phone installation constraints”.
VIDEO DOOR PHONE INSTALLATION CONSTRAINTS
If the configuration mode “Low rise block” is used on the the1760/18 – / 19 video door phones VOG5w you can have a reduction in the number of video door phone in a riser column derived from a column distributor Ref. 1083/53 or a column interface Ref. 1083/50, with the same maximum distances Reduction, is as follows:
| Power supply | Cable type | Number of video door phones |
| 1083/20A | 2Voice Ref. 1083/92 – /94 | 16 |
| CAT5 UTP (one twisted pair) | 8 | |
| 1083/23 | 2Voice Ref. 1083/92 – /94 | 5 |
| CAT5 UTP (one twisted pair) | 3 |
ATTENTION! Any Slave video door phones Ref. 1760/18 – /19 present in the apartments must be powered in Local power mode.
If the video door phone Ref. 1760/18 or /19 is installed as a spare to replace a video door phone, it must be Local power mode of use.
For other types of cables, see the booklet “Limit number of VOG5won the Urmet website by scanning the following QR Code.
 http://qrcode.urmet.com/default.aspx?prodUrmet=163417&lingua=en
CONTACT INSERTION FOR INTERCOM CALLS
In order to make intercom calls, it is necessary to enter contacts in the video door phone book. Up to 32 contacts can be entered.
To enter a new contact, proceed as follows:
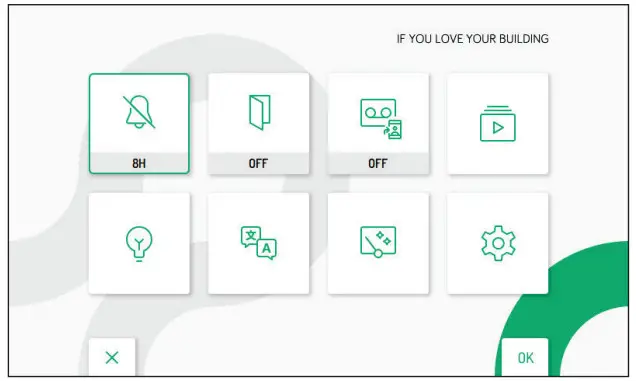
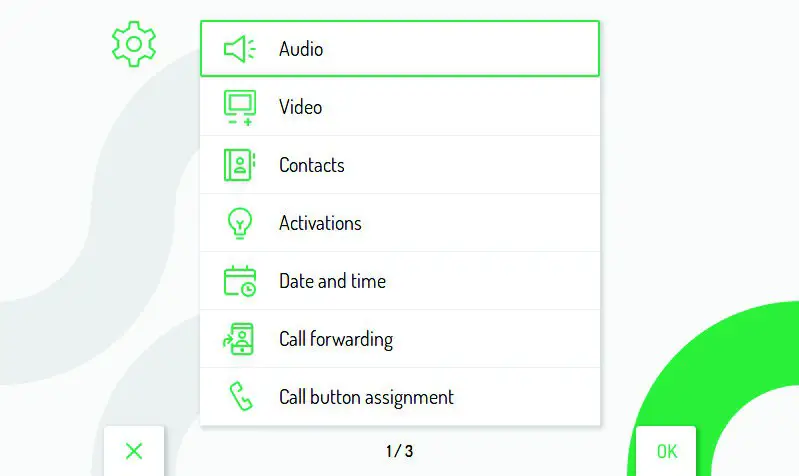
- Press the key twice when the video door phone is in stand-by mode to turn on the display and view the Homepage.For video door phones powered in High rise block and Low rise block, access to the Homepage is when it is already in use on another device, the video door phone will emit a dissuasion tone (4 beeps) indicating that the page cannot be displayed at the moment.
- The display shows the following screen:

- Press keys,, and select the following icon
 .
. - When the selection has been made press the key to confirm.
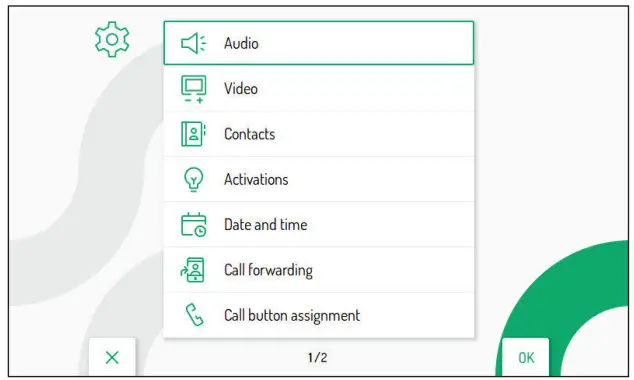
- The display shows the following screen:

- In the configuration menu press the key until selecting “Contacts”.
- Press the key to confirm the selection.

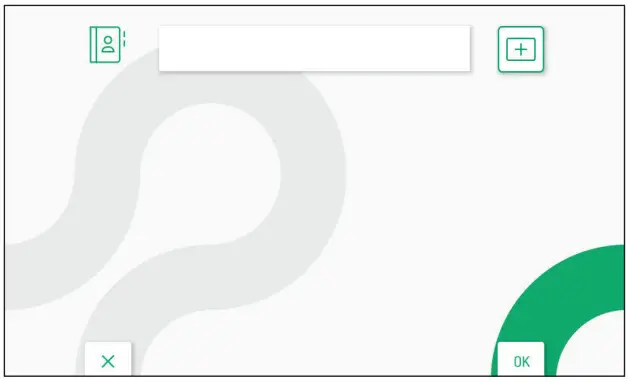
- To enter a new contact, press the key and select the icon to add a new contact
 .
. - Press the key to confirm and display the following screen:

- The following parameters must be defined for each new contact:
Contact type
Press the key![]() to select the following icon
to select the following icon![]() , then press the key
, then press the key![]() to change the contact type.
to change the contact type.![]() External contact: call to a video door phone in another apartment but within the same video door phone user
External contact: call to a video door phone in another apartment but within the same video door phone user![]() Internal contact: call to a video door phone in the same apartment
Internal contact: call to a video door phone in the same apartment
Video door phone ID code
Press the key![]() to select the following icon
to select the following icon![]() , then press the key
, then press the key![]() to enter the video door phone ID code.
to enter the video door phone ID code.
- For external contacts, permissible codes range from 0 to 126
- For internal contacts, permissible codes range from O to 3
In the configuration menu, under “System information”, it is possible to view the ID code of video door phones (for more details see the Parameter configuration handbook available by scanning the QR-Code at the end of the handbook).
Press the keys![]() ,
,![]() ,
, ![]() and
and![]() select on the virtual keypad the numbers that make up the video door phone ID code you want to add
select on the virtual keypad the numbers that make up the video door phone ID code you want to add ![]() to the contacts. Press the key to confirm the selected number.
to the contacts. Press the key to confirm the selected number.
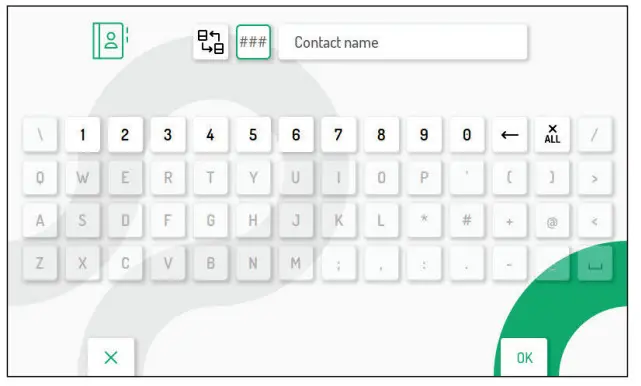
Contact name
Press the keys![]() ,
,![]() ,
, ![]() and
and![]() to select the following icon then press the key
to select the following icon then press the key ![]() to enter the contact name.
to enter the contact name.
Press the keys![]() ,
,![]() ,
, ![]() and
and![]() to use the virtual keypad and enter the contact name. Press the key
to use the virtual keypad and enter the contact name. Press the key ![]() to confirm the characters to be entered.
to confirm the characters to be entered.![]() Finally, press the key
Finally, press the key ![]() to quit the contact insertion page, and the display shows the following screen page:
to quit the contact insertion page, and the display shows the following screen page:
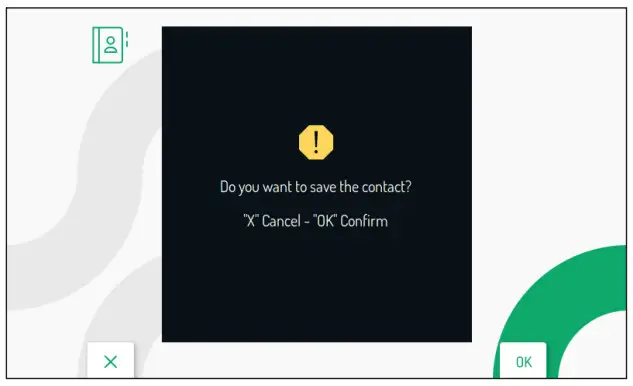
Press the key![]() to save the contact in the book. Press the key to cancel and return to the contact page.
to save the contact in the book. Press the key to cancel and return to the contact page.
RESET TO FACTORY SETTINGS
To reset the device to factory settings, proceed as follows:
- Press the key
 twice when the video door phone is in standby mode to turn on the display and view the Homepage.
- Press keys,, and to select the following icon.
- When the selection has been made press the key to confirm.
- The display shows the following screen:

- In the configuration menu press the key until selecting “Restore to factory data”.
- Press the key to confirm the selection.


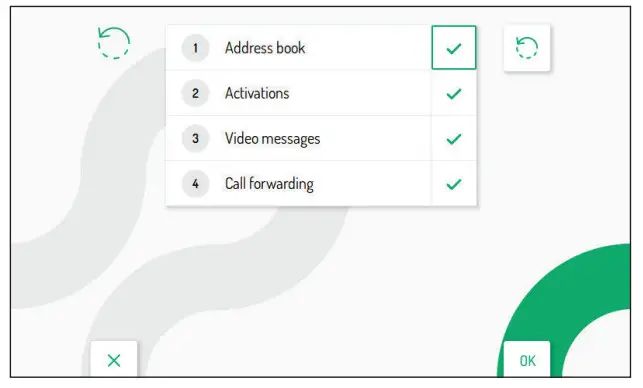
Press the![]() keys
keys![]() and to select which video door phone parameters you want to reset to factory values.
and to select which video door phone parameters you want to reset to factory values.
When the selection has been made, press the key ![]() to enable or disable the parameter for the reset to factory data. Enabling is confirmed by the presence of the icon
to enable or disable the parameter for the reset to factory data. Enabling is confirmed by the presence of the icon ![]() next to the parameter name.
next to the parameter name.![]() By default, all video door phone parameters are enabled for the reset to factory data.
By default, all video door phone parameters are enabled for the reset to factory data.
Press the key![]() to select the following icon
to select the following icon![]() , then press the key
, then press the key ![]() to start reset to factory data.
to start reset to factory data.
The display shows the following screen page: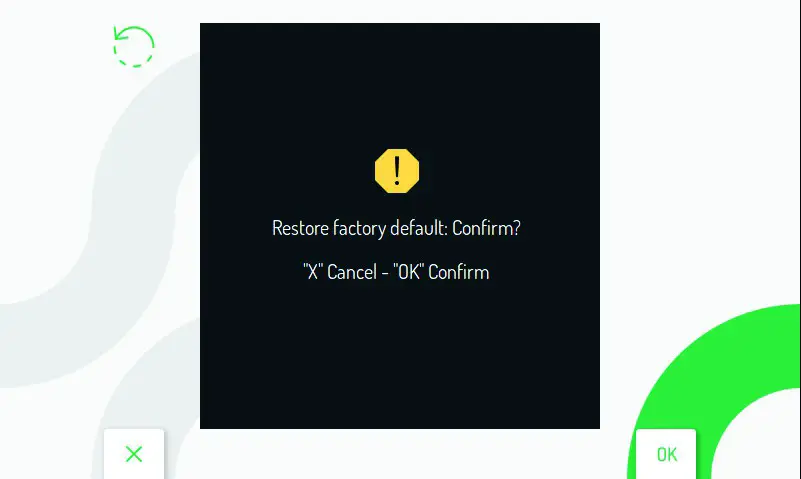
- Press the key to confirm reset to factory data.
- Press the key to cancel and return to the previous page.
TECHNICAL SPECIFICATIONS
Power voltage (LINE IN): ……………………………………………………..36 ÷ 48 V
Power voltage (V+; V-): ……………………………………………………………………24 V~
Consumption (LINE IN): …………………………………………………………………… @ 48 V
Stand-by: ………………………………………………………………………………. < 3 mA
Full rate: ……………………………………………………………………. < 160 Macc
Consumption (V+; V-): ……………………………………………………………………….. @ 24 V~
Stand-by: ………………………………………………………………………………… < 110 mA
Full rate: …………………………………………………………………….. < 370 mA
Maximum distance from local power supply …………………………20 m with cable sec. 1 mm
Frequency band:
WiFi: …………………………………………………………………..2.4GHz (2412.0 MHz – 2462.0 MHz)
Frequency band:
WiFi:………………………………………………………………………… 2.4GHz (2412.0 MHz – 2462.0 MHz)
Output power (Max):
WiFi: ……………………………………………………………………………………………….. 20 dBm
Terminals S+ and S- output ……………………………………………………………. 25 mA @ 24V
Display: ……………………………………………………………………………………………….5’’ TFT-LCD
Display resolution: …………………………………………………………………………….. 800 x 480 pixel
Operating temperature range: …………………………………………………………… -5° ÷ 50°C / 23 ÷ 122 °F
Dimensions (LxDxH): ………………………………………………………….. 160 x 130 x 26 mm / 0,52 x 0,42 x 0,08 ft
![]() Wires with a cross-section area of 0.5 mm² or larger must comply with IEC 60332-1-2; wires with cross section area smaller than 0.5 mm? must comply with IEC 60332-2-2.
Wires with a cross-section area of 0.5 mm² or larger must comply with IEC 60332-1-2; wires with cross section area smaller than 0.5 mm? must comply with IEC 60332-2-2.
KEY TO SYMBOLS

This device complies with Part 15 of the FCC rules. Operation is subject to the following two conditions:
- This device may not cause harmful interference.
- This device must accept all interference received, including interference that may cause undesired operation.
Information to the user statements:
This equipment has been tested and found to comply with the limits for a Class B digital device, pursuant to part 15 of the FCC Rules. These limits are designed to provide reasonable protection against harmful interference in a residential installation.
This equipment generates, uses and can radiate radio frequency energy and, if not installed and used in accordance with the instructions, may cause harmful interference to radio communications. However, there is no guarantee that interference will not occur in a particular installation.
If this equipment does cause harmful interference to radio or television reception, which can be determined by turning the equipment off and on, the user is encouraged to try to correct the interference by one or more of the following measures:
- Reorient or relocate the receiving antenna.
- Increase the separation between the equipment and receiver.
- Connect the equipment into an outlet on a circuit different from that to which the receiver is connected.
- Consult the dealer or an experienced radio/TV technician for help.
RF exposure warning statement
To comply with FCC RF exposure compliance requirements, a separation distance of at least 20 cm must be maintained between the antenna of this device and all nearby persons.
Changes or modifications not expressly approved by the party responsible for compliance could void the user’s authority to operate the equipment.
![]() URMET S.p.A.
URMET S.p.A.
10154 TORINO (ITALY)
VIA BOLOGNA 188/C
Telef. +39 011.24.00.000 (RIC. AUT.) Fax +39 011.24.00.300 – 323
Area tecnica servizio clienti +39 011.23.39.810
http://www.urmet.com
e-mail: [email protected]
MADE IN CHINA


