![]()
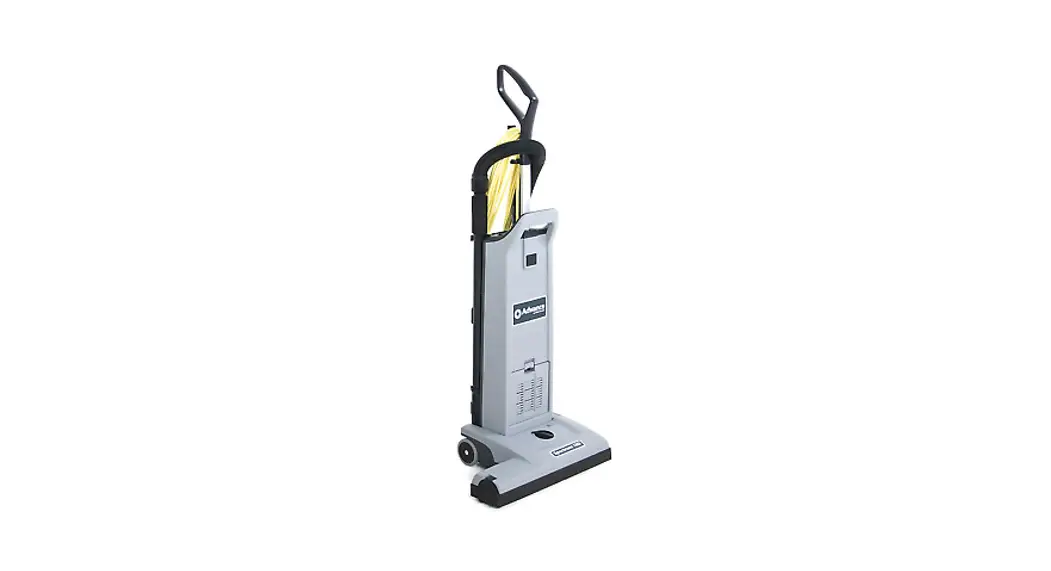
Carpetwin™ 14 / 18
![]()
OPERATOR MANUAL AND PARTS LIST
Advance MODELS 56704200, 56704201
56704200, 56704201 Carpetwin 14, 18
 |  |
IMPORTANT SAFETY INSTRUCTIONS
When using an electrical appliance, basic precautions should always be followed, including the following: Read all instructions before using.
This machine is for commercial use, for example in hotels, schools, hospitals, factories, shops and offices other than normal residential housekeeping purposes.
THIS APPLIANCE IS INTENDED FOR DRY USE ONLY!
DO NOT USE FOR WET FLOOR OR CARPET!
![]() WARNING !
WARNING !
To reduce the risk of fire, electric shock, or injury:
* Do not leave the appliance when it is plugged in. Unplug the unit from the outlet when not in use and before servicing.
![]() WARNING !
WARNING !
To reduce the risk of electric shock, do not use outdoors or on wet surfaces.
* Do not allow to be used as a toy. Close attention is necessary when used by or near children.
* Use only as described in this manual. Use only the manufacturer’s recommended attachments.
* If the appliance is not working as it should be, has been dropped, damaged, left outdoors or dropped into water, return it to a service center. The machine must not be used if the electrical cord shows any sign of damage. Regularly inspect the cord for damage, particularly if it has been crushed, shut in a door or run over.
* Do not pull or carry by the cord, use the cord as a handle, or pull the cord around sharp edges or corners. Keep the cord away from heated surfaces.
* Do not unplug by pulling on the cord. To unplug, grasp the plug, not the cord.
* Do not handle the plug, cord or appliance with wet hands.
* Do not put any object into openings. Do not use with any opening blocked.
* Keep loose clothing, hair, fingers, and all parts of body away from openings and moving parts.
* Do not pick up anything that is burning or smoking, such as cigarettes or matches. Under no circumstances should the machine be used for picking up hot material. In particular the machine must not be used for cleaning open and closed fireplaces, ovens or similar that contain warm or glowing ashes.
* Do not use without dust bag and/or filters in place.
* Turn off all controls before unplugging. The plug must always be removed from the socket outlet before starting any service or repair work of the vacuum cleaner or the cord.
* Avoid vacuuming hard or sharp objects.
* Use extra care when cleaning on stairs.
* The machine must not be used for picking up combustible materials which are health endangering or explosive materials such as petrol (gasoline), nor should it be used in an explosive atmosphere. The machine must not be used for picking up water, other liquids or for picking up hazardous – i.e. poisonous dust.
* No changes or modifications of the mechanical, electrical or thermal safety devices should be made.
* When repairing or replacing the cord, the same type of cord as originally supplied with the machine must be used. This cord can be supplied by ADVANCE.
SAVE THESE INSTRUCTIONS
GROUNDING INSTRUCTIONS
This appliance must be grounded. If it should electrically malfunction, grounding provides a path of least resistance for electric current to reduce the risk of electric shock. This appliance is equipped with a cord having an equipment-grounding conductor and grounding plug. The plug must be plugged into an appropriate outlet that is properly installed and grounded in accordance with all local codes and ordinances.
![]() DANGER!
DANGER!
Improper connection of the equipment-grounding conductor can result in a risk of electric shock. Check with a qualified electrician or service person if you are in doubt as to whether the outlet is properly grounded. Do not modify the plug provided with the appliance. If it will not fit the outlet, have a proper outlet installed by a qualified electrician.
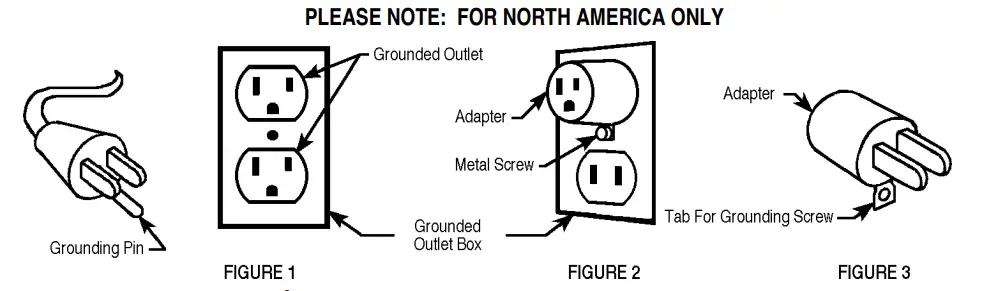
This appliance is for use on a nominal 120-volt circuit, and has a grounding plug that looks like the plug illustrated in Figure 1 below. A temporary adapter illustrated in Figures 2 and 3 may be used to connect this plug to a 2-pole receptacle as shown in Figure 2 if a properly grounded outlet is not available. The temporary adapter should be used only until a properly grounded outlet (Figure 1) can be installed by a qualified electrician.
The green-colored rigid ear, tab, or the like extending from the adapter must be connected to a permanent ground such as a properly grounded outlet box cover. Whenever the adapter is used, it must be held in place by a metal screw. Grounding adapters are not approved for use in Canada. Replace the plug if the grounding pin is damaged or broken.
The Green (or Green/Yellow) wire in the cord is the grounding wire. When replacing a plug, this wire must be attached to the grounding pin only. Extension cords connected to this machine should be 12 gauge, three-wire cords with three-prong plugs and outlets. DO NOT use extension cords more than 50 feet (15 m) long.
INTRODUCTION
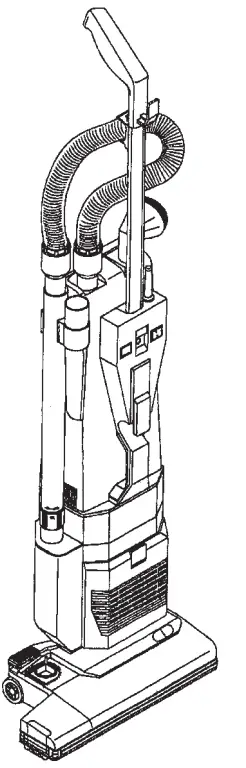
This manual will help you get the most from your Advance Carpetwin.
Read it thoroughly before operating the machine.
Note: Bold numbers in parentheses indicate an item illustrated on page 1.
This product is intended for commercial use only.
PARTS AND SERVICE
Repairs, when required, should be performed by your Authorized Advance Service Center, who employs factory trained service personnel, and maintains an inventory of Advance original replacement parts and accessories.
Call the ADVANCE DEALER named below for repair parts or service. Please specify the Model and Serial Number when discussing your machine.
(Dealer, affix service sticker here.)
NAME PLATE
The Model Number and Serial Number of your machine are shown on the Nameplate on the machine. This information is needed when ordering repair parts for the machine. Use the space below to note the Model Number and Serial Number of your machine for future reference.
MODEL NUMBER
SERIAL NUMBER
UNCRATE THE MACHINE
When the machine is delivered, carefully inspect the shipping carton and the machine for damage. If damage is evident, save the shipping carton so that it can be inspected. Contact the Advance Customer Service Department immediately to file a freight damage claim.
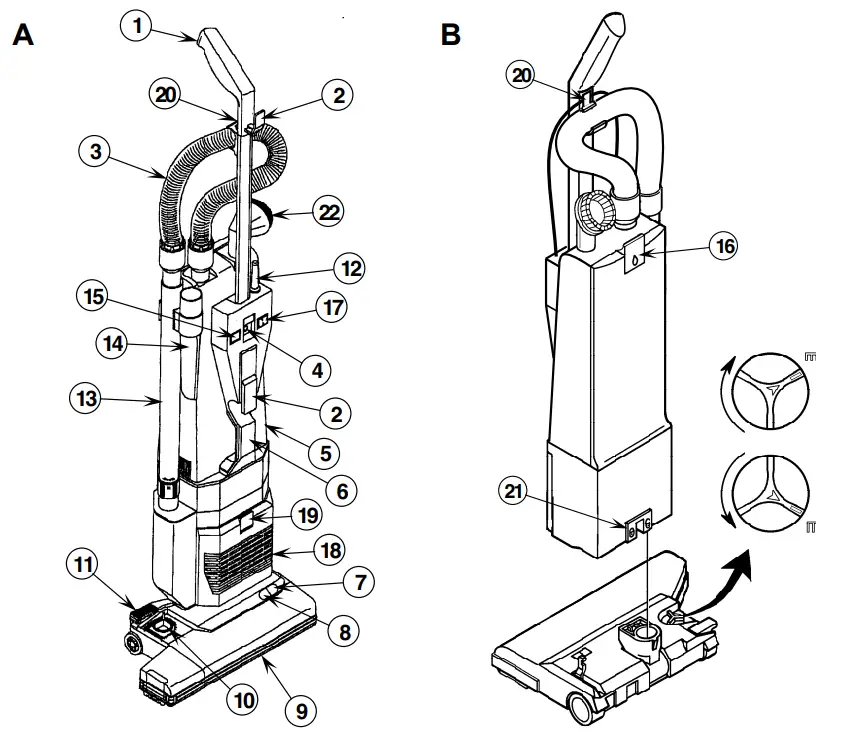
A-KNOW YOUR MACHINE
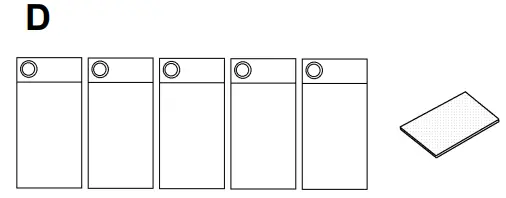
As you read this manual, you will occasionally run across a bold number in parentheses – example: (2). These numbers refer to an item shown on this page. Refer back to this page whenever necessary, to pinpoint the location of an item mentioned in the text.
| 1 Handle 2 Cord Hook 3 Vacuum Hose 4 Handle Lock Button 5 Bag Housing 6 Carrying Handle 7 Red Light 8 Green Light 9 Brush Housing 10 Brush Height Adjustment Knob 11 Pedal | 12 Power Cord 13 Wand 14 Crevice Tool 15 “Bag Full” Light 16 Bag Housing Latch 17 Main Power Switch 18 Exhaust Filter Cover 19 Filter Cover Latch 20 Power Cord Clamp (Figure B) 21 Locking Latch (Figure B) 22 Dusting Brush |
B-SET UP AND ASSEMBLY
- Carefully remove the machine from its carton.
- Push the Handle (1) into the opening at the top of the Bag Housing (5) until the button snaps into the hole between the Switch (17) and the Bag Full Light (15).
- Install the Bag Housing (5) on the Brush Housing (9). Slide the Locking Latch (21) to the left.
- Measure 15 inches of Power Cord (12) from where it comes out of the machine. Insert the cord at this point into the Power Cord Clamp (20).
- Insert one end of the Vacuum Hose (3) into the top of the vacuum body and the other end into the extension wand. Insert the wand into the hole on the right side of the vacuum body and clip onto the right side of the machine. Snap the Hose (3) into the clip below the Handle (1).
- To install a Paper Dust Bag, push the Bag Housing Latch (16) and remove the back cover. Then follow the instructions printed on the Paper Dust Bag. Never operate the machine without a Dust Bag in place.
OPERATING THE MACHINE
- To release the Power Cord (12) from the Cord Hooks (2), press the Handle Lock Button (4) in while pushing down on the Handle (1) and pull the power cord off the hooks. Plug the Power Cord into a properly grounded electrical outlet.
- Turn the Main Power Switch (17) ON. “l” is ON and “O” is OFF.
- Step on the Pedal (11) and tilt the handle back. The Green Light (8) on the base will come on to indicate that the brush motor is running.
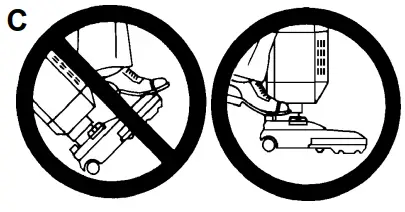
 C – IMPORTANT !
Foot pedal must be used to release base to operating position. Failure to do so could result in damage to the handle release mechanism. - Turn the Height Adjustment Knob (10) to adjust the height of the brush. If the Red Light (7) comes on, slowly turn the Knob in the opposite direction until the light goes off. If the red light stays on continuously, there may be debris wrapped around the brush. This can cause the overload protector for the brush motor to trip. If this occurs, turn the Main Switch OFF and unplug the power cord. Remove any debris from the brush and turn the Main Switch back ON. This will automatically reset the overload protector. The machine can also be reset by locking the handle in the upright position. Remove any debris from the brush and repeat Step 3. If the overload protector trips repeatedly, or if the red light stays on continuously, contact Advance for service.
- Change the bag whenever the “Bag Full” Light (15) comes on. If the light comes on before the bag is full, the inside of the bag may be coated with very fine dust (change the bag), or debris may be built up somewhere between the brush and the bag.
USING THE WAND
To use the Wand (13), put the Handle in the upright locked position. The brush motor will stop automatically. Slide the Wand out of its holder. Install the Crevice Tool (14) or Dusting Brush (22) on the end of the Wand, if desired.
AFTER USING THE MACHINE
- Unplug the Power Cord from the electrical outlet and wrap it around the Cord Hooks on the front of the machine.
- Check to see if the bag is full, replace if necessary. Clean the bag housing, if necessary.
- Clean or replace the Vacuum Inlet Filter every third time the bag is changed. Clean or replace the Electrostat Exhaust Filter every fifth time the bag is changed.
- Remove any built-up carpet fibers or debris from the brush housing.
- Store the machine indoors in a clean, dry place.
VACUUM MOTOR BRUSHES
Have your Advance Dealer check the carbon motor brushes once a year or after 500 operating hours.
![]() IMPORTANT !
IMPORTANT !
Motor damage resulting from failure to service the carbon brushes is not covered under warranty. See the Limited Warranty Statement.
MAINTENANCE
![]() CAUTION !
CAUTION !
Always disconnect the Power Cord before performing any machine maintenance.
CHANGING THE PAPER DUST BAG
Change the Bag whenever the “Bag Full” Light comes on. To replace the Paper Dust Bag :
- Push the Bag Housing Latch (16) in and remove the back cover.
- Remove the Paper Dust Bag following the instructions printed on the bag.
- Install a new Paper Dust Bag following the instructions printed on the bag.
![]() IMPORTANT !
IMPORTANT !
Never operate the machine without a Dust Bag in place.
CHANGING THE CLOTH DUST BAG
Empty the Bag whenever the “Bag Full” Light comes on. To empty the Cloth Dust Bag :
- Push the Bag Housing Latch (16) in and remove the back cover.
- Remove the Cloth Dust Bag following the instructions printed on the bag.
- Remove bag clip and shake out bag contents.
- Put the bag clip back on the bag.
- Install the Cloth Dust Bag following the instructions printed on the bag.
- Replace the Electrostat Exhaust Filter every fifth time the bag is changed (more often in very dusty applications).
![]() IMPORTANT !
IMPORTANT !
Never operate the machine without a Dust Bag in place.
CLEANING THE VACUUM INLET FILTER
The vacuum inlet filter catches any dirt spilled from the bag, before it can enter the vacuum motor. The filter is located just below the bag. Clean the filter every third time that the bag is changed (more often in very dusty applications). To clean the Vacuum Inlet Filter…
- Push the Bag Housing Latch (16) in and remove the back cover.
- Slide the Filter Holder out of the bottom of the Bag Housing.
- Remove the filter and wash it in warm water. Let the filter dry completely before putting it back into the machine.
![]() IMPORTANT !
IMPORTANT !
Never operate the machine without the Vacuum Inlet Filter in place.
D-CHANGING THE ELECTROSTAT EXHAUST FILTER
The electrostat exhaust filter catches any dirt that may escape from the dust bag, vacuum inlet filter, or lower motor filter. The electrostat exhaust filter is located just below the carrying handle. Replace the filter every fifth time that the dust bag is changed (more often in very dusty applications).
To replace the Electrostat Exhaust Filter…
- Push the Filter Cover Latch (19) in and remove the Electrostat Exhaust Filter Cover (18).
- Remove the Filter from the filter holder and insert a new filter in its place.
- Snap the Filter Cover back into place.
![]() IMPORTANT !
IMPORTANT !
Never operate the machine without the Electrostat Exhaust Filter in place.
CHANGING THE BRUSH
- Lay the machine over onto its left side.
- Slide the side cover (item #46 / page 13) off of the brush housing.
- Carefully pry the roller support (item #40 / page 13) off the end of the brush (reuse on new brush).
- Grasp the center of the brush by the bristles and pull it up and out the right side of the housing.
- Slide brush end with hex opening into housing first, make sure it slides all the way down onto transmission support (item #34 / page 13).
- Follow steps 1-3 in reverse order to reassemble.
REPLACING THE BELT![]() WARNING !
WARNING !
To reduce the risk of electric shock, unplug before servicing.
- Remove screws (7 on Carpetwin 14 / 9 on Carpetwin 18) from the top cover (item #2 / page 13) and remove top cover from the brush housing.
- Remove both screws in transmission support (item #34 / page 13).
- Lift the end of the brush up and remove the belt from the brush pulley.
- Bend brush housing out just enough to slide the belt off of the motor pulley (be careful not to break housing!).
- Reassemble in reverse order.
TECHNICAL SPECIFICATIONS
(as installed and tested on the unit)
| Model | Carpetwin 14 | Carpetwin 18 | |
| Voltage | V/Hz | 120/60 | 120/60 |
| Rated Power | W | 900 | 920 |
| Protection Class (electrical) | |||
| Sound Pressure Level | dB(A)/20µPa | 69 | 69 |
| Total Weight | lbs / kg | 19.5 / 8.8 | 20.5 / 9.3 |
| Vibrations at the Hand Controls | m/s² | <2.5m/s² | <2.5m/s² |
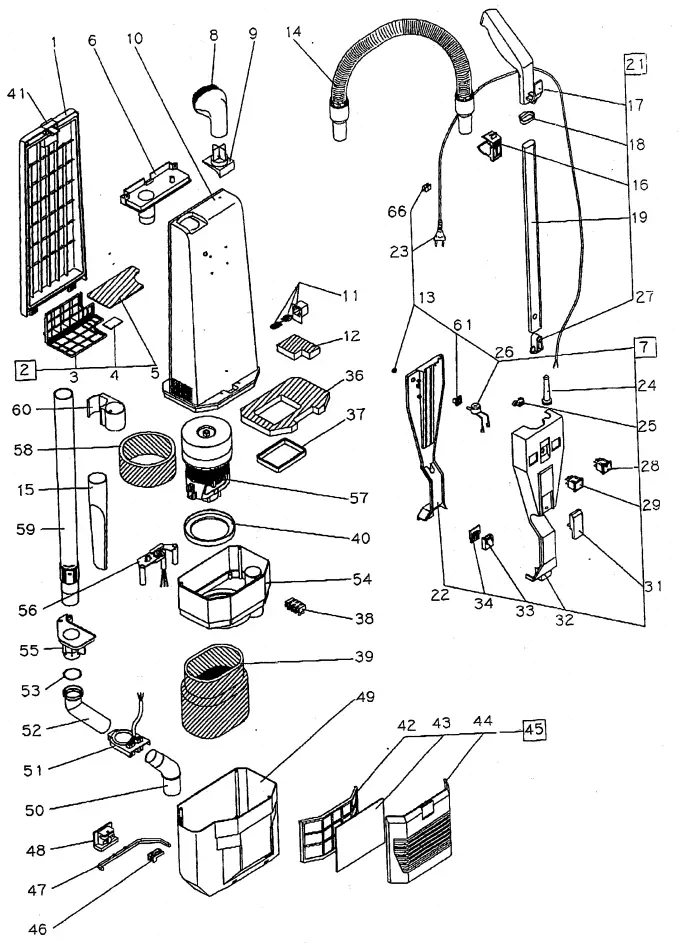
BAG HOUSING
| Item | Ref. No. | Qty | Description |
| 1 | 56704205 | 1 | Bag Housing Cover |
| 2 | 56646851 | 1 | Grill Complete |
| 3 | 56703712 | 1 | Grill Filter Holder |
| 4 | 56703714 | 1 | Scented Pad (pkg of 10) |
| 5 | 56703713 | 1 | Internal Filter |
| 6 | 56703720 | 1 | Bag Entrance |
| 7 | 56704206 | 1 | Electrical System Assembly (3 wires) |
| 8 | 56703785 | 1 | Round Dusting Brush |
| 9 | 56646858 | 1 | Round Dusting Brush Support |
| 10 | 56704207 | 1 | Bag Housing |
| 11 | 56703779 | 1 | Valve Kit |
| 12 | 56646861 | 1 | Valve Filter |
| 13 | 56703978 | 1 | O-Ring |
| 14 | 56704216 | 1 | SemiFlex Hose W/Sleeves |
| 15 | 56703725 | 1 | Crevice Tool |
| 16 | 56704208 | 1 | Upper Hook for Flex Tube |
| 17 | 56646865 | 1 | Handle Grip |
| 18 | 56704209 | 1 | Retainer |
| 19 | 56704221 | 1 | Chromate Tube |
| 20 | 56646869 | 1 | Handle Tube Assy |
| 21 | 56704210 | 1 | Handle Cover |
| 22 | 56703795 | 1 | Cord, 3 x 18 |
| 23 | 56703662 | 1 | Strain Relief |
| 24 | 56703977 | 1 | Cord Clamp |
| 25 | 56704159 | 1 | Vacuum Sensor |
| 26 | 56646875 | 1 | Button (w/support & spring) |
| 27 | 56703708 | 1 | Main Switch |
| 28 | 56646877 | 1 | Indicator Light |
| 29 | 56646878 | 1 | Cord Hook |
| 30 | 56704211 | 1 | Frame Handle Assy |
| 31 | 56646879 | 1 | Contact Housing |
| 32 | 56646880 | 1 | Contact Cover |
| 33 | 56703706 | 1 | Foam Filter |
| 34 | 56703705 | 1 | Gasket |
| 35 | 56703972 | 1 | Terminal Block |
| 36 | 56646884 | 1 | Foam Motor Filter |
| 37 | 56646885 | 1 | Gasket |
| 38 | 56704212 | 1 | Bag Door Latch (w/spring) |
| 39 | 56704222 | 1 | Filter Holder |
| 40 | 56646888 | 1 | Exhaust Filter (pkg of 5) |
| 41 | 56704223 | 1 | Exhaust Filter Cover |
| 42 | 56704224 | 1 | Complete Grill |
| 43 | 56703966 | 1 | Blocking Joint Pin |
| 44 | 56703938 | 1 | Joint Pin |
| 45 | 56646893 | 1 | Control Pin Slide |
| 46 | 56704225 | 1 | Vacuum Motor Housing |
| 47 | 56646895 | 1 | Lower Curve |
| 48 | 56646896 | 1 | Curve Support |
| 49 | 56646897 | 1 | Upper Curve |
| 50 | 56646898 | 1 | O-Ring |
| 51 | 56704215 | 1 | Inner Vacuum Motor Housing |
| 52 | 56646900 | 1 | Hose Inlet |
| 53 | 56646901 | 1 | Cord Clamp |
| 54 | 56704237 | 1 | Vacuum Motor NOTE 1 |
| * | 56704238 | 2 | Carbon Brush for 56704237 & 56704168 TSBUS2002-829 |
| 55 | 56703775 | 1 | Foam Filter |
| 56 | 56704213 | 1 | Telescopic Wand |
| 57 | 56704214 | 1 | Wand Clip |
| 58 | 56704226 | 1 | Vacuum Sensor Adapter |
| 59 | 56703990 | 1 | Cord Clip |
| **# | 56704181 | A/R | Bag, Paper (pkg of 10) |
| **# | 56704182 | A/R | Bag Paper W/Window |
| ** | 56703769 | A/R | Cloth Bag W/Clip |
| ** | 56320676 | A/R | Clip, Cloth Bag |
| ** | 56703774 | A/R | Upholstery Tool |
| ** | 56703771 | A/R | Extension Tube, 30mm x 30cm |
| ** | 56703772 | A/R | Tube Bend W/Suction Control |
** = Optional
* = Not Shown
# = Revised or new since last update
NOTE 1: 56704168 used prior to SN1498331 on 14” & prior to SN1499231 on 18”

BRUSH HOUSING – 14 / 18
| Item | Ref. No. | Qty | Description |
| 1 | 56704203 | 1 | Brush Housing Assembly, 14″ |
| 2 | 56704204 | 1 | Brush Housing Assembly, 18″ |
| 3 | 56704227 | 1 | Body Main Brush Head, 14″ |
| 4 | 56704228 | 1 | Body Main Brush Head, 18″ |
| 5 | 56704229 | 1 | Electric Brush Cover, 14″ |
| 6 | 56704230 | 1 | Electric Brush Cover, 18″ |
| 7 | 56704148 | 1 | Joint Complete w/pin slide (#4) |
| 8 | 56704016 | 1 | Joint Pin Slide |
| 9 | 56704017 | 1 | Support Right Joint w/felt seal |
| 10 | 56704018 | 2 | Plunger |
| 11 | 56703766 | 2 | Spring, Handle Release Pedal |
| 12 | 56704019 | 1 | Double Pin Washer |
| 13 | 56704020 | 1 | Double Release Plate |
| 14 | 56704107 | 1 | Handle Release Pedal |
| 15 | 56704022 | 1 | Support Left Joint w/felt seal |
| 16 | 56704023 | 1 | Switch Activator Pin |
| 17 | 56704024 | 1 | Spring |
| 18 | 56703738 | 1 | Brush Motor Switch |
| 19 | 56703762 | 1 | Brush Adjuster |
| 20 | 56703008 | 1 | Brush Adjuster Knob |
| 21 | 56704028 | 1 | Front Axle |
| 22 | 56703757 | 2 | Front Wheel |
| 23 | 56704030 | 1 | Spring, Brush Adjust |
| 24 | 56704031 | 1 | Rear Axle |
| 25 | 56704032 | 2 | Rear Wheel |
| 26 | 56704033 | 2 | Wheel Retainer |
| 27 | 56704065 | 4 | Screw, 2.9 x 16mm |
| 28 | 56704106 | 1 | Filter Grill |
| 29 | 56704035 | 1 | Brush Motor Filter |
| 30 | 56704124 | 1 | Stop Grill Plate |
| 31 | 56703743 | 1 | Brush Motor, 14″ |
| 32 | 56704037 | 1 | Brush Motor, 18″ |
| 33 | 56704137 | 2 | Carbon Brush for 56703743 & 56704037 |
| 34 | 56704038 | 1 | Brush Motor Support Kit |
| 35 | 56704130 | 1 | Pulley Spacer |
| 36 | 56704129 | 1 | Pulley |
| 37 | 56703853 | 1 | Pulley Nut |
| 38 | 56704042 | 1 | Circuit Board |
| 39 | 56704155 | 1 | Channel Cover |
| 40 | 56704044 | 1 | Transmission Support |
| 41 | 56703747 | 1 | Brush Pulley |
| 42 | 56703746 | 1 | Brush Pulley Nut |
| 43 | 56704039 | 1 | Timing Belt |
| 44 | 56704047 | 1 | Wheels Support |
| 45 | 56704041 | 4 | Screw, 3.9 x 16mm |
| 46 | 56704049 | 1 | Roller Support |
| 47 | 56704050 | 1 | Side Lever |
| 48 | 56704051 | 1 | Front Bumper Gasket, 14″ |
| 49 | 56704052 | 1 | Front Bumper Gasket, 18″ |
| 50 | 56704053 | 1 | Back Bumper Gasket, 14″ |
| 51 | 56704054 | 1 | Back Bumper Gasket, 18″ |
| 52 | 56704055 | 5 | Screw, 4.8 x 50mm (qty of 6 on 18″) |
| 53 | 56704056 | 2 | Screw, 3.5 x 38mm (qty of 3 on 18″) |
| 54 | 56704105 | 1 | Side Cover |
| 55 | 56704058 | 1 | Brush Roller, 14″ |
| 56 | 56704059 | 1 | Brush Roller, 18″ |
| 57 | 56704060 | 1 | Brush Motor Filter |
| 58 | 56704046 | 5 | Screw, 3.9 x 13mm |
| 59 | 56704067 | 2 | Screw, 3.5 x 22mm |
| 60 | 56704045 | 1 | Screw, 2.2 x 16mm |
| 61 | 56704217 | 1 | Lens Set, Red / Green |
| 62 | 56704218 | 1 | Felt for brush housing |
| 63 | 56704140 | 1 | Shoe Kit, 14″ |
| 64 | 56704141 | 1 | Shoe Kit, 18″ |
| 65 | 56704135 | 1 | O-Ring |
| 66 | 56704131 | 1 | Male Electrical Connection Set |
| 67 | 56704231 | 3 | Washer |
* = Not Shown
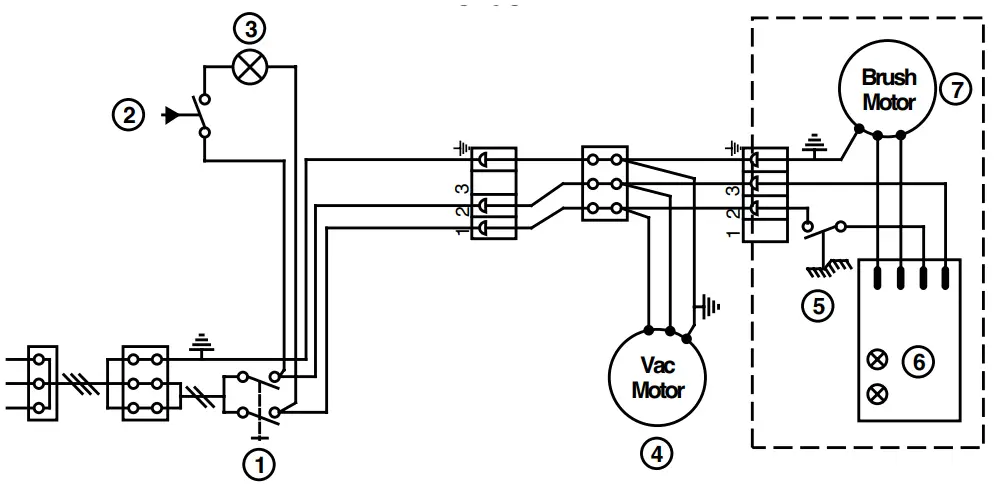
WIRING DIAGRAM
| Item | Ref. No. | Qty | Description |
| 1 | 56703708 | 1 | Main Switch |
| 2 | 56704159 | 1 | Vacuum Sensor |
| 3 | 56646877 | 1 | Indicator Light |
| 4 | 56704237 | 1 | Vacuum Motor (56704168 used prior to SN1498331 on 14” & SN1499231 on 18”) |
| * | 56704238 | 2 | Carbon Brush for 56704237 & 56704168 TSBUS2002-829 |
| 5 | 56703738 | 1 | Brush Motor Switch |
| 6 | 56704042 | 1 | Circuit Board |
| 7 | 56703743 | 1 | Brush Motor, 14″ |
| * | 56704037 | 1 | Brush Motor, 18″ |
| 56704137 | 2 | Carbon Brush for 56703743 & 56704037 |
Carpetwin 14 / 18 TWO YEAR LIMITED WARRANTY
FOR MODELS 56704200 & 56704201 ONLY
Nilfisk-Advance, Inc. warrants each new Carpetwin 14 / 18 carpet vacuum against defects in material and workmanship under normal use and service. The obligation under this warranty is limited to repair or replace at our factory or authorized distributor service station any part or parts thereof which within the warranty period are returned to our factory or authorized distributor service station, transportation prepaid, after examination discloses it to have been thus defective.
The warranty period during which basic coverage applies is Two (2) years for parts replacement and one year for service labor. The start date of the warranty coverage shall be the purchase date by the original end user, or six months from the date the machine was shipped from the factory, which ever is earlier. The Warranty Registration Card is to be completed and returned immediately at the time of purchase.
This warranty shall not apply to: (1) accidents and misuse, (2) damage in transit, (3) overloading the capacity of the machine, (4) failure due to lack of proper maintenance or care as described in the operating and maintenance instructions, (5) relatively minor adjustments such as tightening of screws or bolts, etc., not connected with the replacement of parts, (6) repairs or alterations by an organization other than the factory or an authorized Nilfisk-Advance Service Center.
STATED WARRANTIES ARE IN LIEU OF ALL OTHER WARRANTIES, EXPRESSED OR IMPLIED. Any statutory implied warranties, including any warranty of merchantability or fitness for a particular purpose, are expressly limited to the durations of this written warranty. Nilfisk-Advance will not be liable for any other damages arising out of or in connection with the furnishing, performance, use of or inability to use the machine. This remedy shall be the exclusive remedy of the Buyer.
Authorized Nilfisk-Advance Service Centers can assist owners in the proper handling of any warranty question or claim. In the event that you want to contact Nilfisk-Advance directly, please write to the Customer Service Department at Nilfisk-Advance, Inc., 14600 21st Avenue North, Plymouth, Minnesota 55447-3408. Provide an explanation of the problem and include the serial number of the machine as well as the name of the selling organization. The Customer Service Department will investigate and then contact you.
![]()
Cut out and mail to:
Nilfisk-Advance, Inc.
14600 21st Avenue North
Plymouth, Minnesota 55447-3408
IMPORTANT: This card contains information necessary to expedite warranty protection.
Mail within 30 days of purchase to Nilfisk-Advance.
LIMITED WARRANTY
PLEASE PRINT
Purchaser________________________________________________
Address _________________________________________________
City _______________________ State ___________ Zip _________
Model ______________Serial Number ________________________
Purchased from ___________________________________________
City _______________________ State __________ Zip __________
Date Purchased ___________________________________________
THIS IS TO CERTIFY THAT THE ABOVE EQUIPMENT
WAS CHECKED OUT IN WORKING CONDITION.


