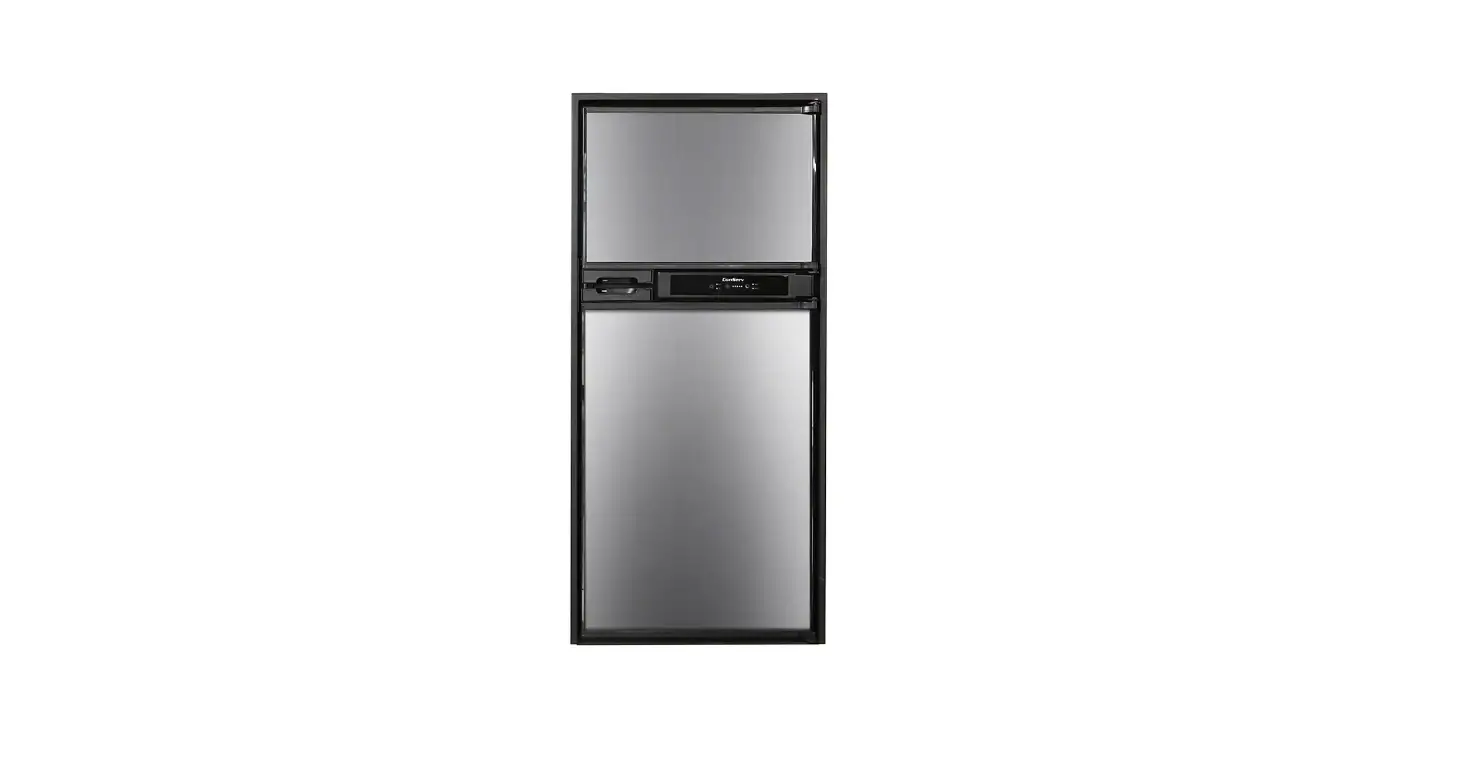
RF 1012 DC S 10 cu. ft. 12-Volt Conserv RV Refrigerator in Stainless

Read the instructions carefully and keep for future reference
Warranty
Conserv Appliances undertakes to the consumer-owner to repair or, at our option, to replace any part qf this product that proves to be defective in workmanship or materials under normal personal, family or household use, in the USA and Canada, for a period of one year from the date of original purchasi For commercial use, the product is warranted for a period of 90 days. During this period, we will providfr all labor and parts necessary to correct such defect, free of charge, if the appliance has been installed
and operated in accordance with the written instructions with the appliance. Ready access to thf appliance, for service, is the responsibility of the consumer-owner. Service would be provided from Monday to Friday between normal business hours.
Exclusions
In no event shall Conserv Appliances be liable for incidental or consequential damages or for damages resulting from external causes such as abuse, misuse, incorrect voltage or acts of God. This
warranty does not cover service calls which do not involve defective workmanship or materials coverec:1 by this warranty. Accordingly, diagnosis and repair costs for a service call which does not involve defective workmanship or materials will be the responsibility of the consumer-owner. I
Specifically, the following work is not covered under warranty and does not constitute warranty! work
- Installation – e.g. blocking ventilation
- Maintenance – e.g. cleaning appliance using solvents
- Mishandling – e.g. breakage of door handle or shelves
Most work is covered. The defining factor is, has the machine malfunctioned (Conserv Appliances is responsible) or has the customer omitted or done something to cause the machine to malfunction (customer is responsible). Some states do not allow the exclusion or limitation of incidental or consequential damages, so the above limitation of exclusion may not apply to you.
WARRANTY SERVICE
This warranty is given by: Conserv Appliances
10222 Georgi belle Drive, Suite 200 Houston, TX 77043-5249
For Service:
Call 1-800-776-353 8
Email: [email protected]
Web: www.ApplianceDesk.com
Business hours: 9:00 am -5:00 pm weekdays
You can register you Warranty by either of the following methods:
- Scan the QR Code
- Open Smart Phon1e
- Open Photo
- Scan QR Code

- Click the Link
- Online at: ApplianceDesk.com/Warranty

GENERAL
- Since it is the responsibility of the consumer-owner to establish the warranty period by verifying the original purchase date, Conserv Appliances recommends that a receipt, delivery slip or some other appropriate payment record be kept for that purpose.
- This warranty gives you specific legal rights, and you may also have other rights which vary from State to State.
- All rights reserved. Manual subject to change without notice.
Safety
Please always follow the safety precautions listed below:
- Do not put acid or flammable or volatile materials inside the appliance.
- Do not puncture or damage refrigerant tubing.
- Unplug the unit immediately if you find any abnormal smell or smoke, and contact Customer Service.
- This appliance is not intended for use by children or persons with reduced physical, sensory or mental capabilities, or lack of experience and knowledge, unless they have been given supervision or instruction concerning use of the appliance by a person responsible for their safety. Children should be supervised to ensure that they do not play with the appliance.
- Use a dedicated power outlet and a three prong power socket, that is properly grounded.
- Do not use extension cords or ungrounded two prong adapters.
- Do not use the power cord or plug if it is damaged.
- When removing the power plug, do not pull on the cord. Grasp the plug firmly and pull it out from the socket.
- Unplug the unit first when doing maintenance or repair and when replacing the light bulb.
- Keep ventilation openings free of obstructions.
Safe Disposal
- Before discarding the refrigerator, remove doors and shelves in order to prevent risk of child entrapment.
- Dispose off this appliance in accordance with local regulations. State of California Proposition 65 Warnings:
WARNING:This product contains one or more chemicals known to the State of California to cause cancer. WARNING:This product contains one or more chemicals known to the State of California to cause birth defects of other reproductive harm.
Power Supply
The refrigerator can be operated with a 12V DC voltage supply.
CAUTION!
- Check the voltage specification on the data plate to make sure it is the same as the power supply.
- To avoid voltage drops and loss of performance, keep the connection1 cable as short as possible and directly connected from the power source to the DC wire connection of the unit.
- Therefore avoid additional switches, plugs or power strips. I
- When connecting to the DC power supply, the circuit shall be protected by fuses with a maximum of 15 Amps, the red cable of the DC power 1 supply connects to the positive pole of the battery and the white cable connects to the negative pole of the battery.
- It is recommended that the cable length should not exceed 2 meters 1 and the cross-section of the cable should not be less than 2mm
- Please check the following ross section it the cable exceeds 2 meters
Disconnect the cooling device and all power source connections froni the battery before you connect the battery to a quick charging device. Overvoltage can damage the electronics of the device.
| 2.5mm2 | 98.5″ | 196.8″ |
| 4mm2 | 157.5″ | 315″ |
| 6mm2 | 236.2″ | 472.4″ |
| 10mm2 | 393.7″ | 787.4″ |
To protect the battery, the refrigerator switches off automatically if the 1 voltage is insufficient (see below table).
| Rated Voltage | 12V | |
| Cut-in voltage | 10.9V | 22.7V |
| Cut-off voltage | 9.6V | 21.3V |
Reversing the Doors
The following set of instructions will guide you to reverse the doors.
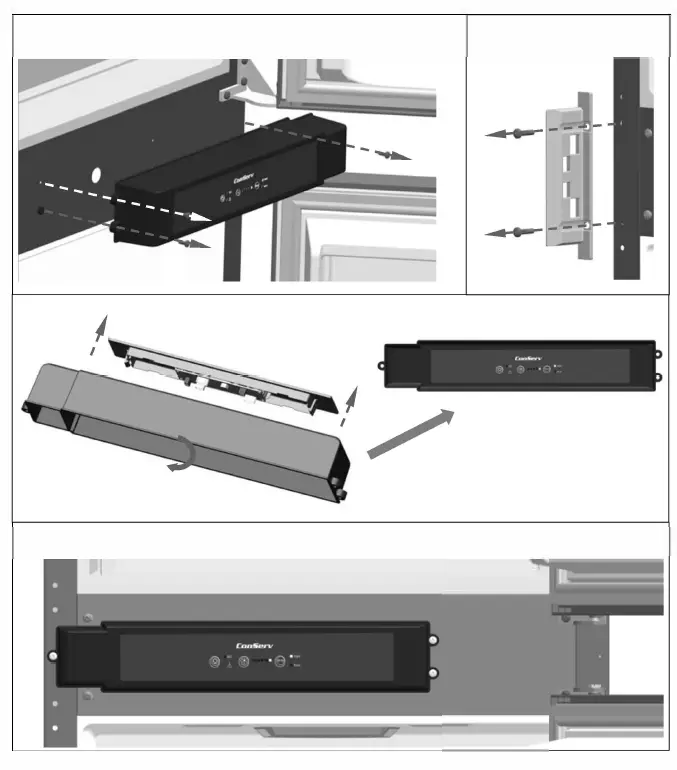
Reverse the Control Panel Box
- Open the refrigerator and freezer doors 120 or more
- Unscrew and remove the control panel box
- Disconnect the wiring harness
- Remove the base plate
- Remove the control panel
- Rotate the control box 180
- Reinstall the control panel on the control box
- Screw the control box onto the other side

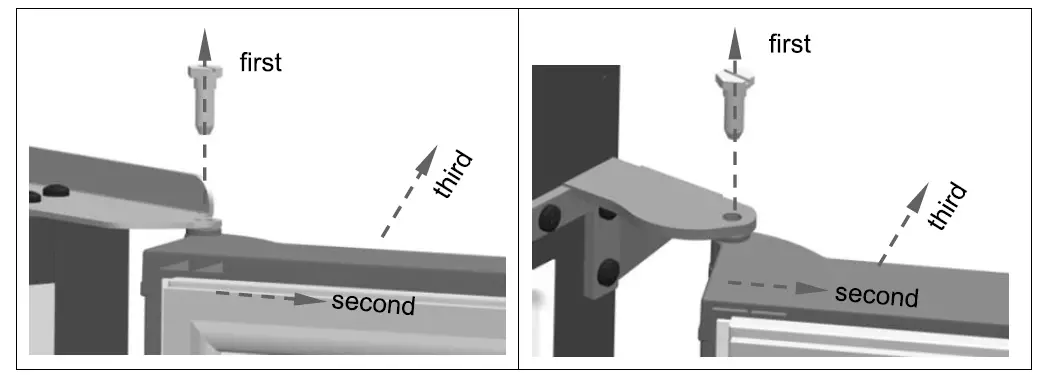
Reverse the doors and handles
- Unscrew and remove the upper hinge pin
- Pull the door(s) out about an inch and then up to separate from the bottom hinge pin
- Remove the handle parts from the door(s)
- Rotate the door(s) 180
- Reinstall the handle parts to the door on the other side

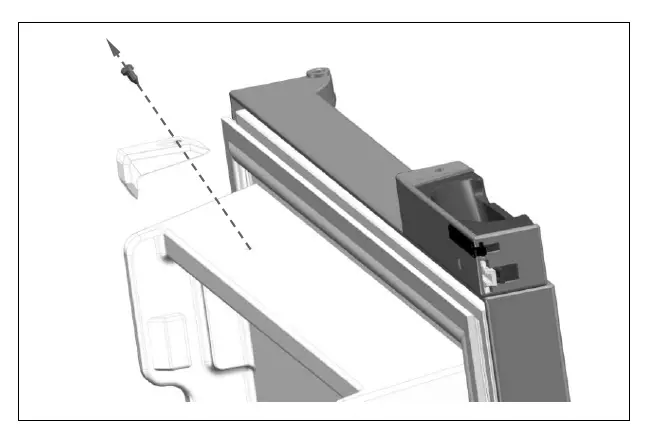
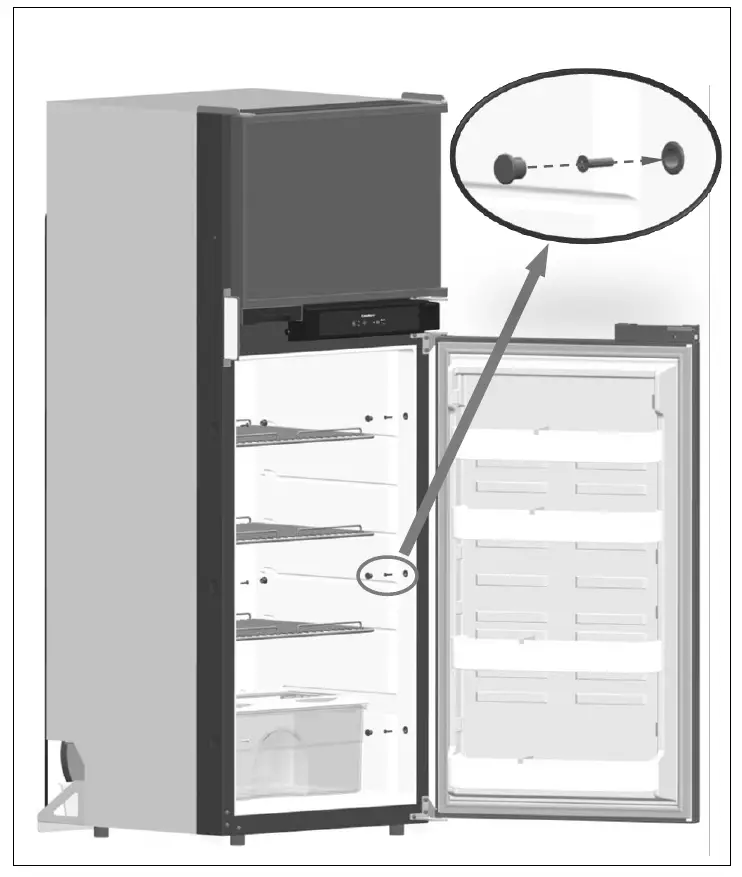
Remove and Reinstall the Magnet Housing Assembly
- Unscrew and remove the magnet housing assembly from the refrigerator door
- Rotate the door 180
- Reinstall the magnet housing assembly on the other side

Remove hinges and pins
- Remove right upper hinge and hinge hole plug
- Rotate hinge hole plug 180′ and reinstall in position R1
- Take left upper hinge from accessory bag and install in position L1
- Take upper hinge from accessory bag and install in position L2
- Remove bottom hinge pin from position R2 and reinstall in position L2
- Remove bottom hinge from position R2 and reinstall in position L3
- Remove upper hinge from position R3 and reinstall in position L4
- Remove bottom hinge from position R4 and reinstall in position L4
- Remove the bottom hinge from position R4
- Reinstall latch plate in position R2 and R3
- Reinstall the doors
NOTE Do not discard removed parts and keep them for future use!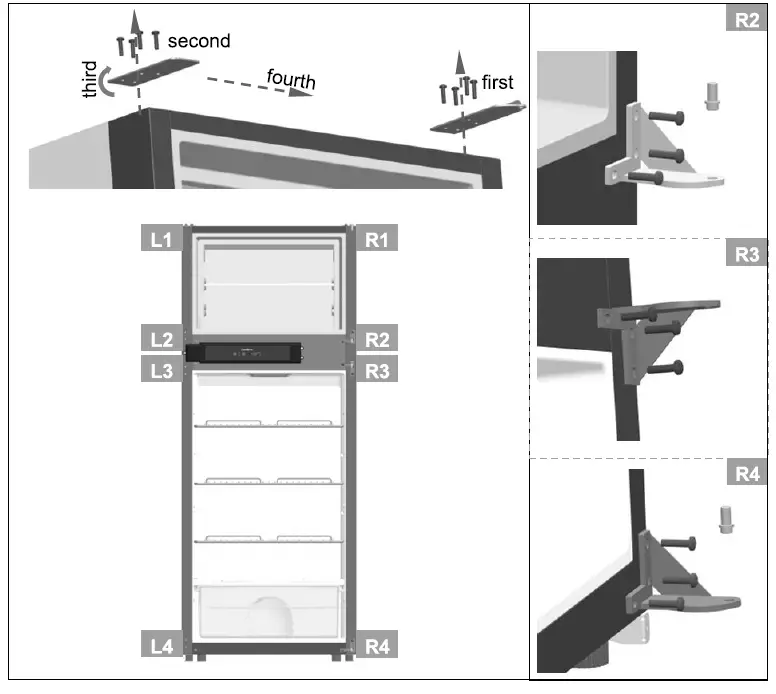
Attaching the Refrigerator
- Connect the Refrigerator drain pipe
- Open the refrigerator door
- Place the refrigerator into the desired space
- Attach the refrigerator using screws and cover the openings with plugs

Attaching top and bottom grills
- Push the top grill into the recess
- Attach it in place using screws
- Push the bottom grill onto the mounting bracket
Ensure the ventilation grills are not blocked or covered.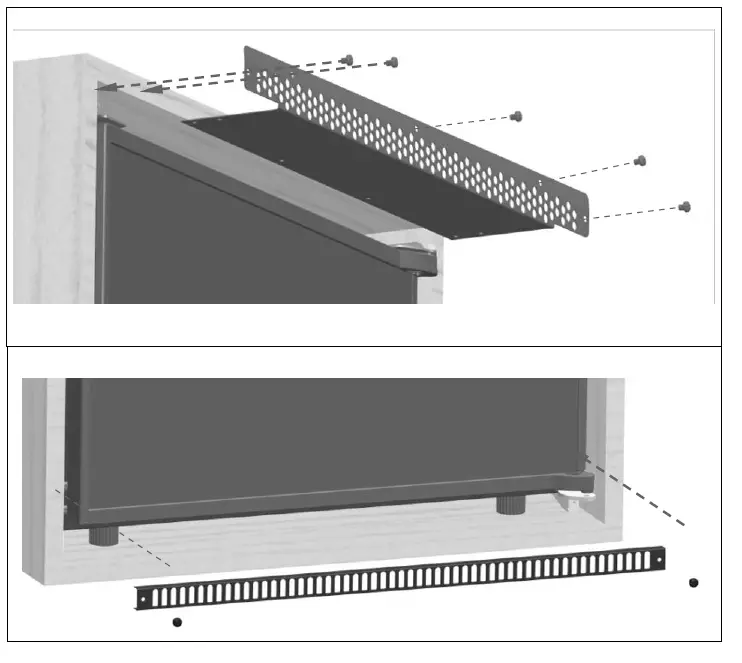
Operation
- This refrigerator is made for use in a recreational vehicle.
- The appliance is designed to be operated with 12V DC supply.
- Place the refrigerator in a well-ventilated place. Maintain space around and behind the refrigerator, and do not cover or block the grill on the rear cover plate of compressor at the back of refrigerator.
- Let the refrigerator stand upright for 6 hours before turning it on.
- Let it cool for 4 hours before putting food in.
Control Panel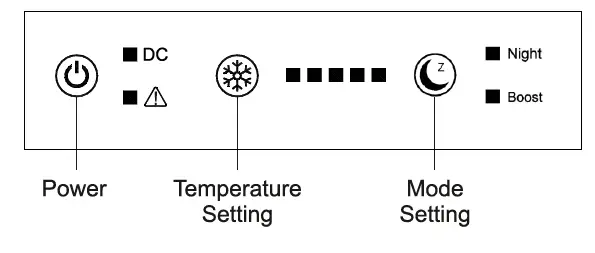
Power on
- Press the Power buttonfor 1 second. A beep will sound and all the indicator lights will lluminate for 10 seconds and then go off, except for the DC indicator light, which will remain on. It will take a few moments for the compressor to start working.
- Press the Power buttonfor 3 seconds to power off the unit.
- A beep will sound and all indicator lights will go off.
Temperature Setting
- Press the Temperature Setting button to set the level of cold.
- Each time you press this button, the 5 indicator lights to the right will illuminate, with one light being the least cold and all 5 lights illuminated showing the coldest setting. 3 lights is the default setting.
- After the temperature is set, the indicator light(s) will go off.
- Temperatures for each setting are shown in the table below


Mode
- There are 2 modes of operation- Night and Boost.
- Press the Mode button C to select the operation mode.
- Night: The fan and compressor operate at low speed, to reduce noise.
- Boost: The compressor operates at normal speed for normal cooling.
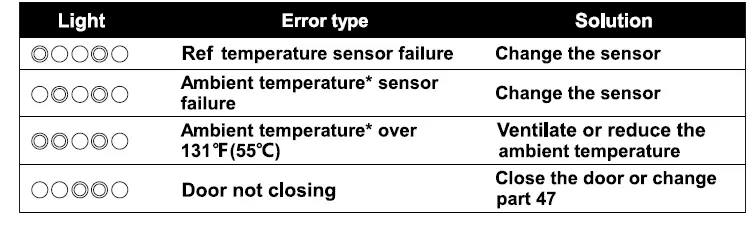
Refrigerator Fault Alarm
- If a fault occurs, a beep will sound and the indicator lights will flash in a specific pattern to diagnose the type of error. The indicator lights flash 5 times every 5 seconds. If multiple errors occur at the same time, the lights will display in a loop every 5 seconds. Beeping will continue until the problem is resolved or any button is touched.
- The table below shows the indicator light patterns, the error and the solution.

Compressor Fault Alarm
- If a fault occurs in the compressor, the Warning Light willilluminate.
- The light will flash every 3 seconds. The number of times it flashes corresponds to the error code. The codes, error descriptions, possible causes and remedies are listed in the table below.
1 Voltage failure The input voltage is outside the set range See section on Power Supply
2 1A Fan current fault Fan current output current is greater than 1A Check or change Condenser fan 3
Starting fault
Compressor motor is blocked or the system pressure is too high Power off the refrigerator for 10 minutes 4
Minimum speed failure Compressor load is too large or the motor speed is too small Check or change the compressor 5
Temperature controller failure Controller shell temperature over 185°F(8S0C) Ventilate or reduce the ambient temperature 6 Controller hardware failure The controller detects abnormal parameters Change the driver of compressor
Defrosting
- When ice builds up at the back wall of the refrigerator or freezer, turn off the appliance. Let the ice melt and clean the appliance before turning it on again.
- Removing Shelves and Door Bins
- To remove shelves, lift the back of the shelf up slightly and pull out.
- To remove door bins, lift up 2″ and pull c
Storage
If the refrigerator is not being used for a long period of time, power it off by disconnecting the DC power supply. Empty, defrost and clean the appliance and leave the door open for ventilation. Push out the vent lock on the door handle assembly.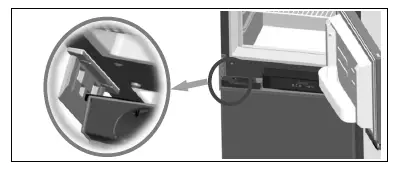
Maintenance
- Always remove all items and unplug the unit before cleaning.
- Clean inside, behind and around the refrigerator regularly, using water and mild detergent, and a damp cloth (not wet)
- Never use boiling water, harsh cleaning chemicals or abrasive materials.
- Clean the door gasket regularly to ensure that the door closes and seals properly.
- Dry all surfaces thoroughly.
Technical Specifications
| Model No. | RF 1012 DC S |
| Total volume | 9.53 cu. ft. |
| Freezer volume | 2.47 cu. ft. |
| Connection voltage | DC 12V |
| Rated current | SA |
| Rated Power Nomal/Eco | 75W/45W@77°F |
| Energy consumption | Normal 0.69kW.h/24h@39°F/77°F Eco 0.55kW.h/24h@ 39°F/77°F |
| Default temperature | Freezer -4~6.8°F Refrigerator 35.6~42.8°F |
| Refrigerant (Quantity ) | R600a (49g) |
| Dimensions | 23″ X 25″ X 60″ |
| Net weight | 108Ibs |
| Foaming agent | C5H10 |
| Inspection/Certification | ETL/ @tRoHS |
Wiring Diagram
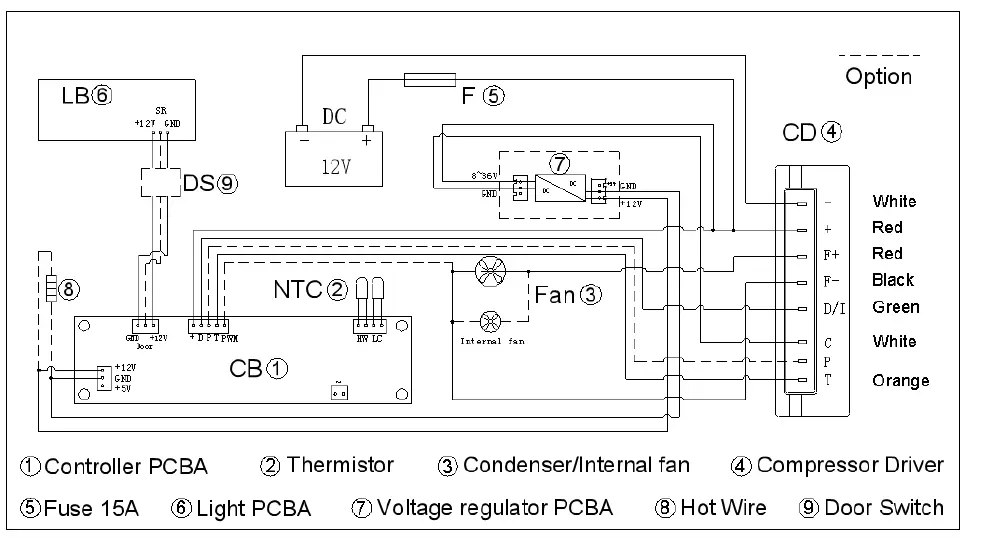
- To continuously improve our products, we reserve the rights to change some specifications in technical data & wiring diagram.
- Please check the refrigerator rating plate.
Troubleshooting
Before calling for service, please check the following issues first
The following phenomenon is normal
- Agurgline sound is caused by the refrigerant flowing inside the system pipe.
- While the units runs, heat is emitted from both sides of the cabinet.
- When the environment is too humid, the edges around door may have a little moisture, simply wipe it with dry cloth.
Cabinet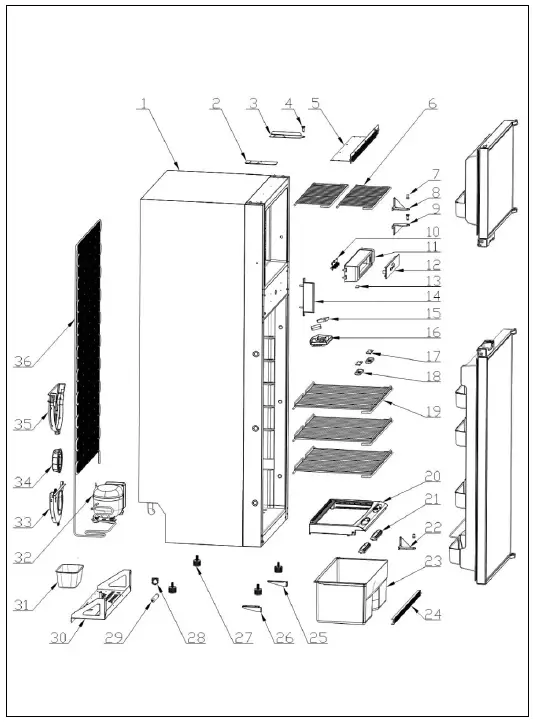
Door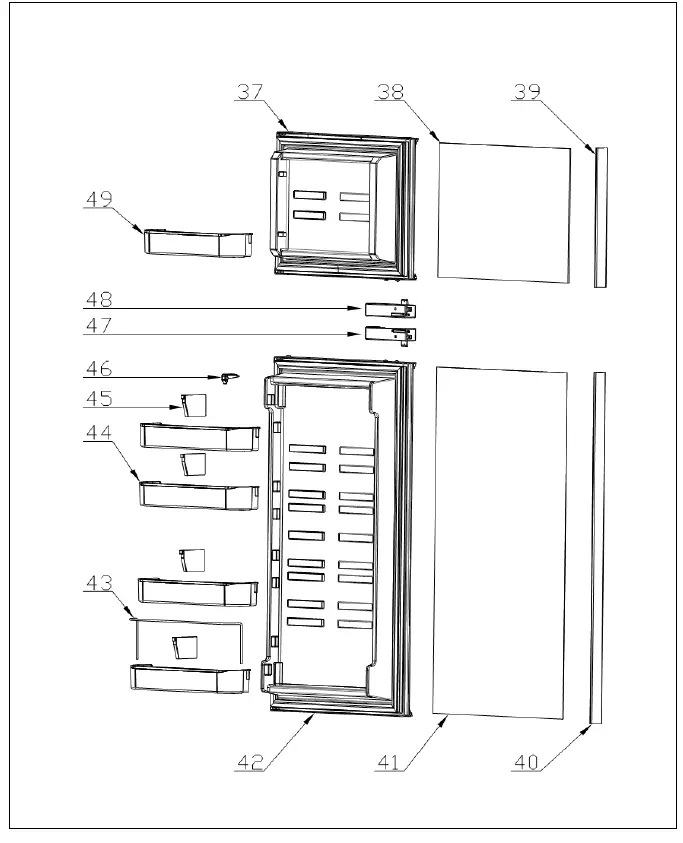
| 1 | FC | Cabinet | 1 |
| 2 | 01.01.27640198 | Upper hinge hole plug | 1 |
| 3 | 01.01.27640130 | Right-top hinge | 1 |
| 4 | 01.01.22502467P | Upper hinge pin | 2 |
| 5 | 01.01.27640199 | Top vent | 1 |
| 6 | 01.01.27640101 | Freezer shelf | 2 |
| 7 | 01.01.22502468P | Bottom hinge pin | 2 |
| 8 | 01.01.22502344 | Bottom hinge | 1 |
| 9 | 01.01.22502343 | Upper hinge | 1 |
| 10 | 01.02.09240259P | Control PCBA | 1 |
| 11 | 01.03.18502230 | Control housing | 1 |
| 12.1 | 01.05.27641521 | Control panel label | 1 |
| 12.2 | 01.03.14540336 | Control panel | 1 |
| 13 | oc | Door switch | 1 |
| 14 | 01.03.22502571 | Latch plate | 1 |
| 15 | 01.02.14540206P | Interior fan | 2 |
| 16 | 01.03.27640334 | Fan housing | 1 |
| 17.1 | 01.02.0924021OP | Interior light R | 1 |
| 17.2 | 01.02.09240211 | Interior light L | 1 |
| 18 | 01.03.09041317 | Light housing and cover | 2 |
| 19 | 01.01.27640102 | Refrigerator shelf | 3 |
| 20 | 01.03.22501326P | Crisper glass shelf | 1 |
| 21 | 01.03.27501310 | Ventilation regulator | 2 |
| 22 | 01.01.22502344 | Bottom hinge | 1 |
| 23 | 01.01.27640161 | Crisper bin | 1 |
| 24 | 01.01.27640162 | Bottom vent | 1 |
| 25 | 01.01.27640162 | Bottom vent right-bracket | 1 |
| 26 | 01.03.02501219P | Bottom vent left-bracket | 1 |
| 27 | 01.03.04040006P | Cabinet foot | 4 |
| 28 | 01.04.14540406P | Drying filter bracket | 1 |
| 29 | 01.01.27640139 | Drying filter | 1 |
| 30 | 01.01.27640139 | Compressor fixed base plate | 1 |
| 31 | 01.01.27641115 | Drip cup | 1 |
| 32 | 01.02.00040218P | Compressor | 1 |
| 33 | 01.03.27640398 | Condenser fan outer cover | 1 |
| 34 | 01.02.27640213 | Condenser fan | 1 |
| 35 | 01.03.27640399 | Condenser fan inner cover | 1 |
| 35 | 01.04.27640412 | Condenser | 1 |
| 37 | FC | Freezer foam door | 1 |
| 38 | OC | Freezer door panel | 1 |
| 39 | 01.03.22502304 | Freezer door panel retainer | 1 |
| 40 | 01.03.22502305 | Refrigerator door panel retainer | 1 |
| 41 | OC | Refrigerator door panel | 1 |
| 42 | FC | Refrigerator door | 1 |
| 43 | 01.01.22501485 | Bottle retainer | 1 |
| 44 | 01.03.22502240 | Refrigerator door bin | 4 |
| 45 | 01.03.08502163 | Bottle divider | 4 |
| 46 | 01.03.27640397 | Magnet housing assembly | 1 |
| 47 | 01.03.22502217 | Lower hinge assembly | 1 |
| 48 | 01.03.22502216 | Upper hinge assembly | 1 |
| 49 | 01.03.18502271P | Freezer door bin | 1 |
| NS | 01.01.27640129 | Left-top hinge | 1 |
| NS | 01.01.22502343 | Upper hinge | 1 |
| NS | 01.02.09040068 | Power cord | 1 |
| NS | 01.03.04006533P | Power cord clamp | 1 |
| NS | 01.02.09040073P | 15 AMP Fuse | 1 |
- FC = Foamed component
- OC = Option component
- NS = Not shown


