Rockford Fosgate PMX-P2 Digital Media Receiver Installation Guide
DASHBOARD TOP INSTALLATION
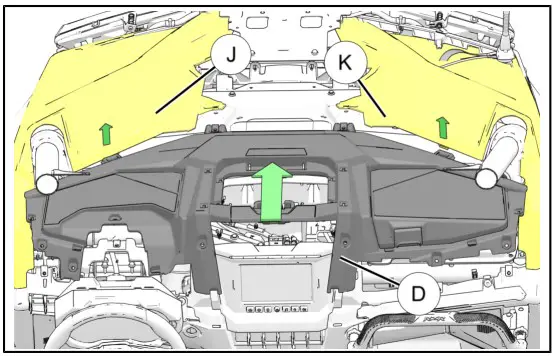
- Carefully lift panels J and K up and away from tabs and install dashboard top D into place by tilting rear section up and installing front section first, then lower rear section into place.
TIP
Have a second person to hold panels up.
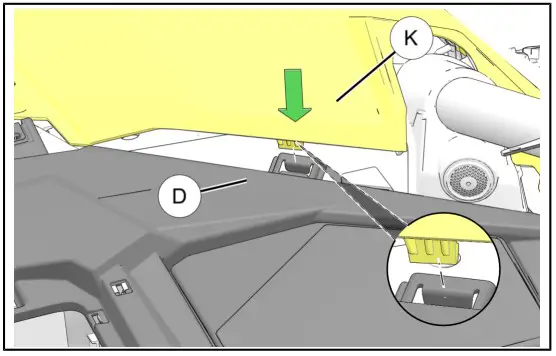
- Ensure that tabs on panels J and K are aligned in slots on dashboard top D. (Only panel K shown. Panel J is similar.
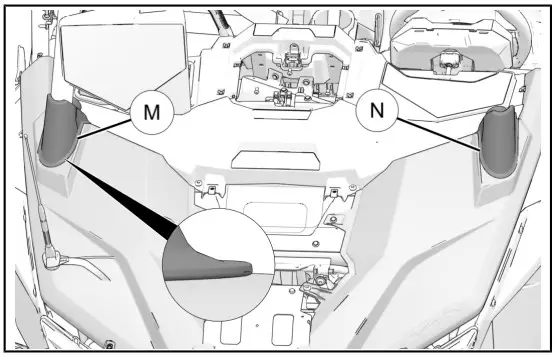
- Ensure that both right M and left N rubber boots are properly installed. Only upper lip should be visible, as shown with inset.
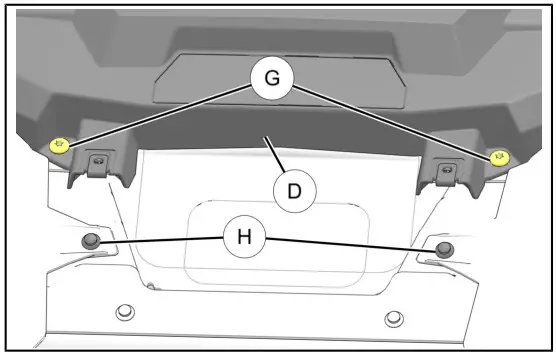
- Reinstall two retained screws G into front edge of dashboard top D and two retained pushpin rivets H. Torque screws to specification.
TORQUE
Screw G:
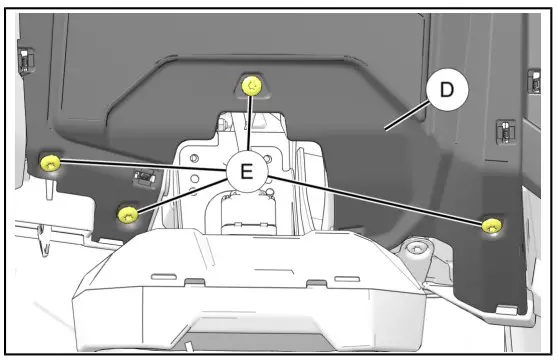
88 in-lbs (10 N·m) - Tilt steering wheel down. Install four retained screws E through dashboard top and torque to specification.
TORQUE
Screw E:
88 in-lbs (10 N·m)
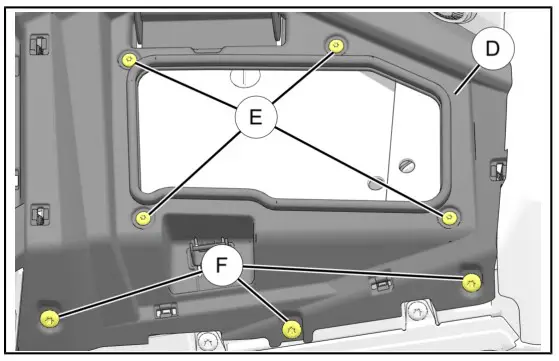
- Open glove box lid. Install four retained screws E around glove box opening and three retained screws F in front of dashboard top D. Torque screws to specification.
TORQUE
Screw E and F:
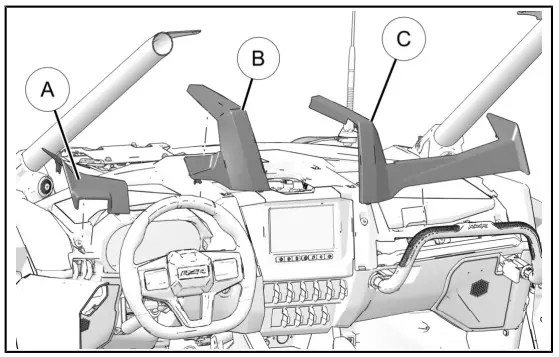
88 in-lbs (10 N·m) - Install retained left A, center B, and right C dash trim pieces.
TIP
Release steering tilt lock for better access.
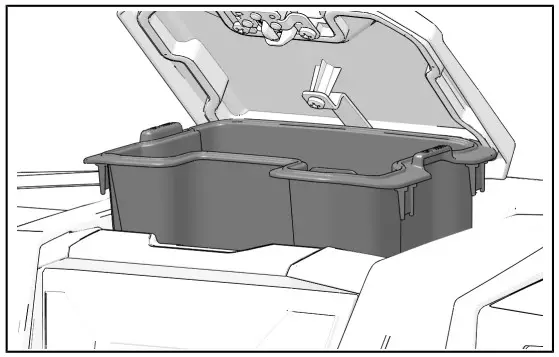
DASHBOARD STORAGE INSTALLATION
- Slide storage compartment into dashboard cavity.
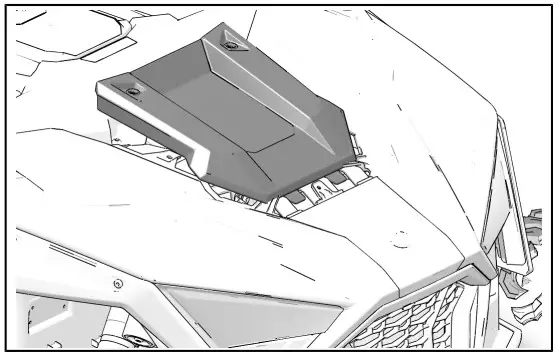
CENTER HOOD PANEL INSTALLATION
- Slide panel forward until tabs slide into front hood panel. Turn two quarter-turn fasteners to secure center hood panel.
FEEDBACK FORM
A feedback form has been created for the installer to provide any comments, questions or concerns about the installation instructions. The form is viewable on mobile devices by scanning the QR code or by clicking HERE if viewing on a PC.

SPECIFICATIONS
| Product Name | Digital Media Receiver |
| Model | PMX-P2 |
| Operating Voltage | 10.5V – 16V |
| Fuse Rating | 15A |
| Power Output | 25 W X 4 @ 4 Ohms RMS 50 W x 4 @ 2 Ohms Peak |
| Max, RCA Output Voltage | 4V |
| Output Impedance | 5000 |
| Frequency Response | 20 – 20kHz |
| Frequency Range (Europe) | FM: 87.5 MHz – 108 MHz AM: 526.5 kHz – 1606.5 kHz |
| Frequency Range ( U.SA ) | FM: 87.5 MHz – 107.9 MHz AM: 530 kHz – 1710 kHz |
| WB Frequency Range | 162.40 – 162.55 (US & Canada) |
| Tuner Presets | 18 FM / 12 AM f 6 WB / 18 SXM |
| USB Compatibility | 2.0 |
| USB Capacity | 32 GB max, 255 Folders max. 999 Songs max |
| USB Output | 1A |
| Android Compatibility | Bluetooth”. Only |
| Bluetooth Version | 4.2 +EDR, A2DP 1.3 |
| Bluetooth transmitter frequency range | 2.402 GHz – 2.480 Ghz |
| Bluetooth transmitter power | 5 10 dBm (EIRP) |
| Bluetooth transmitter modulation | GFSK, Tr/4 DQPSK, 8DPSK |
| Operating temperature range | -20°C – +50°C |
Rockford Corporation 600 South Rockford Drive Tempe Arizona United States
Hereby, [Name of manufacturer] declares that the radio equipment type [designation of type of radio equipment] is in compliance with Directive 2014/53/EU. The full text of the EU declaration of conformity is available at the following internet address: www.rockfordfosgate.com
There are no restrictions on regional use.


