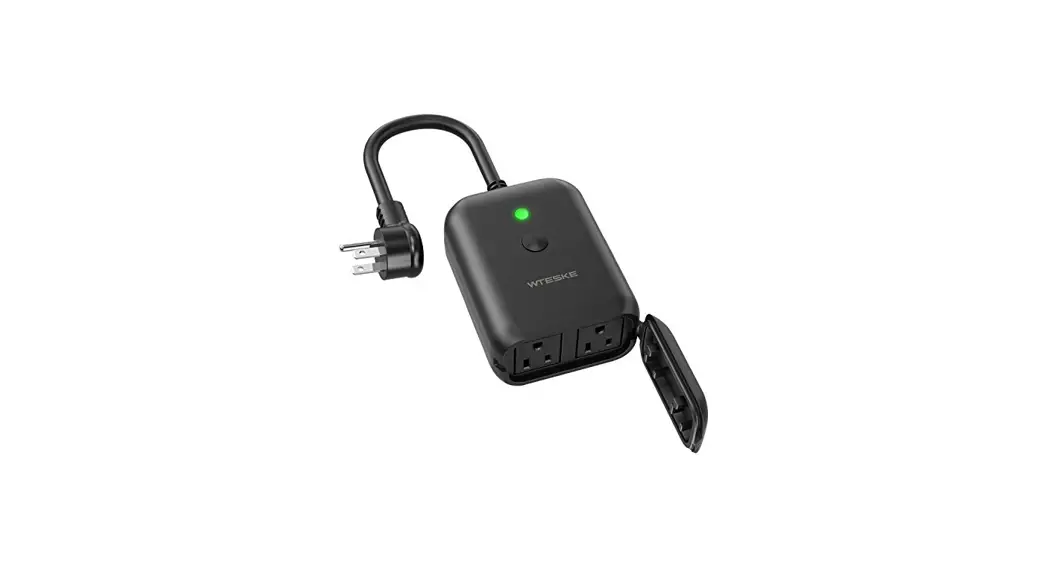
![]() Installation Instructions for Smart Plug-in Dimmer
Installation Instructions for Smart Plug-in Dimmer
Works with DIMMABLE LED, CFL,
Incandescent and halogen bulbs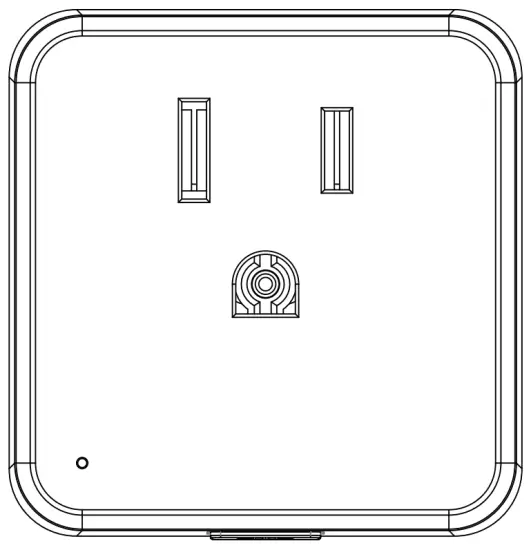
| Model No. | PDNA012U2-W-300 |
| Rated Voltage | 120V,60Hz |
| Rated Power | 300W |
| Load Range | Incandescent.: 15W-300W |
| LED/CFL: 3W-200W | |
 : 3W-200W : 3W-200W | |
 : 3W-200W : 3W-200W | |
| Dimming type | Phase-cut dimming |
| Operating Temperature | 0 C —35 C |
| Operating Humidity | 10% R.H.-90% R.H. |
| Size | 45.5 x47 x50.5 mm |
FCC Information
This device complies with Part 15 of the FCC Rules. Operation is subject to the following two conditions:
- This device may not cause harmful interference, and
- This device must accept any interference received, including interference that may cause undesired operation.
This equipment has been tested and found to comply with the limits for a Class B digital device, pursuant to part 15 of the FCC Rules. These limits are designed to provide reasonable protection against harmful interference in a residential installation.
This equipment generates, uses, and can radiate radio frequency energy and, if not installed and used in accordance with the instructions, may cause harmful interference to radio communications.
However, there is no guarantee that interference will not occur in a particular installation. If this equipment does cause harmful interference to radio or television reception, which can be determined by turning the equipment off and on, the user is encouraged to try to correct the interference by one or more of the following measures:
- Reorient or relocate the receiving antenna.
- Increase the separation between the equipment and receiver.
- Connect the equipment into an outlet on a circuit different from that to which the receiver is connected.
- Consult the dealer or an experienced radio/TV technician for help.
FCC CAUTION
Any changes or modifications to this unit not expressly approved by the manufacturer could void the user’s authority to operate the equipment.
RF EXPOSURE STATEMENT
This equipment complies with the FCC RF radiation exposure limits set forth for an uncontrolled environment. This equipment should be installed and operated with an minimum distance of 20cm between the radiator and any part of your body.
This equipment meets the exemption from the routine evaluation limits in section 2.5 of RSS-102. It should be installed and operated with a minimum distance of 20cm between the radiator and any part of your body.
IC Information
- This device may not cause interference. and
- This device must accept any interference, including interference that may cause undesired operation of the device.
WARNINGS AND CAUTIONS
- After installing the dimmer, it is recommended to set the minimum brightness level to make bulbs turn on immediately.
- If you are unsure about any part of these instructions, consult a licensed electrician.
- To reduce the risk of overheating and possible damage to other equipment do not install to control a motor-operated receptacle, fluorescent lighting fixture, or a transformer supplied receptacle.
- Use with compatible dimmable LED, CFL bulbs, Incandescent or halogen fixtures only.
- When multiple bulbs are used with one dimmer DO NOT mix bulb types. All bulbs shall be either LED, CFL, or Incandescent. Using the same model of each bulb will enhance dimmer performance.
Functional parts instructions
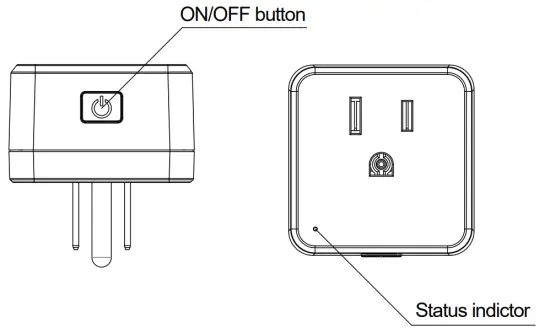
Status indicator
- Indicator lights red: The load lights are OFF and no App connect.
- Indicator lights yellow: The load lights are ON and no App connect.
- Indicator lights green: App has connected.
- Indicator lights green and flashes: In the EZ connection mode, indicator lights green and flashes quickly (flash once every 2 seconds); or In the AP connection mode, indicator lights green and flashes slowly (flash once every 4 seconds).
ON/OFF button
- Turn-ON/OFF: Press the ON/OFF button once.
- Dimming: Press and hold to dim the lights, release then press and hold again to change the dimming direction.
- Quick to the Max. brightness: Continuous press ON/OFF button twice.
- Quick to the Max. brightness: Continuous press ON/OFF button twice.
- Set the Min. brightness: Turn on the light and dim to the Min. the brightness you desired, continuously press the ON/OFF button 6 times then finished the Min. brightness setting.
- Recover to the factory default Min. brightness: Turn on the light, continuously press the ON/OFF button 9 times.
- Enter to the EZ network connection mode: Turn on the light, continuously press the ON/OFF button 5 times, the status indicator will flash quickly(flash once every 2s), then your phone can connect to the dimmer. The light will flash once when succeeded the connection.
(The dimmer will exit connection mode after 3 minutes of inactivity.) - Enter to the AP network connection mode: Turn on the light, continuously press the ON/OFF button 7 times, the status indicator will flash slowly(flash once every 4s), then your phone can connect to the dimmer. The light will flash once when succeeded the connection.
(The device will exit connection mode after 3 minutes of inactivity.) - Recover to factory default: Turn on the light, continuously press the ON/OFF button 10 times, the lights flash once mean recovered.
(Default: 1. Turn on the light will at Max. brightness; 2. The min. brightness at 1% ; 3. Current at EZ network connection mode.)
Function Description
Table of the functions
Function | Operation method | Dimmer operation | phone operation |
| Turn-ON/OFF | Press once | √ | √ |
| Dimming | Press/Press and hold | √ | √ |
| Quick to the Max. brightness | Press twice | √ | √ |
| Set the Min. brightness | Press 6 times | √ | √ |
| Reset the default brightness | Press 9 times | √ | × |
| EZ network connection mode | Press 5 times | √ | × |
| AP network connection mode | Press 7 times | √ | × |
| Reset to the factory default | Press 10 times | √ | × |
| Schedule ON/OFF | – | × | √ |
| Share device | – | × | √ |
| Group control | – | × | √ |
Priority
- The operation of the device itself could stop the operation of mobile APP when at the operation of the device itself, mobile APP operation couldn’t work.
Troubleshooting
| Symptoms | Possible Cause | Solution |
| Lights flickering | The lamp has a bad connection | Reconnect and fix the wires |
| One dimmer connects to multiple types of bulb, incur interference and cause flicker | Change bulbs to the same type | |
| LED and CFL flickers at the low end of the dimming range | Load compatibility is not good | Turn up lamp minimum brightness properly |
| Light does not turn on | The circuit breaker has tripped | Turn power on |
| Fuse burn out | Change fuse | |
| Lamp burned out | Change lamp | |
| The lamp has a bad connection | Reconnect the circuit | |
| Light does not respond | Abnormal | Restart the power |
Mobile app operation
Step 1 Download the ‘Smart Life’ App
- Use your mobile device to scan the QR code below or search for “Smart Life” in the App Store or Google Play to download and install the app.
 http://smartapp.tuya.com/smartlife
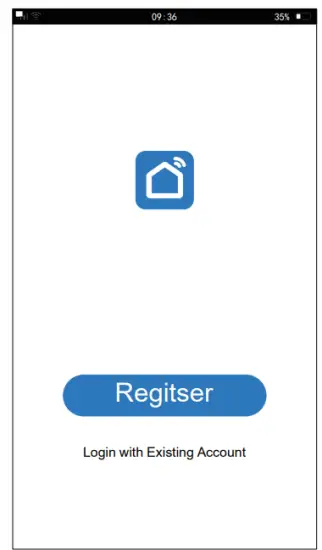
Step 2 Register an account and Login
- Open the Smart Life app, click Register to create an account, and log in.
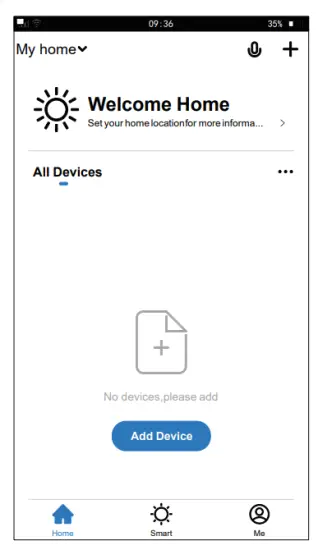
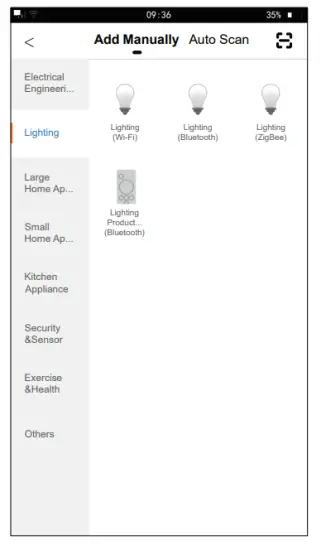
Step 3 Add Device
- Click ‘Add Device’ or the top right-hand corner ‘ + ’ ;
- Click ‘lighting’ then to enter the device connection interface; Lighting
 |  |
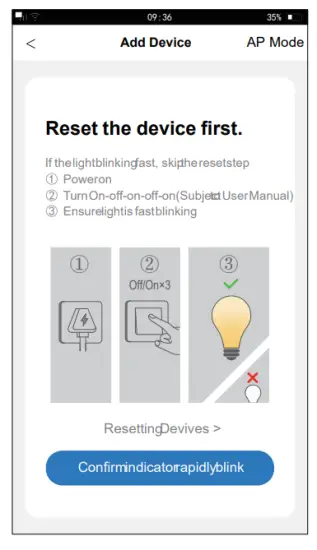
Step 4 Mobile device connection
Step 4a EZ network connection mode:
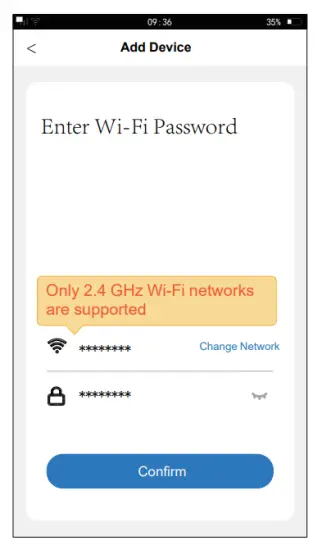
Turn on the light, continuously press the ON/OFF button 5 times, status indicator lights green and flash quickly(flash once every 2s), and load lights flash once mean enter to the paring mode; then your phone can connect to the device.
- Confirm the Status indicator flash quickly, click

- Enter your Wi-Fi password and click then wait
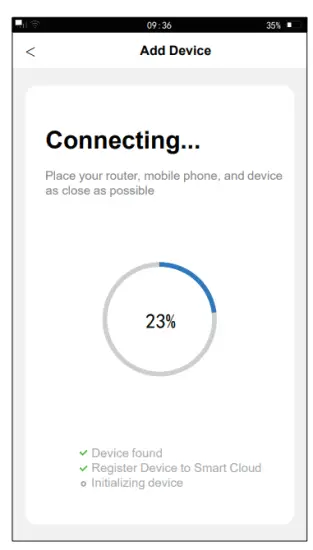
 for the connection.
 - The loading light flashes once when succeeded the connection.
 |  |
 | |
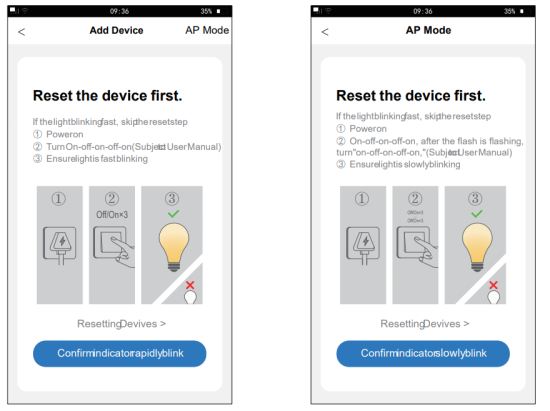
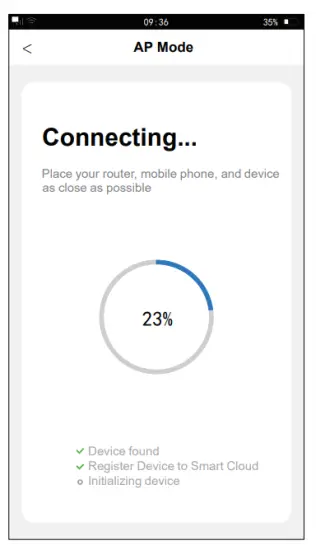
Step 4b AP network connection mode:
Turn on the light, continuously press the self-reset switch 7 times, status indicator lights green and flash slowly(flash once every 4s), and load lights flash twice means enter to the paring mode; then your phone can connect to the device.
- Click ‘APMode’ to enter the operation interface.
- Confirm the status indicator flash slowly, click
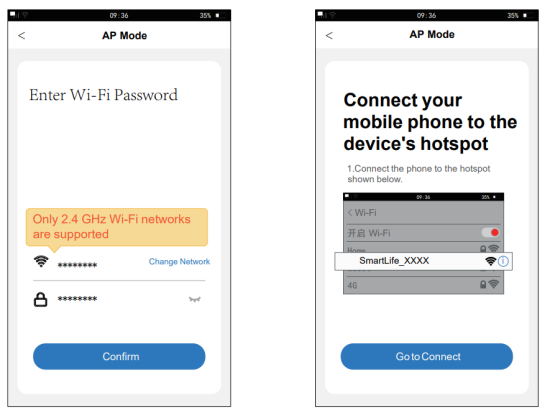
- Enter the Wi-Fi password in your home and click
- Click,
 connect to the Wi-Fi that comes with the dimmer, and return, waiting for the connection.
 - The loading light flashes once when succeeding in the connection.


- Click
 to enter the operation interface.
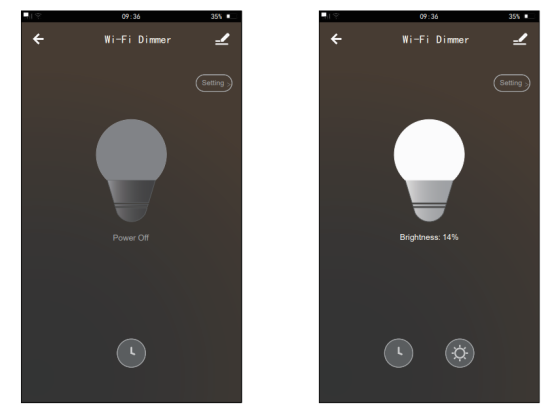
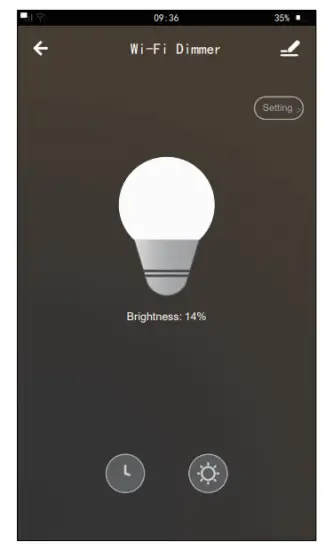
Step 5 Mobile phone app control outlet dimmer
- Click
 to control the light on/off function of the dimmer.
 - Click
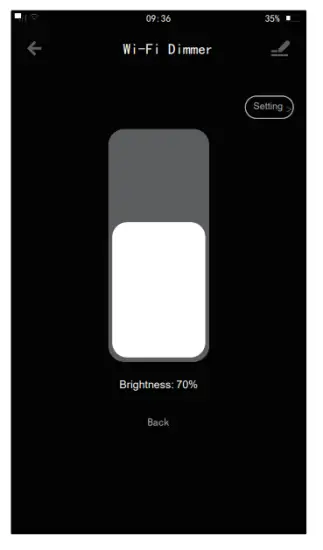
 to enter the dimming interface for dimming.
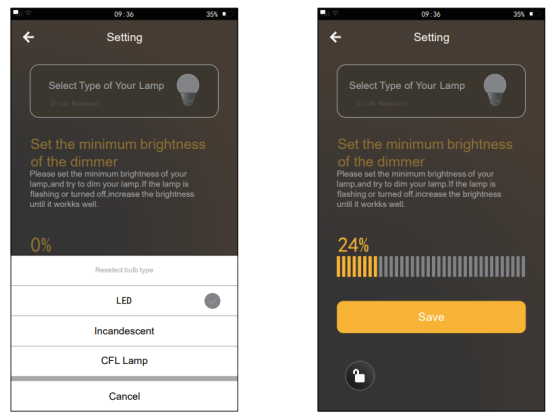
- Click
 to enter the minimum brightness interface for setting dimmer.
- Select the bulb type which connected with the dimmer.
- Set the minimum brightness of the light and save it.

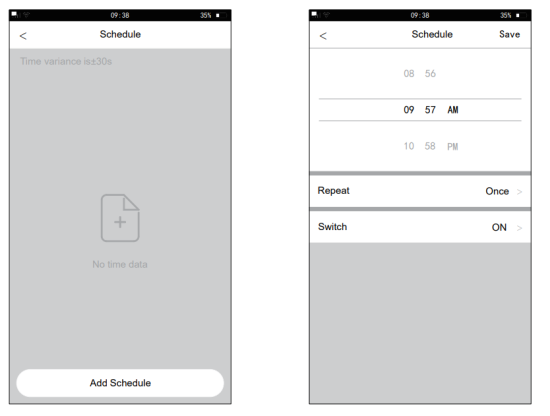
- Click
 Set the schedule light on/off function of the dimmer.
- Add schedule and then save it.

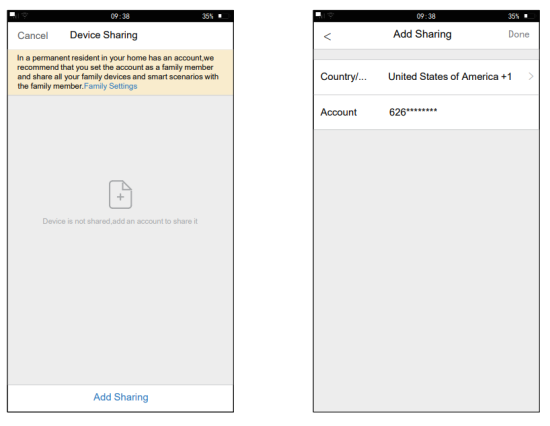
- After the dimmer connection is completed, it can be shared with many people, that is, one dimmer can be controlled by multiple APPs.
- Click
 to enter the device details interface;
 - Click ‘Share Device’ to enter the device sharing interface.

- Click ‘Add Sharing’, add the account you are willing to share.

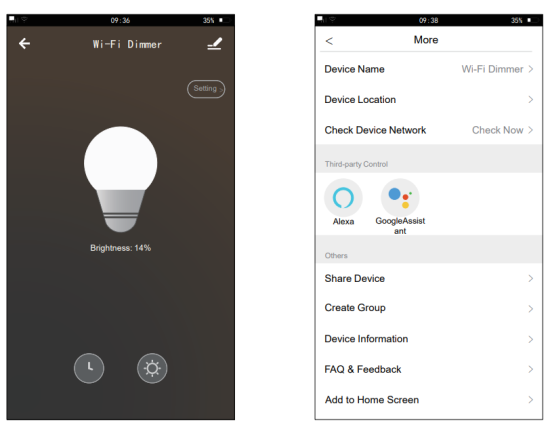
Support Amazon Alexa and Google Home voice control
For Amazon Alexa
- Alexa,turn on <device name>
- Alexa,turn off <device name>
- Alexa,set <device name> to percent
- Alexa,brighten/increase <device name>
- Alexa,dim/decrease <device name>
For Google Home
- Hey Google,turn on <device name>
- Hey Google,turn off <device name>
- Hey Google,is <device name> on/off?
- Hey Google,brighten/increase <device name)
- Hey Google,Dim/Brighten <device name> by 50%
![]()


 Nzw39 Manual")


