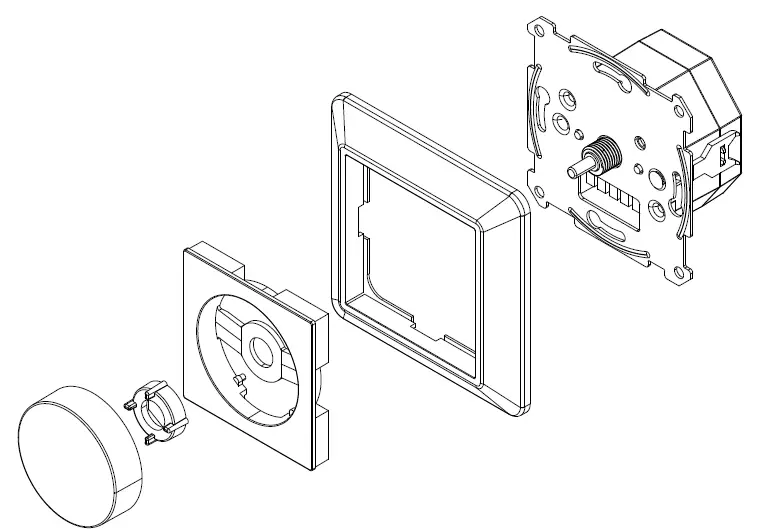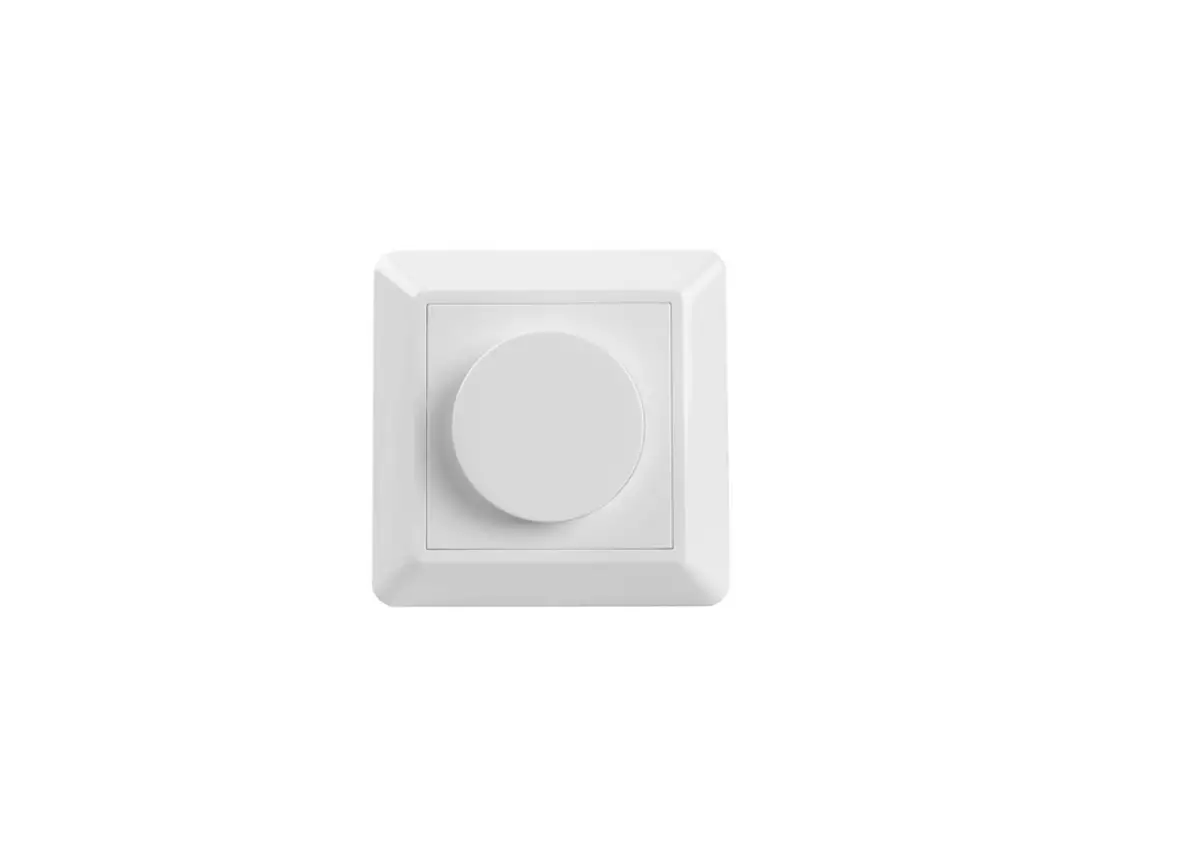
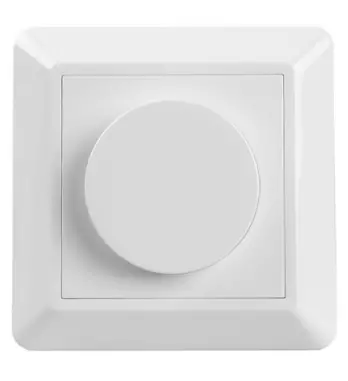
SUNRICHER Push Compatible Z-Wave Knob Smart Dimmer
Function introduction
Front side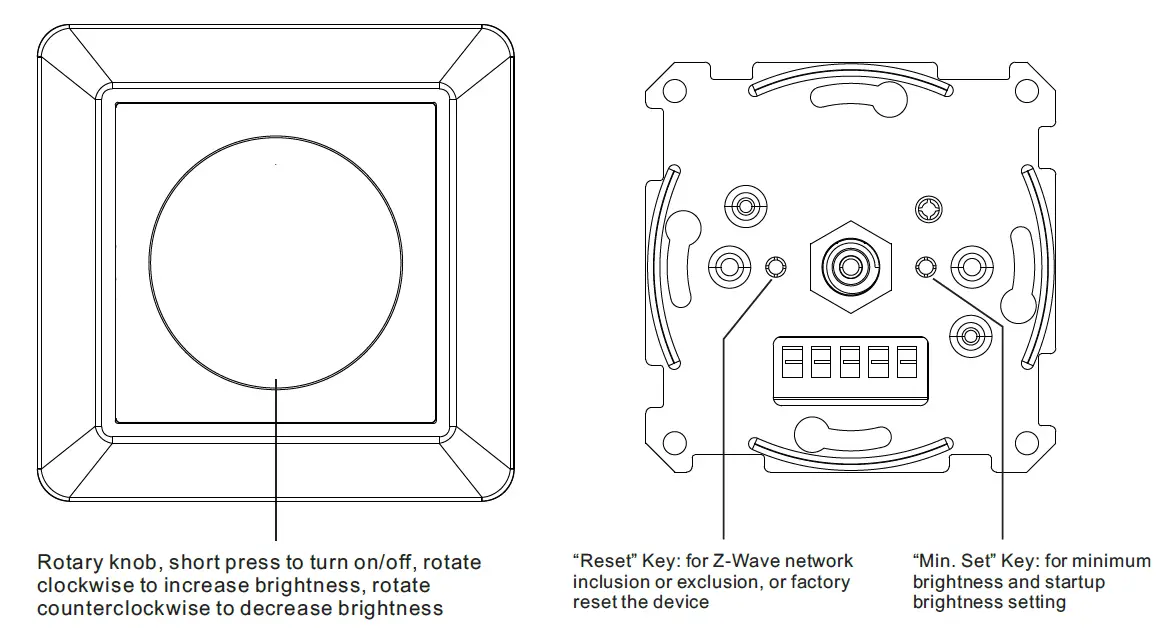
Backside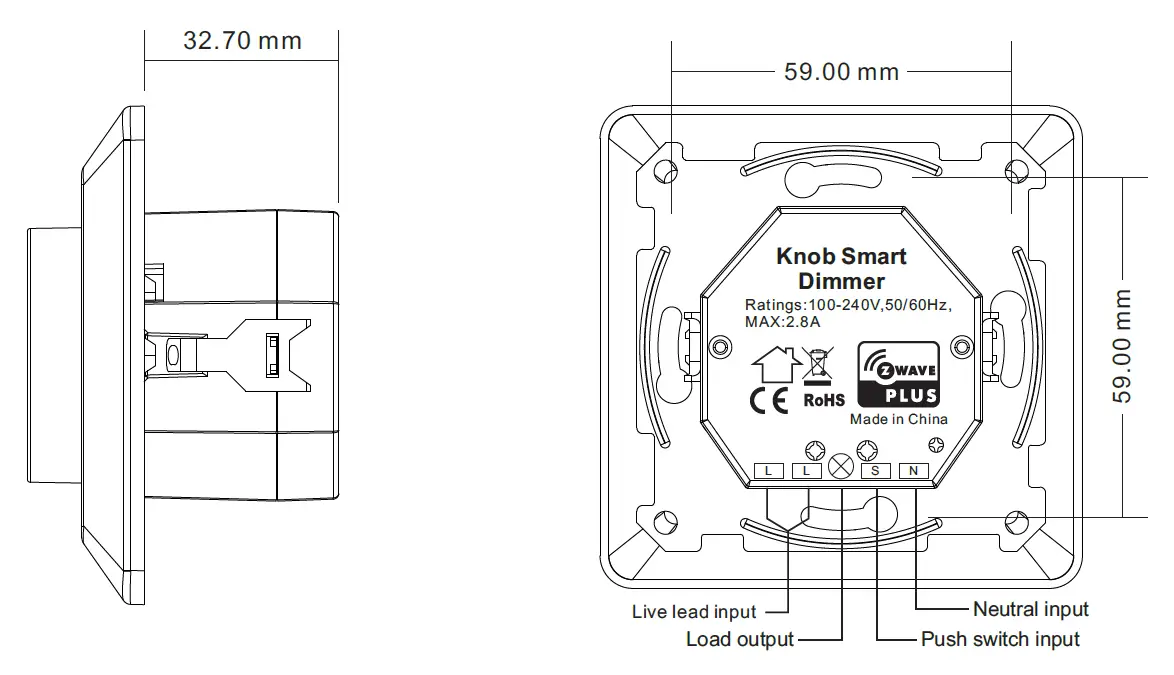
Product Data
| Z-Wave Frequency | 868.42MHZ (EU)/908.42MHz(US)/921.42MHz(ANZ) |
| Input Voltage | AC100-240V |
| Output Voltage | AC100-240V |
| Max. Load Current | 2.8A |
| Operating temperature | 0 to 40°C |
| Relative humidity | 8% to 80% |
| Dimensions | 83.8×83.8×52.4mm |
Safety & Warnings
- DO NOT install with power applied to the device.
- DO NOT expose the device to moisture.
Quick Start
How to install
- Step 1: power on the Z-Wave Knob Smart dimmer.
- Step 2: activate inclusion mode on your Z-Wave controller.
- Step 3: activate the inclusion mode of the dimmer by triple pressing the reset button on the dimmer. The dimmer will be included to Z-Wave network.
Product Description
The knob smart dimmer is a Z-Wave device designed to work with various types of light sources. It may be connected to a two-wire or three-wire configuration so it can operate with or without neutral lead. The dimmer can switch or dim connected light source either through Z-Wave devices or through the rotary knob directly. The smart dimmer is equipped with an algorithm of smart light source detection which makes configuration easier and ensures high compatibility of the device. It may be used as a switch with non-dimmable light sources (in a 3-wire connection). The dimmer can be included and operated in any Z-Wave network with other Z-Wave certified devices from other manufacturers and/or other applications. All non-battery-operated nodes within the network will act as repeaters regardless of vendor to increase the reliability of the network. The encryption mode that the dimmer supports is S2 Unauthenticated. When the dimmer is being included in a Z-Wave network, you can use your primary controller/gateway to enable encryption mode or disable encryption. (The primary controller/gateway shall support encryption mode configuration). The dimmer supports OTA and can update firmware wirelessly.
Main Features
- Advanced microprocessor control,
- Implemented algorithm of smart light source detection,
- Auto-adjustment of the appropriate control mode to connected load,
- Active power and energy metering functionality,
- Soft start function,
- The memory of the last lighting level settings
- With push switch, the input can be controlled by universal AC push switches
It operates under the following loads
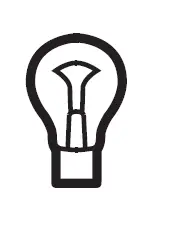
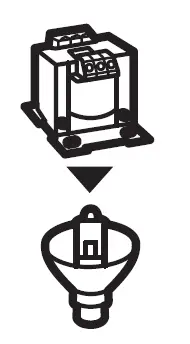
- Conventional incandescent and HV halogen light sources
- ELV halogen lamps and dimmable LED bulbs (with electronic transformers)
- MLV halogen lamps (with ferromagnetic transformers)
- Dimmable LED bulbs
- Dimmable compact fluorescent CFL tube lamps
It can be configured to use “Trailing edge” or “Leading edge” to control the following load types
- “Trailing edge” for resistive loads
- “Trailing edge” for capacitive loads
- “Leading-edge” for inductive loads
Installation Guide
Please read carefully the enclosed user manual before installation of the knob dimmer, in order to ensure error-free functioning.
Minimum and Startup Brightness Setting Button
- Press and hold down the button for 3 seconds to set minimum brightness: when the current brightness value is 1%-50%, it will be set as minimum brightness. When the current brightness value is 0%, the previously set minimum brightness will be deleted.
- Short press the button twice to set startup brightness: when the current brightness value is 1%-50%, it will be set as startup brightness. When the current brightness value is 0%, the previously set startup brightness will be deleted.
ATTENTION: Prior to the assembly of the product, the voltage network has to be switched OFF and ensured against re-switching.
Inclusion (adding to a Z-Wave network)
- Set primary controller/gateway into inclusion mode (Please refer to your primary controller’s manual on how to turn your controller into inclusion).
- Power on the knob dimmer and set it into inclusion mode. There are two methods to set the dimmer into inclusion mode:
- Repower on the dimmer, it will be set into inclusion mode automatically and waiting to be included.
- Triple press the reset button on the dimmer, it will set the dimmer into inclusion mode.
Exclusion (removing from a Z-Wave network)
There are two exclusion methods:
- Method 1: Exclusion from the primary controller/gateway as follows:
- Set the primary controller/gateway into exclusion mode (Please refer to your primary controller’s manual on how to set your controller into exclusion).
- Triple press reset button, the dimmer will be set to exclusion mode and waiting to be excluded, then the dimmer will be excluded from the network.
- Method 2: Factory reset the dimmer will force it to be excluded from a network. (please refer to the part “Factory Reset” of this manual)
Note: Factory reset is not recommended for exclusion, please use this procedure only if the primary controller/gateway is missing or otherwise inoperable. - Factory Reset
Press and hold down the reset button for over 10 seconds, the dimmer will be reset to factory defaults, the load brightness will be restored to 50%, and will flash slowly. - Association
Z-Wave devices control other Z-Wave devices. The relationship between one device controlling another device is called association. In order to control a different device, the controlling device needs to maintain a list of devices that will receive controlling commands. These lists are called association groups and they are always related to certain events (e.g. button pressed). In case the event happens all devices stored in the respective association group will receive a common wireless command. - Association Groups
Association Groups Group Name Max Nodes Description Group 1
Lifeline
5
1. When press and hold down “Reset” button for 10S to reset the dimmer, send “Device Reset Locally Notification CC” to associated devices of this group to report factory reset information. 2. When load state changes, send “Basic Report CC” to associated devices of this group.
3. When a load over current is detected, send “Over-current detected” to Lifeline.
4. When a mains voltage drop is detected, send “Voltage drop/drift” to Lifeline.
5. When a load malfunction is detected, send “Emergency shutoff status” to Lifeline.
Group 2
Launch 1
5
When short press the knob, send “Basic Set 0xff/0x00” to associated devices of this group. - Set and unset associations: (Note: All association information will be cleared automatically once the dimmer is excluded from a network.) Set association by operating primary controller/gateway to send packets to the dimmer:
The primary controller/gateway sends packets to the dimmer using “Command Class ASSOCIATION” - Operating the device
Short press the reset button on the dimmer to switch ON/OFF the load. Short press the knob to switch ON/OFF the load, rotate the knob clockwise to increase light intensity to 100%, rotate the knob counterclockwise to decrease light intensity to 1%. - Node Information Frame
The Node Information Frame is the business card of a Z-Wave device. It contains information about the device type and the technical capabilities. The inclusion and exclusion of the device is confirmed by sending out a Node Information Frame. Besides this, it may be needed for certain network operations to send out a Node Information Frame.
How to send out Node Information Frame: When the dimmer is set to inclusion/exclusion mode again, it will send out Node Information Frame, there are 2 kinds of operation as follows:
- triple press reset button, the dimmer will be set to inclusion/exclusion mode, then send out Node Information Frame.
- When the dimmer is under inclusion mode, there are two kinds of operation:
- Triple press inclusion/exclusion button, the dimmer will be set to inclusion mode again, and send out Node Information Frame.
- Power off and power on the dimmer, it will be set to inclusion mode automatically, and send out Node Information Frame.
Technical Data
| Wireless Range | up to 100 m outside, on average up to 40 m inside buildings |
| SDK | 6.71.03 |
| Explorer Frame Support | Yes |
| Device Type | Light Dimmer Switch |
| Generic Device Class | GENERIC_TYPE_SWITCH_MULTILEVEL |
| Specific Device Class | SPECIFIC_TYPE_POWER_SWITCH_MULTILEVEL |
| Role Type | Always On Slave (AOS) |
| Routing | Yes |
SUPPORTED COMMAND CLASS
| Node Info | Security Command Supported Report | ||
| COMMAND_CLASS_ZWAVEPLUS_INFO | V2 | COMMAND_CLASS_MANUFACTURER_SPECIFIC | V2 |
| COMMAND_CLASS_TRANSPORT_SERVICE | V2 | COMMAND_CLASS_VERSION | V2 |
| COMMAND_CLASS_SECURITY | V1 | COMMAND_CLASS_SWITCH_MULTILEVEL | V4 |
| COMMAND_CLASS_SECURITY_2 | V1 | COMMAND_CLASS_SCENE_ACTIVATION | V1 |
| COMMAND_CLASS_SUPERVISION | V1 | OMMAND_CLASS_SCENE_ACTUATOR_CONF | V1 |
| COMMAND_CLASS_METER | V3 | ||
| COMMAND_CLASS_NOTIFICATION | V8 | ||
| COMMAND_CLASS_CONFIGURATION | V1 | ||
| COMMAND_CLASS_ASSOCIATION_GRP_INFO | V3 | ||
| COMMAND_CLASS_ASSOCIATION | V2 | ||
| COMMAND_CLASS_FIRMWARE_UPDATE_MD | V4 | ||
| COMMAND_CLASS_POWERLEVEL | V1 | ||
| COMMAND_CLASS_DEVICE_RESET_LOCALLY | V1 |
Notification Command Class Voltage drop/drift The dimmer supports Voltage drop/drift, when a mains voltage drop is detected, the dimmer will send out Voltage drop/drift to Lifeline
| Notification Type | Notification |
| Power management (0x08) | Voltage drop/drift (0x05) |
Over-current detected The dimmer supports Over-current detected, when overcurrent of the load is detected(current over 3.2A continuously for over 20 seconds), the dimmer will send out Over-current detected to Lifeline.
| Notification Type | Notification |
| Power management (0x08) | Over-current detected (0x06) |
Emergency shutoff The dimmer supports Emergency shutoff, when a load malfunction is detected, the dimmer will send out Emergency shutoff status to Lifeline.
| Notification Type | Notification |
| System (0x09) | Emergency shutoff status (0x07) |
Configuration Command Class
| Parameter | Size | Description | Default Value | |
| 2 | 1 | Info: Saving load state before power failure 0 - shutoff load 1 - turn on load 2 - save load state before power failure | 2 | |
|
3 |
1 | Info: Enable/disable to send the basic report to the Lifeline when the load state changed (When value set as 1, re-power on the dimmer, it will send Basic report automatically) 0 - Disable to send Basic report 1 - Enable to send Basic report |
1 | |
|
4 |
1 | Default fade time (unit is second, this value has the same function as Duration of Multilevel) Valid value: 0~127 |
1 | |
| Value | Description | |||
| 0x00 | Instantly | |||
| 0x01..0x7F | 1 second (0x01) to 127 seconds (0x7F) in 1 second resolution. | |||
| 5 | 1 | Setting minimum brightness value Valid value: 0~50, the bigger the value is, the higher the load’s minimum brightness is | 15 | |
| 6 | 1 | Setting maximum brightness value Valid value: 0~100 | 100 | |
| 7 | 1 | Choose MOSFET driving type 0 – trailing edge 1 – leading edge | 0 | |
| 8 | 1 | Setting step of the knob Corresponding dimming stepping level for each rotation of the knob (a full dimming stepping level is 99), Valid value: 1-50 | 5 |
|
9 |
1 | Added to and removed from a network through external switch (when enables this function, triple press the external switch within 1.5 seconds to be added to or removed from a network) 0 – disable 1 – enable |
0 |
|
10 |
1 | Enable/disable to detect load after re-power on (detect load type, minimum brightness, maximum brightness) 0 – disable 1 – enable to detect every time after re-power on 2 – enable to detect only after first re-power on Note: When the device does not belong to any network, load detection will be enabled every time after re-power on. When the device has already been added to a network, load detection will be disabled. |
0 |
| 11 (read only) | 1 | Wiring type 0 – unknown 1 – 2 Wire With No Neutral 2 – 3 Wire With Neutral | 0 |
| 12 (read only) |
1 | Load type 0 – unknown 1 – resistive 2 – inductive 3 – capacitive |
0 |
| 13 | 1 | Enable/disable over current protection (over 3.2A for 20 seconds continuously) 0 – disable 1 – enable | 1 |
| 14 | 2 | Power automatic report absolute threshold, unit is W When power changes above the absolute threshold, immediately report current power value | 10 |
| 15 | 1 | Power automatic report percentage threshold, unit is % When power changes above the percentage threshold, immediately report current power value | 20 |
| 21 | 4 | Power metering automatic report time cycle, unit is second Valid time cycle value: 5~2678400 | 600 (10 minutes) |
| 22 | 4 | Energy metering automatic report time cycle, unit is second Valid time cycle value: 5~2678400 | 1800 (30 minutes) |
| 23 | 4 | Voltage metering automatic report time cycle, unit is second Valid time cycle value: 5~2678400 | 3600 |
| 24 | 4 | Current metering automatic report time cycle, unit is second Valid time cycle value: 5~2678400 | 3600 |
| 31 | 1 | Setting dimming curve 0 – linear dimming 1 – logarithmic dimming | 0 |
|
32 |
1 | Setting startup brightness of the load Valid value: 0~99 Note: every time when turn on the load from OFF status, if the target brightness is lower than the startup brightness, the brightness will first go to the startup brightness value then fall down to the target brightness |
0 |
Wiring Diagram
- terminal for live lead
- terminal for neutral lead
- the output terminal of the dimmer (controlling connected light source)
- terminal for push switch
Compatible load types and recommended values of power for supported loads
| Supported load types | 100-240V~ | ||
 | Resistive loads Conventional incandescent and halogen light sources | 20-600W @ 230V 20-300W @ 110V | |
|
| Capacitive loads Fluorescent tube lamp (compact / with electronic ballast), electronic transformer, LED | Using Bypass: 3-300W @ 230V 3-150W @ 110V | No Bypass Used: 20-300W @ 230V 20-150W @ 110V |
 | Inductive loads Ferromagnetic transformers | 20-300W @ 230V 20-150W @ 110V | |
Controlled by a push switch
Once connected with a push switch, click the push switch to switch ON/OFF, press, and hold down it to increase/decrease light intensity between 1% to 100%.
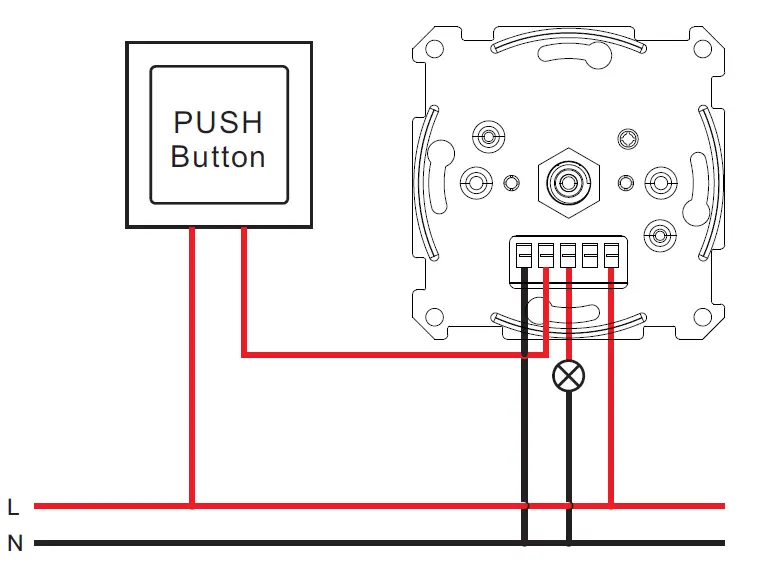
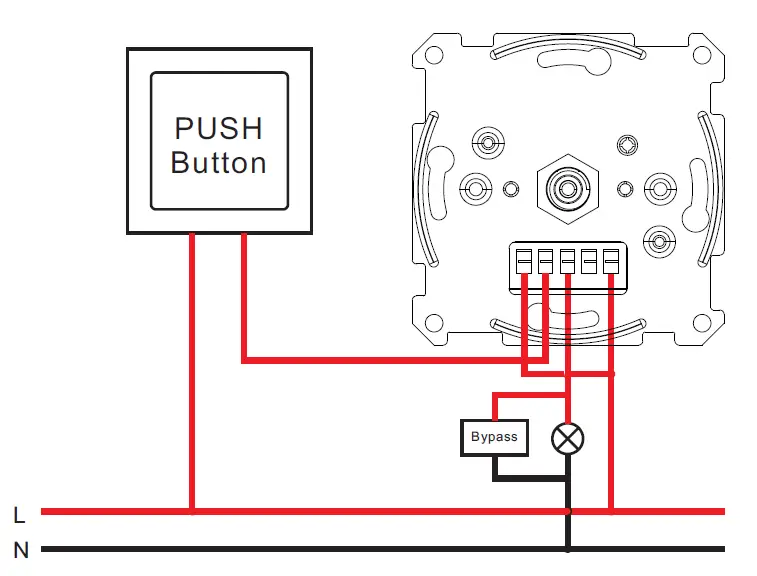
- 2-Wire Connection With No Neutral Lead Single push switch wiring
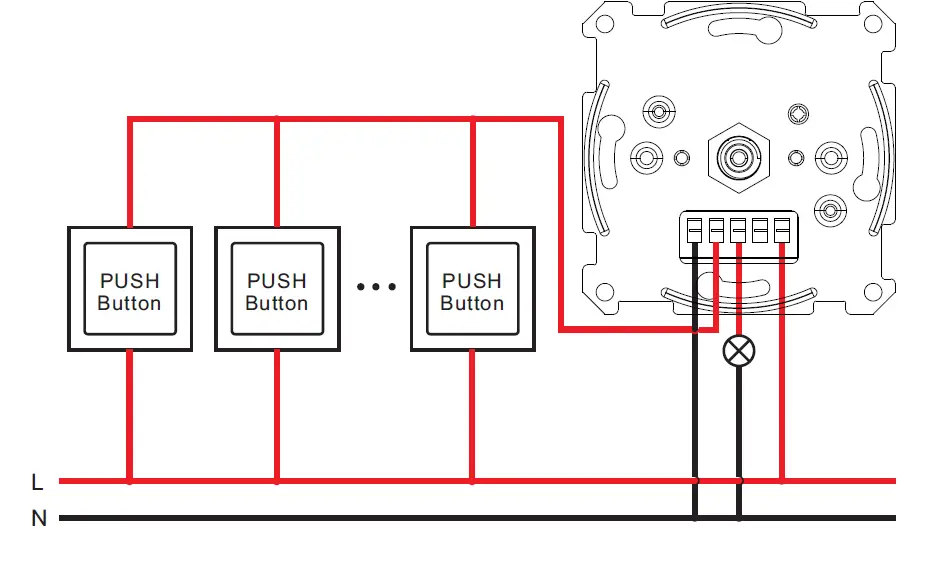
 Multiple pushes switch wiring for multiple control points
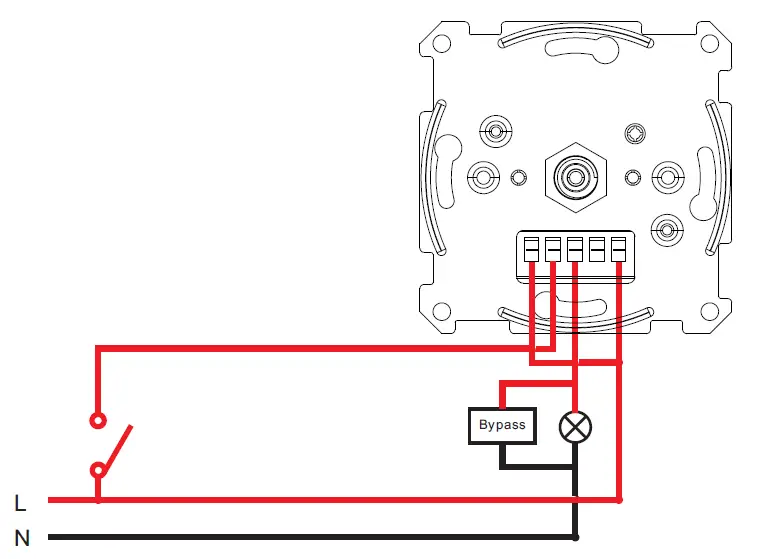
 The Bypass is a device designed to work with the knob smart dimmer. It should be used in case of connecting LED bulbs or energy-saving compact fluorescent lamps. The Bypass prevents the flickering of the LED lights and the glowing of the turned-off compact fluorescent lamps. In the case of a 2-wire connection, the Bypass allows reducing the minimum power of load required by the dimmer for correct operation. The Bypass provides powering of the dimmer in case of controlling the low loads of minimum power down to 3W (for cosφ>0.5).
- Wire Connection With Neutral Lead Single push switch wiring

- Multiple pushes switch wiring for multiple control points

- Multiple pushes switch wiring for multiple control points
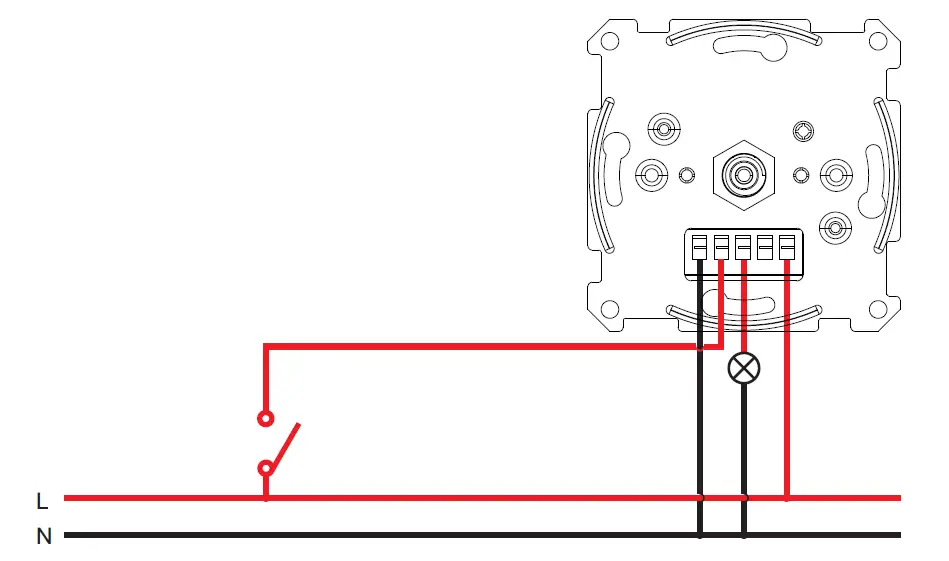
- With normal on/off switch 2-Wire connection without neutral lead

- Wire connection with neutral lead

- Wire connection with neutral lead
 Multiple pushes switch wiring for multiple control points
 The Bypass is a device designed to work with the knob smart dimmer. It should be used in case of connecting LED bulbs or energy-saving compact fluorescent lamps. The Bypass prevents the flickering of the LED lights and the glowing of the turned-off compact fluorescent lamps. In the case of a 2-wire connection, the Bypass allows reducing the minimum power of load required by the dimmer for correct operation. The Bypass provides powering of the dimmer in case of controlling the low loads of minimum power down to 3W (for cosφ>0.5).