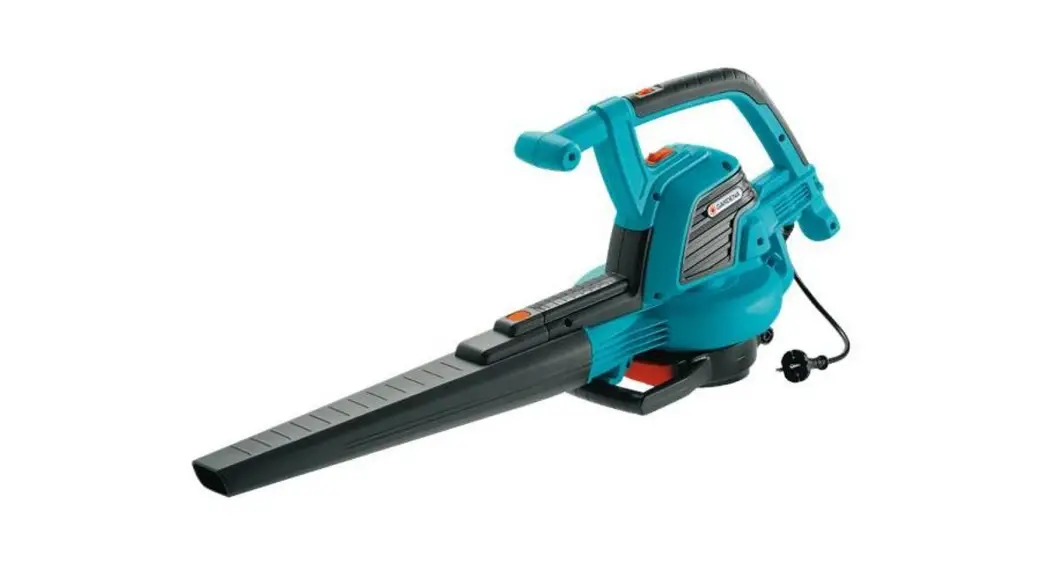
![]() EJ3000 Garden Vacuum Cleaner Blower
EJ3000 Garden Vacuum Cleaner Blower
Instruction Manual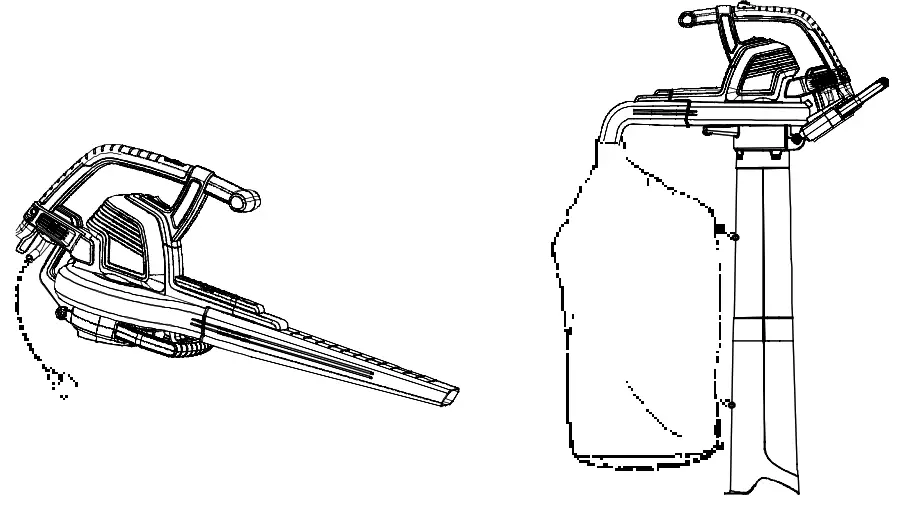 ErgoJet 3000 (EJ3000)
Art. 9332-20
GARDENA ErgoJet 3000 (EJ3000)
![]() These are the original English operating instructions. Please read the operating instructions carefully and observe the notes given. Use these operating instructions to familiarise your-self with the product, the proper use and the safety instructions.
These are the original English operating instructions. Please read the operating instructions carefully and observe the notes given. Use these operating instructions to familiarise your-self with the product, the proper use and the safety instructions.![]() For safety reasons, children and young people under the age of 16, as well as people not familiar with these operating instructions, may not use this product. Persons with reduced physical or mental abilities may use the product only if they are supervised or instructed by a responsible person.
For safety reasons, children and young people under the age of 16, as well as people not familiar with these operating instructions, may not use this product. Persons with reduced physical or mental abilities may use the product only if they are supervised or instructed by a responsible person.
→ Keep these operating instructions in a safe place.
1. Area of application of your GARDENA ErgoJet 3000 (EJ3000)
Proper use as blower.
The GARDENA ErgoJet 3000 (EJ3000) is suitable when used as a blower for sweeping debris or grass clippings from driveways, sidewalks, patios, etc. and for blowing grass clippings. straw, or leaves into piles. or removing debris from corners, around joints, or between bricks.
Proper use as vacuum:
The GARDENA ErgoJet 3000 (EJ3000) is suitable when used as a vacuum for picking up dry material such as leaves, grass, small twigs. and bits of paper.
DANGER! Risk of injury!![]() If not used properly this product can be dangerous. The warnings and safety instructions must be followed to ensure reasonable safety and efficiency in using this product. The operator is responsible for following the warnings and instructions in this manual and on the product. Never use the product unless the guards provided by the manufacturer are in the correct position.
If not used properly this product can be dangerous. The warnings and safety instructions must be followed to ensure reasonable safety and efficiency in using this product. The operator is responsible for following the warnings and instructions in this manual and on the product. Never use the product unless the guards provided by the manufacturer are in the correct position.
Safety instructions
→ Please note the safety instructions on the ErgoJet 3000 (EJ3000).![]() WARNING: This unit can be dangerous! Careless or improper use can cause serious injury.
WARNING: This unit can be dangerous! Careless or improper use can cause serious injury.![]() Read the user instructions carefully to make sure you understand all of the controls and what they do.
Read the user instructions carefully to make sure you understand all of the controls and what they do. Do not expose to rain. Do not leave the product outdoors while it is raining.
 Switch off! Remove plug from mains before adjusting, cleaning or if cable is entangled or damaged.
![]() The use of eye and ear protection is recommended.
The use of eye and ear protection is recommended.![]() Keep bystanders away.
Keep bystanders away.
General Power Tool Safety Warnings![]() WARNING: Read all safety warnings and all instructions. Failure to follow the warnings and instructions may result in electric shock, fire and/or serious injury.
WARNING: Read all safety warnings and all instructions. Failure to follow the warnings and instructions may result in electric shock, fire and/or serious injury.
Save all warning and instructions for future reference. The term -power tool” in the warnings refers to your mains operated (corded) power tool.
- Work area safety
a) This product is not intended for use by persons (including children) with reduced physical, sensory or mental capabilities, or lack of experience and knowledge, unless they have been given supervision or instruc-tion concerning the use of the product by a person responsible for their safety. Children should be supervised to ensure that they do not play with the product. Local regulations may restrict the age of the operator. Never allow children or people unfamiliar with these instructions to use the product. Power tools are dangerous in the hands of untrained users.
b) Never operate the product while people, especially children, or pets are nearby. Distractions can cause you to lose control.
c) Never blow debris in the direction of bystanders. The operator or user is responsible for accidents or hazards occurring to other people or their property.
d) Keep work area clean and well lit. Cluttered or dark areas invite accidents.
e) Do not operate power tools in explosive atmospheres, such as in the presence of flammable liquids, gases or dust. Power tools create sparks which may ignite the dust or fumes. - Electrical safety
a) Power tool plugs must match the outlet. Never modify the plug in any way. Do not use any adaptor plugs with earthed (grounded) power tools. Use only on AC mains supply voltage shown on the product rating label. Unmodified plugs and matching outlets will reduce risk of electric shock.
b) Avoid body contact with earthed or grounded surfaces, such as pipes, radiators, ranges and refrigerators. There is an increased risk of electric shock if your body is earthed or grounded.
c) Do not expose power tools to rain or wet conditions. Water entering a power tool will increase the risk electric shock.
d) Do not abuse the cord. Never use the cord for carrying, pulling or unplugging the power tool. Keep cord away from heat, oil, sharp edges or moving parts. Before use, examine cord for damage. Replace cord if there are signs of damage or ageing. Do not use the product if the cord is damaged or worn. Immediately disconnect from the mains electricity supply if the cord is cut, or the insulation is damaged. Do not touch the electric cord until the electrical supply has been disconnected. Do not repair a cut or damaged cord. Replace it with a new one. Damaged or entangled cords increase the risk of electric shock.
e) The electric cord must be uncoiled. Coiled cord can overheat and reduce the efficiency of the product. Always wind cord carefully, avoiding kinks.
f) When operating a power tool outdoors, use an extension cord suitable for outdoor use fitted with a coupler according to IEC 60320-2-3. Use of a cord suitable for outdoor use reduces the risk of electric shock.
g) If operating a power tool in a damp location is unavoidable, use a residual current device (RCD) protected supply with a tripping current of not more than 30 mA. Even with a RCD installed, 100% safety cannot be guaranteed and safe working practices must be followed at all times. Check your RCD every time you use your product. Use of an RCD reduces the risk of electric shock. - Personal safety
a) Stay alert, watch what you are doing and use common sense when operating a power tool. Do not use a power tool while you are tired or under the influence of drugs, alcohol or medication. A moment of inattention while operating power tools may result in serious personal injury.
b) Use personal protective equipment. Always wear eye protection and hearing protection. To prevent dust irritation, the use of a dust mask is recommended. Protective equipment such as eye protection. hearing protection, dust mask. nonskid safety shoes. or hard hat used for appropriate conditions will reduce personal injuries.
c) Prevent unintentional starting. Ensure the switch is in the off position before connecting to power source, picking up or carrying the tool. Carrying power tools with your finger on the switch or energising power tools that have the switch on invites accidents.
d) Do not overreach. Keep proper footing and balance at all times. On slopes, be extra careful and wear non-slip footwear. Do not walk backwards while operating your product. Walk, never run. Do not use ladders while operating the product This enables better control of the power tool in unexpected situations.
e) Dress properly. Always wear suitable clothing, gloves, and stout shoes. Do not wear loose clothing or jewellery. Keep your hair, clothing and gloves away from moving parts. Loose clothes. jewellery or long hair can be caught in moving parts. - Power top use and care
a) Only use the product in the manner and for the functions described in these instructions. Always direct the cord to the rear, away from the product. Do not force the power tool. Use the correct power tool for your application. The correct power tool will do the job better and safer at the rate for which it was designed.
b) Always make sure your product is in a safe operating condition before use. Do not use the power tool if the switch does not turn it on and off. Know how to stop the product quickly in an emergency. Any power tool that cannot be controlled with the switch is dangerous and must be repaired.
c) The impeller continues to rotate after your product has been switched oft. The motor must be stopped and the impeller blade no longer turning to avoid serious injury from the rotating blades.
d) Disconnect the plug from the power source: – before removing or replacing fully assembled debris bag: – perbefoicdreleaving the product unattended for any – before clearing a blockage; – before checking. cleaning or working on the appliance: – if the product starts to vibrate abnormally. Check immediately. Excessive vibration can cause injury. – before passing to another person.
e) Store idle power tools out of the reach of children and do not allow persons unfamiliar with the power tool or these instructions to operate the power tool. Power tools are dangerous in the hands of untrained users.
f) Maintain power tools. Check for misalign-ment or binding of moving parts, breakage of parts and any other condition that may affect the power tool’s operation. If damaged, have the power tool repaired before use. Keep all cooling air inlets clear of debris. Many accidents are caused by poorly maintained power tools.
g) Use the power tool and accessories in accordance with these instructions, taking into account the working conditions and the work to be performed. Use the product only in daylight or good artificial light. Use of the power tool for operations different from those intended could result in a hazardous situation.
Maintenance and storage
Have your power tool serviced by a qualified repair person using only identical replace-ment parts. This will ensure that the safety of the power tool is maintained.
- Keep all nuts. bolts and screws tight to be sure the product is in a safe working condition.
- Replace worn or damaged parts for safety. – Use only genuine replacement parts and accessories.
- Inspect the debris bag regularly. If the debris bag becomes worn or damaged. replace.
- Store in a cool dry place and out of reach of children. Do not store outdoors.
Blower safety warnings
- Inspect the area before using the unit. Remove all debris and hard objects such as rocks. glass. wire. etc., that can ricochet, be thrown, or otherwise cause injury or damage during operation.
- Never run the unit without the proper equipment attached. When used as a blower, always install a blower tube. Use only recommended attachments to prevent personal injury.
- Do not use blower near leaf or brush fires, fireplaces, barbecue pits, ashtrays, etc. Proper use of the blower will help avoid spreading fire.
- Never place objects inside the blower tubes; always direct the blowing debris away from people, animals, glass, and solid objects such as trees, automobiles, walls, etc. The force of air can cause rocks. dirt, or sticks to be thrown or to ricochet which can hurt people or animals, break glass. or cause other damage.
- Never use for spreading chemicals, fertilizers, or any other substances. This will prevent the spreading of toxic materials.
Vacuum safety waminas
- Stop the motor and disconnect the extension cord before opening the air Inlet door or attempting to insert or remove the vacuum tubes. The motor must be stopped and the impeller blades no longer fuming to avoid serious injury from the rotating blades.
- Inspect the area before using the unit. Hard objects can be thrown through the collection bag or the housing and become dangerous missiles which can cause serious injury to the operator or others.
- Do not vacuum stones, gravel, metal, broken glass, etc. Proper use of the unit will reduce possible personal injury and/or damage to the unit.
- Do not attempt to vacuum water or other liquids. Water or other liquids entering a power tool will increase the risk of electric shock
- Never run the unit without the proper equipment attached. When used as a vacuum, always install vacuum tubes and collection bag assembly. Make sure the collection bag assembly is completely zipped when unit is running to avoid flying debris. Use only recommended attachments.
- Do not vacuum discarded matches, cigars, cigarettes, or ash from fireplaces, barbecue pits, brush piles, etc. Avoid situations which could set the collection bag on fire. To avoid spreading fire, do not use blower near leaf or brush fires. fireplaces. barbecue pits. ashtrays. etc
- Always use the shoulder strap when vacuuming. This will help maintain control of the power tool.
- Check air intake openings, elbow tube, and vacuum tubes frequently, always with the unit stopped and the power source disconnected. Keep vents and tubes free of debris which can accumulate and restrict proper air flow. Do not use with any opening blocked. Keep free of dust, lint, hair and anything that may reduce air flow.
Assembly
![]() WARNING: Stop the unit and unplug the extension cord before opening the inlet cover or attempting to install or remove the blower tube or vacuum tubes. The motor must be stopped and the impeller blades no longer turning to avoid serious injury from the rotating blades.
WARNING: Stop the unit and unplug the extension cord before opening the inlet cover or attempting to install or remove the blower tube or vacuum tubes. The motor must be stopped and the impeller blades no longer turning to avoid serious injury from the rotating blades.
Fitting the blower tube:
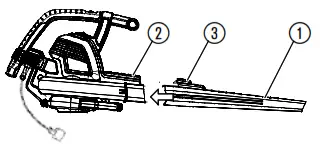
- Align the grooves on the blower tube 1 with the grooves on the blower outlet 2.
- Push the blower tube onto the blower outlet until it snaps into place; tube is secured to blower by tube release button 3.
- To remove the blower tube, press the tube release button 3 while pulling on tube.
NOTE: A safety switch will prevent the unit from starting if the blower tube is not installed correctly.
Fitting the vacuum tubes:
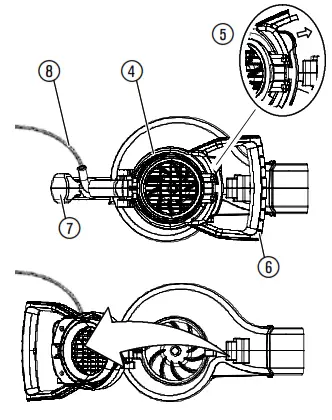
- Open the inlet cover 4 by releasing the latch 5 as shown and pulling up on the vacuum assist handle 6.
- Allow latch to snap into rear handle of blower 7. Ensure mains cable 8 remains free.
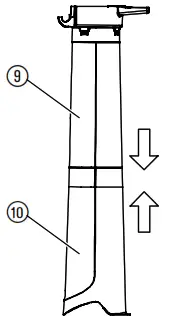
NOTE: There are 2 vacuum tubes, an upper tube 9 and a lower tube 10.
The upper tube has a hinge and hooks on one end and is cut straight on both ends.
The upper tube attaches to the blower unit. The lower tube has a curved end that you point toward the ground during vacuum use. The lower tube attaches to the upper tube - To attach the lower vacuum tube 10 to the upper vacuum tube 9, first align the seams of the two tubes.
Then, press the two tubes together until the lower tube is fully seated in the upper tube.
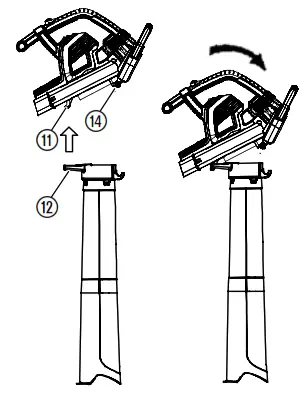
- Place the hinge 12 of the upper tube into the hook 11 on the bottom side of the unit
- Using the ground for support 13, pivot the blower unit until tube snaps into the latches of the retaining posts 14 on the blower unit.
NOTE: A safety switch will prevent the unit from starting if the vacuum tubes are not installed correctly.
 |  |
Attaching the collection bag:
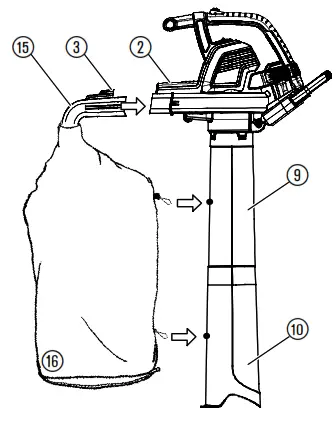
- Align the grooves on the elbow tube 15 with the grooves on the blower outlet 2.
- Push the elbow tube onto the blower outlet until it snaps into place; elbow tube is secured by tube release button 3.
- Clip the collection bag 16 to the loops on the upper vacuum tube 9 and lower vacuum tube 10.
NOTE: A safety switch will prevent the unit from starting if the elbow tube is not installed correctly.
Attaching the shoulder strap:
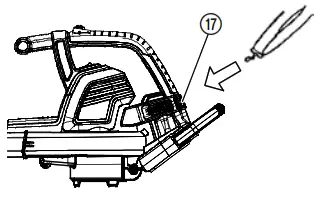
For extra support when using your unit as a vacuum, a shoulder strap is included with your unit. Attach the strap to the unit before operation. Snap the hook onto the retainer 17.
Converting unit from vacuum use to blower use:
- Stop unit and unplug the extension cord.
- Remove the elbow tube and collection bag.
- Remove the vacuum tubes by releasing the latch on the vacuum inlet cover and rotating the cover until the tubes are released from the latches of the retaining posts.
- Close the inlet cover and make sure it is latched closed.
- Re-install the blower tube. Refer to FITTING THE BLOWER TUBE for instructions on how to attach this item.
NOTE: A safety switch will prevent the unit from starting if the inlet cover is not latched closed.
Operation
![]() WARNING: Do not use the unit without the tubes or collection bag properly attached to avoid flying debris and/or impeller contact which can cause serious injury. Always wear gloves and use eye protection to prevent rocks or debris from being blown or ricocheting into the eyes and face which can result in blindness or serious injury.
WARNING: Do not use the unit without the tubes or collection bag properly attached to avoid flying debris and/or impeller contact which can cause serious injury. Always wear gloves and use eye protection to prevent rocks or debris from being blown or ricocheting into the eyes and face which can result in blindness or serious injury.
Cables:
Use only 1.00mm2 size cable up to 40 metres length maximum.
Maximum rating: 1.00mm2 size cable
3000 W
Mains cables and extensions are available from your local approved service centre. Only use extension cables specifically designed for outdoor use.
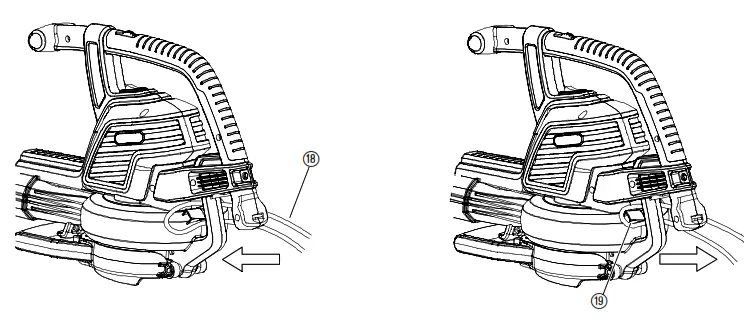
Connecting the unit -cable lock/extension cables:
Loop the extension cable 18 and insert it into the cable lock 19.
This prevents unintentional separation of the electrical connection. Then connect it to the mains cable.
Starting the blower:
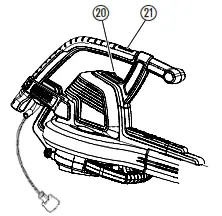
Switching the blower on:
Move the ON/OFF switch unit. 20 to the ON (I) position to turn on the
NOTE: The motor speed can be increased or decreased by using the variable speed control 21.
CAUTION: To avoid causing damage to the unit, only use the variable speed control in blow mode. DO NOT attempt to use the variable speed control in vacuum mode. Lower speeds during vacuum use could allow debris to build up, stall the motor and cause unit failure.
Switching the blower off:
To stop the unit, move the ON/OFF switch 20 to the OFF (0) position.
Working positions:
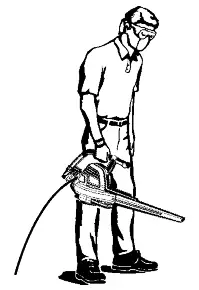
Blow mode Use your unit as a blower for sweeping debris or grass clippings from driveways, sidewalks, patios, etc. Also, for blowing grass clippings, straw, or leaves into piles, or removing debris from corners, around joints, or between bricks.
Use the variable speed control to increase or decrease the motor speed during blower use. Direct air flow by directing the blower tube down or to one side.
Always work away from solid objects such as walks, large stones, vehicles, and fences.
Clean corners by starting in corners and moving outward. This will help prevent an accumulation of debris which could fly into your face Be careful when working near plants. The force of the air could damage tender plants.
Vacuum mode
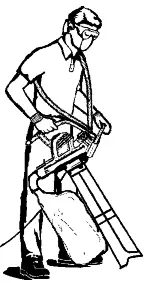
Use your unit as a vacuum to pick up dry material such as leaves, grass, small twigs, and bits of paper.
For best results during vacuum use, operate your unit at high speed.
Move slowly back and forth over the material as you vacuum.
Avoid forcing the unit into a pile of debris as this can clog the unit. Keep the vacuum tube about an inch above the ground for best results.
![]() WARNING: If the unit becomes clogged, stop the unit and unplug the extension cord. Wait until the Impeller has completely stopped turning, then remove the vacuum tubes. Carefully reach into the vacuum opening and clear out the clogged debris. This will reduce possible personal injury from the impeller.
WARNING: If the unit becomes clogged, stop the unit and unplug the extension cord. Wait until the Impeller has completely stopped turning, then remove the vacuum tubes. Carefully reach into the vacuum opening and clear out the clogged debris. This will reduce possible personal injury from the impeller.
Storage
Storage:
Store unit unplugged, well out of the reach of children.
- Stop unit and disconnect from the mains electricity supply.
- Allow motor to cool before storing or transporting.
- Store unit with all guards in place. Position unit so that any sharp object cannot accidentally cause injury.
Extended storage:
Prepare unit for storage at the end of the season or if it will not be used for 30 days or more. If your blower is to be stored for a period of time:
- Stop unit and disconnect from the mains electricity supply.
- Clean the entire unit before lengthy storage.
- Open inlet cover and clean any dirt, grass, or debris that has collected. Inspect the blower and all tubes. Close and make sure the cover is latched.
- Use a soft brush to clean air vents and air inlet of debris. Do not use water.
- Store your unit and extension cord in a well ventilated area and covered, if possible, to prevent dust and dirt accumulation. Do not cover with plastic. Plastic cannot breathe and may cause condensation and eventual rust or corrosion.
- Check entire unit for loose screws. Replace any damaged, worn, or broken parts.
- Remove tube(s) for easier storage.
Disposal:
(In accordance with EU-directive 2002/96/EC)![]() This product must not be added to normal household waste. It must be disposed of in line with local environmental regulations.
This product must not be added to normal household waste. It must be disposed of in line with local environmental regulations.
Maintenance
![]() WARNING: Stop the unit and disconnect the plug from the power source before making any adjustments, changing accessories, or performing maintenance.
WARNING: Stop the unit and disconnect the plug from the power source before making any adjustments, changing accessories, or performing maintenance.
Such preventive safety measures reduce the risk of starting the power tool accidentally.
BEFORE EACH USE
Check for loose fasteners and parts:
Keep all nuts, bolts and screws tight to be sure the product is in a safe working condition. Be sure all parts are assembled properly.
- Inlet Cover
- Blower Tube
- Vacuum Tubes
- Collection Bag
Check for damaged or worn parts:
Contact your authorized service dealer for replacement of damaged or worn parts.
- ON/OFF Switch – Ensure switch functions properly by moving the switch to the OFF position. Make sure motor stops; then restart motor and continue.
- Inlet Cover – Discontinue use of unit if inlet cover fails to latch properly or if it is damaged in any way.
AFTER EACH USE
Inspect and clean unit and labels:
Clean collection bag:
- After each use, inspect complete unit for loose or damaged parts. Clean the unit using a damp cloth.
- Wipe off unit with a clean dry cloth.
IMPORTANT: THE COLLECTION BAG MUST BE PROPERLY EMPTIED.
- You must properly empty and maintain the collection bag to avoid deterioration and obstruction of air flow.
- Remove the collection bag from the unit and empty after each use. Do not store bag without emptying the bag of all contents (grass, leaves, etc.).
- Wash the bag once a year. Remove the bag from the blower and turn the bag inside out. Wash the bag with a water hose. Allow the bag to hang and dry completely before you reuse the bag.
![]() WARNING: If the unit becomes clogged, stop the unit and unplug the extension cord. Wait until the impeller has completely stopped turning, then remove the vacuum tubes. Carefully reach into the vacuum opening and clear out the clogged debris.
WARNING: If the unit becomes clogged, stop the unit and unplug the extension cord. Wait until the impeller has completely stopped turning, then remove the vacuum tubes. Carefully reach into the vacuum opening and clear out the clogged debris.
This will reduce possible personal injury from the impeller.
Removing an object from the air intake:
- Remove the vacuum tubes.
- Carefully reach into the vacuum opening and clear out the air intake area. Clear all debris from impeller.
- Inspect the impeller for cracks. If cracked or damaged. do not use the unit. Have parts replaced by your authorized service dealer. Do not attempt to replace them yourself.
Troubleshooting
![]() WARNING: Always stop unit and unplug the extension cord before performing all of the recommended remedies below except remedies that require unit to be operating.
WARNING: Always stop unit and unplug the extension cord before performing all of the recommended remedies below except remedies that require unit to be operating.
The motor must be stopped and the impeller blades no longer turning to avoid serious injury from the rotating blades.
| Problem | Possible cause | Remedy |
| Unit fails to operate. | 1. Switch in the OFF (0) position. 2. Extension cord disconnected. 3. Circuit breaker tripped, or fuse blown. 4. Blower tube, elbow tube, and/or vacuum tube not installed correctly. 5. Collection bag is full. 6. Mechanical failure. | 1. Slide switch to ON (I) position. 2. Reconnect extension cord. 3. Reset circuit breaker or fuse. 4. Check tube installation. 5. Empty collection bag. 6. Contact your authorized service dealer. |
| Unit vibrates abnormally. | 1.Mechanical ailure. | 1. Contact your authorized service dealer. |
| Impeller will not turn freely. | 1. Debris in air intake area. 2. Mechanical failure. | 1. Clean unit. Remove any debris. 2. Contact your authorized service dealer. |
![]() For any other malfunctions, please contact the GARDENA service department. Repairs must be carried out by GARDENA service departments or specialist dealers authorised by GARDENA.
For any other malfunctions, please contact the GARDENA service department. Repairs must be carried out by GARDENA service departments or specialist dealers authorised by GARDENA.
| Motor – power consumption | 3000 W max. |
| Mains voltage | 220 – 240 V |
| Frequency | 50 Hz |
| Vacuum flow | 170 l/s |
| Mulch ratio | 16:01 |
| Blow speed | Max. 310 km/h |
| Weight blower/vacuum | Max. 4,5 kg |
| Capacity of debris bag | 45 l |
| Sound pressure level | 82,6 dB(A), KpA: 3,0 dB(A) |
| Sound power level LWA2) | Measured 99 dB(A)/guaranteed 102 dB(A) |
| Hand/arm vibration avhw1) | 3,92 ms², K: 1,5 ms² |
Service / warranty
Warranty:
GARDENA guarantees this product for 2 years (from date of purchase). This guarantee covers all serious defects of the unit that can be proved to be material or manufacturing faults. Under warranty we will either replace the unit or repair it free of charge if the following conditions apply:
- The unit must have been handled properly and in keeping with the requirements of the operating instructions.
- Neither the purchaser or a non-authorised third party have attempted to repair the unit.
The blower tube and vacuum tubes are wearing parts and are not covered by the guarantee. This manufacturer’s guarantee does not affect the user’s existing warranty claims against the dealer/seller.
If you have any problems with this product, please contact our Service or return the defective unit together with a short description of the problem – in case of guarantee, with a copy of the receipt – postage paid to one of the GARDENA Service Centres listed on the back of this leaflet.
Product Liability
We expressly point out that, in accordance with the product liability law, we are not liable for any damage caused by our units if it is due to improper repair or if parts exchanged are not original GARDENA parts or parts approved by us, and, if the repairs were not carried out by a GARDENA Service Centre or an authorised specialist. The same applies to spare parts and accessories.
EU Declaration of Conformity
The undersigned Husqvarna AB, 561 82 Huskvarna, Sweden hereby certifies that, when leaving our factory, the units indicated below are in accordance with the harmonised EU guidelines, EU standards of safety and product specific standards. This certificate becomes void if the units are modified without our approval.
Description of the units: Blower/vacuum
Type: ErgoJet 3000 (EJ3000)
Art. No.: 9332
EU directives: 2006/42/EC, 2004/108/EC, 2000/14/EC
Applicable standards:
EN 60335-1, Part of IEC 60335-2-100, Part of EN 15503, EN 62233, EN 55014-1, EN 55014-2, EN 61000-3-2, EN 61000-3-3, EN ISO 3744, ISO 11094
Deposited Documentation:
GARDENA Technical
Documentation,
Ronnie E. Goldman
Conformity Assessment
Procedure:
according to 2000/14/EC
Art.14 Annex V
Noise level: measured / guaranteed 99 dB(A) / 102 dB(A)
Year of CE marking: 2011
Huskvarna, Sweden, 01.11.2011
Authorised representative
 Ronnie E. Goldman
Director of Engineering –
Handheld products
| Australia Husqvarna Australia Pty. Ltd. Locked Bag 5 Central Coast BC NSW 2252 Phone: (+61) (0) 2 4352 7400 [email protected] | Denmark GARDENA / Husqvarna Consumer Outdoor Products Salgsafdelning Danmark Box 9003 S-200 39 Malmö [email protected] |
| New Zealand Husqvarna New Zealand Ltd. PO Box 76-437 Manukau City 2241 Phone: (+64) (0) 9 9202410 [email protected] | Great Britain Husqvarna UK Ltd Preston Road Aycliffe Industrial Park Newton Aycliffe County Durham DL5 6UP [email protected] |
| Ireland Husqvarna UK Ltd Preston Road Aycliffe Industrial Park Newton Aycliffe County Durham DL5 6UP [email protected] | Canada / USA GARDENA Canada Ltd. 100 Summerlea Road Brampton, Ontario L6T 4X3 Phone: (+1) 905 792 93 30 [email protected] |
References
 Anasayfa
-
Outils de jardin GARDENA: tondeuses, arrosage, décoration de jardin
-
Husqvarna Österreich Forst und Garten
-
Husqvarna UK | Chainsaws, Lawn Mowers & Garden Tools
 Husqvarna Forest & Garden
-
Husqvarna Australia | Tools & Equipment for Lawn, Garden and Forestry
-
Husqvarna Brasil
-
Husqvarna Colombia
-
Husqvarna Ecuador
-
Husqvarna Magyarország
-
一瀬製作所 | ステンレス建具のプロフェッショナル■設計・製作・施工
-
www.net.ve - This website is for sale! - www Resources and Information.
-
GARDENA - Garden tools - GARDENA
-
Husqvarna Гора и Градина


electric Blower Vac Instructions")


