![]()
THE USER GUIDE
START HERE
System Requirements
Minimum iOS 9.3 or Android 4.4
Dedicated 2.4GHz Wifi Network
TECHNICAL SUPPORT
www.satco.com/Starfish
- DOWNLOAD THE STARFISH APP
 https://smartapp.tuya.com/satcosmart
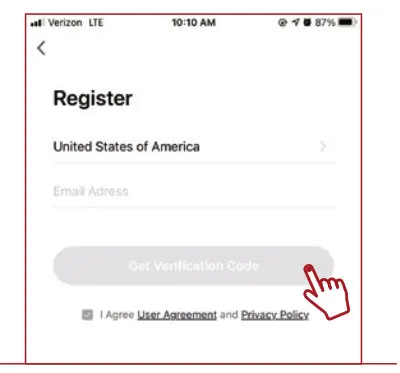
 - Launch the App and tap “Register” for new accounts or “Login” for existing accounts.
- Enter the E-Mail address, then tap “Get verification code”.

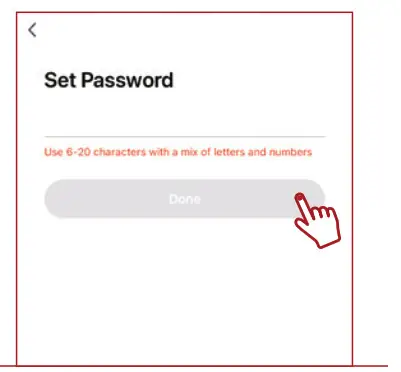
- Create a Password then tap “Done”


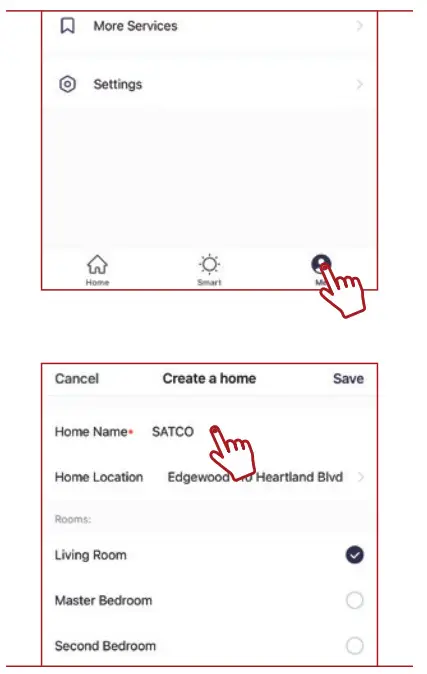
Create a Home
- Tap the “Me” button on the bottom of the screen, and then tap “Home Management”. Tap the “Create home” button to set up you’re home.

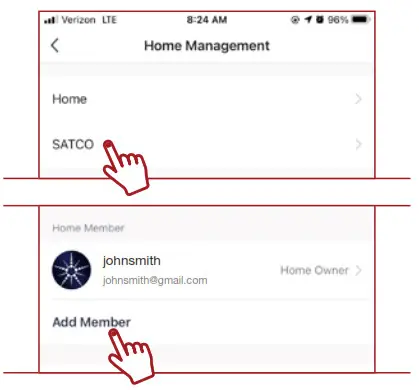
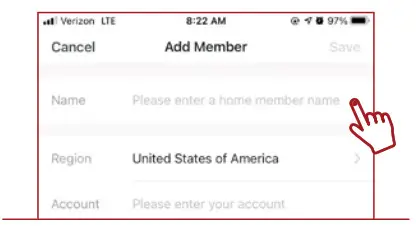
- From the Home Management screen, select the Home that you would like to share. Tap “Add Member” and select the way that you would like to send the invitation

- Enter the user information and select if the new member will be an “Administrator” or a “Common Member” in the Home. Tap “Save” to send the invitation

Add Devices
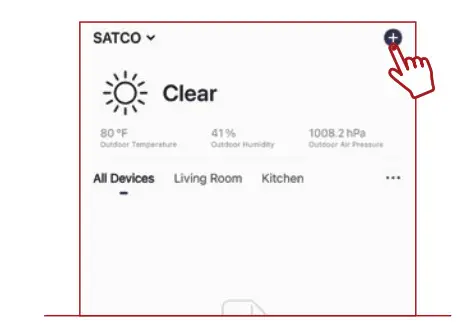
- Tap the plus (+) button on the upper right-hand corner to add a device

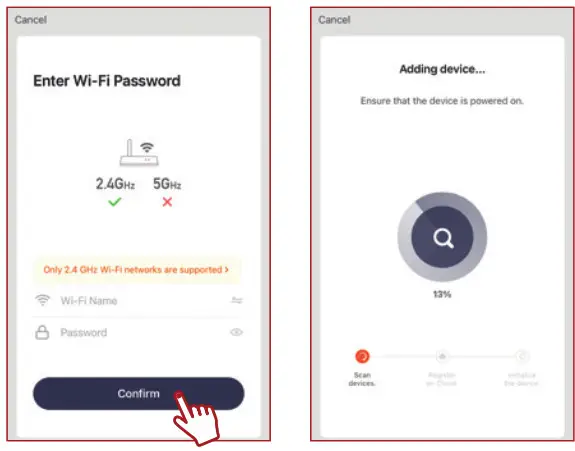
- Make sure you are connected to a 2.4GHz WiFi
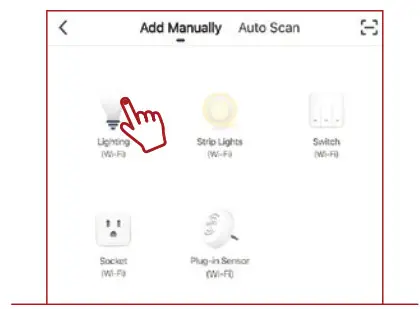
The network then manually add smart lighting devices
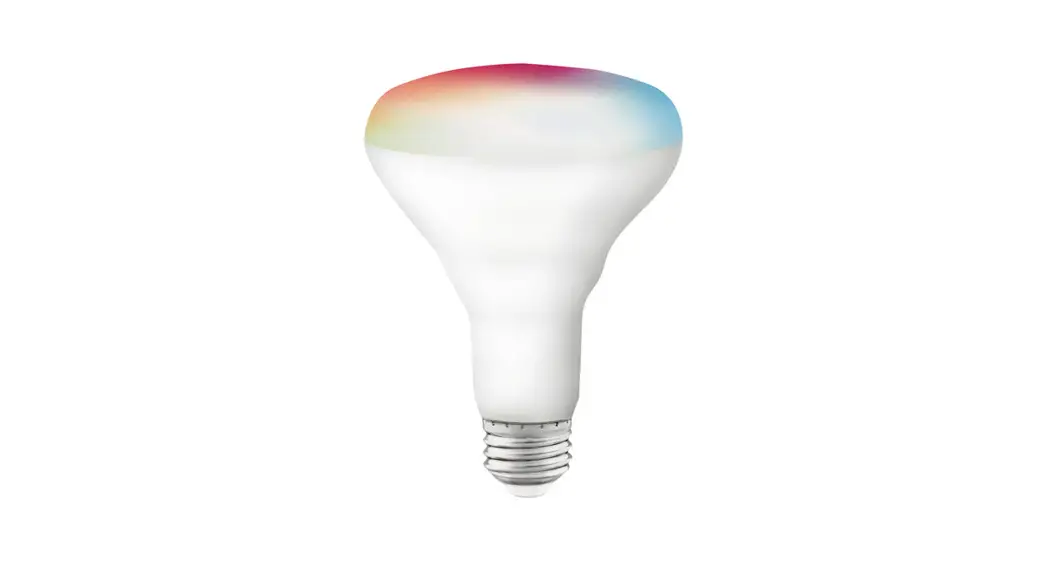
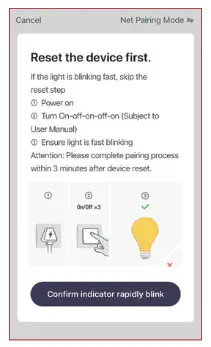
- Fit your bulb into the desired fitting & switch it on.
Your bulb should be flashing.
Note; If the devices are not flashing, turn devices On and Off 5 times to enter pairing mode.
- Ensure you are on the same 2.4GHz Wi-Fi network that you will be adding your devices to. Enter the Wi-Fi password and tap “OK”.
- The status menu will appear. Wait until it’s completed.
Note: If unsuccessful, please refer to the FAQs on Satco.com/Starfish
- To rename the device, tap the “Pen” icon, enter the new name and tap “Completed”. The device is now ready to be controlled with the starfish App.
Features
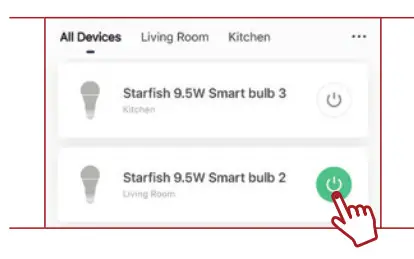
Individual Bulb On/Off
- Tap the Power Button to turn the device On or Off

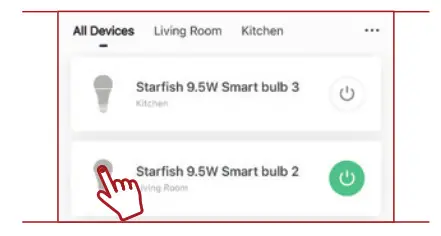
Individual Bulb Setting
- Tap the device icon for additional device features

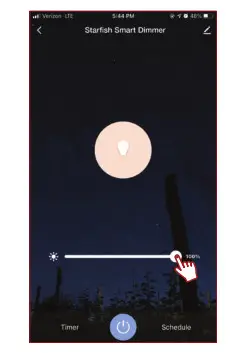
Dimming
- Slide the dimming bar left or right to set the brightness level
Note: Screen is shown for “dimming only” product.
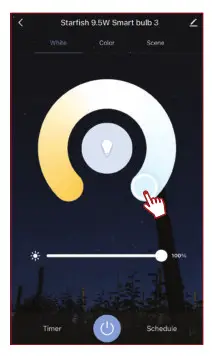
Tunable White
- Use the round slider to adjust color temperatures from Warm to Cool
Slide the dimming bar left or right to set the brightness level
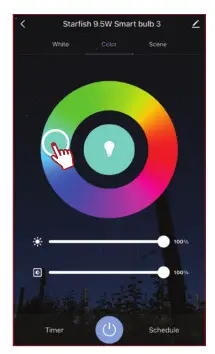
Color Changing
- Tap on any part of the color wheel to select your desired color
Use the slide bars to adjust the brightness and color saturation
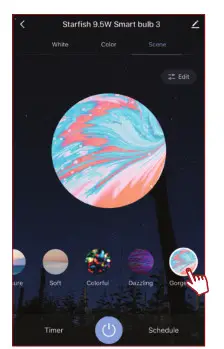
Effects
Tap on a preset effect or create a custom effect by tapping on the edit button
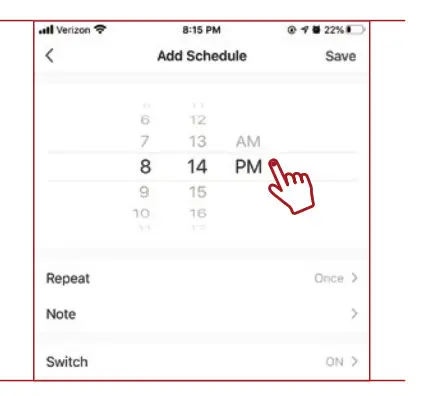
Schedule
- Tap on the “Schedule” button

- Select a time for the event to occur
Tap “Repeat” to repeat on certain days of the week, otherwise, the event will only occur once. Select the days that you would like the schedule to repeat.
Select if you would like the device to turn on or off.

Timer
- At the device control panel, tap the Timer Button to create a countdown timer. Select time and confirm to start the timer.
Advanced Settings
- Additional settings are available in the device settings menu.
Tap the pen icon in the upper right corner to access the menu screen
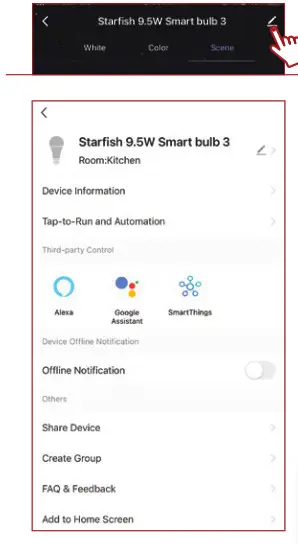
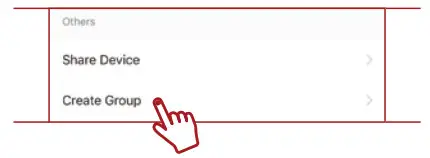
Create Groups
- Tap the “Create Group” option
NOTE: To create groups you will need at least 2 devices.
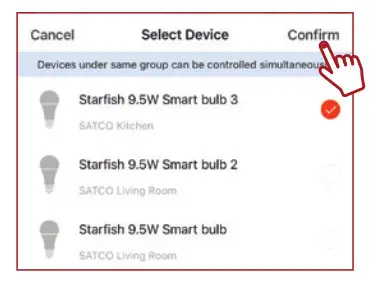
- Select the devices you want to group and then tap “Confirm”

- Enter the group name and click “Save”
Edit Groups
- Tap the pen icon in the upper right corner

- Rename the group or remove a device from the group. Once complete, tap “Confirm” in the upper right corner.


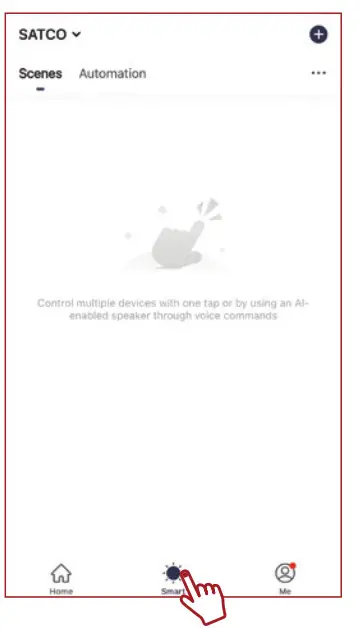
Automation and Scenes
- Tap the Smart button on the bottom of the screen and then the plus (+) button on the top right-hand corner to set up your first Scene or Automation

- Select “Run Scene” to create a scene that can be executed with the click of a button
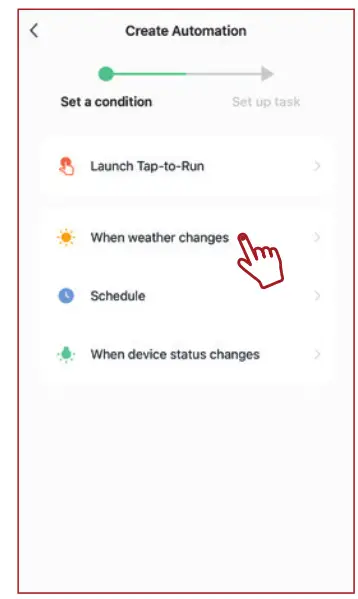
Select “When weather changes”, “Schedule” or “When device status changes” to have your devices run automatically based on the condition.
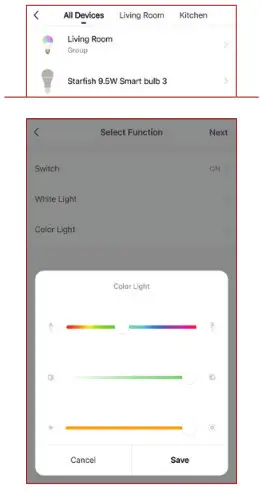
- Select the devices or groups that you would like to be controlled, and then select if you would like those devices to Turn On or Off, and the color.

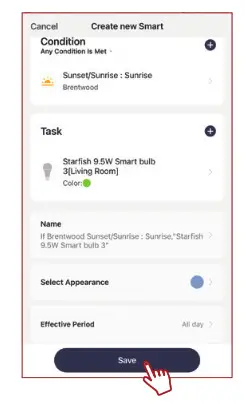
- Tap “Next” and then review the Automation or Scene. Click “Save” to activate your Automation or Scene.

CONNECTING TO ALEXA
Note: Make sure that your Alexa App is connected to your Amazon device and is working properly
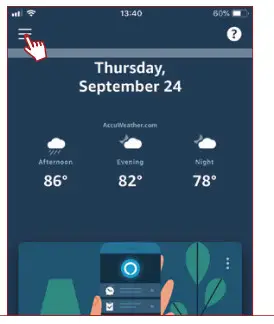
- Log in to your Alexa App and tap the top left corner to access the menu.

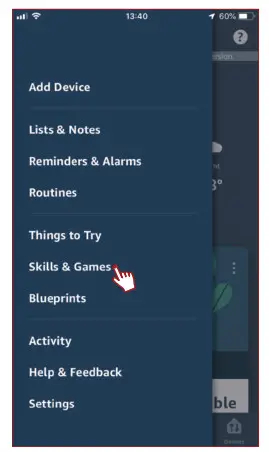
- Tap”Skills & Games”

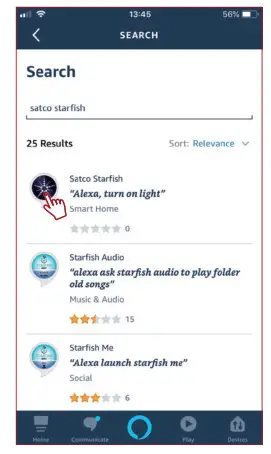
- Type “Satco Starfish” and tap on the icon in the search results.

- Tap “Enable to Use” to begin linking your account.

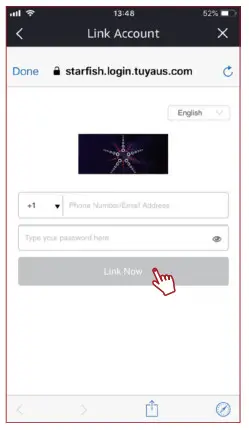
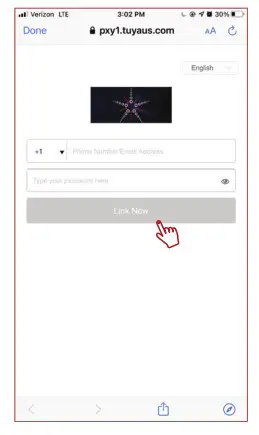
- Enter your Satco Starfish username and password to link your accounts, then tap “Link Now”.
Note: You must use the same username and password from the Starfish App.
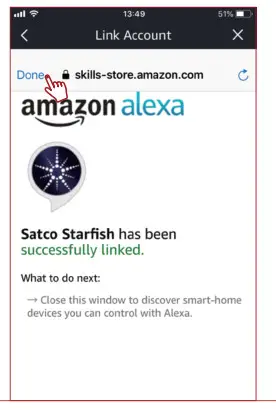
- Tap “Authorize” on the next page to link your Starfish account to Alexa
- Once your Starfish account is successfully linked to Alexa, tap “Done” on the top left corner

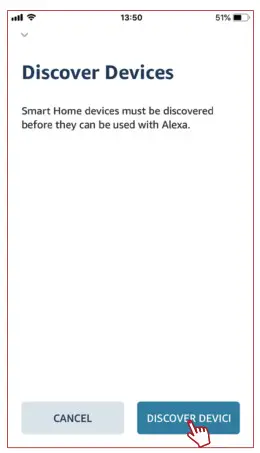
- Tap “Discover Devices” to connect your Smart devices

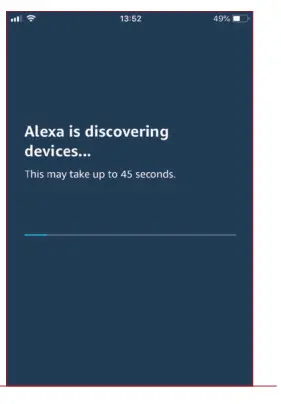
- Wait for Alexa to detect the devices from the Starfish App
 Your devices will now be paired and can be controlled through the Alexa App or through your Alexa device
 Your devices will now be paired and can be controlled through the Alexa App or through your Alexa device
CONNECTING TO GOOGLE HOME
Note: Make sure your Google Home App is connected to your Google device and is working properly
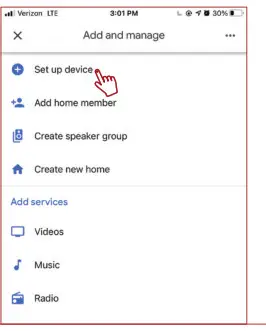
- Open the Google Home app, then tap “Set up device”.

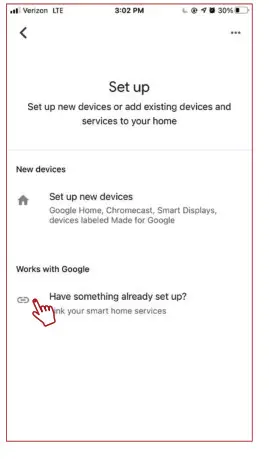
- Tap “Have something already set up?”.

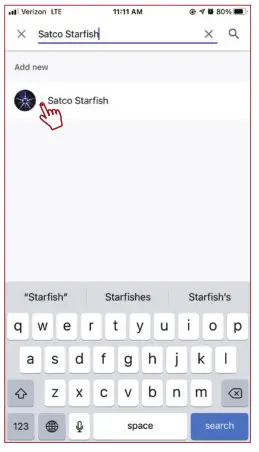
- Type “Satco Starfish” and tap on the icon in the search results.

- Enter your Satco Starfish username and password to link your accounts, then tap “Link Now”.
Note: You must use the same username and password from the Starfish App.

VOICE CONTROL
Now that you have linked your Starfish devices to Amazon or Google, you will be able to control them with voice commands from your Alexa or Google Assistant devices. Below are some common voice commands that can be used after you say “Alexa” or “OK, Google”:
Turn on “Device Name”
Turn off “Device Name”
“Device Name” to 50%
Turn “Group Name” off
Turn “Device Name” to soft white [Tunable White Devices Only]
Turn “Device Name” to Blue [RGB Devices Only]
Note: Refer to your Amazon or Google app to confirm the “Device Name” for each of your devices
CONNECTING TO SMART THINGS
Note: Make sure your SmartThings App is connected to your hub and is working properly
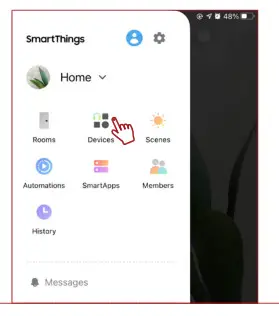
- Open the SmartThings App, then tap the top left corner to access the menu
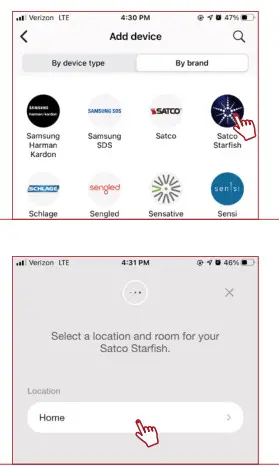
Tap “Devices” and then “Add new device”
- Select “Satco Starfish” from the “By brand” list, then select the location where you would like to add the device

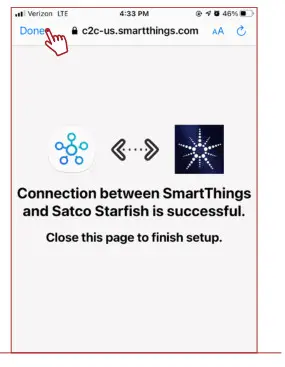
- Enter your Satco Starfish username and password to link your accounts, then tap “Link Now”
Note: You must use the same username and password from the Starfish App - Tap “Authorize” on the next page to link your Starfish account to SmartThings
Once your Starfish account is successfully linked to SmartThings, tap “Done” on the top left corner
Your devices will now be paired and can be controlled through the Google Home App or through your Google device
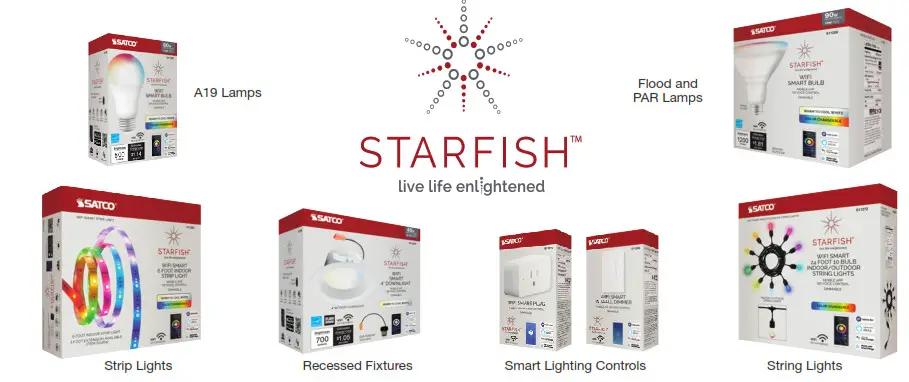
ENJOY THESE OTHER GREAT STARFISH WIFI SMART LED PRODUCTS
Copyright Satco Product’s Inc. 2020 Not responsible for typographical errors. Specifications / App features are subject to change. See user agreement for full details. App images are representations of the actual App. Amazon, Alexa, and all related logos and trademarks of Amazon.com, Inc. and its affiliates.
Siri is a registered trademark of Apple Inc. Google and Google Play are trademarks of Google LLC.


