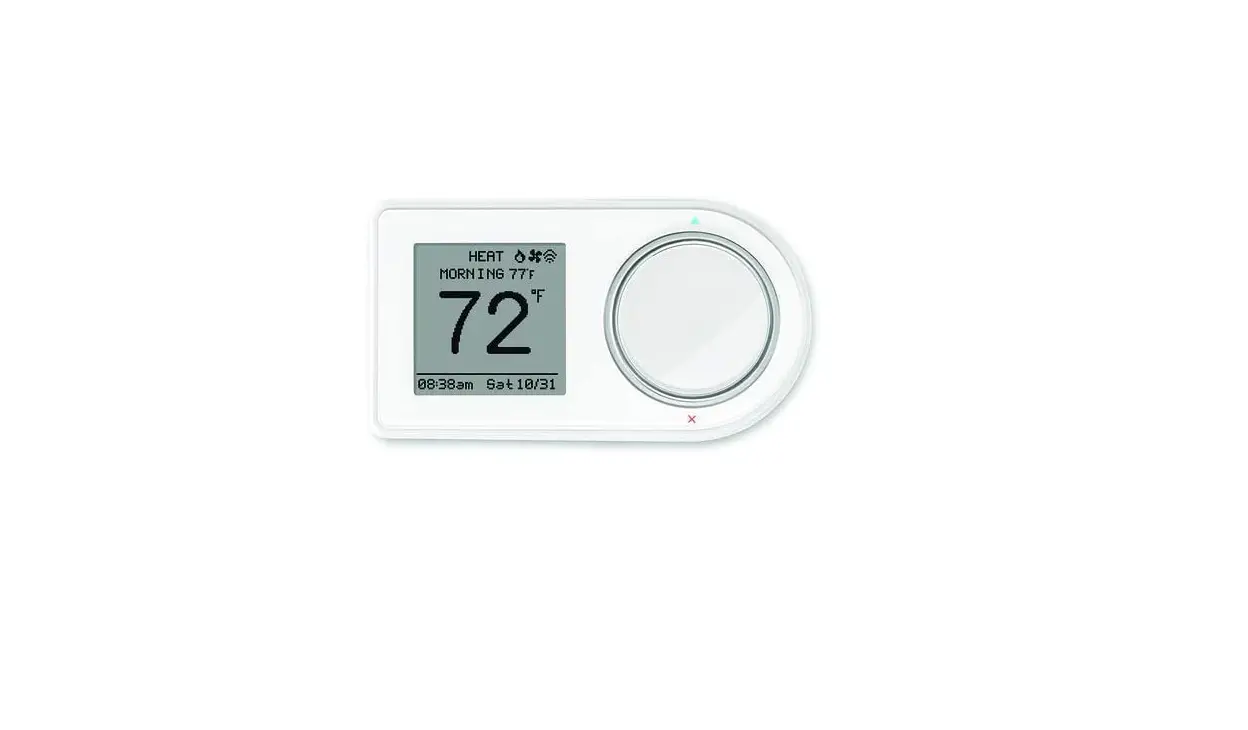
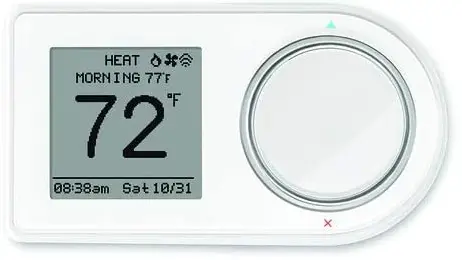
 Lux Products GEO-WH Wi-Fi Thermostat
SPECIFICATION
- BRAND: LUX
- MODEL NAME: WiFi Connected Thermostat
- ITEM DIMENSIONS LXWXH:81 x 1.5 x 3 inches
- CONTROLLER TYPE: Vera, Amazon Alexa, IOS, Android
- COLOR: White
- INCLUDED COMPONENTS: Thermostat
- POWER SOURCE: Battery Powered
- ITEM WEIGHT:95 Pounds
- SHAPE: Rectangular
- DISPLAY TYPE: Digital
- CONTROL TYPE: Button Control
- CONTROL METHOD: Voice
- CONNECTIVITY PROTOCOL: Wi-Fi
- STYLE: Smart, Wi-fi
- NUMBER OF BATTERIES: 2 AA batteries required.
INTRODUCTION
The first Wi-Fi thermostat without a power supply. The free iOS and Android app for this 7-day programmable thermostat includes geo-fencing. universal system suitability with three different power sources: C-wire, two AA batteries, or a micro USB. mounting might be vertical or horizontal.
GETTING STARTED
FOR USE ON:
- Most 24-volt heating and cooling systems
- 1 or 2 stage heat / 1 or 2 stage cool: gas, oil, or electric furnace and a/c systems
- 1 or 2 stage heat / 1 stage cool: heat-pump style systems
- 2-wire hydronic (hot water) zone valves
- Gas Millivolt wall / floor heaters
NOT FOR USE ON:
- 120/240 VAC line- voltage systems (without a transformer)
- Heat pumps that have (Y2) two compressor stages
Locate and gather the following items for ease of installation
INCLUDED
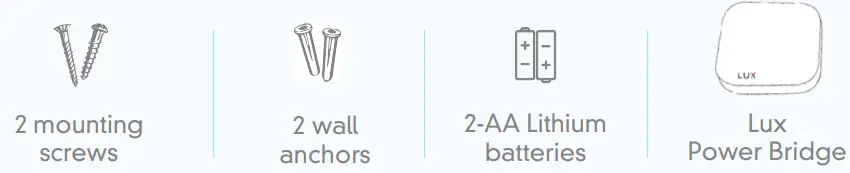
ITEMS NEEDED
SWITCH POWER OFF AND TAKE PHOTO OF EXISTING WIRING
IMPORTANT: Turn off the power at circuit breaker to both your heating & cooling systems before performing any wiring.
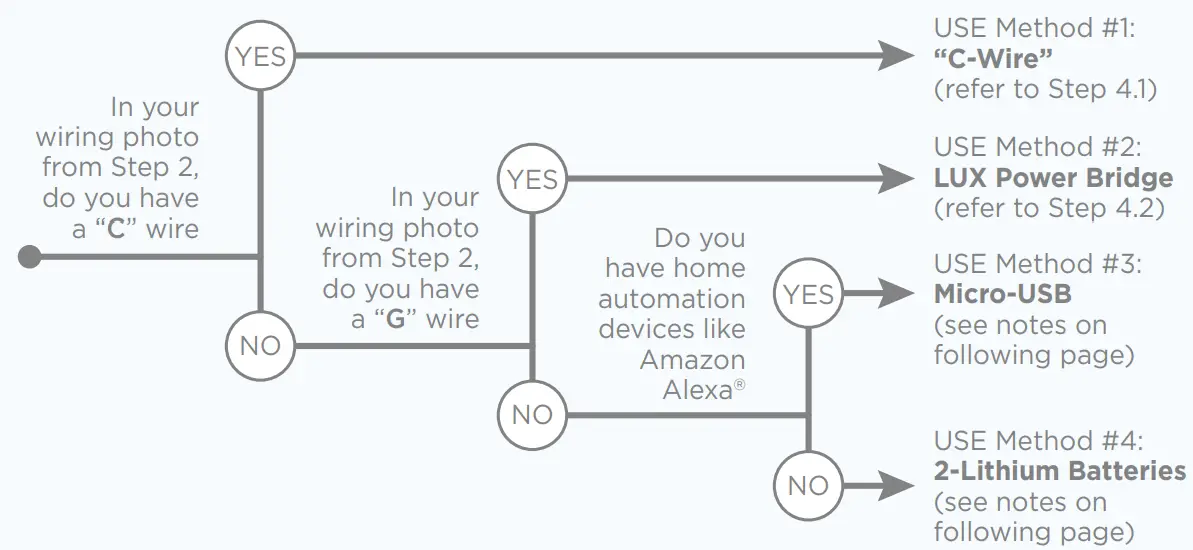
DETERMINE HOW YOUR LUX/GEO WILL BE POWERED
LUX/GEO can be powered by one of four methods (in order of best performance):
- Method #1 & #2 (Preferred): 24V System Power “C-wire” (this powers GEO from your heating/cooling equipment and provides the best performance when using WiFi)
- Method #3: USB micro-port on GEO (wall adapter & cord not included – use 1A wall adapter)
- Method #4: Battery Powered* (2-AA Lithium batteries included)

NOTES FOR METHOD #3: MICRO-USB
You can use any standard USB wall adapter and Micro-USB cable; however, the wall adapter must be rated for 1 Amp (1000 mA) or higher.
- A Micro-USB kit with extra-long power cable is available from LUX through our luxproducts.com website.
- Refer to Step 4.1 for wiring method.
- Notice for battery powered installations
- GEO® should only be used with lithium batteries.
- Battery failure could leave property without controlled heating or cooling. Reliance on battery power is not recommended with prolonged absence from property.
- Battery life will vary depending on your settings. After installation you can choose to adjust the “energy profile” for your GEO. This energy profile will determine the delay in GEO responding to changes from the App, but can increase battery life.
- Refer to Step 4.1 for wiring method.
REMOVE EXISTING THERMOSTAT AND WIRE YOUR LUX/GEO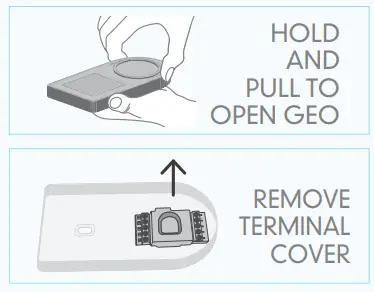
- Release wires and mounting screws from old thermostat and remove base from wall.
- Open GEO from base, pull up on plastic “cover” between terminal blocks to access and pull wires through.
- Secure GEO base to wall (mounting hardware & optional wall plate included)
As an added resource, a glossary of terms is available on luxgeo.com, along with video demos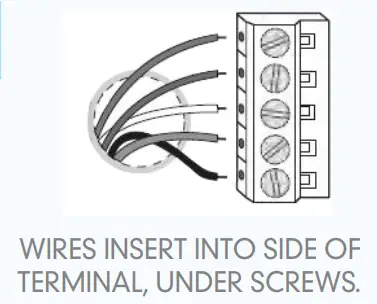
On the following pages, there are several different methods of wiring the GEO thermostat depending upon system type and the power method selected in Step 3. Follow the scenario most appraise for your system type, and please contact LUX support if there are any questions.
WIRING FOR METHODS: #1 C-WIRE, #3 MICRO-USB, AND #4 BATTERY POWER
4.1A WIRING TERMINAL REFERENCE: CONVENTIONAL FURNACE – GAS/OIL/ELECTRIC & AIR- CONDITIONING (WITHOUT LUX POWER BRIDGE)
Referencing your wiring photo & terminal guide below, wire to GEO.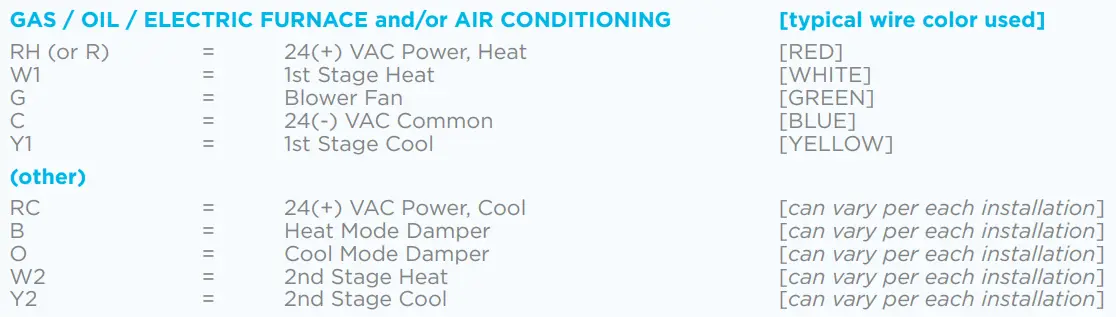
IMPORTANT: If you have both an RC and RH wire present, remove the RED shorting cap inside of GEO (the YELLOW shorting cap must only be on one pin, not both).
Wiring is complete – you may return “cover” between terminal blocks.
B WIRING TERMINAL REFERENCE: HEAT PUMP SYSTEMS (WITHOUT LUX POWER BRIDGE)
Referencing your wiring photo, attach your thermostat wires to the LUX/GEO using your original wiring letters and the following terminal reference as a guide based upon your system type.
NOTE: There should NOT be a wire used on the W1 wire connection at terminal.
IMPORTANT: If you have both an O wire and B wire (i.e.: Trane system), please install B to the “C” terminal
IMPORTANT: For Heat Pump applications, the YELLOW shorting cap must be across both metal pins instead of the default of just one. Also, there will NOT be a wire connected to the “W1” terminal.
Wiring is complete – you may return “cover” between terminal blocks.
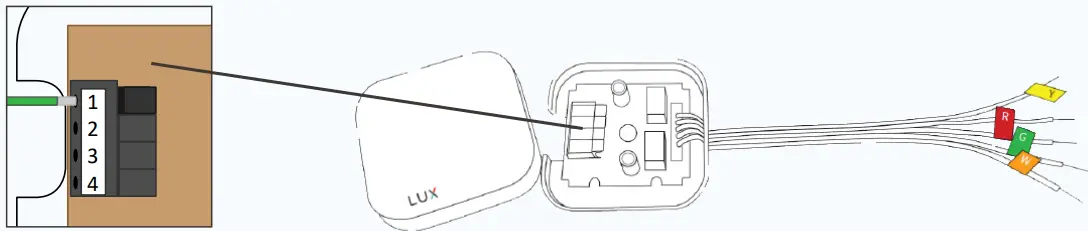
WIRING FOR METHOD: #2 USING LUX POWER BRIDGE
4.2 WIRING TERMINAL REFERENCE: INSTALLING GEO WITH THE LUX POWERBRIDGE
The LUX Power Bridge is for applications that do not have a C-wire at the thermostat:
- Take a photo of the wiring at both your thermostat and your furnace. The Power Bridge cannot be used with 2-wire applications, and requires at least cooling or heating wires and a fan “G” wire at the thermostat. If you have more wires (multi-stage systems) than are needed for installing the Power Bridge, leave them attached as they are.
- AT YOUR THERMOSTAT – Use the thermostat wire labels to identify each thermostat wire with its current terminal letter. If any of your thermostat wiring connections are unclear, please call LUX Technical Support.

- AT YOUR FURNACE (AIR HANDLER) – Remove the door panel and locate your control board. Use the additional wire labels to identify each wire from your thermostat with its terminal letter on the control board. If any of your furnace wiring is unclear, please call LUX Technical Support. Depending upon your application, some wires attached to the control board will remain in place and will not be used with the LUX Power Bridge.


NOTE: When installing the Power Bridge, press the terminal levers before inserting wires into the holes. Once the wire is fully inserted, gently pull on the wire to confirm that it is securely installed. Press all the way down on the lever to release a wire.
A INSTALLING THE LUX POWER BRIDGE ON CONVENTIONAL SYSTEMS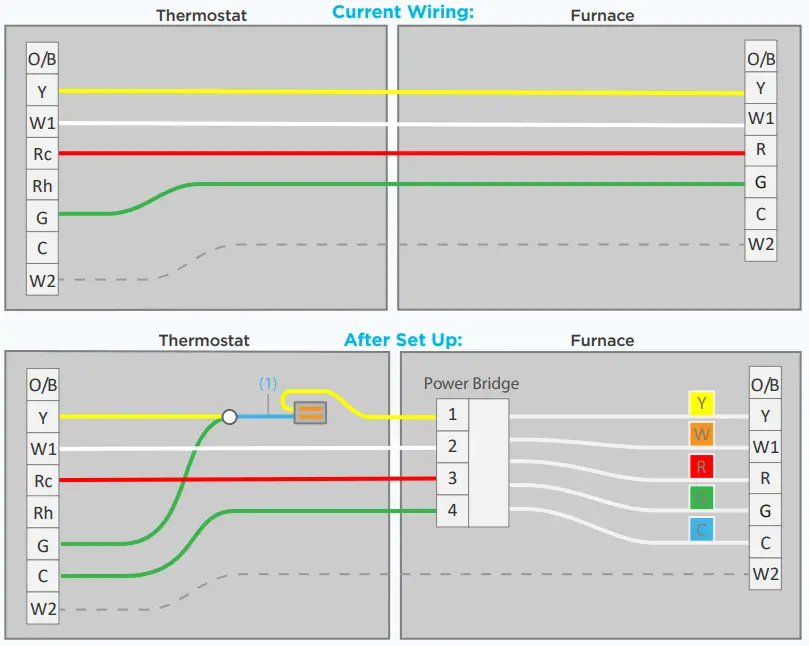
- If your system provides a second stage of heating, you may have a W2 wire. You can leave this wire as-is in your furnace and connect it to the W2 block on your new thermostat.
- If you have two R wires (R, Rc, or Rh), please call LUX Technical Support for assistance with your installation.
- Connect your old Y wire to the empty hole next to the blue end of the y-splitter (1). Snap the orange lever shut to secure the wire in its place. Insert the yellow end of the y-splitter into the thermostat’s Y terminal and the green wire into the G terminal.
- Move your old G wire to the C terminal on your thermostat.
B INSTALLING THE LUX POWER BRIDGE ON HEAT PUMP SYSTEMS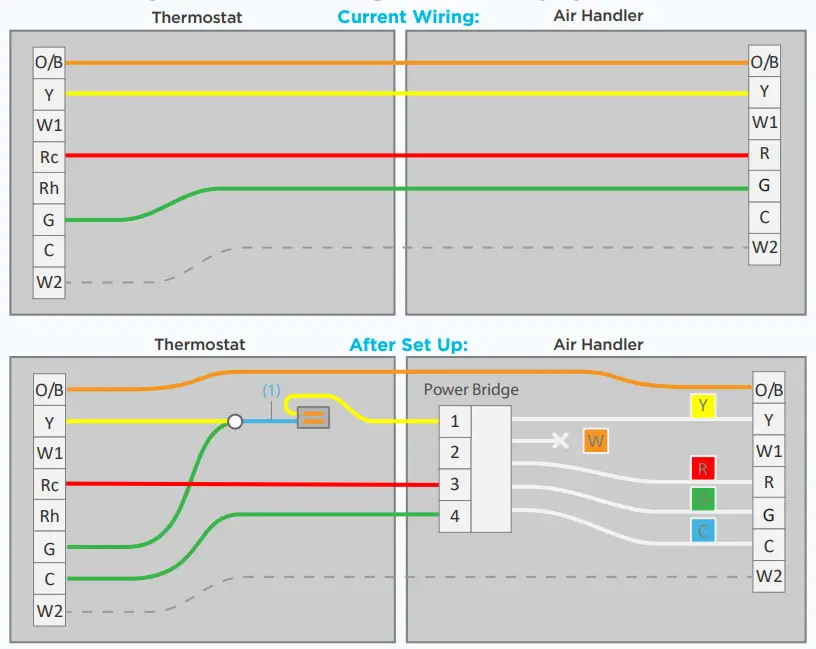
- If your system provides a second stage of heating, you may have a W2 wire. You can leave this wire as-is in your furnace and connect it to the W2 block on your new thermostat.
- You may or may not have a W1 terminal block on your control board. Do not connect the Power Bridge’s “W” wire to any terminal block on your control board.
- Connect your old Y wire to the empty hole next to the blue end of the y-splitter (1). Snap the orange lever shut to secure the wire in its place. Insert the yellow end of the y-splitter into the thermostat’s Y terminal and the green wire into the G terminal.
- Move your old G wire to the C terminal on your thermostat.
INSTALLING THE LUX POWER BRIDGE ON COOL ONLY SYSTEMS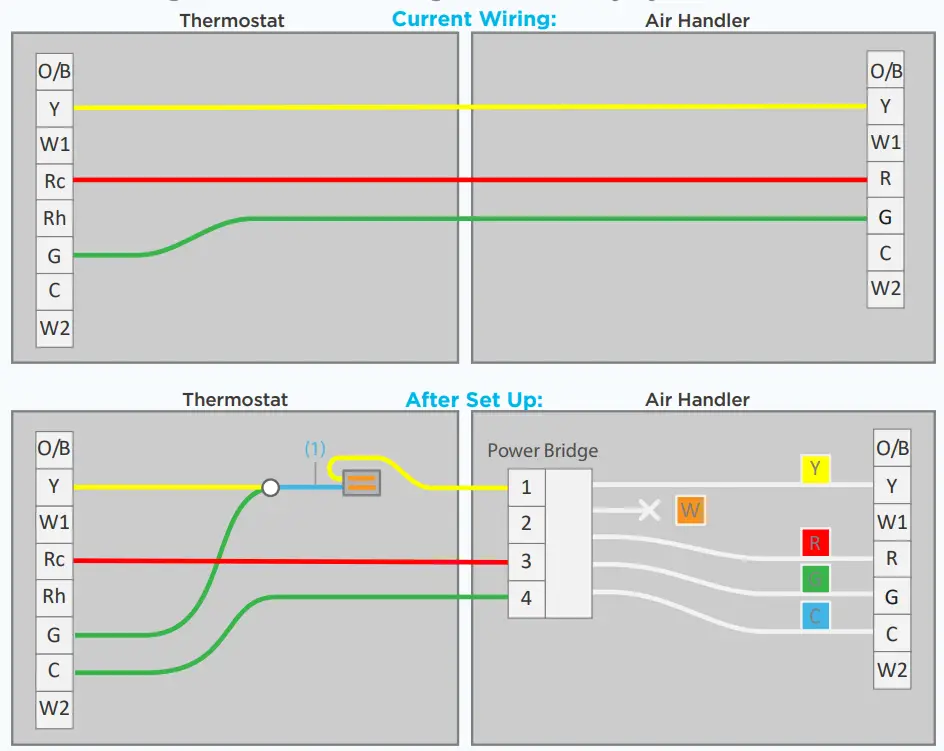
- The Power Bridge’s “W” wire is not used for this system – do not connect it to your control board.
- Connect your old Y wire to the empty hole next to the blue end of the y-splitter (1). Snap the orange lever shut to secure the wire in its place. Insert the yellow end of the y-splitter into the thermostat’s Y terminal and the green wire into the G terminal.
- Move your old G wire to the C terminal on your thermostat.
INSTALLING THE LUX POWER BRIDGE ON HEAT ONLY SYSTEMS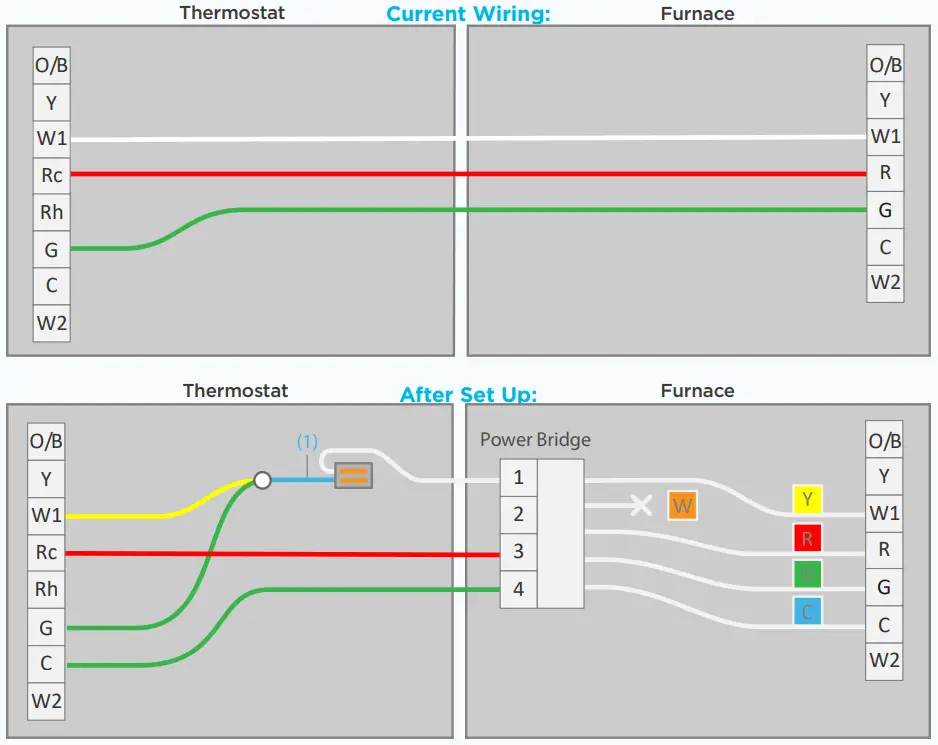
- For this system type, you will need to connect the Power Bridge’s “Y” wire to the W1 terminal block on your control board. Re-label the yellow tab on the Power Bridge’s Y wire with one of the included W wire stickers. You will not use the Power Bridge’s “W” wire for this system.
- Connect your old W wire to the empty hole next to the blue end of the y-splitter (1). Snap the orange lever shut to secure the wire in its place. Insert the yellow end of the y-splitter into the thermostat’s W terminal and the green wire into the G terminal.
- Move your old G wire to the C terminal on your thermostat.
POWER ON
- For methods #1 with C-wire and #2 with LUX Power Bridge: secure GEO front onto base
- For method #4 Battery Power: insert 2-AA Lithium batteries & secure GEO front onto base
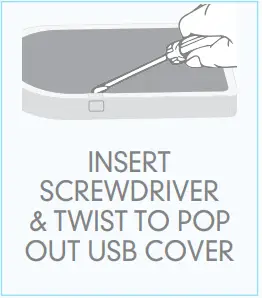
- For method #3 USB power: place a flathead screwdriver against port cover from inside GEO along bottom side – twist & push out. Plug in Micro USB and insert into base.

- Once GEO front has been secured to base (line up and firmly push), return power to system.
WITH GEO SECURE & POWER ON – the display should illuminate, if not, check power is back on.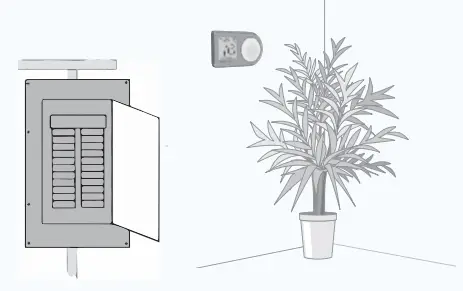
CONFIGURE SYSTEM SETTINGS
GEO will guide you through setup Rotate the control wheel to navigate through options and values. To select, press; to go back, press (X).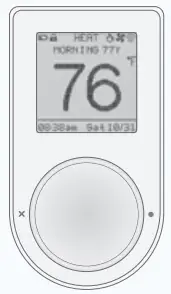
GEO WILL PROMPT YOU TO SELECT:
- Whether heating and/or cooling are connected.
- System type (only applies if you have heat).
Note if you wired per section 4.1a or 4.3a you have a furnace. If you wired per section 4.1b or 4.3b you have a heat pump.
If furnace fan is not operating properly after installation, change from furnace: gas to furnace: electric in the settings menu.
- The number of stages for heat/cool you have. Most common is 1 heat/1 cool. Not sure? refer to our online glossary to learn more.
- If you have set more than 1 stage of heat or cool, the OFFSET setting adjusts the stage-2 cut in.
IF YOU HAVE NOT YET DOWNLOADED YOUR LUX PRODUCTS APP, DO SO NOW
CONNECTING LUX/GEO
You will need an iOS or Android device to set up your GEO. If you have a different device, visit LUXGEO.com. Set-up follows a series of screen prompts – have your GEO and mobile device ready.
- GETTING READY TO CONNECT
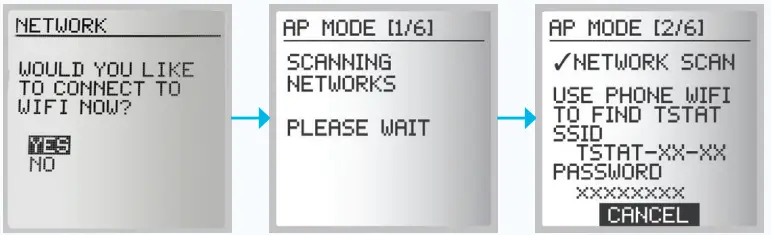
You’ve downloaded the LUX Products App, created a user account and now, from your GEO, select “yes” for WiFi setup GEO will begin scanning – but you can move on to 8b.
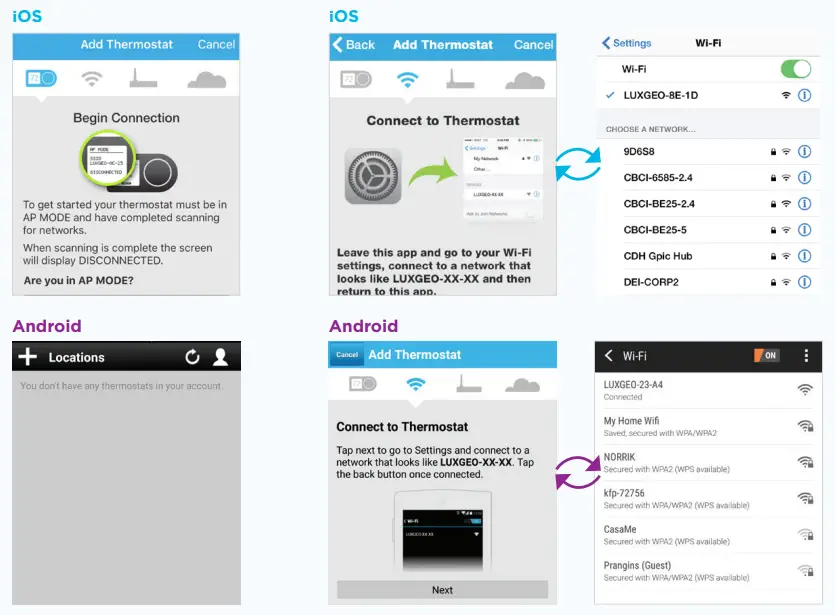
- CONNECTING GEO TO YOUR MOBILE DEVICE

- Open App and click the + icon to add device. When prompted, leave App & go to your mobile device’s WiFi settings menu.
- Select the WiFi network that looks like TSTAT-xx-xx.
- Enter in the password displayed on the thermostat.
- After connecting to TSTAT-xx-xx return back to the App.
- SELECT YOUR HOME WIFI NETWORK & ENTER PASSWORD

Once the GEO connects to your home WiFi Network, the thermostat will automatically complete steps 3-6. - WHEN ROOM TEMP APPEARS ON GEO DISPLAY, CONTINUE BY FOLLOWING PROMPTS ON APP
Once you see on app and on GEO – your system is now successfully connected.

TROUBLESHOOTING
You may need to manually reconnect your phone to your WiFi network. If this is unsuccessful – restart GEO by going to menu/ settings/network and pick up App from step 8b.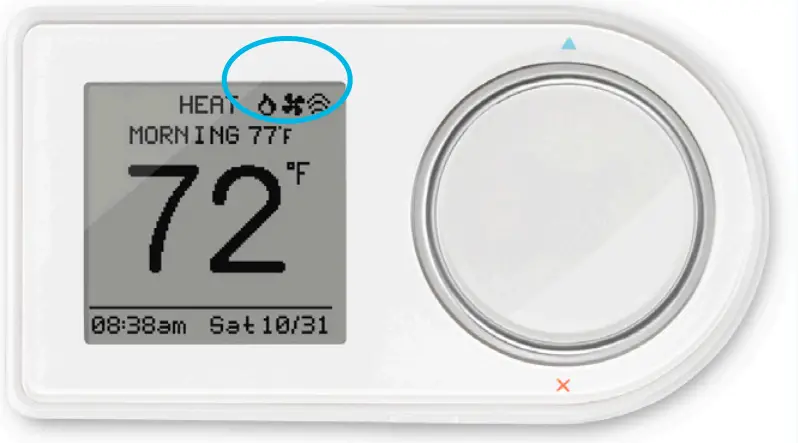
CUSTOM SETTINGS & RADIUS SET-UP
Radius is a geofence that allows you to set a geographic “fenced” zone via your mobile device. Using GPS, Radius (geofencing software) will recognize your approach into or out of the “fenced” area and trigger your thermostat to adjust to either your “at home” comfort settings or “Away” settings which provide more efficient energy use. With Radius, geofencing can be set on multiple devices/users and to your custom needs and can work with or without a thermostat schedule to still save energy when away from home.
Please note and be assured that your GPS location is NEVER reported or known by LUX Products.
SETTING YOUR “FENCE”

TIP: If you set your fence further from your home then your system will have more time to make your home comfortable before you get home. If you set the fence closer to home then you will save more energy but sometimes your system will not have time to recover before you get home. If you are using battery power, we recommend setting a larger distance.
ENJOY THE COMFORT, PEACE OF MIND AND FLEXIBILITY OF YOUR LUX/GEO THERMOSTAT.
Visit our online community for interesting articles and tips for saving energy at luxproducts.com. Thank you.
LUX/GEO® is a trademark of LUX Products Corporation. Radius is a trademark of EnergyHub, Inc.
LUX Products Corporation, Philadelphia, PA 19112 LuxProducts.com ©2017
FAQs
Can the app control two thermostats, each with their own zone?
Yes. I have two, I control with one app.
If you set a temperature will it automatically toggle between heating and cooling as necessary or do you have to manually switch between the two?
From the video around the 1 minute mark I say yes. Here is the link. https://www.youtube.com/watch?v=kdYVLZxEU9k
will this work with a 2 wire system
Yes, this will work with a 2 wire system. If your system is gas like mine, you have to set the thermostat to electric. I moved houses and had trouble switching to a 2 wire from a havoc system with AC. The old app worked great.
Can I disable or choose not to activate geo-fencing? Just because I leave with my cell phone doesn’t mean there aren’t other people or pets at home.
Yes, you can choose to not activate the geo-fencing. We did not enable the geo-fencing for exactly the same reasons you mention. We are off grid and I really wanted a smart thermostat so I could turn my pellet stove “off” remotely if I was concerned about the battery status before we could get back & turn the gen on.
Does this thermostat have the ability to adjust the “swing setting” and “offset setting” like the lux tx9600ts?
Yes, you can adjust the swing and the offset values on the LUX Geo unit.
I’ve noticed the display turns off after 12 hours? Anyone know the stats on how long? And is there a way to make the display stay on w time?
You must have a “C” common wire or use the Lux power kit to power up the thermostat for a constant display. The LUX Geo will go into a sleep mode overnight to save battery power and will give you a display when your morning period starts or whenever the dial is pressed.
Can the display be turned off? My thermostat is in my bedroom, so I need to be able to turn off the display at night.
The display is off until you touch the dial, then it lights up.
What information is provided by the energy usage report?
The iPhone app will show the run time per hour per day on the dashboard. You can see the temperature of the building in a graph with the run time below.
can temperature swing be adjusted? I am going to use this in a garage and want about 5 degrees of swing before it kicks on.
Yes, but not via the app. Go to wheel scroll to menu, then settings, then system, then calibration, then manipulate in the direction you want and make your setting, then press enter
Do I need a wifi hub in my home?
Just need WiFi. Any wireless router
does this only work on a smartphone app, or can I use my home computer for the wifi?
It can be used on a computer, we cannot have our phones on us at work so I control mine from my desktop at work all the time. I highly recommend this product.
Does this thermostat have 2 programs – 1 for heat and 1 for cooling?
Yes, the LUX Geo will have a separate cooling and heating programs.
How can I tell if the auxiliary heat is on?
At bottom of app. these setting for heat or cool, if they show heat on but your heater not running that should have a/c tech look for problem in your unit.
How big is the wall plate?
about 3×5.
Will there be a Apple HomeKit version?
At this time, we do not have the ability to operate with the Apple Home Kit. But in the future, we will have a version which will.


