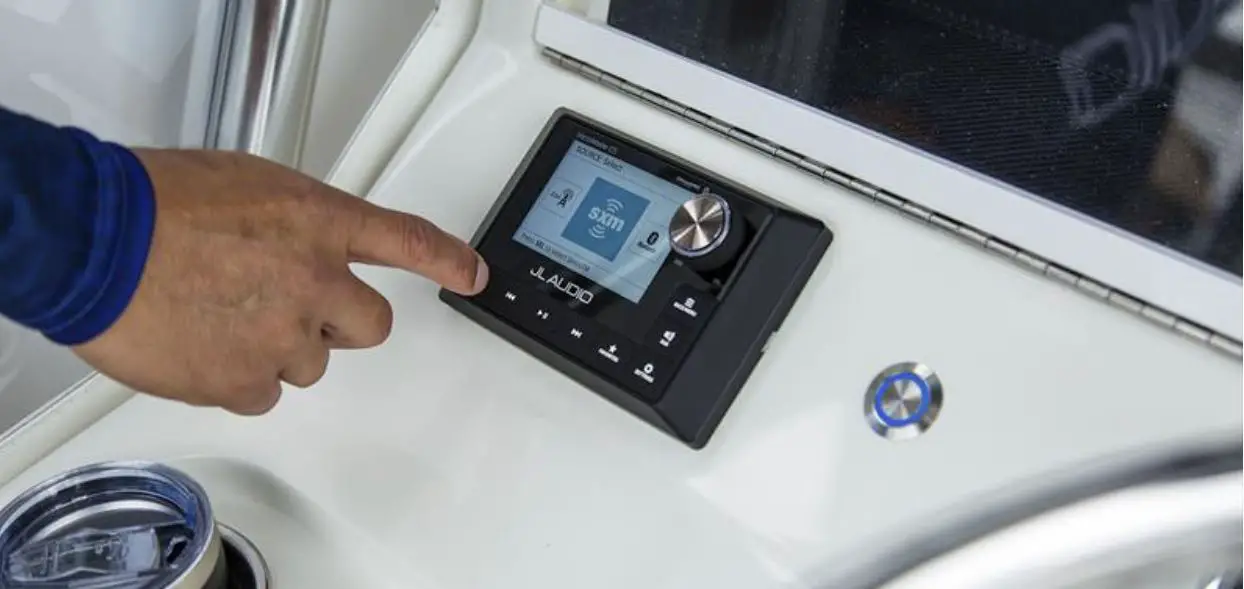
JL AUDIO MediaMaster 105 Marine 4 Zone Digital Media Receiver
FCC COMPLIANCE STATEMENT
This device complies with Part 15 of the FCC Rules. Operation is subject to the following two conditions
- This device may not cause harmful interference.
- This device must not accept any interference received, including interference that may cause undesired operation. These limits are designed to provide reasonable protection against harmful interference in a residential installation.
- This equipment generates, uses and can radiate radio frequency energy and, if not installed in accordance with the instructions, may cause harmful interference to radio communications.
- However, there is no guarantee that interference will not occur in a particular installation.
- If this equipment does cause harmful interference to radio or television reception, the user is encouraged to try to correct the interference by one or more of the following measures
- Reorient or relocate the receiving antenna.
- Increase separation between the equipment and the receiver
- Connect the equipment to an outlet on a circuit different from that to which the receiver is connected.
- Consult the dealer or an experienced radio/TV technician for help.
Any changes or modifications not expressly approved by the party responsible for compliance could void the user’s authority to operate this equipment.
SAFETY CONSIDERATIONS
Only use this product in vehicles with 12 volt, negative-ground electrical systems. This product is not certified or approved for use in aircraft.
Mount this product securely to prevent damage or injury in severe conditions. Do not replace the power wire fuse with one of a different value.
Never bypass the fuse. Listen to your audio system at levels appropriate for operating conditions and hearing safety.
INSTALLATION CONSIDERATIONS
Installation requires appropriate tools and safety equipment. Professional installation is recommended. This product is water-resistant. Do not submerge or subject to high pressure water spray. Before installation, turn off the audio system and disconnect the battery system from the audio system. Install in a dry, well-ventilated location that does not interfere with your factory-installed systems. If a dry environment is not available,
a location that is not exposed to heavy splashing may be used. Before cutting or drilling, check for potential obstacles behind mounting surfaces. Carefully route all system wiring away moving parts and sharp edges secure with cable ties or wire clamps and use grommets and loom where appropriate to protect from sharp edges.
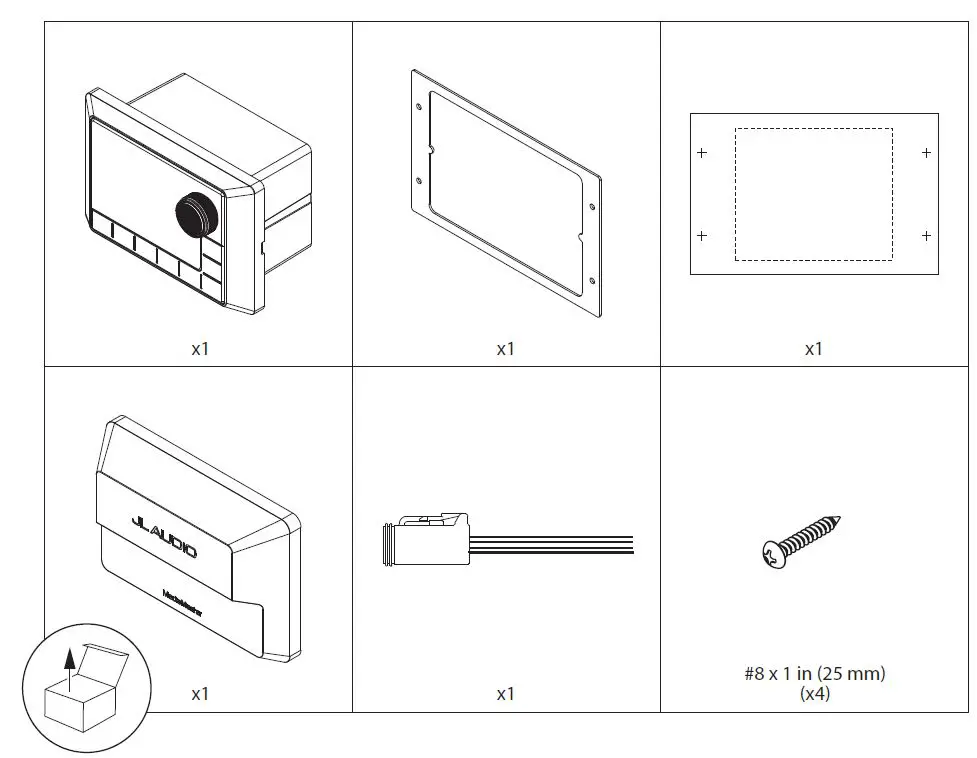
PACKAGE INSIDE
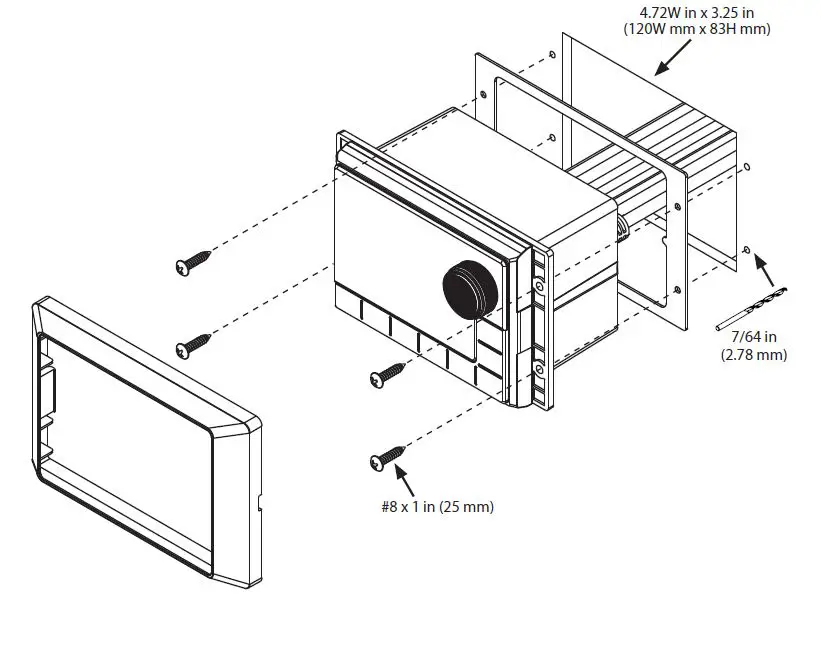
GENERAL MOUNTING
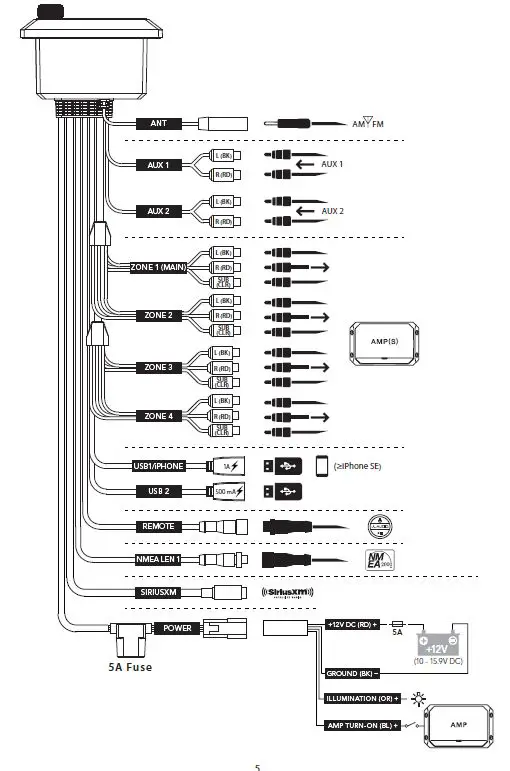
GENERAL CONNECTIONS
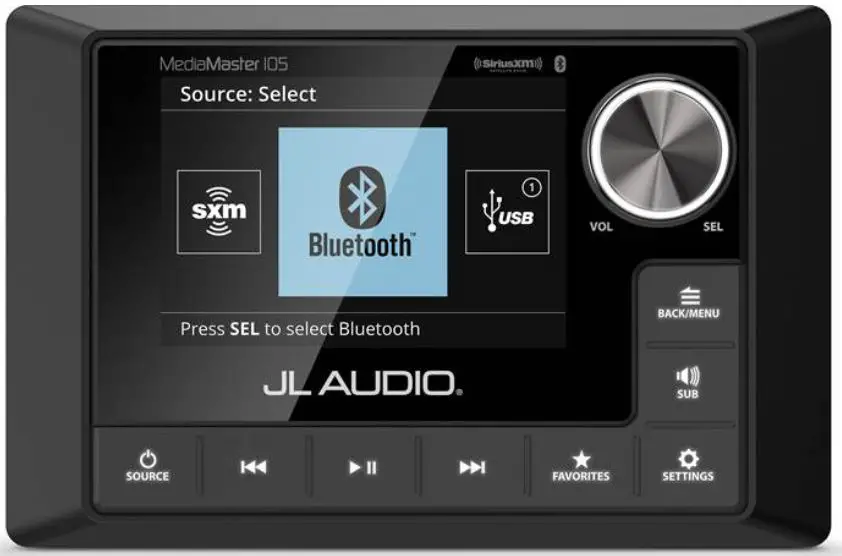
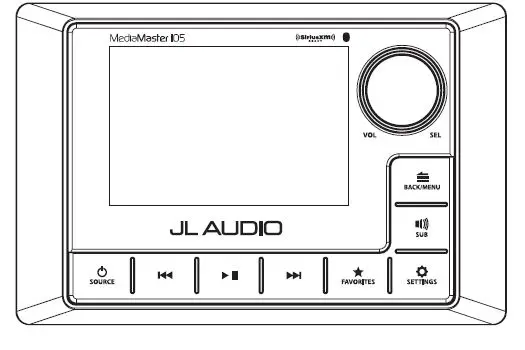
CONTROL PANEL
GENERAL CONTROL FUNCTIONS
| Control | Function | |
 | Source/ Power | Short press to turn ON; Long press to turn OFF When on, short press to display the SOURCE. Select menu |
 | Volume/ Select | Rotate to adjust volume. Rotate/press for navigation and making selections |
 | Settings | Short press to access the Audio Zone Tone & Balance settings. Long press to access the System Settings. Main Menu |
 | Back/ Menu | Short press to go back one step or access source specific menus |
 | Favorites | Short press to access stored presets.Long press to store a frequency as a preset up to 24 |
 | Mute/ Pause | Short press to mute/unmute audio (AM/FM/SiriusXM/DAB+/AUX1/ AUX2) or pause/resume the current selection (USB1/USB2/Bluetooth.When the Audio Zone Levels screen is displayed, press to mute all audio AM/FM/SiriusXM/DAB+/AUX1/AUX2/USB1/USB2/Bluetooth) |
|
|
Forward | Short press to Manually adjust tuner forwards AM/FM/SiriusXM/DAB+ Select the next track USB1/USB2/Bluetooth) Long press to Seek to the next channel FM Skip forward ten frequency steps (AM) Initiate Rapid Channel Browsing forward SiriusXM Fast forward (USB1/USB2) |
|
|
Backward | Short press to Manually adjust tuner backwards AM/FM/SiriusXM/DAB+Restart track/select the previous track USB1/USB2/Bluetooth) Long press to Seek to the previous channel FM Skip backwards ten frequency steps (AM) Initiate Rapid Channel Browsing backward SiriusXM. Fast rewind (USB1/USB2) |


| SYSTEM MENU SETTINGS | ||
| Long press to access the System Settings: Main Menu | |
| Rotate to navigate Press to make selections | |
| Setting | Function | |
| Name this Device | Create a custom name to display on connected Bluetooth devices and NMEA 2000 networks | |
| Audio Zone Setup | Configures each set of audio zone outputs | |
| AUX Input Sensitivity | Configures AUX input sensitivity: 2V or 1V RMS default. | |
| Diagnostic | Displays serial number, hardware and software version info. | |
| Display | Configures display and brightness settings. | |
| Low Voltage Alert | Built-in alert notifies when +12VDC supply voltage drops below 10 volts | If triggered, the unit will enter Safe Mode with a message to turn the unit off until normal operating voltage is restored. |
| Scrolling Text | Enables continuous scrolling of available RDS/track text info | |
| Tuner Region | Configures AM/FM tuner range/scale for a specific region; DAB+ replaces SiriusXM outside of North America. | |
| Power-up Settings | Configures display activation upon connection to power. | |
| AUDIO ZONE MENU SETTINGS | |||
| Long press to access the System Settings: Main Menu | ||
| Rotate to navigate Press to make selections | ||
| Zone | Function | Setting 1 | Setting 2 |
|
Z1: Zone1 Z2: Zone2 Z3: Zone3 Z4: Zone4 |
Level Control Mode | Relative: Links the volume levels of Zones 2 – 4 with the level of ZoneLinked zones will proportion- ally follow Zone 1’s volume. Each zone’s offset level is independently adjustable, allowing you to create a customized level controller, specific to a vessel’s layout. | |
| Absolute: Creates an independent level control for selected zones, each with its own separate volume level slider. | |||
| Fixed | 4V RMS Max (default) 2V RMS Max 1V RMS Max | ||
| Off | |||
|
Rename Zone | Bow, Bridge, Cabin, Cockpit, Galley, Helm, Stateroom 1, Stateroom 2, Tower, Transom | ||
| Custom Name | Alphanumeric Input | ||
| Factory Default | |||
| Max Volume Limit | Max Vol Limit | ||
| Sub 1 Sub 2 Sub 3 Sub 4 | LPF ( Low Pass Filter) | Off (default) 60 Hz 80 Hz 100 Hz | |
| Sub Off | |||
| Z2: Zone2 Z3: Zone3 Z4: Zone4 | Tone Control Mode | Same as Zone 1 | |
| Independent Tone Control | |||
BLUETOOTH AUDIO
You may wirelessly stream audio from a Bluetooth compatible device from up to 35 ft away (11 m). Up to 8 devices can be paired to the MM105, but only one streaming device can connect at one time.
| BLUETOOTH MENU SETTINGS | |
| With Bluetooth selected as a source, short press to display the Bluetooth: Main Menu |
| Rotate to navigate Press to make selections |
| Setting | Function |
| Now Playing | Return to the Now Playing Screen |
| Pair New Device | Initiates Pairing Mode connected devices will be disconnected |
| Connect Paired Device | Display all paired devices for connection |
| Set Primary Device | Assign priority to a paired device for automatic connection |
| Delete a Paired Device | Select from paired devices for removal |
| Delete All Paired Devices | Removes all paired devices from memory |
USB CONNECTIONS
The MM105 includes two ports to connect with USB storage class devices (thumb drive, digital audio player, etc.
- USB 1: High-speed connection for use with iPhone/iPod (MFi Certified) or USB storage device 1 A charging output.
- USB 2: Full-speed USB storage device connection 500 mA charging output.
| USB MENU SETTINGS | |
| With USB1 or USB2 selected as a source, short press to display the USB: Main Menu |
| Setting | Function |
| Now Playing | Return to the Now Playing Screen |
| Shuffle | Activate Shuffle: On or Off (default) |
| Repeat | Activate Repeat: All, Song or Off (default) |
| Playlists | Displays Playlists in library |
| Artists | Displays Artists in library |
| Songs | Displays Songs in library |
| Albums | Displays Albums in library |
| Genres | Displays Genres in library |
| Composers | Displays Composers in library |
IMPORTANT
Properly secure the connected device before driving to prevent damage from dropping or sudden acceleration/braking. Control, functionality and display may vary depending on the model and version of iPhone connected. When connected via USB port, make sure to unpair or disable the Bluetooth connection to avoid possible playback conflicts. If you experience abnormal performance during operation, disconnect the iPhone and check its condition. Restart your iPhone if performance does not improve. Made for iPhone” means that an electronic accessory has been designed to connect specifically to an iPhone and has been certified by the developer to meet Apple performance standards. Apple is not responsible for the operation of this device or its compliance with safety and regulatory standards. Please note that the use of this accessory with an iPhone may affect wireless performance iPhone and all related marks and logos are trademarks of Apple Inc., registered in the U.S. and other countries.
SIRIUSXM SATELLITE RADIO
Only SiriusXM brings you more of what you love to listen to, all in one place. Get over 140 channels, including commercial-free music plus the
best sports, news, talk, comedy and entertainment. Welcome to the world of satellite radio. A SiriusXM Vehicle Tuner and Subscription are required. For more information, visit www.siriusxm.com
SiriusXM service is only available in the continental US and Canada. Activating Your SiriusXM Subscription After installing your SiriusXM Connect tuner and antenna, power on your MM105 and select SiriusXM mode. You should be able to hear the SiriusXM preview channel on Channel 1. If you cannot hear the preview channel, please check the installation instructions to make sure your SiriusXM Connect tuner is properly installed.
After you can hear the preview channel, tune to Channel 0 to find the Radio ID of your tuner. In addition, the Radio ID is located on the bottom of the SiriusXM Connect Vehicle Tuner and its packaging. You will need this number to activate your subscription. Write the number down for reference. Note the SiriusXM Radio ID does not include the letters I, O, S or F. In the USA, you can activate online or by calling SiriusXM Listener care Visit www.siriusxm.com/activatenow. Call SiriusXM Listener Care at 1-866-635-2349. For Canadian Subscriptions please contact
- Visit www.siriusxm.ca/activate
- Call SiriusXM Customer Care at 1-888-539-7474
- As part of the activation process, the SiriusXM satellites will send an activation message to your tuner.
- When your radio detects that the tuner has received the activation message, your radio will display Subscription Updated.
Once subscribed, you can tune to channels in your subscription plan.
Note
The activation process usually takes 10 to 15 minutes, but may take up to an hour. Your radio will need to be powered on and receiving the SiriusXM signal to receive the activation message.
Parental Controls
Some SiriusXM channels contain mature content. When the Parental Controls feature is enabled, channels with mature content are restricted and will require a 4-digit lock code to access. Enabling Parental Controls
- Press to access the SiriusXM: Main Menu.
- Turn VOL/SEL to Parental Controls and press to enter.
- Press to select Lock Mature Channels. After, you must enter a 4-digit lock code to lock mature content channels.
- Parental Control default passcode: 0000
- Use to enter the 4 digit lock code and select Save when finished.
Changing the Lock Code
- Press BACK/MENU to access the SiriusXM: Main Menu.
- Turn to VOL/SEL Parental Controls and press to enter.
- Turn to VOL/SEL Edit Lock Code and press enter.
- Use to enter the current 4-digit lock code and select Enter when finished.
- Use to VOL/SEL enter the new lock code and select Enter to confirm.
- Make sure to save your 4-digit lock code for future reference.
This allows access to the SiriusXM operational menu options. Refer to the table below for available settings and functionality.
- Press to BACK/MENU access the SiriusXM Main Menu.
- Turn to VOL/SEL highlight one of the menu settings listed in the table below and press to enter.
- Use to VOL/SEL make selections.
| Setting | Function |
| Now Playing | Return to the Now Playing Screen |
| Browse By Channel | View list of available SiriusXM channels |
| Browse By Category | View list of available SiriusXM channels by category |
| My Account | View your SiriusXM account status, Radio ID and Reset SiriusXM command |
| Parental Controls | Settings for access to Lock and Unlock Mature SiriusXM channels |
| Direct Tune | Allows entry for direct channel selection |
Album Art
Album art can be displayed for most of the SiriusXM music channels. When album art is not available, the Channel Default Logo image or the SiriusXM Default Logo image will be displayed.
Resetting SiriusXM Settings
A reset will restore all presets and settings, including parental controls, back to their factory defaults.
- Press to BACK/MENU access the SiriusXM: Main Menu.
- Turn to VOL/SEL My Account and press to enter.
- Turn to VOL/SEL Reset SiriusXM and press to enter.
- Use to VOL/SEL select Confirm.
Sirius, XM and all related marks and logos are trademarks of Sirius XM Radio Inc. All rights reserved.
SIRIUSXM TROUBLESHOOTING
Advisory messages may appear on the display when a SiriusXM-Connect Vehicle Tuner is connected to the MM105. Refer to the table below for an explanation and suggested corrective actions.
| Advisory Message | Description |
|
Check Antenna | The radio has detected a fault with the SiriusXM antenna. The antenna cable may be either disconnected or damaged. Verify that the antenna cable is connected to the SiriusXM Connect Vehicle Tuner. Inspect the antenna cable for damage and kinks. Replace the antenna if the cable is damaged. SiriusXM products are available at your local audio retailer or online at www.shop.siriusxm.com |
| Check Tuner | The radio is having difficulty communication with the SiriusXM Connect Vehicle Tuner. The tuner may be disconnected or damaged. Verify that the SiriusXM Connect Vehicle Tuner cable is securely connected to the radio. |
|
No Signa | The SiriusXM Connect Vehicle Tuner is having difficulty receiving the SiriusXM satellite signal. Verify that your vehicle/vessel is outdoors with a clear view of the sky. Verify that the SiriusXM antenna is mount on the exterior. Move the SiriusXM antenna away from any obstructions. Inspect the antenna cable for damage and kinks.NConsult the SiriusXM Connect Vehicle tuner installation manual for more information on antenna installation. Replace the antenna if the cable is damaged. SiriusXM products are available at your local audio retailer or online at www.shop.siriusxm.com |
|
Subscription Updated | The radio has detected a change in your SiriusXM subscription status. Press VOL/SEL to clear the message. In the U.S.A., visit www.siriusxm.com or call 1-866-635-2349 if you have questions about your subscription. In Canada, visit www.siriusxm.ca or call 1-888-539-7474 if you have questions about your subscription. |
| Channel Unavailable | The channel that you have requested is not a valid SiriusXM channel or the channel you were listening to is no longer available. You may also see this message briefly when first connecting a new SiriusXM Connect Vehicle tuner. Visit www.siriusxm.com for more information about the SiriusXM channel lineup. |
|
Channel Unsubscribed | The channel that you have requested is not included in your SiriusXM subscription package of the channel that you were listening to is no longer included in your SiriusXM subscription package. In the U.S.A., visit www.siriusxm.com or call 1-866-635-2349 if you have questions about your subscription package or would like to subscribe to this channel. In Canada, visit www.siriusxm.ca or call 1-877-438-9677. |
| Channel Locked | The channel that you have requested is Locked by the radio Parental Control feature. |
SPECIFICATIONS
| Electrical | |
| Operating Voltage | 14.4V DC (10V – 15.9V) |
| Operating Temp Range | -4 F to +158 F (-20 C to +70 C) |
| Current Draw / Fuse Value | 1.5 A (max) / 120 mA (standby) / 5 A |
| NMEA 2000 LEN | 1 (Micro-C connector) |
| Display / Resolution | 3.5 in. TFT LCD backlit / 320 x 480 |
| Audio Outputs/Inputs | |
| Output Channels | One stereo pair and mono subwoofer RCA plugs per zone |
| Output Configuration | Relative, Absolute, Fixed or Off |
| Maximum Output Voltage | Relative or Absolute: 4V RMS Fixed: Selectable 4V/2V/1V RMS |
| Output Impedance | 250 Ω |
| Auxiliary Input Channels | Two stereo pairs of RCA plugs 2V/1V RMS Input Sensitivity) |
| Tuner | |
| FM Tuner with RDS | 87.5 MHz to 107.9 MHz 0.2 MHz step |
| AM Tuner | 530 kHz to 1710 kHz 10 kHz step |
| DAB+ Tuner | 170 MHz to 230 MHz |
| Favorites | 24 presets across all tuners/bands |
| Bluetooth® | |
| Profile | A2DP v1.2, AVRCP v1.4 |
| Core Specification | Version 2.1 + EDR |
| Codec | SBC, Qualcomm aptX audio |
| Connection Range | Up to 35 ft / 11 m |
| USB | |
| Interface | USB 2.0 |
| Charging Output | USB1: 1 A / USB2: 500 mA |
| Supported Audio Formats | MP3, MP4, WAV, AAC, M4A, M4B |
| Apple Compatibility | iPhone SE (2nd generation), iPhone 11 Pro Max, iPhone 11 Pro, iPhone 11, iPhone XS Max, iPhone XS, iPhone XR, iPhone X, iPhone 8 Plus, iPhone 8 functionality contingent upon compatible iOS release |
| Dimensions | |
| Unit W x H x D | 5.94 in. x 3.90 in. x 3.94 in. (151 mm x 99 mm x 100 mm) |
| Mounting Hole W x H | 4.72 in. x 3.25 in 120 mm x 83 mm |
AUXILIARY CONTROL OPTIONS
Your MediaMaster includes two connection types for adding control capabilities from auxiliary locations. Refer to the supplied Owner’s Manual of each controller/type (sold separately) for specific user and installation instructions.
- NMEA 2000 Connection.
- NMEA 2000, Micro C connector interfaces directly with NMEA 2000 networks using applicable NMEA 2000 cables and connectors (sold separately.
REMOTE Connection
Permits direct connection of MediaMaster wired controllers (sold separately) using accessory controller cables and splitters (sold separately). Add up to three remotes to a single MediaMaster, at up to 75 ft (23 m) away.
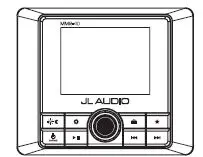
MMR 40
NMEA 2000 Network Controller with Full-Color LCD Display Full function, water resistant IP66 rated controller.

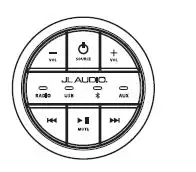
MMR 20 BE
Wired Remote Controller Auxiliary, water-resistant (IP67 rated) controller.
MMR 5N2K
NMEA 2000 Volume Controller. Water resistant (IPX7 rated) controller.
NMEA 2000 MFD Control
Achieve control capabilties from compatible multi function displays MFD. NMEA 2000 functionality requires compatible NMEA 2000 entertainment protocols PGN and may require a software upgrade of connected MFD devices.


