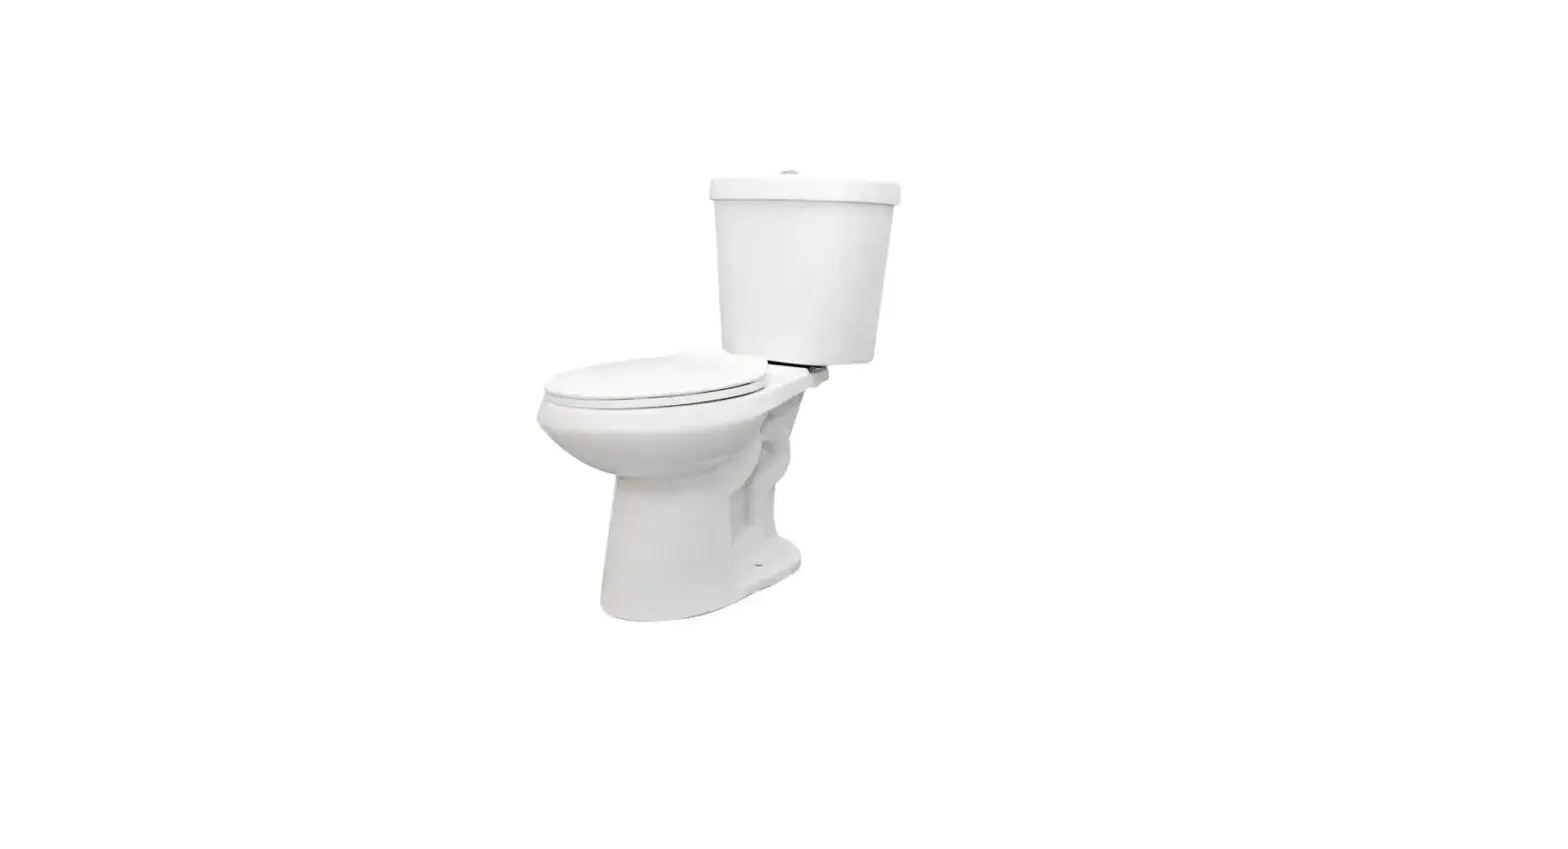
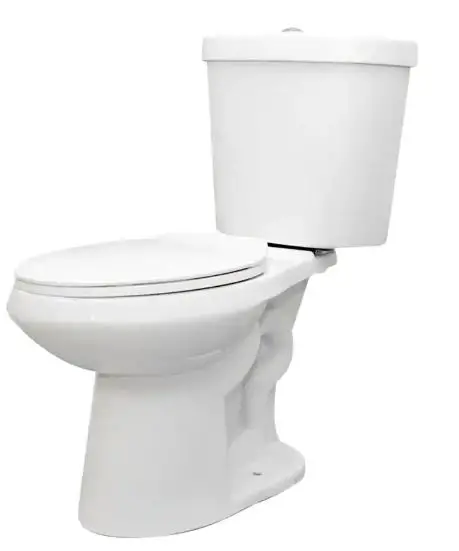
Glacier ray N2316 DUAL FLUSH TOILET
THANK YOU
We appreciate the trust and confidence you have placed in Glacier Bay through the purchase of this toilet. We strive to continually create quality products designed to enhance your home. Visit us online to see our full line of products available for your home improvement needs. Thank you for choosing Glacier Bay!
Safety Information
WARNING: Handle with care. Vitreous chinaware is glasslike with sharp edges if broken. Do not drop, handleroughly, or overtighten bolts.
WARNING: Risk of hazardous gases. If a new toilet is not installed immediately, temporarily plug the floor flange hole with a towel (or cover) to block sewer gases from escaping.
CAUTION: Observe local plumbing and building codes
Warranty
LIMITED LIFETIME WARRANTY
Glacier Bay products are manufactured with superior quality standards and workmanship and are backed by our limited lifetime warranty. Glacier Bay products are warranted to the original consumer purchaser to be free of defects in materials or workmanship. We will replace FREE OF CHARGE any product or parts that proves defective. Simply, return the product / part to any of The Home Depot retail locations or call 1-855-HD Glacier (1-855-434-5224) to receive the replacement item. Proof of purchase (original sales receipt) from the original consumer purchaser must bemade available for all Glacier Bay warranty claims.
This warranty excludes incidental/inconsequential damages and failures due to misuse, abuse or normal wear and tear. This warranty excludes all industrial, commercial and business usage, whose purchasers are hereby, extended a five year limited warranty from the date of purchase, with all other terms of this warranty applying except the duration of warranty.
Some states and provinces do not allow the exclusion or limitation of incidental or consequential damages, so the above limitations may not apply to you. This warranty gives you specific legal rights and you may also have other rights that vary from state to state and province to province. Pleasesee a store or contact 1-855-HD Glacier for more details.
Contact the Customer Service Team at 1-855-434-5224 or visit www.HomeDepot.com
Pre-Installation
PLANNING INSTALLATION
Before beginning installation of this product, make sure all parts are present. Compare parts with the Hardware Included and Package Contents lists. If any part is missing or damaged, do not attempt to assemble, install, or operate the product. Contact customer service for replacement parts. Estimated Assembly Time: 60 minutes
TOOLS REQUIRED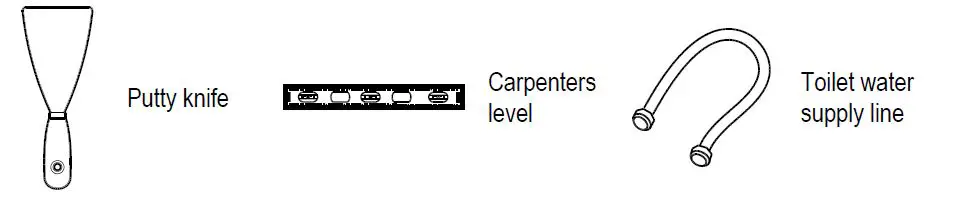
HARDWARE INCLUDED
NOTE: Hardware not shown to actual size.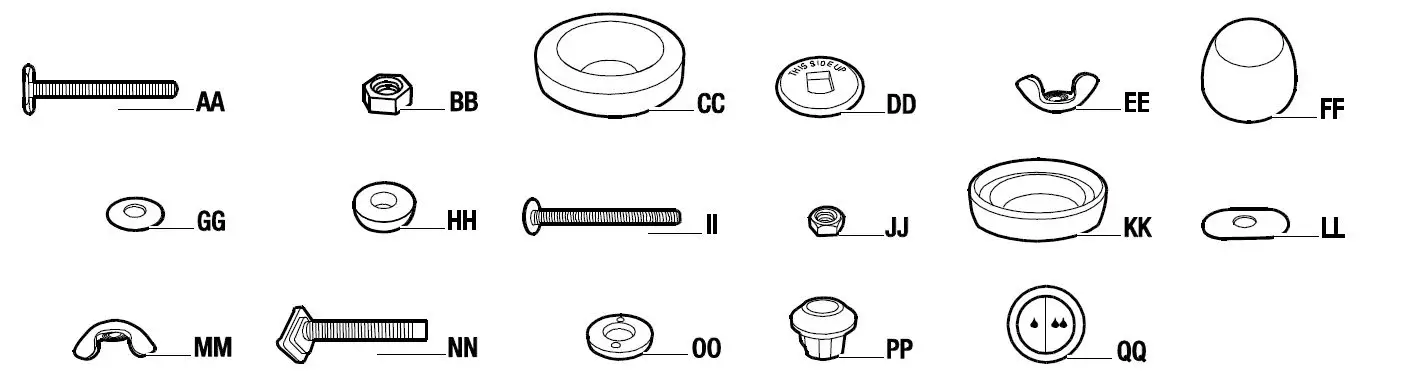
| Part | Description | Quantity |
| AA | Floor bolt | 2 |
| BB | Floor bolt hex nut | 2 |
| CC | Wax ring | 1 |
| DD | Plastic disc | 2 |
| EE | Floor bolt wing nut | 2 |
| FF | Bolt cap | 2 |
| GG | Brass washer (Preassembled to Tank (A)) | 2 |
| HH | Rubber washer (Preassembled to Tank (A)) | 4 |
| II | Bolt (Preassembled to Tank (A)) | 2 |
| JJ | Hex nut (Preassembled to Tank (A)) | 2 |
| KK | Rubber sealing gasket | 1 |
| LL | Oval metal washer | 2 |
| MM | Wing nut | 2 |
| NN | Lock bolt | 2 |
| OO | Toilet seat washer | 2 |
| PP | Lock nut | 2 |
| Dual flush button | 1 |
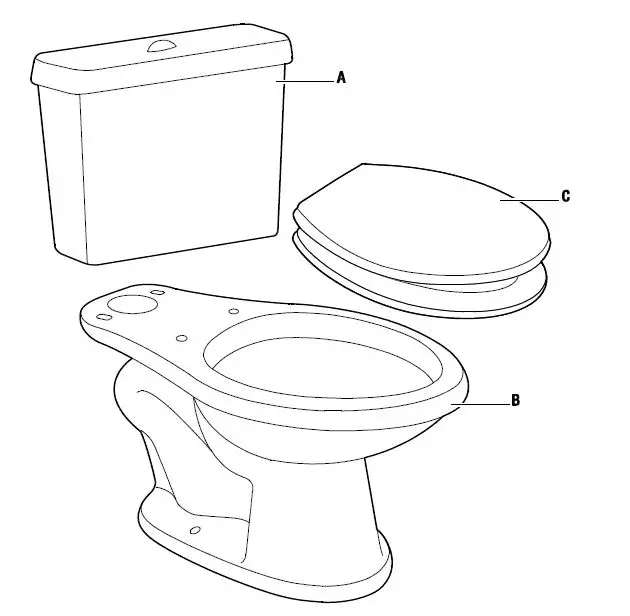
PACKAGE CONTENTS
| Part | Description | Quantity |
| A | Tank with cover | 1 |
| B | Toilet bowl | 1 |
| C | Seat with lid | 1 |
Installation
Removing the old toilet
- Turn off the water supply and flush the tank completely. Towel or sponge remaining water from the tank and bowl.
- Disconnect and remove the old water supply line.
- Remove the bowl from the floor by removing the bolt caps and the floor bolt nuts.
- Remove the floor bolts from the toilet flange and clean old wax, putty, and sealant from the base area.
- Temporarily plug the floor flange with a towel or cover to block sewer gases from escaping.
NOTE: The mounting surface must be clean and level before the new toilet is installed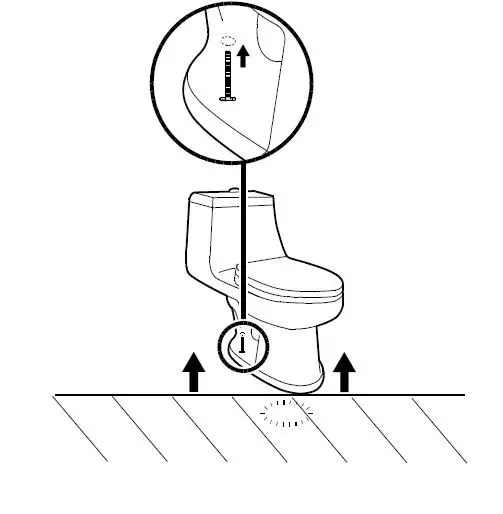
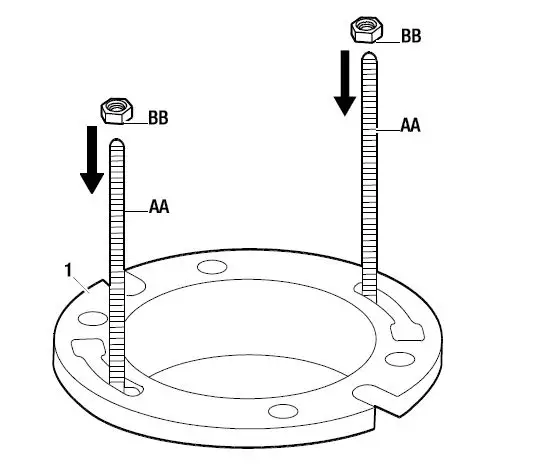
Installing the floor bolts
- Insert the floor bolts (AA) into the slots on the toilet flange (1) with the bolt heads down and threaded ends facing up. The heads of the floor bolts (AA) should be perpendicular to the slot opening in the toilet flange.
- Ensure the floor bolts (AA) are parallel to the wall. When set, hand-tighten the hex nuts (BB) onto the floor bolts (AA) to secure.

Installing the wax ring
Turn the toilet bowl (B) upside down onto a towel or cushioned surface. With the rounded (tapered) end of the wax ring (CC) facing the toilet, place the wax ring (CC) around the raised outlet ring of the bowl (B), and press firmly enough so the wax ring (CC) adheres to the bowl (B).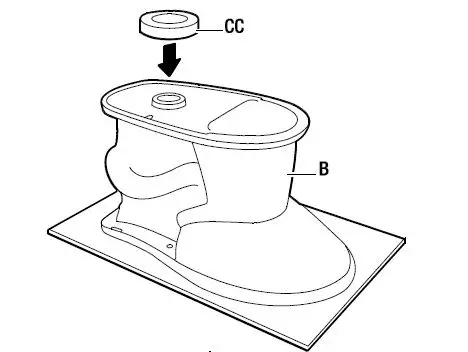
Securing the toilet
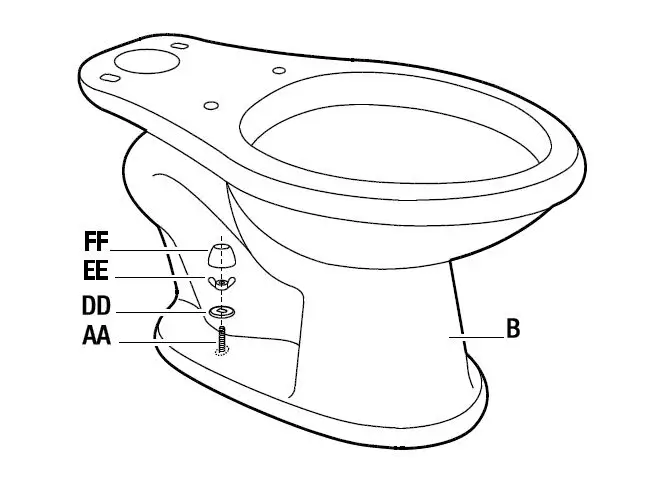
- From the backside of the toilet (B), place the plastic discs (DD) over the floor bolts (AA), noting ‘this side up’ on the top of the discs.
- Tighten the floor bolt wing nuts (EE) onto the floor bolts (AA) to secure the position of the plastic discs (DD).
- Place the bolt cap covers (FF) over the floor bolts (AA) and snap into place.

Installing the toilet
Place the toilet bowl (B) over the toilet flange (1) in alignment with the floor bolts (AA) so they protrude through the slots on the base of the toilet bowl (B). Press down on the toilet bowl (B).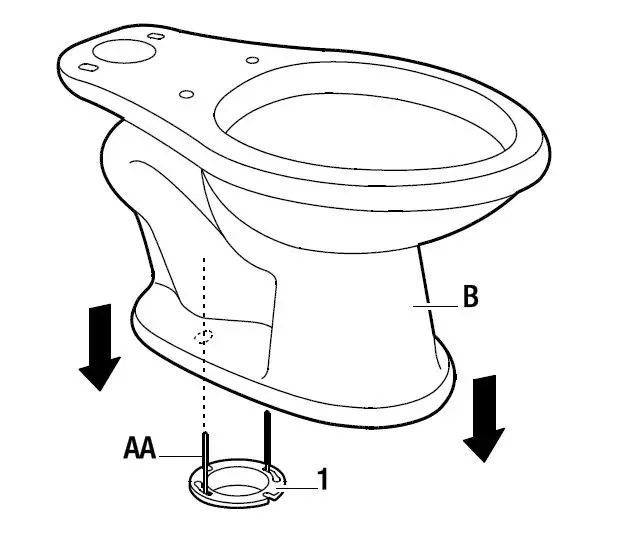
Installing the tank
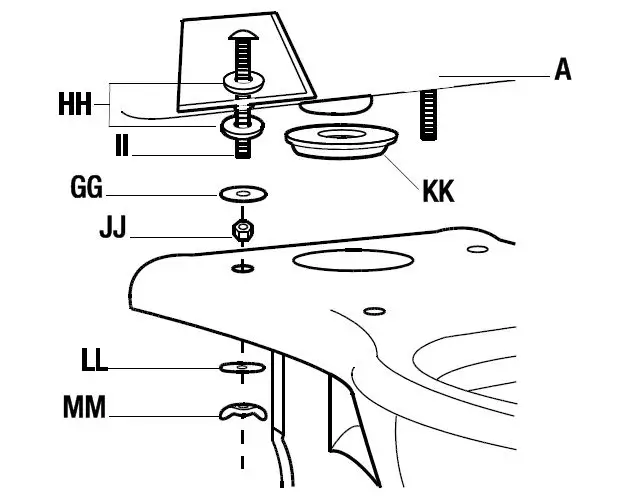
- Attach the rubber sealing gasket (KK) to the center drain holeunder the tank (A).
- Gently place the tank (A) on the toilet bowl (B) with bolts (II)protruding out underneath.
- Place an oval metal washer (LL) followed by a wing nut (MM) onto each protruding bolt (II).
- Tighten the wing nuts (MM) enough so that the tank (A) sits flat on the toilet bowl (B). Make sure the tank (A) is parallel to the wall and straight on the toilet bowl (B).
CAUTION: Do not overtighten the nuts. Severe damage may occur.
Installing and adjusting the flush button
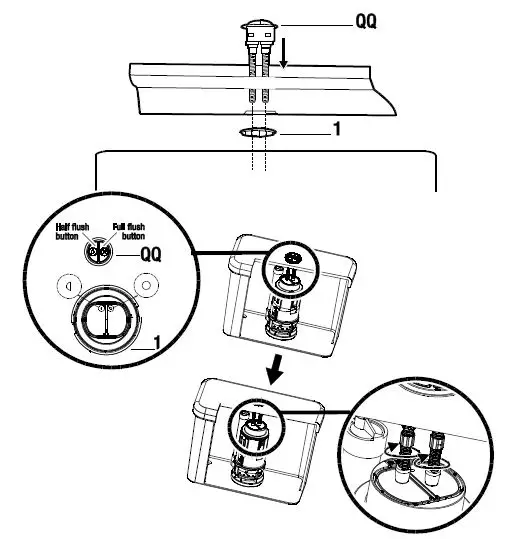
- Position the flush button mechanism (QQ) in tank lid so the single drop button will align with blue lever (half flush) on top of the flush valve and double drop button aligns with the white lever (full flush).
- Secure the flush button mechanism (QQ) in the tank lid by hand tightening the lock nut (1).
- The rubber tip on the bottom of the push rods leading from the flush buttons should lightly touch the top of the levers on the flush valve.
- To increase the rod length, turn the rod locknut counterclockwise to loosen, then rotate the push rod counter-clockwise to increase exposed length. When the desired length is achieved, turn the rod locknut clockwise, while holding the push rod, until it is tightened

Connecting the water supply line
- Connect the water supply line (not included) between the tank (A) and shut-off valve.
- Tighten the tank connection coupling nut ¼ turn beyond hand tight.
- Turn on the supply valve and allow the tank (A) to fill.
- Check for leakage at all connections and tighten or correct as needed.
NOTE: Do not overtighten the tank connection

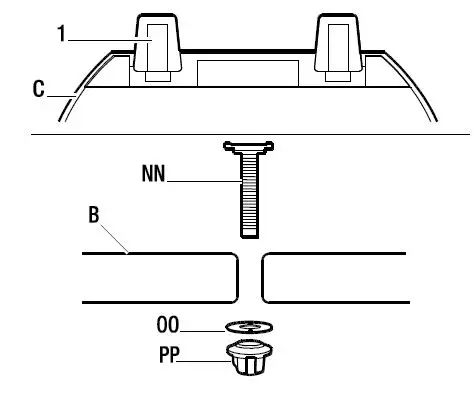
Installing the seat with lid
- Turn the toilet seat with lid (C) upside-down.
- Insert the lock-bolt (NN) in the bolt trough (1), then adjust thelock-bolt (NN) to make the hole distance match with the toilet.
- Turn the toilet seat with lid (C) over so that the lock-bolts (NN)protrude downward.
- Insert the lock-bolts (NN) into the holes on the toilet (B) and adjust the toilet seat and lid (C) to find the best assemblyposition.
- Place the washer (OO) and the lock-nut (PP) onto the lock bolt (NN) from underneath the toilet (B) and tighten the lock-nut (PP) firmly to secure the seat and lid (C) in place on the toilet(B).

Care and Cleaning
Your new toilet is made of stain-, acid- and abrasion-resistant vitreous china. Clean the outside surface with mild soap, warm water and a soft cloth. On stubborn stains use a powdered detergent and damp sponge or nylon scouring pad. Never use abrasive scouring powders, cleansers or pads because they will scratch, damage and dull the surface. The manufacturer shall not be responsible or liable for any tank fitting damage caused by the use of cleaners containing chlorine (calcium hypochlorite). When cleaning your toilet seat, wash it with mild soapy water. Rinse the seat thoroughly with clean water and dry with a soft cloth. Avoid detergents, disinfectants or cleaning products in aerosol cans. NEVER use abrasive scouring powders on your seat. Some bathroom chemicals and cosmetics may cause damage to the seat’s finish, so test your cleaning solution on an inconspicuous area before applying to the entire surface.
WARNING: DO NOT USE IN-TANK CLEANERS. Products containing chlorine (calcium hypochlorite) can seriously damage tank fittings potentially causing leaks, excessive water use and property damage.
Troubleshooting
| Problem | Solution |
| No water flows into the tank. | □ Make sure the water supply valve is fully open. □ Check the debris filter screen for any obstruction that would restrict the water supply. To check the debris screen, shut off the water supply. Disconnect the supply line. Remove any debris from inside the threaded shank which might be preventing proper water flow. Reconnect and turn the water supply on, checking for leaks. |
| The flush quality of the toilet is poor. | □ Make sure the water level in the tank is up to the water line printed on the overflow tube of the flush valve. To increase the water level, turn the adjustment screw on the fill valve clockwise to raise the float cup. □ Make sure the push rods are the correct length. The push rods should be set to a gap of approximately 1/16 in. above the push buttons of the flush valve. To adjust, loosen the collar on the push rod and turn the rod counterclockwise to extend the length. Tighten the collar to secure. |
| Water continues to run. | □ Check to make sure the rubber seal gasket on the flush valve is completely closed. Clear any debris from the gasket surface and sealing area of the flush valve which may be obstructing full closure. |
Replacement Parts List
| Part Name | Model Number |
| Fill Valve | □ A1260 |
| Flush Valve | □ A2422 |
Questions, problems, missing parts? Before returning to the store,call Glacier Bay Customer Service 8 a.m. – 6 p.m., EST, Monday-Friday1-855-434-5224
HOMEDEPOT.COM
Retain this manual for future use


