![]() condo Rod set
condo Rod set
installation Guide
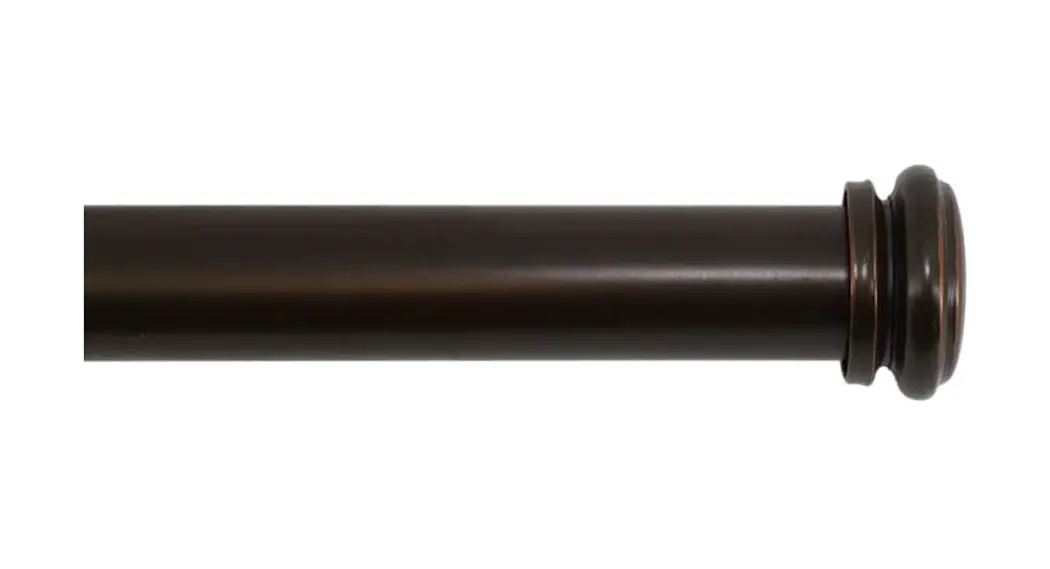
Condo Rod Set
![]() CAUTION: Before installing brackets, always check there are no hidden wires or pipes.
CAUTION: Before installing brackets, always check there are no hidden wires or pipes.![]() WARNING: Product failure due to using incorrect fixings is the responsibility of the installer. In case of doubt on what anchor to use, please consult with a professional.
WARNING: Product failure due to using incorrect fixings is the responsibility of the installer. In case of doubt on what anchor to use, please consult with a professional.
Pre-Installation
NOTICE: Two people may be required for easier installation on larger-width windows.
PACKAGE CONTENTS

CARE AND CLEANING
To remove dust, use a vacuum cleaner with a brush attachment end or gently rub the rod using a water-dampened cloth with a mild detergent only.
TOOLS REQUIRED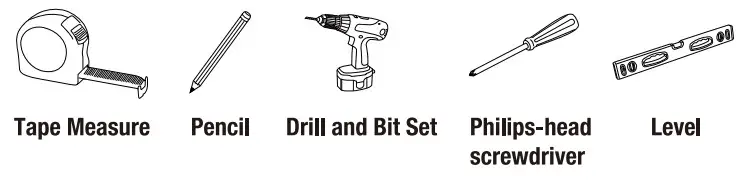
| Part | Description | Quantity | |
| A | Wall-end bracket | 2 | |
| A-1 | Ring | X1 Per wall-end bracket. | |
| A-2 | Base | X1 Per wall-end bracket. | |
| B | Bracket | 3 (See NOTICE below) | |
| C | Inner rod | 1 | |
| D | Outer rod | X1 For length 91.4cm 183cm X2 For length 183cm 365.8cm | |
| E | Screw E (Bracket & Base installation) | 8 | |
| F | Screw F (Center bracket adjustment) | 3 | |
| G | Screw G (Ring adjustment) | 2 | |
| H | Screw-in anchors | 8 | |
INSTALLATION
Retain this manual for future use.
Prepare installation
Loosen screws (G) on wall-end bracket rings (A-1) and remove 2-PIECE telescopic rod (C & D). Disassemble wall-end brackets (A) by unscrewing bases (A-2) from rings (A-1). Place two bases (A-2) against desired locations from the walls and ensure they are horizontally aligned, then mark screw holes. Note: the distance between the center of bracket rings (A-1) and the ceiling/wall cannot exceed 8cm. Use a tape measure, level, and pencil as needed.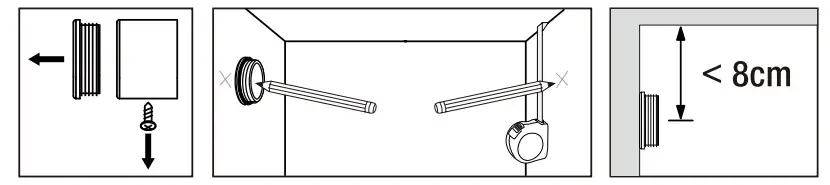
Mounting to drywall or paneling
Drill horizontally one pilot hole for each wall-end base (A-2) using a 1/4 in. drill bit, without forcing or enlarging the hole. Screw anchors (H) into the wall, and install wall-end bracket bases (A-2) by fastening screws (E) into the anchors (H).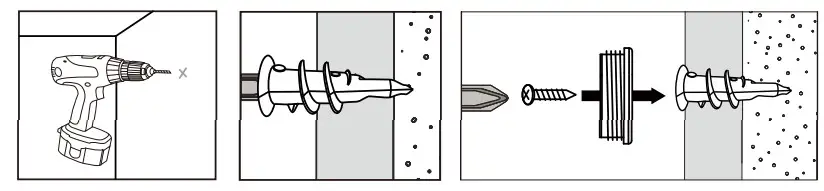 2B Mounting to wood or studs
Drill horizontally one pilot hole for each wall-end bracket base (A-2) using a 3/32 in. drill bit, without forcing the drill or enlarging the hole. Install wall-end bracket bases (A-2) by fastening screws (E).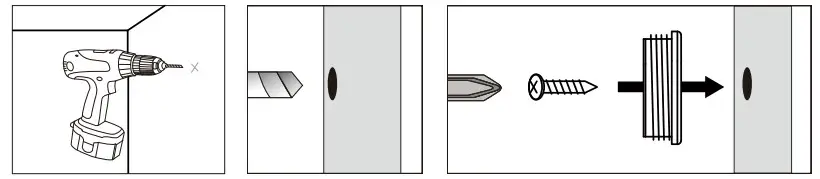 Re-assembling wall-end brackets
Fasten rings (A-1) back onto the bases (A-2) to re-assemble wall-end brackets (A).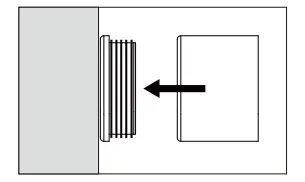 NOTICE: In case of two adjacent wall-to-wall windows, install two condo rod sets. For each rod set, install a wall bracket (A) on one end, a bracket (B) at center of rod, and another bracket (B) near the corner for maximum support. Finally, link two condo rods with a corner connector (sold separately).
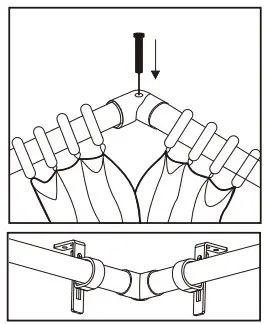
Center bracket installation
To identify the bracket (B) position, first, loosen the center bracket adjustment screw (F). Next, slide the bracket over telescopic rods (C & D) and temporarily insert rods into both side brackets (A).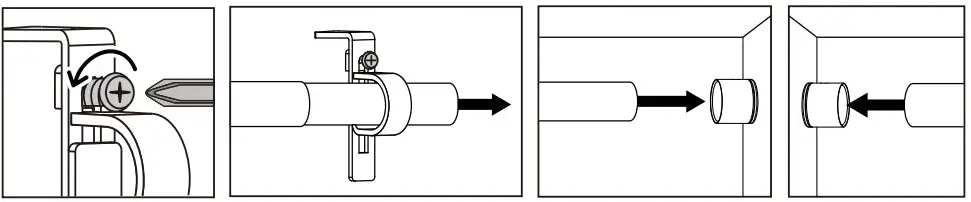 Position the bracket base against the ceiling/wall to mark screw holes.
Remove rods (C & D) and follow steps 24/2B to install brackets with screws (E) and anchors (H) according to markings. Finally, tighten the center bracket adjustment screw (F).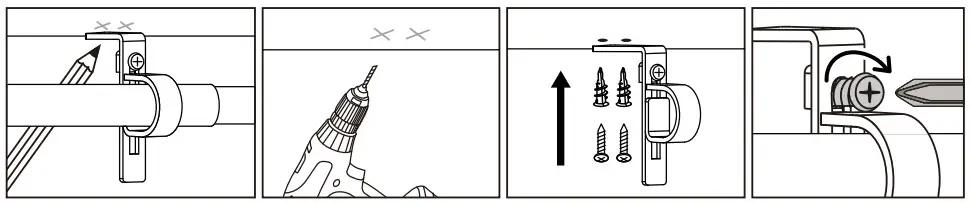 5A If rod length is 91.4cm – 183cm
Slide 2-PIECE telescopic rod (C & D) through bracket (B). Feed one drapery panel through either side and insert the 2-PIECE telescopic rods into the adjacent wall-end bracket (A). Repeat the operation on the opposite end.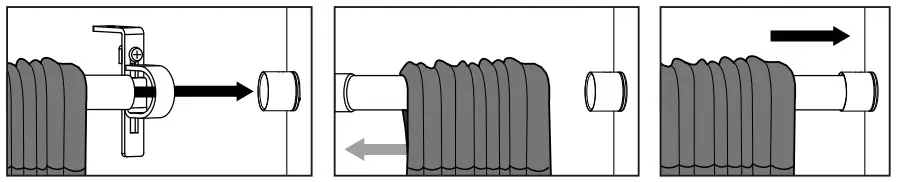 5B If rod length is 183cm – 365.8cm
Take 2-PIECE telescopic rod (C & D) and slide inner rod (C) through bracket (B). Feed one drapery panel over the telescopic rod (C & D) and insert the outer rod (D) into the adjacent wall-end bracket (A). Slide extra outer rod (D) onto inner rod (C) to form a 3-PIECE telescopic rod. Feed a second drapery panel over the extra outer rod (D) and insert rod (D) onto the other wall-end bracket (A).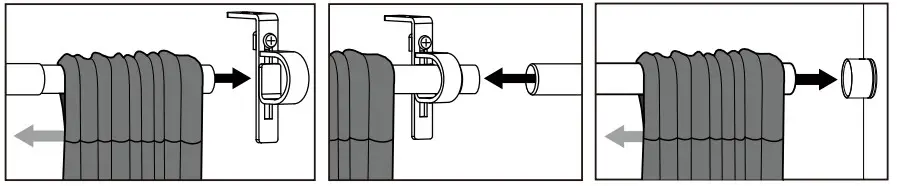
Final adjustments
Fasten screws (G) on wall-end bracket rings (A-1) to secure the telescopic rod in place. Then tuck and slide drapery panels to desired positions. 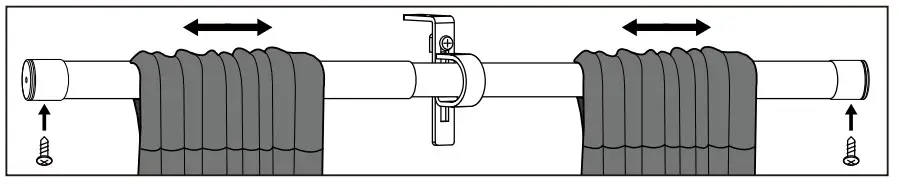
![]()


