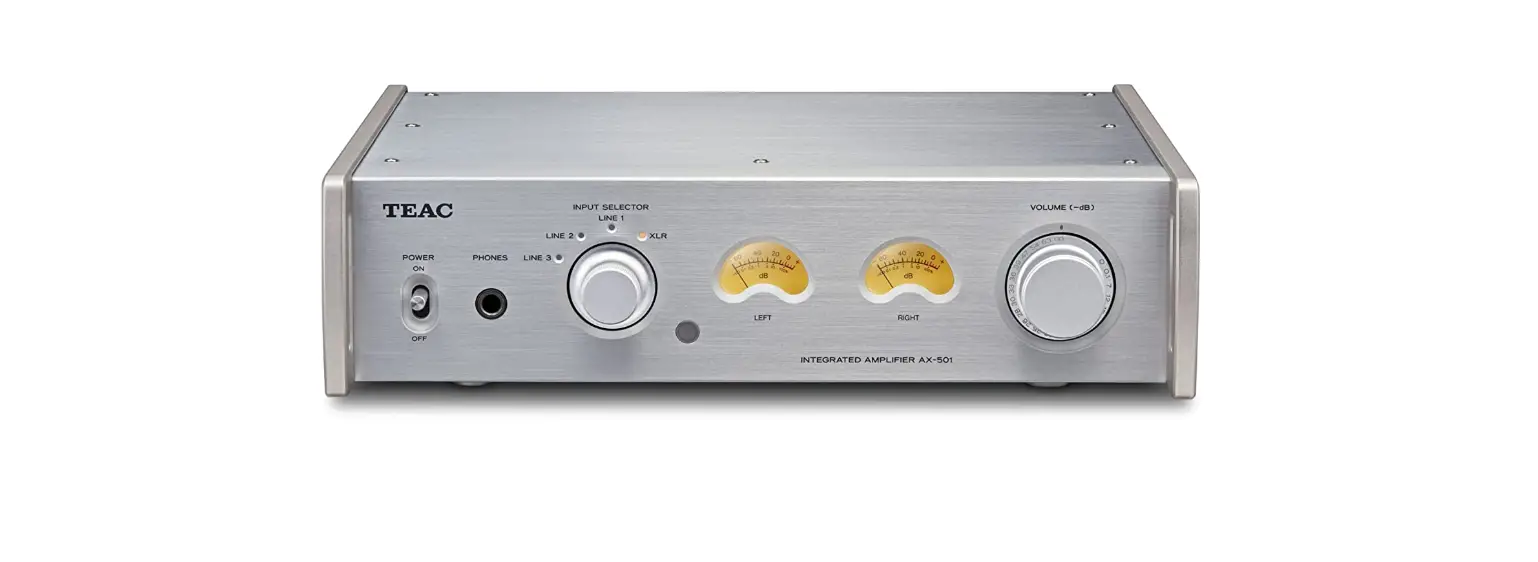
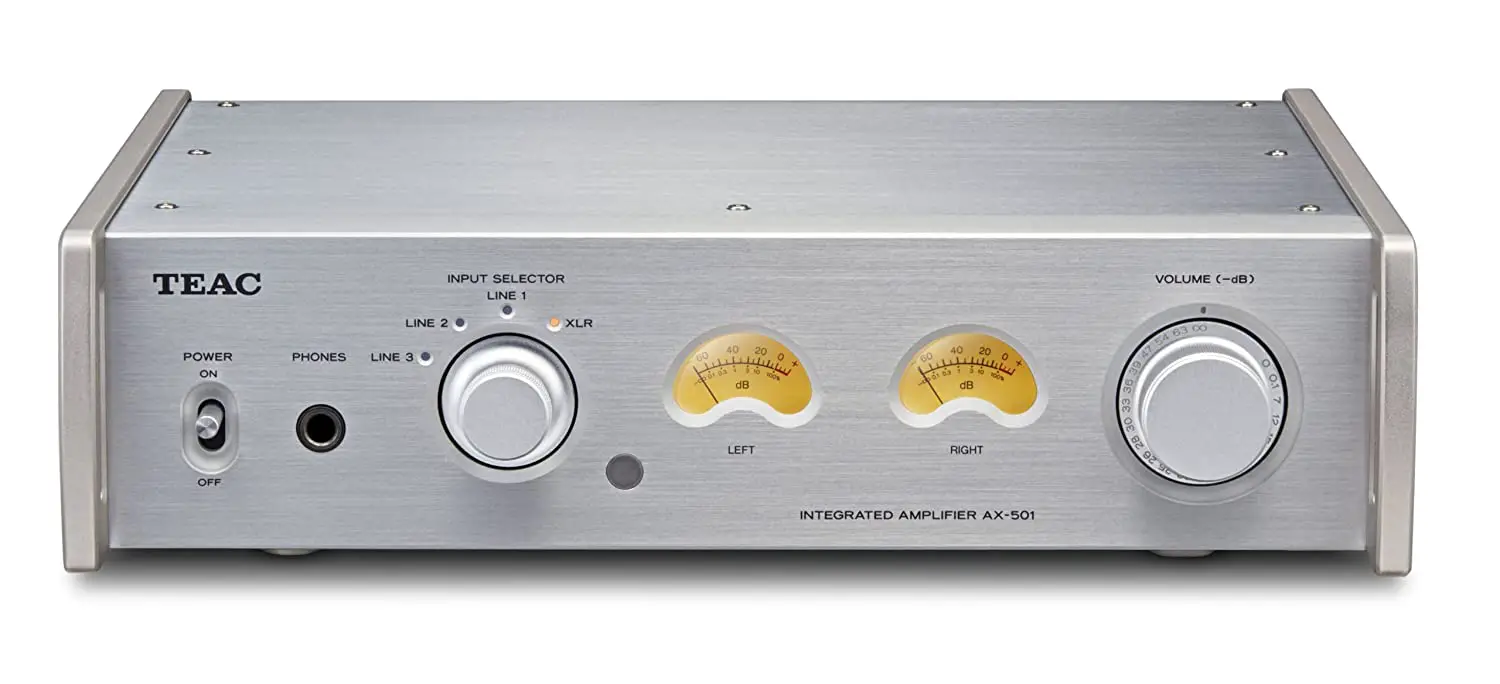
Teac AX-501 Integrated Amplifier
IMPORTANT SAFETY PRECAUTIONS
CAUTION: TO REDUCE THE RISK OF ELECTRIC SHOCK, DO NOT REMOVE COVER (OR BACK). NO USER-SERVICEABLE PARTS INSIDE. REFER SERVICING TO QUALIFIED SERVICE PERSONNEL. The lightning flash with arrowhead symbol, within an equilateral triangle, is intended to alert the user to the presence of uninsulated “dangerous voltage” within the product’s enclosure that may be of sufficient magnitude to constitute a risk of electric shock to persons. The exclamation point within an equilateral triangle is intended to alert the user to the presence of important operating and maintenance (servicing) instructions in the literature accompanying the appliance. WARNING: TO PREVENT FIRE OR SHOCK HAZARD, DO NOT EXPOSE THIS APPLIANCE TO RAIN OR MOISTURE. CAUTION
- DO NOT REMOVE THE EXTERNAL CASES OR CABINETS TO EXPOSE THE ELECTRONICS. NO USER SERVICEABLE PARTS ARE INSIDE.
- IF YOU ARE EXPERIENCING PROBLEMS WITH THIS PRODUCT, CONTACT TEAC FOR A SERVICE REFERRAL. DO NOT USE THE PRODUCT UNTIL IT HAS BEEN REPAIRED.
- USE OF CONTROLS OR ADJUSTMENTS OR PERFORMANCE OF PROCEDURES OTHER THAN THOSE SPECIFIED HEREIN MAY RESULT IN HAZARDOUS RADIATION EXPOSURE. IN USA/CANADA, USE ONLY ON 120 V SUPPL
For U.S.A. This equipment has been tested and found to comply with the limits for a Class B digital device, pursuant to Part 15 of the FCC Rules. These limits are designed to provide reasonable protection against harmful interference in a residential installation. This equipment generates, uses, and can radiate radio frequency energy and, if not installed and used in accordance with the instructions, may cause harmful interference to radio communications. However, there is no guarantee that interference will not occur in a particular installation. If this equipment does cause harmful interference to radio or television reception, which can be determined by turning the equipment off and on, the user is encouraged to try to correct the interference by one or more of the following measures:
- Reorient or relocate the equipment and/or the receiving antenna.
- Increase the separation between the equipment and receiver.
- Connect the equipment into an outlet on a circuit different from that to which the receiver is connected.
- Consult the dealer or an experienced radio/TV technician for help.
CAUTION Changes or modifications to this equipment not expressly approved by TEAC CORPORATION for compliance will void the user’s warranty. For Canada Industry Canada’s Compliance Statement: This Class B digital apparatus complies with Canadian ICES-003. Cet appareil numérique de la classe B est conforme à la norme NMB-003 du Canada. DECLARATION OF CONFORMITY We, TEAC EUROPE GmbH. Bahnstrasse 12, 65205 Wiesbaden-Erbenheim, Germany declare in own responsibility, the TEAC product described in this manual is in compliance with the corresponding technical standards. Precautions concerning batteries Misuse of batteries could cause them to rupture or leak leading to fire, injury or the staining of nearby things. Please read and observe the following precautions carefully.
- Be sure to insert the batteries with correct positive (+) and negative (_) orientations.
- Use batteries of the same type. Never use different types of batteries together.
- If the remote control is not used for a long time (more than a month), remove the batteries to prevent them from leaking.
- If the batteries leak, wipe away the leakage inside the battery compartment and replace the batteries with new ones.
- Do not use batteries of types other than those specified. Do not mix new batteries with old ones or use different types of batteries together.
- Do not heat or disassemble batteries. Never throw batteries into fire or water.
- Do not carry or store batteries with other metallic objects. The batteries could short circuit, leak or explode.
- Never recharge a battery unless it is confirmed to be a rechargeable type

IMPORTANT SAFETY INSTRUCTIONS
- Read these instructions.
- Keep these instructions.
- Heed all warnings.
- Follow all instructions.
- Do not use this apparatus near water.
- Clean only with dry cloth.
- Do not block any ventilation openings. Install in accordance with the manufacturer’s instructions.
- Do not install near any heat sources such as radiators, heat registers, stoves, or other apparatus (including amplifiers) that produce heat.
- Do not defeat the safety purpose of the polarized or grounding type plug. A polarized plug has two blades with one wider than the other. A grounding type plug has two blades and a third grounding prong. The wide blade or the third prong are provided for your safety. If the provided plug does not fit into your outlet, consult an electrician for replacement of the obsolete outlet.
- Protect the power cord from being walked on or pinched particularly at plugs, convenience receptacles, and the point where they exit from the apparatus.
- Only use attachments/accessories specified by the manufacturer.
- Use only with the cart, stand, tripod, bracket, or table specified by the manufacturer, or sold with the apparatus. When a cart is used, use caution, when moving the cart/apparatus combination to avoid injury from tip-over.
- Unplug this apparatus during lightning storms or when unused for long periods of time.
- Refer all servicing to qualified service personnel. Servicing is required when the apparatus has been damaged in any way, such as power-supply cord or plug is damaged, liquid has been spilled or objects have fallen into the apparatus, the apparatus has been exposed to rain or moisture, does not operate normally, or has been dropped.
CAUTION
- The apparatus draws nominal non-operating power from the AC outlet with its POWER or STANDBY/ON switch not in the ON position.
- The mains plug is used as the disconnect device, the disconnect device shall remain readily operable.
- Caution should be taken when using earphones or headphones with the product because excessive sound pressure (volume) from earphones or headphones can cause hearing loss.
- Do not expose this apparatus to drips or splashes.
- Do not place any objects filled with liquids, such as vases, on the apparatus.
- Do not install this apparatus in a confined space such as a book case or similar unit.
- The apparatus should be located close enough to the AC outlet So that you can easily reach the power cord plug at any time.
- If the product uses batteries (including a battery pack or installed batteries), they should not be exposed to sunshine, fire or excessive heat.
- CAUTION for products that use replaceable lithium batteries: there is danger of explosion if a battery is replaced with an incorrect type of battery. Replace only with the same or equivalent type.
WARNING Products with Class construction are equipped with a power supply cord that has a grounding plug. The cord of such a product must be plugged into an AC outlet that has a protective grounding connection.
Included items
Check to be sure the box contains all the included items shown below. Please contact the store where you purchased this unit if any of these items are missing or have been damaged during transportation.
- Power cord × 1
- Remote control unit (RC-1309) × 1
- Batteries for remote control unit (AAA) × 2
- Owner’s manual (this document) × 1
- Keep this manual in a safe place for future reference.
- Warranty card × 1
Before use
Placement precautions
- Avoid placing the unit in direct sunlight or close to any source of heat, such as a radiator, heater, open fireplace or amplifier. Also avoid locations that are subject to vibrations or exposed to excessive dust, cold or moisture.
- Place the unit in a stable location near the audio system that you will use with it.
- As the unit could become warm during operation, always leave sufficient space around it for ventilation. When installing this unit, leave a little space (at least 3 cm or 1.2″) between it and walls and other devices in order to allow good heat dissipation. When placing it in a rack, for example, leave at least 5 cm (2″) open above it and 10 cm (4″) open behind it. Failure to provide these gaps could cause heat to build up inside and result in fire.
- You may stack this unit with a PD-501HR or other 501 series units. However, if heat should cause the protection circuit to be activated and sound output stops suddenly, place this unit on top and with sufficient distance between it and walls and other devices in order to improve heat dissipation.
- Do not place CDs, CD-Rs, cassette tapes, other audio equipment or other items that are susceptible to heat on top of the unit. Doing so could damage these items.
- Do not put cloth on top of the unit or place the unit on top of bedding or thick carpets.
- Doing so could cause the unit to overheat and damage it. Do not move the unit during use.
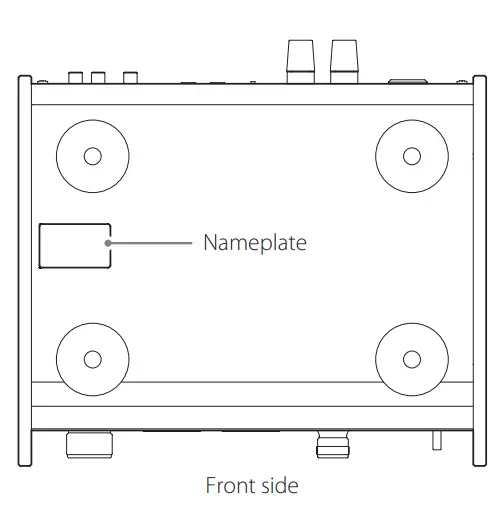
- The voltage supplied to the unit should match the voltage printed on the rear panel. If you are in any doubt regarding this matter, consult an electrician.
- Do not open the body of the unit as this might result in damage to the circuitry or cause electric shock. If a foreign object should get into the unit, contact your dealer or TEAC customer support.
- When removing the power plug from the wall outlet, always pull directly on the plug; never yank on the cord.
- Depending on the electromagnetic waves of television broadcasts, interference might appear on television screens when this unit is on. This does not mean that this unit or the TV is malfunctioning. If this occurs, turnthis unit off.
Maintenance
If the surface of the unit becomes dirty, wipe it with a soft dry cloth. If the unit becomes very dirty, dampen a soft cloth slightly with a diluted neutral cleanser and thoroughly wring out any excess fluid before using the cloth to wipe the unit. For your safety, disconnect the power cord from the socket before cleaning.
- Never spray liquid directly on the unit.
- Do not use thinner or alcohol as they could damageV the surface of the unit.
- Avoid allowing rubber or plastic materials to touch this product for long periods of time, because they could damage the cabinet.
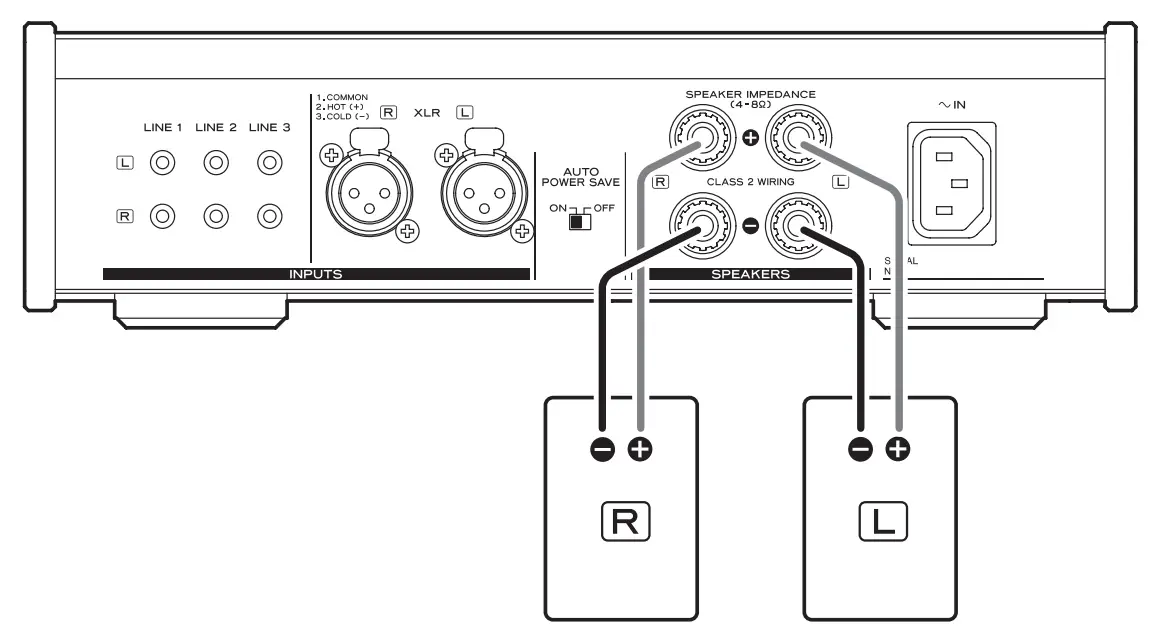
Connecting speakers (1)
Precautions when connecting speakers
- Connect the power plugs after all connections have been made.
- Carefully read the operation manuals of the devices that you are connecting and follow their instructions.
Caution
- This unit works with speakers that have nominal impedances between 4 Ω and 8 Ω. Use of speakers with impedances of less than 4 Ω, in particular, could cause the protection circuit to activate and sound output to stop. In some cases, damage could even occur to this unit and the speakers.
- This unit’s red terminal is positive (+) and its black terminal is negative (_).
- If the exposed end of a core wire in a speaker cable contacts another cable or terminal, a short could occur.
- Never allow a speaker cable to short.
- To avoid noise, do not bundle the speaker cables with the power cord or other cables.
Connecting speaker cables
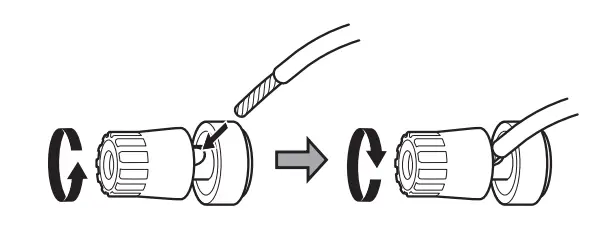
- Remove about 1 cm (0.4″) of the sheath at the end of the speaker cable and twist the cable core well.
- Turn the terminal cap left (counterclockwise) to loosen it.
- Insert the wire into the hole in the terminal screw and turn the terminal cap right (clockwise) to connect it securely.

- Do not allow the cable sheath to touch the terminal.
- Make sure it is connected securely by gently pulling on the cable.
Connecting speakers using banana plugs You can also connect speakers using commercially available banana plugs. Connect the speaker cable to the banana plug first, and then insert the plug into the terminal.
- Loosen the terminal cap before using the banana plug.
- Carefully read the instructions of the banana plugs that you intend to use with this unit.
For European customers In accordance with European safety regulations, it is not possible to connect banana plugs to the speaker terminals on European models. The holes into which banana plugs are inserted have been covered with black caps. Connect the speakers using spades or bare wires. If the black caps become separated from the terminals, return them to their original position.
Using the remote control
Precautions for use
- Misuse of batteries could cause them to rupture or leak leading to fire, injury or the staining of items nearby. Please carefully read and observe the precautions on page 3.
- Point the remote control unit at the main unit’s remote sensor from within 5 m (16 ft) of it. Make sure that there are no obstructions between the remote control and] the main unit.
- If direct sunlight or strong artificial illumination shines on the remote sensor, the remote control might not function. If that is the case, move this unit to another location.
- If the remote control unit is operated near other devices that generate infrared rays, or if other remote control devices using infrared rays are used near the unit, it might operate incorrectly. The other devices might also operate incorrectly.
Battery installation
Remove the cover from the back of the remote control and insert two AAA batteries with their ¥/^ ends oriented in the case as shown. Replace the cover.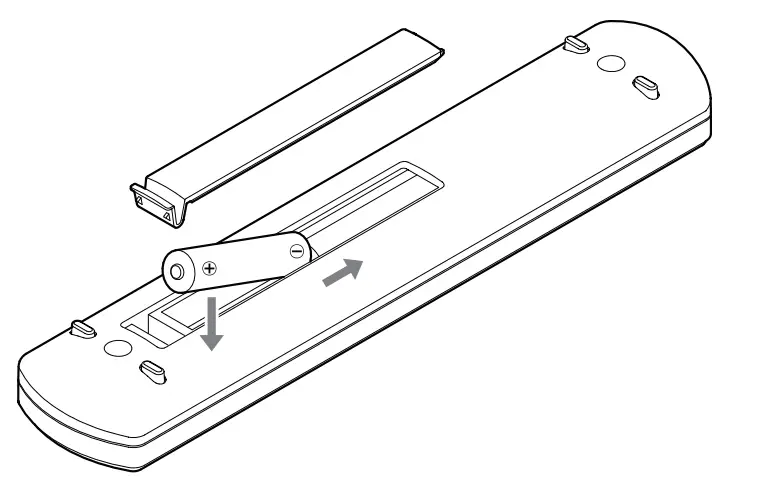 Battery replacement If the operation range of the remote control decreases, the batteries have become exhausted. In this case, replace the batteries with new ones.For detailed information about the collection of batteries, please contact your local municipality, your waste disposal service or the point of sale where you purchased the items.
Connecting equipment
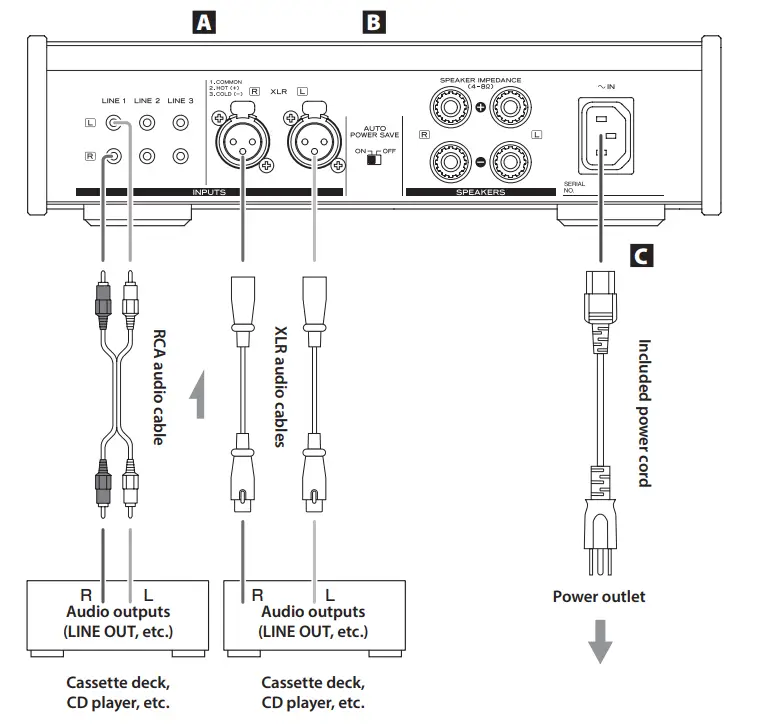
- Analog audio input connectors (LINE 1), (LINE 2), (LINE 3), (XLR) Use these to input stereo analog audio. Connect cassette decks, CD players and other analog audio output devices to these connectors. Use a commercially available audio cable to connect these devices.
- LINE 1: RCA audio cable
- LINE 2: RCA audio cable
- LINE 3: RCA audio cable
- XLR: Balanced XLR cable Connect this unit’s R jack with the R jack of the audio output device. Likewise, connect its L jack to the other in device’s L jack.
- This unit’s XLR connectors are 2: HOT.
- AUTO POWER SAVE switch Use to turn the automatic power saving function ON and OFF. When ON, the unit will automatically enter standby mode if there is no audio input for about 30 minutes.
- When in standby mode, turn this unit’s INPUT SELECTOR or press a button on the remote control to turn the unit ON.
- Power inlet (~IN) Insert the included power cord here. After completing all other connections, insert the power plug into a power outlet. Unplug the cord from the outlet when not using the unit for a long time. Use only the included power cord. Use of a different cord could cause fire or electric shock.
Do not turn the unit on until after making all connections.
- Carefully read the manuals of the devices that you are connecting and follow their instructions when making connections.
- Do not bundle connecting cables with power cords. Doing so could cause noise.
- Connect all plugs completely.
Names and functions of parts (main unit)
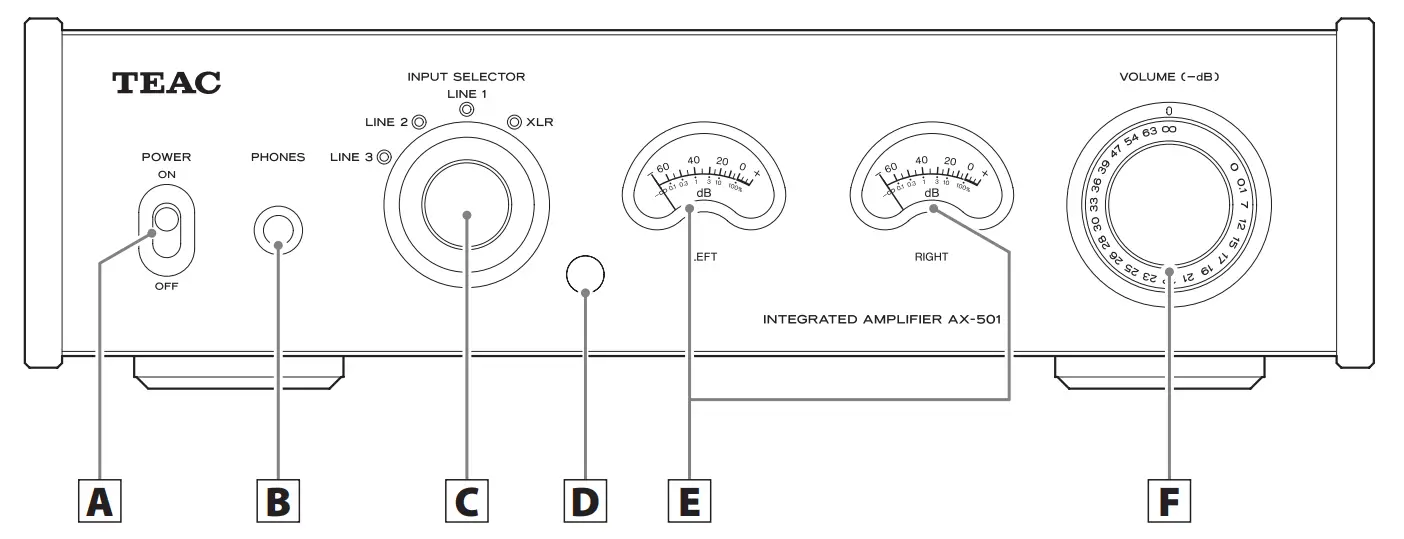
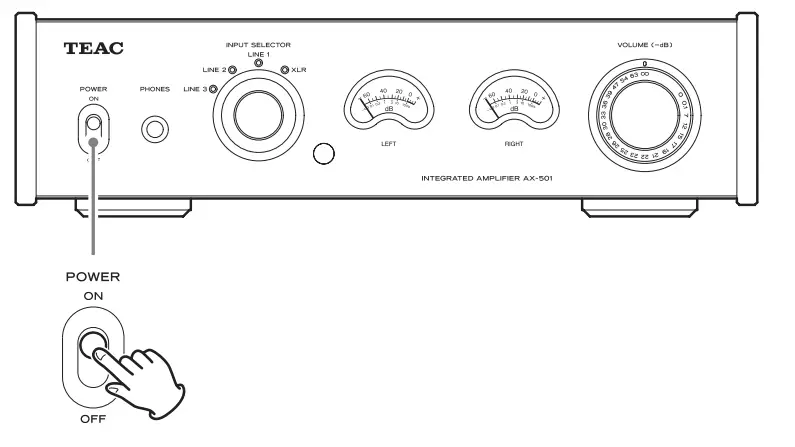
- POWER switch Use to turn the unit ON and OFF.
- PHONES jack Connect headphones with a standard 6.3 mm (1/4″) stereo plug here.
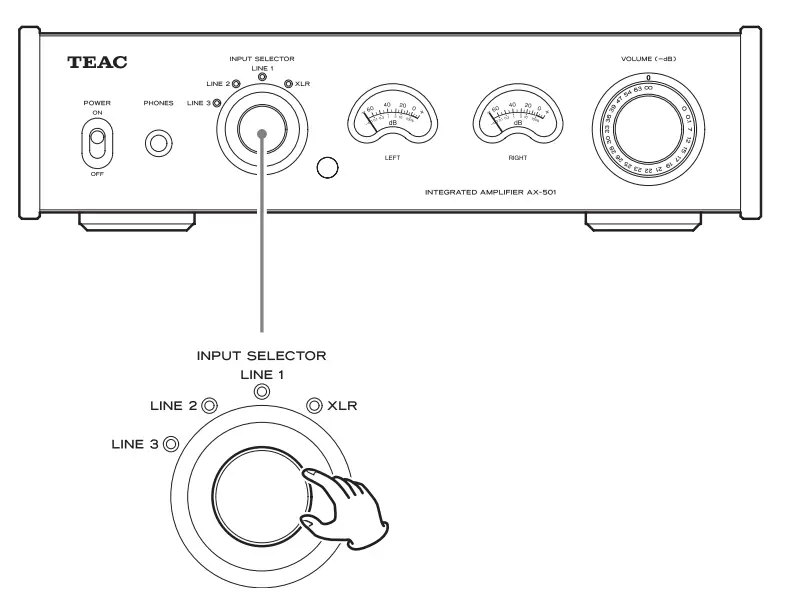
- INPUT SELECTOR knob Use to select the input source. The indicator for the selected input source lights.
- Remote control signal receiver Signals from the remote control are received here. When using the remote control, point it toward this area.
- Level meters These show the output levels.
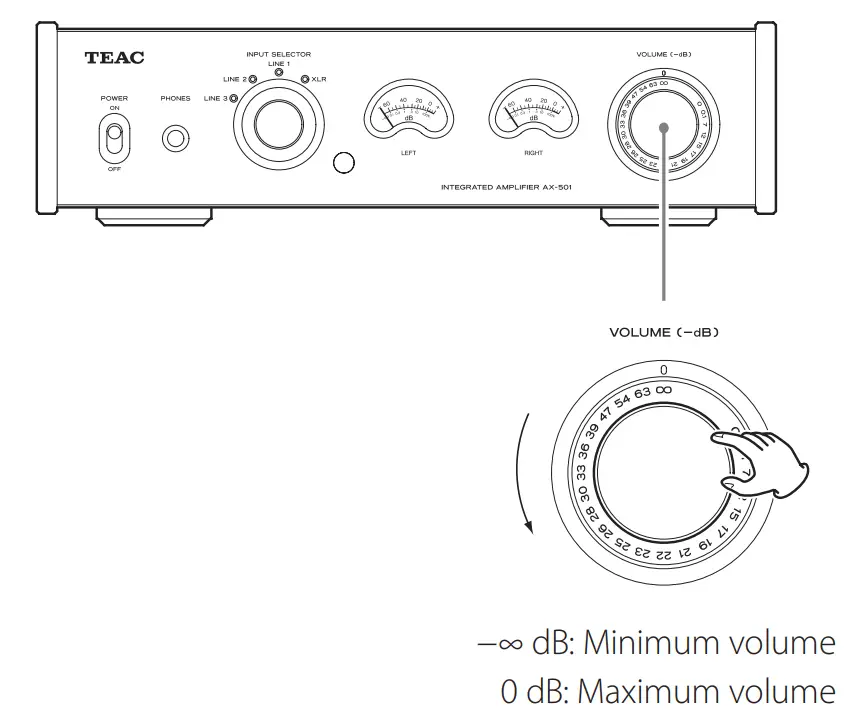
- VOLUME knob Use to adjust the volume. Turn it clockwise (right) to increase it and counterclockwise (left) to decrease it. The maximum volume is 0, and the minimum volume is −∞ (minus infinity). Before turning the unit ON, set the VOLUME knob to −∞. Failure to do so could result in sudden loud noises that could damage speakers and harm your hearing.
Names and functions of parts (remote control)
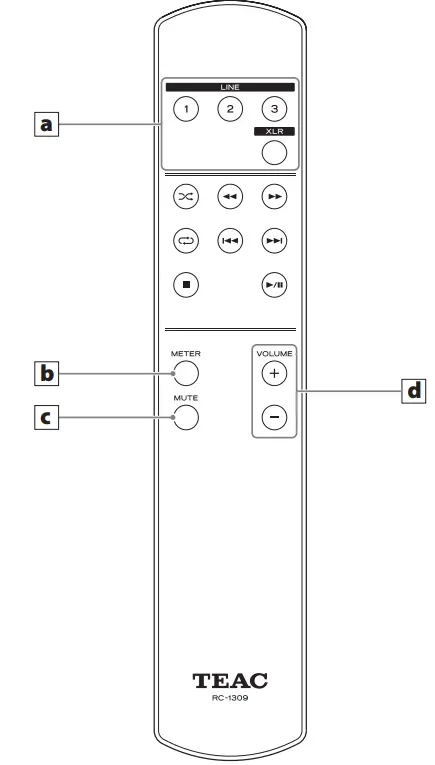
- The RC-1309 remote control supplied with the AX-501 can control both AX-501 and PD-501HR units. This manual explains how to use it with the AX-501.
- When both the main unit and the remote control have buttons with the same functions, this manual explains how to use either of them. The corresponding buttons can be used in the same manner.
- Input selection buttons Use these to select the input source.
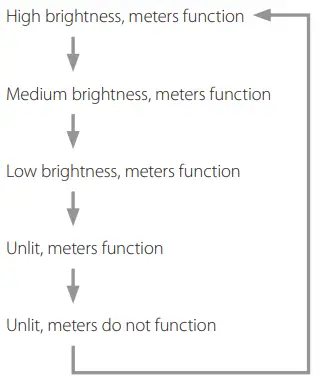
- METER Illumination adjustment button Press this to change the meter illumination and operation settings. Press repeatedly to cycle through the illumination and operation settings in the following order.

- MUTE button Press this to temporarily silence sound output. Press it again to restore sound output at the previous level.
- VOLUME (+, −) buttons Use to adjust the volume.
Basic operation
- Minimize the volume. Use the VOLUME knob or the remote control VOLUME buttons to minimize the volume.

- Set the POWER switch to ON.

- Turn the INPUT SELECTOR knob to select the input source.
 The indicator for the selected source lights.
 - Operate the playback device. Refer to the operation manual of that device.
- Adjust the volume.
 Start playback on the source and use the VOLUME knob or remote control VOLUME buttons to adjust the volume to its optimal level.
 The indicator for the selected source lights.
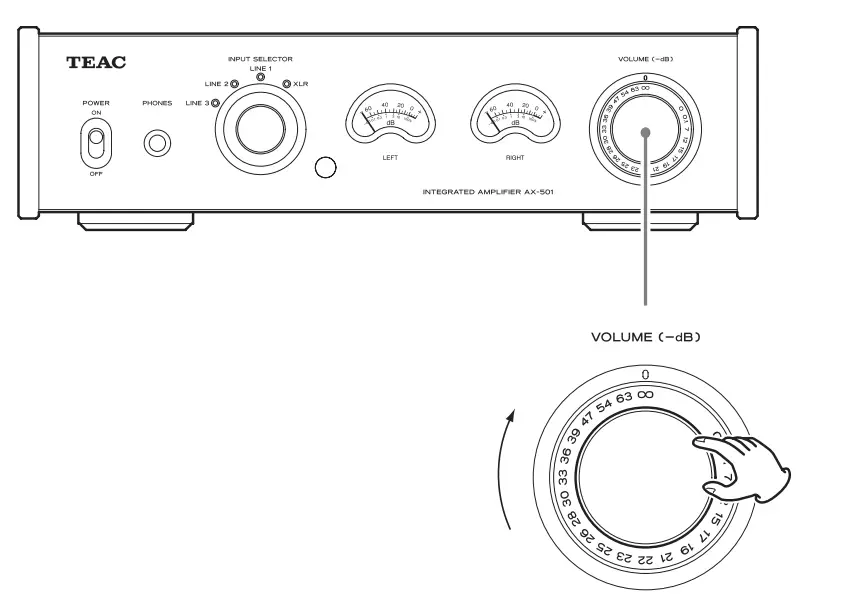 Start playback on the source and use the VOLUME knob or remote control VOLUME buttons to adjust the volume to its optimal level.
Troubleshooting
If you experience a problem with this unit, please check the following items before requesting service. If it still does not operate correctly, contact the retailer where you purchased the unit or TEAC customer support (see the back cover for contact information). General The unit will not turn on.
- Check that the power cord is completely plugged into the power outlet. If the outlet is switched, confirm that the switch is in the ON position.
- Connect a different electrical device to the outlet to confirm that it is supplying power.
No sound is output.
- Adjust the VOLUME knob. Turn it clockwise (right) to increase the volume (page 12).
- Use the INPUT SELECTOR knob to select the input that is connected to the source that you want to hear (page 14).
- Reconfirm connections with other equipment.
Remote control does not work.
- If the batteries are exhausted, replace both of them with new ones.
- The remote control will not work if there is an obstruction between it and the main unit. Point the remote control toward the main unit and use it within 5 m (16 ft) of the front panel.
There is a humming noise.
- If a connecting cable is near a power cord, fluorescent light or similar cause of interference, increase the distance between them as much as possible.
There is no sound from one side of the headphones.
- Confirm that the headphones plug is inserted completely.
Sound output suddenly stopped.
- Heat might have caused the protection circuit to activate. Set the POWER switch to OFF once, and wait several minutes before restarting the unit.
The level meter lights are blinking and no sound is output.
- The + and − speaker cables might have shorted. Turn the unit OFF and check the speaker connections.
Automatic power saving caused the unit to enter standby.
- Shift the POWER switch to OFF once and then turn the unit back ON.
Since a microcomputer is used in this unit, it might not operate correctly sometimes due to noise and other interference from outside the unit. If this should occur, remove the AC cord from the power socket and wait a while before repowering the unit again.
Specifications
Amplifier
- Maximum output· 120 W + 120 W (4 Ω, 1 kHz, JEITA) 70 W + 70 W (8 Ω, 1 kHz, JEITA)
- Rated output · 100 W + 100 W (4 Ω, 1 kHz, JEITA) 65 W + 65 W (8 Ω, 1 kHz, JEITA)
- Compatible speaker impedance range· 4 Ω – 8 Ω
- Total harmonic distortion· 0.005% (1 kHz, 8 Ω, 1 W, JEITA)
- S/N ratio (input short)
- LINE IN · 100 dB (IHF-A)
- Frequency range· · · · · · · · · · · · 10 Hz – 60 kHz (+1 dB, −5 dB)
Headphones output
- Connector· Standard 6.3 mm (1/4″) stereo jack
- Maximum output level· 50 mW + 50 mW or more (32 Ω, THD+N 0.005%)
Analog audio inputs
- Connectors· RCA jacks × 3 pairs
- Maximum input level· 3.5 Vrms
- Nominal input level· 0.3 Vrms
- Connectors· XLR connectors × 1 pair
- Maximum input level· 7.7 Vrms
- Nominal input level· 1.2 Vrms
General Power supply
- Model for Europe· AC 220 – 240 V, 50 Hz
- Model for USA/Canada· AC 120 V, 60 Hz
Power consumption
- Models for Europe and USA/Canada· 68 W
- External dimensions · 290 mm × 81.2 mm × 264 mm (11 1/2” × 3 1/4” × 10 1/2”) (W × H × D including protrusions)
- Weight · 4.0 kg (9 lb)
- Operating temperature range· +5°C to +35°C
- Operating humidity range· 5% – 85% (no condensation)
- Storage temperature range· −20°C to +55°C
Included accessories
- Power cord × 1
- Remote control unit (RC-1309) × 1
- Batteries for remote control unit (AAA) × 2
- Owner’s Manual (this document) × 1
- Warranty card × 1
- Specifications and appearance are subject to change without notice.
- Weight and dimensions are approximate.
- Illustrations in this owner’s manual might differ slightly from production models.
FAQS
All models made for North America only support 110/120V applications. If you’re using a North American model in a 220V application, then you will need to use it with a step down power transformer to convert the voltage.
Yes, it should. You simply have to change the remote’s mode over to “Network CD Player” for that to work. The procedure to do that is in the 6005’s owner’s manual.
The 1200 incorporates HDMI and other digital inputs while the PM is strictly analog. The 1200 also has dedicated sub pre-outs while the PM does not. You can still use a sub with the PM, but the crossover setting would be controlled on the sub itself.
In US & Canada markets, it fits 120 v only.
Yes and No. I use mine as a body pillow and although it keeps me quite warm during the winter months, it’s just too hot to snuggle with during the summer evenings. Also, my chronic Restless Leg Syndrome tends to catch the exposed speaker wires (ouch) when I’m simultaneously listening to and entering into REM but that is my own fault for not using proper terminations. I hope this helps with your purchasing decision.
The curved sides are hard plastic. The middle section is anodized metal.
You can Bi Wire. Down load the Manual from the Marantz website and you can see the back of the unit.
No steps, volume is continuously variable, if I understand the question correctly.
We have been recommending the Audioengine B1 Bluetooth Music Receiver.This unit sells for $189 and supports both analog and optical digital outputs.
It appears that the amp in the phono section operates in class A. Not able to fine any other class type documentation regarding the remainder of the PM 8006 integrated amplifier. Sorry.
No switch on the PM8006. 120v input only.
No, not to my knowledge. I bought this for myself as a sort of Christmas present. It has a very good phono stage but the only thing I miss about my old Kenwood amp is the mono/stereo switch. This will extract more information from a record, but also surface noise. I have the best results with a Shure cartridge and a very fine conical needle- an elliptical will create too much noise, especially if you have older “mono” records. Oddly, it will “run warm” when playing CD’s so make certain it is well ventilated. It will shut itself off after a few minutes of “receiving no input signal”, which is nice. Lastly, the three “tone” controls are not that significant and almost not needed.


